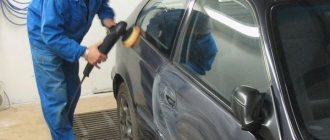
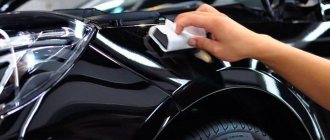
In the 80-90s, painting with single-color enamel without smudges and dust was considered the highest aerobatics among painters. Since the mid-90s - applying “metallic” without stripes and “apples”. Then they began to master the “smooth transition”, learned to adjust the shagreen on the parts to the factory...
Technological progress poses new challenges for the modern painter. In particular, skills in working with three-layer coatings - “mother-of-pearl” and “xyrallic”.
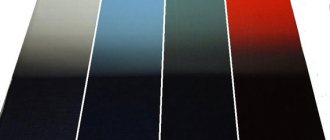
Today we’ll talk about repairing three-layer mother-of-pearl using the “smooth transition” method. This type of repair, which is considered the most difficult, will provide a good demonstration of all the intricacies of working with “three-layer.”
Features of three-layer coatings
A three-layer or three-stage coating is a type of “base + varnish” coating.
The first layer of such a coating is a layer of base substrate of one color or another, on top of which a layer of “spectacular” paint is applied and this “sandwich” is completed - a transparent varnish. A three-layer coating most often has a mother-of-pearl effect, the main components of which (mica microparticles) are found in the second layer.
Repairing such a coating has two features.
The first is that the mother-of-pearl layer (the one in the middle) has high transparency - under it we seem to “see a little” of the substrate. This gives a characteristic visual effect to the three-layer coating: the mother-of-pearl particles are “illuminated” from all sides, both from above, through the transparent varnish, and from below, by light reflected from the substrate.
This transparency of the mother-of-pearl layer creates certain difficulties during partial painting. Because if we can see the substrate under the mother-of-pearl, then its border may also be noticeable when touching up the paint. You can try to hide this border with additional layers of mother-of-pearl, but this will greatly change the shade of the coating, which is unacceptable.
Second feature. Since the color properties of the technical layer strongly depend on the thickness of the transparent pearlescent layer, during repairs we can never know in advance how many layers of pearlescent paint will need to be applied.
Moreover, not only the number of layers matters, but also the manner of applying the paint. Each painter has a slightly different layer thickness. That is why pearlescent paint for repairs is usually prepared strictly according to the formula, and is not tinted.
To determine how many layers of mother-of-pearl need to be applied, it is recommended to conduct a special preliminary test before starting painting. After some practice, this test does not require much time or materials, and you can be guaranteed to avoid color mismatches on the new and old surfaces.
Bubbles
Causes:
- poorly washed car (perhaps not all dust was removed at the stage of treatment with abrasive materials);
- high humidity in the painting booth;
- unadjusted spray gun;
- mismatch between the paint/varnish and the selected solvent.
Bubbles may be caused by an unadjusted spray gun.
How to fix: use sandpaper to completely remove varnish and paint from the problem area; apply primer; wash and dry the surface thoroughly; apply paint.
Preliminary tests
You can conduct a simplified test, or you can do a more accurate one.
For any of them, you must first prepare three identical test plates.
Simplified test
- First, we apply a substrate to all plates, which is used as the first layer of a three-layer system. The substrates have good covering ability, so two layers are usually sufficient to cover the plate. To speed up drying between layers, you can use a hairdryer.
- After the substrate has dried, paint the first test plate with one layer of pearlescent paint, the second with two, and the third with three layers.
- After the mother-of-pearl has dried, apply a transparent varnish to all plates using standard technology. Since varnish can also affect the color of the mother-of-pearl, you should use the same varnish as for the repair.
After drying the test plates, we apply each of them to the car part (tightly, without gaps) and select the application method in which the paint most accurately matches the color of the original coating.
Color comparisons must be made from different viewing angles and lighting.
Let’s say the second plate matches, which means that when painting it is necessary to apply 2 layers of mother-of-pearl under the same painting conditions and gun settings that were used to make the test plate.
Accurate test
If you want to achieve an even more accurate match of the repair coating to the original, it is recommended to conduct a more complex test.
- We apply a substrate to all plates.
- We paint the first test plate with one layer of pearlescent paint, the second with two, and the third with three.
- We horizontally mask the upper halves of each plate and apply a “drop layer” of mother-of-pearl to their lower parts (at a pressure reduced to 1-1.5 bar and from a slightly greater distance).
- Again we mask each of the three plates by half, but now the border should run vertically. Apply clear varnish to half the plates.
As a result, we have four zones on each test plate:
The first zone is 1, 2 or 3 layers of pearlescent paint, respectively. The second zone is the same plus the last drip layer. The third zone is the same as in the first zone, but covered with transparent varnish. The fourth zone is the same as in the second zone, but covered with transparent varnish.
This test is a double control: the varnished areas of the test plates can be compared with the surface of the part, and the areas without varnish allow you to control the process of applying pearlescent paint before applying the varnish.
Smudges on the primer
The reasons for the appearance of smudges on the primer paint may be the same shortcomings in preparation for the car painting procedure that have already been described in the previous paragraphs.
Correcting this defect, by the way, is even easier than with paint. Why? Firstly, in any case you will be applying new layers of paint on top, that is, slight roughness is acceptable. Secondly, there is no point in using a blade; you can get by with sandpaper of different grits. After clearing the area of smudges, it is best to apply an additional layer of the same primer paint.
Surface preparation
In one of the previous articles, painting with a metallic transition was discussed in detail and presented schematically. In it we looked at repairing minor damage to the rear fender with a transition over the varnish on the C-pillar.
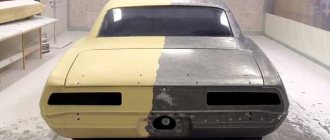
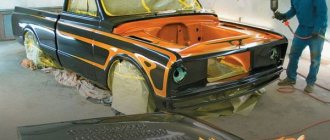
Today we will repair the same imaginary car, but for a change we will consider another, no less common accident: a front corner impact in which the front fender was damaged.
Let's complicate our task by the fact that the damage on the wing is quite large and located in the central part of the part. And since creating a transition on mother-of-pearl requires a lot of space, we won’t be able to create a transition within the element in this case. You will have to stretch the transition to the adjacent part (door).
When repairing three-layer coatings, the total number of layers is large, and a large area is required to create a transition. Therefore, it is often impossible to perform this repair within one part.
Another complication is color. In our case, under several layers of translucent mother-of-pearl there will be not just a colored substrate, but a base layer with metallic inclusions. According to the developers, such a coating looks even more beautiful (additional shine and depth), but during repair it creates additional difficulties, since in this case the transition must be made not only along the mother-of-pearl, but also along the substrate. For this we will use a colorless base.
As for surface preparation for partial repair of three-layer coatings, its steps are similar to those described in the above-mentioned article.
The priming area is treated with material graded P400-P500 dry or P800-P1000 wet. The remaining area of the part, as well as the adjacent element, is treated with Scotch-Brite gray modification (ultrafine) using matting paste.
Instead of gray Scotch Brite, you can use similar matting felt from other companies, or graded paper P800-P1000 when processed with a dry sander, or graded material P1200-P1500 when sanded by hand in a wet manner.
After matting, the part is thoroughly washed with water to remove paste residues, dried and degreased. Then, having dusted the part with a jet of compressed air and a sticky cloth, you can begin applying the first layers of coating.
Materials and tools, room
In order to paint a car in two colors, the following will be useful:
- compressor and spray gun;
- covering film, capes, masking tape from different manufacturers;
- varnish, enamels, solvents, primer;
- putty materials to remove scratches and dents;
- containers for stirring;
- painting mask or respirator;
- abrasives and polishing pastes, sandpaper of various grain sizes, power tools for preparing the surface of a car and polishing after painting.
Some other things may be required, but it will also be important to properly prepare the room where the painting work will be done. The main obstacle is dust, which is usually invisible, but will settle on the surface when painting. It can make all efforts to paint a car pointless and ruin the work. Therefore, you need to clean the room with a vacuum cleaner, wash the floor, and remove everything unnecessary before starting work on painting the car.
Applying a colorless base
Before applying the substrate (especially if the substrate is not just colored, but with metallic inclusions like ours), it is recommended to apply a layer of transparent base to the part (or most of it), designed to eliminate the visible boundaries of the repaired area.
When repairing three-layer coatings, it is not advisable to apply a colorless base to the primer area. Since there are still many layers ahead of us, the likelihood increases that a large amount of solvent from these layers will affect the soil, sub-dissolving it. This may cause the edges of the primed area to appear.
And since the task of a colorless base is to accept particles of the applied material in the transition zone, we will apply it precisely in this zone, without wasting it on the entire surface.
In our case, the mixture is applied starting from the beginning of the door and somewhere halfway, closer to the handle - it is in this area that the transition will be located.
Causes of paint swelling
All cases of the formation of paint blisters can be divided into two groups, namely:
- The factory paint on the car body peels off and lifts;
- Swelling of the paint occurs after repairing a car's paintwork.
In both cases, the external picture is approximately the same, but the nature of these phenomena is completely different. Let's figure out why the paint on the car comes off in both cases.
Lifts factory paint
The reason here is clear. The original paintwork can peel off and swell when it loses contact with a hard surface. That is, some changes have occurred with the body metal. In the vast majority of cases, this is corrosion, which could occur due to:
- external damage to paintwork (mechanical influences);
- rusting of metal from the inside.
In the first option, air and moisture enter through the damaged coating to the metal surface of the body, and its oxidation begins, the source of which gradually expands. In an area where the metal is covered with even a slight coating of rust, the paint no longer adheres and begins to deform under the influence of changes in temperature and humidity. Thus, local swellings of the paintwork are formed, which we observe in the form of bubbles and folds.
In the second case, the corrosion process begins from the back side of the body metal while the external paintwork of the car is intact. The corrosion process, penetrating the front side, begins to spread, peeling off the paint.
Outwardly, both processes in the early stages are practically the same, but the methods of elimination are different. If in the first case you can get by with half measures, that is, local restoration of the paintwork of the car body, then the second option requires, first of all, repair of the body part (welding work) or its replacement.
Paint swells after car paintwork repair
If peeling of the factory coating occurs quite rarely, then after repairing the paintwork it happens much more often. There may be several reasons for this, and sometimes you can only guess about them. Often swelling of applied layers of primer or paint after attempts to independently restore the body coating. This can happen due to the following reasons:
- violation of the technological sequence of paintwork repair;
- use of incompatible working compositions;
- the use of low-quality mixtures to restore car body coating.
Application of the substrate
The next step is applying the base coat. To do this, there is no need to wait for the colorless base to dry. After applying it, you need to drain the remaining mixture from the tank, lightly rinse the gun, pour the substrate into it and immediately begin application, since only a semi-wet layer can ensure the correct orientation of the metal particles (if it is a “showy” substrate) and complete absorption of pollen.
The base substrate is applied in 2-3 layers, each of which should cover a larger area than the previous one. Waiting time between layers is 5-10 minutes at 20°C.
Sometimes it is recommended that after applying two covering layers, add a certain amount of “pure” mother-of-pearl to the base composition and apply another 1-2 layers of this mixture to the surface, gradually expanding the area to be painted. This technology allows you to bring the base shade as close as possible to the mother-of-pearl layer and thus make its border invisible. But remember, in order to “crank out” this action, the base and pearlescent paints must be prepared in the same resin system.
Another important point. Since the thickness of a three-layer coating is greater than that of a conventional two-layer coating, there is a possibility of a decrease in the adhesion and strength characteristics of the coating during further operation. To prevent this, manufacturers often recommend adding a hardener to the substrate - this increases the adhesion between the layers.
If peeling occurs after repair
If the body paint work is done with high quality, such peeling occurs only in exceptional cases, and the standard layer of paint peels off and swells even less often. However, there is always a possibility of this, and the reasons may be:
- the use of cheap, low-quality mixtures for body restoration work;
- the use of compounds that are incompatible with each other and do not provide the paint with proper adhesion to the surface;
- violation of technologies recommended for painting.
It will not be possible to solve such problems on your own, even if at first glance the defective areas seem small and practically do not increase over time. In fact, corrosion processes have already begun under the paint layer, which can only be prevented by completely removing the paint layer, stripping the body and repainting it. Moreover, attempts to clean and paint over only the damaged areas on top of the old layers will lead to the fact that the damage hidden from view will still increase, but will become obvious only when the processes are already irreversible and the scale of the damage is critical.
Everyone knows what colors cars are painted now. Especially the Germans and especially the trade winds. Paints are considered more environmentally friendly and water-based, but the quality of the coating suffers from this. This problem also affected my car. After winter, several small swellings of this type appeared on the driver's side. Or rather, 6 pieces - 3 on the driver's door, 2 on the passenger door and 1 on the rear fender.
One of these swellings on the hind wing increased slightly even in the summer. Therefore, the decision was made to treat locally. Using a Dremel, I carefully scraped the area being repaired down to the metal to remove only the swollen paint, without going into healthy areas. Somehow, I didn’t take a photo, but the picture gives the idea.
Then I degreased it and painted it with acrylic primer in 2 layers with a brush. After drying, I tinted it with a repair kit of paint and varnish.
From a close distance, of course, it is visible, but polishing should solve this issue.
Application of “mother of pearl”
We remember how many layers of pearlescent paint we need to apply (this amount was determined by the test) and 15-20 minutes after applying the substrate, we smoothly spray the required number of layers with a wait of 5-10 minutes between them.
You need to apply mother-of-pearl in such a way that the painted area covers the applied substrate, but does not extend too far beyond its border.
Remember that the thickness of the mother-of-pearl layer greatly affects the shade. Therefore, if two or three layers of mother-of-pearl are required to obtain the desired shade, you still need to “enter” the transition zone with only one layer.
To do this, it is recommended to use the narrowing method shown in the diagram below. The first layer is applied to a larger area, and the second to a smaller one, remaining “inside” the first layer. Thus, at the junction of the old and new coatings, we will always have only one layer of mother-of-pearl and the repair boundary will not be noticeable, since the paint is transparent and the color transition will look smooth.
Color Disorders
Often the structure and smoothness of the paintwork remain normal, but it still has to be redone: this is due to changes in shade, the appearance of stains and other color defects.
Dull or cloudy surface
Externally, the defect looks like a spot of milky-white “fog” on a painted part. Cloudiness can form on any of the paint layers and even on the primer. In the future, without taking action, it will remain the same or turn into a bubble. The causes of dull spots or the appearance of cloudy areas are as follows:
- small thickness of individual layers of paint,
- carrying out work at low temperatures or high humidity,
- using a low-quality solvent or a large amount of it,
- drafts, excessive air circulation in the room.
Light clouding can be easily removed by polishing, re-smoothing and painting. Also, minor defects can be treated with a special remover and then sprayed with paint.
Apple and stripes
Such phenomena often occur on metallic coatings. They are expressed in the presence of darker or lighter areas on the paint in the form of spots, stripes that appear immediately after painting. The reasons for the defect are:
- the use of a slowly evaporating solvent,
- the diameter of the gun nozzle is too large,
- short drying time of layers,
- applying the finishing coat of paint under excessively high pressure.
To get rid of the problem, you will have to repaint the part - it cannot be corrected by other methods. You must follow the correct technology for applying paint, maintain the required drying time for layers, and use a high-quality spray gun with a nozzle of the optimal size.
Loss of color
Sometimes the newly applied coating will show discolored areas. The lower layers of enamel transfer pigment to the primer, while the color from the upper layers is absorbed by the deeper paint. This also happens with polyester paints and varnishes when too much hardener is added. The reasons may also be the following:
- incompatibility of bitumen or anti-corrosion coating with paint,
- poor mixing of enamel with solvent or hardener,
- insufficient isolation of the new paint from the old coating.
Before work, it is important to accurately measure the volume of hardener and solvent and mix the components well. It is better to remove the old coating completely, or test the new paint on an inconspicuous area.
Color Mismatch
In this case, the newly applied paint color is very different from the old shade in which the body was painted. The reasons are:
- poor quality or too thin coating,
- incorrect color mixing technique, incorrect tinting and choice of pigments,
- applying paintwork from too close or far away,
- poor hiding power,
- violation of the proportions of enamel and solvent, hardener.
To restore it, you need to sand the part, degrease and prime it, followed by painting.
Chalking
Chalking occurs when particles of chalk are identified on the surface of the enamel, which leads to erosion and loss of gloss. This can happen during the operation of an old car, when the paint loses its properties over time. Other reasons:
- accelerated atmospheric aging of paintwork,
- use of poor hardener, solvent,
- destruction of the protective layer of enamel by ultraviolet radiation.
The coating can only be restored by completely replacing it. Occasionally, partial paint restoration helps.
Bloody Sunset
Previous paintwork may bleed through the top layer of new enamel, causing severe discoloration. The reasons are:
- dissolving effect of the diluent, damage to the coloring pigment,
- insufficient drying of individual layers,
- pouring too much hardener,
- poor mixing of putty,
- poor hiding power of enamel.
To prevent such a situation from arising, it is necessary to test the quality of the enamel in advance on a hidden area of the body, apply a new layer of paintwork only after the previous one has dried, carefully mix the materials and maintain proportions.
Discoloration
Often the bright color of the new coating fades in the sun. The main cause of enamel discoloration is exposure to ultraviolet radiation. There are other prerequisites:
- low-quality varnish, enamel,
- long-term exposure to an aggressive environment,
- use of low-grade solvent.
To improve the appearance of the body, it should be sanded and repainted. To prevent fading, only high-quality materials that are not afraid of UV radiation should be used.
Yellowing of the varnish
With such a defect, the varnish acquires a yellowish tint, which is especially noticeable in bright daylight. The problem arises due to the use of expired or low-quality varnish or solvent, the use of a contaminated spray gun, or as a consequence of ongoing corrosion processes.
To work, you need to buy only new high-quality materials and strictly follow breeding standards. To restore, you can remove the top layer of varnish and apply it again after polishing.
Color Variation
Such a defect appears externally as a change in color coupled with the appearance of darker or lighter zones. The cause most often is poor color mixing or improper distribution of pigment throughout the paint. Other preconditions for the problem to occur:
- introduction of a diluent with poor solubility,
- enamel is too liquid
- holding the spray gun at the wrong angle while working,
- the appearance of foreign gases at the site of enamel application (ammonia and carbon dioxide).
To restore the attractiveness of the coating, you need to let it dry completely and apply a new layer with precise adherence to the technology.
Applying varnish
After 15-20 minutes, the surface is varnished using standard technology (two, one and a half, or one layer, depending on the dry residue). In our case, the transition over the varnish is not performed and both elements are completely covered with varnish.
If you need to do a varnish transition, follow the instructions in the metallic gradation article linked above.
As you can see, despite the more complex technology, surfaces painted with three-layer “pearls” are quite amenable to the same types of repairs as two-layer ones, including painting with a “smooth transition”.
The described technology will allow you to make the repaired coating indistinguishable from the original, even despite the certain technological complexity of “pearl” paints.
ZinedineZidane › Blog › Preparing and painting a car with your own hands (part 2. Painting)
Do-it-yourself metallic car painting (base and varnish) in the garage
Painting a car in a garage, and even with your own hands, is undoubtedly a complex process, burdened by the small space of the garage, the lack of a normal exhaust hood, etc. Let's look at how to paint a car with base and varnish to get a decent result.
We prepare and paint cars in combat conditions or close to them, i.e. in garages. Therefore, you won’t be frightened by heat or cold; the lack of exhaust hood puts us in a state of euphoria!
The results we achieve, even when painting close to zero degrees Celsius, sometimes exceed the results of painting in ideal conditions of a paint booth, with its supply and exhaust ventilation filters and dryers. I am in no way belittling the advantages of spray booths, this is what you need to strive for, but, unfortunately, there is a financial issue, and then, sometimes a person just needs to do a one-time job, for example, paint a couple of mirrors or a bumper. Therefore, I think this article will be somewhat useful to you, especially if you work in the same conditions - garages, i.e. in combat.
How much does the procedure cost?
Registration actions at the State Traffic Inspectorate are paid. For re-registration of a vehicle for any reason, the owner pays a fixed state fee. The cost of changing the color of a car in the traffic police in 2020-2021 is 850 rubles. The amount includes two services:
Attention! If there is no free space in the vehicle registration certificate for a new entry, you must issue a duplicate; it costs 800 rubles. It is also recommended to obtain a duplicate if the registration certificate is in unsatisfactory condition.
The owner of the vehicle can pay the state duty in any convenient way:
Deadlines for applying to the traffic police
Having repainted or covered the car body with vinyl, you should immediately write an application to the MREO. According to current laws, registration of a change in car color with the traffic police is carried out within the first 5 days. Violation of the established deadlines threatens the car owner with fines.
To avoid problems and unexpected expenses, you should choose a branch in advance, make an appointment, and also prepare a complete package of documents for re-registration of a car. You are allowed to undergo the procedure in any department of the city, regardless of your place of residence.
Who is a white car suitable for?
We recommend monochrome white primarily to extroverts and creative individuals, regardless of gender, age, or status. This is your shade if you view your car as a fashionable gadget or are a perfectionist when it comes to car body cleanliness. It will highlight your individuality and commitment to technology. Will set you up for positivity and receiving energy from communication. White is the most neutral color, so it never goes out of style. It looks most advantageous in gloss, pearl and pearl shades. Snow-white gloss and ivory have an equally expensive and bright look.
Hyundai Solaris “Snezhinka” › Logbook › White car - a STRONG issue with painting
Dear owners of white Solaris and white cars in general.
This is an appeal to you. A situation arose that I had to take the car to Blokavto on Perovskaya (Moscow) to have the fender painted. The reason is a 15 cm shallow scratch from a sharp object such as a nail. They promised to give the car back in a week. As a result: a week later I called myself - they promised me that in 2 days. I called two days later and they said another 2 days because we didn’t get the color right and were repainting it. I called again 2 days later and they said come. Result: instead of the promised week, it turned out to be two. I'm coming. I look - the color is different. They begin to explain to me that it is difficult to achieve white, that it has a million shades (like any other), that my original paint has already faded (since March!), that this is the best option there can be. I was somewhat confused, but still decided to pick up the car. The master assured me that the painting has a 6-month guarantee and if I decide that the quality of the work still does not suit me, I can return the car for repainting at any time. But we all know that there are cases when, when returning the car, they shove the document you signed under your nose and say: “You accepted the car, you had no complaints, so what’s the question?” In general, I previously wrote on 2 copies of the acceptance certificate (mine and the service one): “there is a difference in color on the painted part.” For some reason I didn’t write a copy for the insurance company... but I should have, because it seems like all the work was done for the insurance company. I decided the following: wait until the weekend and ask independent people for their opinions on the quality of the painting. On weekends because on weekdays it’s not realistic - it’s dark in the mornings and evenings, but during the day we all work. Well, to make sure that suddenly it’s my perfectionism that has worked and I’m already imagining something that isn’t really there. But purely visually, the painted part is noticeably yellower, this is especially visible next to the white door. I actually have the following questions for the audience: 1. Have you encountered problems with painting white cars? Is it really impossible to get a perfect color match? 2. Does the master tell the truth about shades, difficulties and faded paint? 3. In your experience, do I have the right to demand repainting, provided that I have already picked up the car, but left my comments on the report? 4. Can I claim some kind of compensation while repainting? Considering that the first painting took two weeks instead of the promised one and as a result the work was not done well? I'm interested in a replacement car, because without it I'm a bit stuck. Are there any laws/documents that regulate this issue? If not, then what can I rely on, what can I appeal to in this situation in order to get what I want?
Source
Automotive base enamel, what's what.
Metallic paint is a one-component composition that does not require the addition of a special hardener.
And diluted with a special thinner for metallics. They got their name from the aluminum powder they contain. These small particles reflect light and create different colors. At different viewing angles, color, hue, brightness, saturation may differ. Painting a metallic car yourself
is quite complicated and requires proper application. Since the ability of paint to reflect light largely depends on how it is applied to the surface being painted. If it is not applied evenly, then a painting defect “spotting or striping” may appear due to different layer thicknesses. This fact makes the metallic painting process very difficult, especially for beginners.
Metallic painting refers to two-layer coatings. Since a transparent varnish is applied on top, which adds shine and protection to the surface.
Base and metallic, what's the difference?
There is practically no difference here. The base paint is the “Base” to which metallic grain is added to obtain the necessary shades and tints. You've probably heard the expression "Clean base". This is a base paint without adding grain, such as the color: White Cloud, which is used to paint our VAZ, Priors, Grants, etc. Mobihel company. There are a large variety of shades, the most popular are: metallic gray, blue, green, gold, black, white, silver, graphite.
Why should you contact the specialists of our company?
If you collect an incomplete set of documents, or make mistakes in the application, you will not be able to re-register the car quickly and easily. By using the services of professionals, you will complete the procedure of changing the color of your car at the traffic police without queues, spending a minimum of time and effort. Several reasons to contact us:
Our website provides a complete list of services and prices. To make an appointment with the Moscow traffic police and clarify the details, leave a request online or call the phone number listed on the website, consult with a specialist, choose a convenient time for your visit.
Tips on how to properly paint a ceiling without streaks
Achieve optimal lighting. The best results will be obtained during the day. Then all the “unpainted” parts will be more noticeable.
- For good paint without streaks, you must try to ensure normal or high humidity. As practice shows, painting the ceiling with a roller without streaks in the summer is much easier than in the winter. In warm weather, the humidity level is much lower. Thanks to this, the paint dries faster, which prevents it from being rolled out well over the entire area.
- Good preparation is a must. Clean up everything from the floor so as not to “wade through” the rubble. Extra obstacles will take up time, but you need to paint quickly. Therefore, professionals who know how to properly apply paint to the ceiling prefer a roller with a long handle so as not to use a stepladder.
- To prevent streaks from appearing on the ceiling, you need to work energetically and quickly!
- The paint must be diluted with clean tap water until a very liquid consistency is achieved.
- There is no need to try to vigorously squeeze the roller. The ribbed surface in the ditch is not used for squeezing, but to evenly distribute the paint over the coat. The roller must be constantly saturated, so you need to dip it more often.
- When you start painting the ceiling, do not press the roller with force. It is necessary to roll it, and not press it or rub it. This will allow you to paint the ceiling with a roller without streaks.
- Paint should be applied in squares, not stripes. Especially when the room area is large. You need to work in a zigzag motion to evenly distribute the paint throughout the sector. Also, you should not stay in one square for a long time. Still, after making a few movements, stop. After making sure that the entire surface of the painted area has been treated, move on to another square. The borders of the squares need to be rolled out while they are wet. The work must be continuous and dynamic!
- After applying the first coat of paint, carefully inspect the ceiling in good lighting. If there are any unpainted areas left, you need to quickly roll them while the surface is wet. After the ceiling has dried, you must check the result again. If the paint doesn't adhere well, you can make a second attempt. However, if there are problems again, you will have to start all over again, that is, sand and prime several times.
It is important to know that any touch-up after drying will form new stains.
For your information:
When using semi-gloss or gloss paints, the result may not be as expected. Matte is more preferable and does not leave clearly visible stains. On a snow-white ceiling, unlike a beige or cream ceiling, any flaws are more noticeable. Therefore, if you are not confident in your abilities, then add a little color to the paint. Remember that the larger the surface area, the higher the likelihood of obtaining a questionable result.
Therefore, you shouldn’t be surprised when in a small bedroom the ceiling looks like it was painted, but in a large living room you can’t look at it without tears. The quality of the paint is also important. You can save money on wall paint, but for the ceiling, buy the best! He's much more picky.
Don't strive for perfection. Painted surfaces are almost never perfect. The main thing is that in bright light, spots, stripes, stains and smudges do not catch your eye. The ideal can only be achieved if you use all kinds of sprayers.
Video:
Video:
Original two-tone body painting: nuances of the work
A car painted in an unusual color is not guaranteed to attract attention. To give the car originality without going broke on materials, painting in two harmoniously combined colors is often used. A high-quality painting of this type is guaranteed to make the car stand out in a stream of “gray” traffic and save the owner from searching for an exclusive enamel color. Again, if the painting process is carried out by a master who is not devoid of a certain talent, and also has all the necessary technologies, the result will differ from other cars in originality and uniqueness. The painting procedure and photos of two-tone cars are presented in this publication.