The cost of gasoline and diesel fuel increases every year, for this reason most car owners are switching to gas equipment. According to average estimates, savings on fuel can reach 50%, and the payback for the equipment itself, together with registration, is approximately one year.
However, in order for the gas system to work properly and to avoid breakdowns, it is necessary to take a responsible approach to choosing a manufacturer, and installation should only be carried out by qualified service center employees who specialize in working with gas equipment.
Basically, now 4th generation equipment is installed on vehicles, which can work on any type of motor systems. It already has an electronic control system, which is the most convenient switching mechanism. However, the cost of the equipment and repair kit is slightly higher. In order for the 4th generation gearbox to operate smoothly, it is necessary to undergo timely maintenance. And besides, you need to follow the operating rules and refuel with high-quality fuel.
HBO installation diagram without secrets and secrets
Car enthusiasts who are “floating” in the gas topic are sure that installing gas equipment is like calling rain with a shaman.
Experienced gas motorists tend to simplify the process. The truth in the middle is the law.
We will describe the connection procedure, focusing on the points where both experienced and novice installers stumble.
In Ukraine, it is customary to divide gas installations into generations (1-6). This does not mean that the previous one is inferior to the next one, but it facilitates professional communication: putting gas on a carburetor engine is one set of elements, but the same injector or injection requires a different solution.
Let's consider installation using the example of fourth generation equipment. These installations account for 8 out of 10 applications.
What do the experts think?
For unprepared motorists, HBO still raises questions and doubts. Is this harmful to the engine? Why is there such a range of prices on the market? Is it possible to save money if you purchase a used LPG kit? We discussed these and other questions with the director of the service station, Vladimir .
– Even when calling specialized service stations in advance, the difference in cost could reach up to 500 rubles. Where does it come from?
– The installation work is the same everywhere, plus or minus. The cost depends primarily on the equipment. Many services call the brand of equipment over the phone, but, as a rule, they talk about electronics. This allows you to attract customers. But what kind of nozzles and reducer there will be, whether there will be a safety main valve or whether the cylinder will initially have a multi-valve - these details are no longer announced. The main thing is to entice with the price.
Anyone who does not understand or encounters HBO for the first time is “led” to it. It would be good if during installation it was announced that the injectors and gearbox would be cheap Chinese ones. There are guys who are silent about this too. What is actually installed in the car becomes clear later, when problems arise or when the owner finds out about it somewhere from the outside.
– How can an ignorant person avoid such problems?
– To avoid being deceived, you need to first collect information on the Internet. Read, watch, consult. When a person has more or less understood the issue, when calling the service station, he asks specifically for a list of spare parts that will be installed.
In this case, installers will no longer be able to deliver an outright “cheap” product. Although the price, of course, will be different. A person who saves on installing gas equipment saves primarily on spare parts, but not on work. And this is saving on yourself with all the ensuing consequences.
– Is it possible to somehow visually distinguish inexpensive “China” from the “original”?
– I’ll tell you using our Digitronic equipment as an example – its originality can be checked on the website using the serial number. It will be difficult to visually understand what’s what: only those who work with gas will be able to tell the difference. In addition to our auto center in Belarus, there are literally 1-2 representatives who work directly with the plant. It’s hard to say what the remaining 100 installers will install. There are conscientious guys, but there are also plenty of dubious offers.
– Do all LPG installers provide a guarantee?
– Guarantee guarantees are different. For original equipment, the warranty is provided by the factory. For Digitronic it is 3 years for electronics and 1.5 years for mechanics without mileage limitation - this is important. That is, it makes no difference whether gas is supplied to a personal car or a taxi. But for non-original equipment, the warranty is provided by the person who sold the equipment. In reality, this guarantee may not work, since the original task - to sell - has already been completed.
– Is it possible to save money by installing a used LPG kit?
– If you have an accurate idea of what kind of equipment it is and how it was operated, there are no problems. In a taxi, for example, it is normal to “transfer” a set from one car to another. Buying from an ad is a pig in a poke with a lot of nuances. In a good way, before purchasing, you need to come to the specialized service together with the seller so that the specialists can definitely tell you what’s what.
In addition, even when purchasing a used kit, you must count on 100-200 rubles of additional costs in addition to the cost of work. You can reuse the cylinder, reducer, electronics and nozzles, but various fittings, hoses and other “consumables” must be installed new.
– What can go wrong during installation? What does a person who has never encountered HBOT need to know?
– Without experience it’s difficult to understand what’s what. But everything should be laid out neatly, nothing should be loose anywhere. It is also necessary to pay attention to the presence of a safety valve. It can be either in the multi-valve of the cylinder, or installed separately in the line. Those who like to save money often do not install it in principle - this is wrong. Another example of savings is main pipes. We install plastic ones that do not oxidize, do not clog and, in principle, are almost not afraid of anything. Often, for the sake of saving, they install cheap aluminum ones from refrigeration equipment - this should not happen either.
– Why can you sometimes see a lit “check” on cars with gas?
– A lit check does not mean that the HBO is to blame; the car may have other problems. In the case of HBO, if the “check” lights up, it most often occurs immediately after installation. Each case must be examined separately. Additional configuration may be necessary, or new non-original equipment may already be faulty from the start. Gas is in some ways more demanding than gasoline. It happens that there are no problems on gasoline, but on gas spark plugs or wires that have already exhausted their service life make themselves felt.
– How often should the gas equipment be serviced in the future?
– 1000-1500 kilometers after installation, “zero” maintenance is carried out. His job is essentially to make sure everything is fine. The standard service interval is 10,000 kilometers. After this mileage, it is necessary to change the filter in front of the injectors, costing from 10 to 25 rubles, depending on the installed equipment. Filters in the gearbox and valve are changed in the range from 25,000 to 40,000 kilometers, depending on the car. The procedure is also inexpensive and does not present any particular difficulties.
In addition, the cylinder must be re-examined every two years. This is necessary to pass a technical inspection or travel abroad. Initially, new cylinders already have factory certification; after its expiration, this can be done at any specialized service center.
– What cars are equipped with LPG now?
- They bet on everything. For new “state cars”, for “premium” cars, for frankly older cars - literally for everything. The one who counts the money switches the car to gas. This is true for both commercial vehicles and private car owners.
Due to difficulties with refueling, methane is not so relevant; propane is the choice of the vast majority. If a person only travels home and to work, then the benefits of HBO are debatable. But if the mileage approaches approximately 20,000 kilometers per year, then this is already a reason to switch to gas.
– We cannot help but ask the most hackneyed question: does LPG harm the engine?
– Oh, this is an eternal topic of debate. Let me put it simply: if engines really suffered massively from gas, would tens of thousands of car owners start doing this? You need to not skimp on the installation initially, and also do timely maintenance of the car and LPG, and then there will be no problems, even after several hundred thousand kilometers.
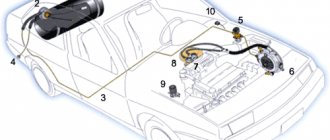
Connection diagram for HBO 4th generation
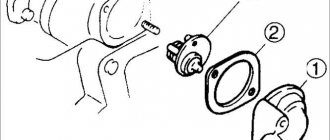
1st stage. The gearbox is mounted - it is immediately connected to the cooling system. An electromagnetic valve with a gas filter in the liquid phase is installed nearby.
Then the controller (ECU) is attached. Wires for the multivalve are selected from the harness. The line and wires run along the bottom from the gearbox to the cylinder.
2nd stage. The cylinder and multivalve are attached - its wires are connected to the ECU wires, and the outlet pipe is connected to the gas line. The inlet pipe of the multivalve is connected to an external filling device (FDU).
3rd stage. The fittings are cut in - gas and vacuum. Tubes connect the nozzles to the inserts, and the vacuum fitting to the gearbox. The supply tube from the gearbox is connected to the bar with nozzles. In between, a gaseous phase filter is installed.
Up to this point, the 4th generation HBO scheme is identical for all brands. Next are the nuances.
Stage 4 – electric. The wires are marked differently. A diagram is attached to a specific ECU model. Therefore, there is no universal step-by-step instruction, but there is an unchanging principle that guides all installers.
For correct operation, the ECU requires on-board data on ignition, engine speed, opening time of gas injectors, and information from standard sensors.
To “remove” them, you need to cut into the electrical circuit from each unit or node to the BC. Also, according to the diagram supplied with the ECU, wires are connected to the gas equipment elements - gas injectors, gearbox, fuel mode control button. After installation is completed, we begin setting up the equipment.
Do it yourself: tips
If you plan to install the gas equipment yourself, then we will select a turnkey kit, and in addition to a complete set of car keys, you will need: drill and drill bits (3-16 mm), screwdriver, 2 carriers, electrical tape, heat shrink, screwdrivers, soldering iron, hexagons , hammer, pliers, pipe cutter, taps.
Some tips will also help:
- ICE – undergo diagnostics;
- crash into the cooling system in parallel!
- Make the length of the tubes from the nozzles to the insert the same! (no more than 20cm);
- Place the nozzles in a vertical plane!
- cut the fittings into the manifold at an angle similar to gasoline injectors;
- Removing the collector is a must!
- hide the gas line along the bottom in a niche of the gas pipeline;
- Treat holes in the body with anticorrosive.
If anything goes wrong, welcome to contact us. Good luck!
Pros and cons of installing gas equipment yourself
To find out what the pros and cons are in self-installation, you need to read the numerous reviews and reviews of those people who have tried to do it. It must be said that this will be given differently to each person. It depends on your experience working with automotive equipment, knowledge and skills.
Specialists who do this work at car services do not recommend doing this yourself. Their advice is not based solely on the desire to make money. Installing an LPG system on a car with your own hands is not only difficult, but also dangerous. You cannot be sure that everything will work out perfectly if you are not confident in every action you take.
Positive aspects of independent work:
- saving money;
- development of skills and knowledge;
Disadvantages of working independently:
- a lot of time;
- the need to independently register equipment, prepare and submit all necessary documents to the traffic police;
- the likelihood of incorrect installation or selection of system elements;
- there is a high probability of not having all the tools necessary for work;
- impossibility of checking and setting in the absence of diagnostic equipment;
Do-it-yourself HBO installation: step-by-step instructions
If the car owner decides to take this step, then each step must be performed thoughtfully, use several sources to compare instructions and consult with qualified specialists. This is what takes the most time. At the same time, installing LPG on a carburetor with your own hands is an opportunity to increase the level of knowledge and skills.
It’s worth starting work with the purchase of all equipment spare parts. The standard set of 4th generation gas equipment includes:
- HBO kit. It may contain various elements, depending on the make of the car. It is better to clarify this information with specialists. The owners purchase harnesses, brains, valves, hoses, injectors, sensors, buttons and gearboxes.
- Balloon. It is worth choosing this element based on the design of the car. There are various designs: torus-shaped, straight, etc.
- Multivalve. It is advisable that it be equipped with a remote refueling system.
- Gas level sensor.
- A programmer required to configure the control unit.
- A disk containing instructions, diagrams and firmware.
- Injector harness.
- Copper hoses are 1.5 and 8 meters, diameter 8 and 6, respectively.
As practice shows, the cost of all spare parts is around 20 thousand rubles.
Most often, this equipment is sufficient. Costs may vary. Here a lot depends on the kit and the cost of the cylinder itself. On average, total expenses are about 25 thousand rubles.
Sequence of operations:
- installation of a cylinder;
- installation of a multivalve;
- installation of a level sensor;
- installation of an electromagnetic shut-off valve;
- installation of lines and filling device;
- checking the system for leaks;
- gearbox installation;
- insertion and installation of injectors into the manifold;
- collection of low pressure line;
- tank filling and pressure testing;
- installation of “brains”;
- system configuration and performance testing.
When installing the cylinder, it is necessary to take into account that the hole for the multivalve should be located on the same side as the fuel filler hole. The multivalve is installed on the cylinder using bolts. The process of installing a level sensor on a multivalve may vary depending on the selected model.
The installation of lines and a filling device may take the most time. 4th generation gas equipment has two lines. One is used as the main highway, and the other as a filling station. Copper bolts and barrels are used to connect copper tubes.
ATTENTION! After completing the above operations, perform a leak test!
In order to determine the tightness of the installed system, it is necessary to use a compressor. It will be enough to pass 5-6 atmospheres through the lines to understand whether they allow air to pass through.
The gearbox is mounted in the engine compartment. As a rule, it is best to place it close to the radiator. This is not as important as the location of the outlet. It should be on top and directed according to the movement of the car. Another condition is to be below the coolant level.
When fixing and installing the injectors, it is important that the tubes do not differ in length. It's better if they are short. After the entire system is completed, it is necessary to configure it.
1. Part one. Selecting HBO.
———————————————————————————
So... in the spring of 2008, my favorite Mitsubishi Eclipse sports car was sold, a loan was taken out and a small 2003 Toyota Corolla hatchback E12 was purchased, with an engine capacity of only 1400 cubic meters and a power of 97 horsepower. The engine, by the way, has an interesting system called “VVT-I”, which, depending on the driving style, adjusted the valve timing by shifting one of the camshafts.
This is her - my Toyota Corolla: HBOT transplant patient
Almost simultaneously, the decision was made to install LPG (gas-cylinder equipment) and it was necessary to choose which one. There were two reasons to establish, and both were very, very significant, so I can’t undertake to single out the main one. Namely: these are savings when driving (a liter of gas is always almost half the price of a liter of gasoline) and the quality of gas (everyone knows that Smolensk 95th gasoline in quality is somewhere between kerosene and donkey urine).
When choosing an LPG, the first thing you need to do is select the type (or generation). There are five generations in total:
1st generation
. It is also called “carburetor”. The gas in front of the carburetor (before the throttle valve) is under the same pressure as in the atmosphere. The engine itself sucks in as much as it needs.
2nd generation.
It is sometimes called a single-injection type of gas. The point is that there is one injector, which injects gas into the intake manifold on command from the gas computer (a lambda probe is retrofitted). The gas pressure on the atmosphere is higher than atmospheric pressure, although not always.
Between the first and second there are transitional types of HBO: the system is similar to the first generation HBO, but the pressure at the output of the reducer changes slightly depending on the analysis of the lambda probe (i.e. feedback is introduced).
3rd generation.
Or “Injected” gas. The idea is four injectors (one for each cylinder), injection occurs in a phased manner for each cylinder, is controlled by its own brains, and is retrofitted with a lambda probe and other sensors.
4th generation.
Also injection, but the gas injection control unit is not an independent computer, but obeys the signals of the car computer for gasoline injectors, converting them into gas signals. Accordingly, it can only be installed on fuel-injected cars. The system is very competent, equipped with a bunch of sensors, the driver doesn’t even need to switch: the system will do everything itself.
5th generation.
Direct injection. The gas is not converted into a gaseous phase, but is supplied directly to the cylinders in liquid form. Also full electronics.
The higher the generation, the more expensive the equipment, but the lower the generation, the more disadvantages such equipment has. You can read more details on the Internet (there is a ton of information). Just keep in mind that the LPG generation numbers adopted in our country may differ from those accepted in the West.
I went from the bottom up: the first generation did not fit, because... There is a problem with “popping” noises that can cause my plastic intake to rip. The second and third are doubtful, because “fine” engine control by its own computer is not provided. This refers to different modes of enriching (leaning) the mixture or compensating the load on the engine, which are carried out by the gasoline “brains” unnoticed by the driver, but when they disappear, non-fatal, but unpleasant symptoms appear on the gas. The fourth one is suitable. The fifth is also suitable... But: the fifth generation contains a so-called liquid phase gas pump (it is installed in a cylinder). Our gas contains a slightly larger amount of moisture and a slightly larger amount of dust and fine scale (from storage), which is why these same pumps tend to fail in our country. The spare part, as you understand, is non-trivial and very expensive.
There was no question about the type of gas: propane was chosen without hesitation due to the ease of its maintenance (the cylinder has only 16 atmospheres, versus 200 for methane) and the huge number of propane gas stations (methane ones still need to be looked for). Of course, the price of methane is almost half the price of even propane (and almost four times lower than gasoline), but the consumption will be noticeably higher, and in general, see above. By the way, propane is also called: propane-butane, liquefied petroleum gas (or LPG), bottled gas, liquefied petroleum gas, etc... In English: LPG: Liquid Petroleum Gas (liquefied petroleum gas). To avoid confusion, I will give the names of methane: natural gas, compressed natural gas, compressed natural gas, network gas, in English CNG Compressed Natural Gas - compressed natural gas. Gas stations for propane are called AGFS (automobile gas filling station), for methane - CNG filling stations (automobile gas filling compressor station).
So... the 4th generation was chosen.
A little more about it: liquid gas from a cylinder is converted into a gaseous state and supplied to gas injectors. Gasoline brains, while the engine is running, send signals to gasoline injectors, and are based on a whole bunch of sensors, incl. knock sensors, air flow sensors, engine temperature sensors, air temperature sensor, oxygen sensor in the exhaust gases (the so-called lambda probe), lambda after the catalyst (there are up to three lambda probes in a car), crankshaft position sensors, camshaft position sensors, etc. . Gas brains “listen” to the signal from gasoline injectors and convert them into signals for gas injectors, depending on the temperature and pressure of the gas in front of them. Therefore, even the slightest “whims” of gasoline brains will be clearly processed when working on gas, which was impossible to achieve with previous generations of gas equipment. Moreover: the fuel mixture will be regulated in the way that the engine (more precisely, the gasoline brains, because the car thinks that it runs on gasoline) likes it most, i.e. there is no need for periodic fine tuning of the gas system, which means there will be no gradual over-enrichment or over-leanness of the fuel mixture, which means the engine will work happily for a long time without your intervention.
A little more detail on how it works:
the gas is in a liquid state in the cylinder (maximum pressure is only 16 atm). A device called a “multi-valve” is installed on the cylinder. Its task is to receive gas into a cylinder at a filling station, release gas into the fuel line, and also monitor safety (more on this below). The fuel line (as well as the filling line) is simply a copper tube. At the end of the fuel line there is an electromagnetic valve (sometimes a second one is installed on the multivalve). All he does is turn off or turn on the supply of liquid gas further. And then we have a gearbox. Its task is to convert liquid gas into a gaseous state, and maintain constant pressure at the outlet. But everyone knows well (or not so well) that evaporation requires a large amount of heat (otherwise the gas evaporates very poorly). As an eighth-grader would say, during the transition from the liquid to the gaseous phase, a lot of cold is released. Actually, yes, the principle is exactly the same as in refrigerators and air conditioners (refrigerant R600(?) is propane with a very small proportion of anti-knock additives). Therefore, the gearbox will freeze all the time, especially from the inside, where there are a bunch of rubber cuffs and springs. And they quickly deteriorate when frozen. To prevent this from happening, the gearbox must be constantly heated. To do this, it is connected to the cooling system: a tee is installed to the stove. In addition: to optimize the opening time of the gas injector, the gearbox has an additional vacuum inlet: it is connected to the intake manifold after the throttle valve. This is done so that the gas pressure is always exactly one atmosphere higher than the pressure in the intake manifold. Well, actually, after the gearbox, using a thick and reliable rubber hose, gas is supplied to the injectors, which inject it directly to the intake valves (they cut into the intake manifold as close as possible to the gasoline injectors). Of course, all this equipment is tightly entangled with wires. Explanatory pictures can also be found on the Internet - I will not repeat myself...
So…
I figured out what I want and how it will work. Next, you need to choose a manufacturer. I dismissed domestically produced gas equipment as soon as I read terrible stories about their glitches. I like Italians. There is also Holland, but the price tag there is somewhat unrealistic. In general, I settled on the largest Italian manufacturer - Landi Renzo (abbreviated as LR). Frankly speaking, it’s not the cheapest choice, but a careful study of the devices and reviews about them showed that everything else is a “Landi Renzo hack.” LR's fourth generation system is called “Omegas”. One of the most expensive existing systems. There is a newer one - Omegas Plus: it is slightly cheaper than simple Omegas (about three thousand), although it has a more adaptive signal recalculation algorithm, but it is also more crude (it has just been released to the market). Having called the HBO installers in Smolensk, they promised to install it for 45 thousand rubles... This amount made the hair stand up not only on my head... However, they offered a cheaper option: the Digitronic system. Not a bad system, by the way, but worse than omegas. There will be a few words about it below.
The difference between Omegas and Omegas Plus is as follows: after recalculation, for fine tuning, Omegas builds an adjustment table for each engine operating mode (for different speeds and different pressures on the gas pedal, taken into account in the form of different intake pressures). This table is built manually, by eye (i.e. by feel), and to correct it, just software and hardware are not enough: you need a service key, which sells for $300. Omegas Plus essentially does not have this table. Instead of such a clarifying table, special algorithms for calculating the refinement are used based on the laws of physics. Installers, however, prefer the regular Omegas, or the almost similar Digitronic system, which is distinguished, however, by much less reliable components.
2. Purchase
———————————————————————————
After wiggling my hair and creaking my brains, I decided to buy the Omegas Plus system separately and install it myself, especially since it seemed like a fairly simple task, albeit a very time-consuming one. For the purchase, I developed a whole scheme, because the systems are not sold to just anyone, and I really wanted a discount. I found an LR dealer in Moscow and introduced myself to them as a “pirate” car service center from the glorious city of Smolensk, which wants to install LPG. “Pirate” - i.e. there are no documents, no permits, no licenses, i.e. does not exist officially at all. There are a ton of such services throughout Russia, and there are also plenty of LPG installers. In general, they believed me. And when they believed me, I got myself a heaping discount on equipment under the “car service” column. Not a bad discount, by the way.
To order, it was necessary to select the shape and size of the gas cylinder. I didn’t really want to have an iron bandura taking up space in the trunk, especially since the rear seats are folding, creating an absolutely flat trunk up to the front seats. In general, the balloon there is not at all according to Feng Shui. Then the option with a toroidal cylinder (a kind of donut the size of a car wheel) was chosen. The torus is placed in the niche for the spare tire, and the spare tire dangles in the trunk (I generally throw mine in the garage if I only drive around the city). By the way, special covers are sold for spare parts (300 rubles, if my memory serves me correctly). Next, you need to choose the size of this cylinder. The outer diameter is easy to calculate: it is equal to the diameter of the spare tire. I even took a little more, because... There was still space left from the spare tire to the walls, and the bottom of the niche was flat. The height is a little more complicated: above the spare tire there is a piece of sealing foam of fairly thick thickness. I measured the distance from the estimated lowest point of the cylinder (where it lies on the floor) to the edge on which the removable trunk floor (which is “hairy”) rests. This is where I screwed up (I must say, not for the last time), because although the hairy part of the trunk rested on the edge, the shape of the bottom was complex and fell 2 cm below the edge. As a result, the polyk sticks out by the same 2 cm, but this is not visible, and it did not bring any inconvenience.
In addition, toroidal cylinders come in two types: regular (with a hole like a donut) and filled (with gas instead of a hole). That is, in the form of a pancake (or cutlet). But this cutlet has a hole with hoses on the outside (with a torus it is inside, in the door), so for them you would have to cut out the bottom of the car and make a huge hole at the bottom with a transition to the side of the spare tire niche, plus, cut off the spare tire mounting bracket, and make This can only be done with a grinder, setting everything around with overheated metal... Creepy, in a word. For a torus, the hole is disproportionately smaller and neater. In general, having decided on the cylinder, I ordered the following:
1. Landi Renzo Omegas Plus kit (for engine power 75-110kW), including brains, wiring harnesses, injectors, hoses, valve (separate, although it is included in the gearbox), button, gas pressure and temperature sensor (separate, although they are available in composition of injectors) and gearbox. For some reason it was called “Landi LSI E LI02” on the invoice. For some reason, I don’t know, they told me that this was necessary for customs and cash on delivery, although Landi Renzo was written on it, and the firmware corresponded to Omegas Plus. Well, that is, that’s what it was. 250$
By the way, there are two options for gearboxes: LI02 (large, but there is no need to drain the condensate) and IG1 - it is much smaller in size, but condensate must be drained from it periodically (for which there is a tiny tap). I chose LI02 because I’m lazy and there’s enough space under the hood. $100
2. Cylinder torus inner neck 630×225 for 54 l ATIKER (Turkey). By the way, 54 liters is the volume of the cylinder, but no more than 80% of gas can be filled into any cylinder (for safety reasons), i.e. maximum - 43 liters. This is monitored by a multivalve. $55
3. Multivalve TOR Tomasetto 220/30/cl. And with VZU. The kit includes the multivalve itself and a remote filling device (a connector with a valve, to which a hose is connected at the filling station). $30
4. Gas level sensor for Tomasetto multivalves. This is a sensor that is inserted instead of an arrow into the multivalve and connected to the gas brains. Its only function is to show the gas level in the cylinder using four LEDs on the switch button (gas-petrol). As it turned out, the thing is very crooked and useless. 5$
5. Universal programmer DR77 (USB port). With its help, gas brains are configured and flashed. 100$
6. CD “Documentation for installing LPG.” There are diagrams, instructions, firmware, etc. Free.
7. EAP injector harness, 4 cyl. return, euro. Direct-reverse and Euro\Asia were bought at random, I guessed about the reverse, but not about the Euro. I had to cut off the connectors (they didn’t fit) and solder them. However, harnesses are also sold without connectors, and installers mostly take them.
I ordered, paid (through the bank), went to pick it up. In fact, the large Italian dealer was an office in a semi-basement outside the Moscow Ring Road without a sign on the territory of some kind of car depot. True, with its own installation center. But the main thing is that their prices were very tasty... For which I had to pay: they did not give me a set of copper hoses. During the showdown on site, the manager apologized profusely - he said that the warehouse did not coincide with 1C, that this was nonsense - two hundred rubles was the red price on market day for these hoses, that they would later send either hoses or money, and so on... I agreed, but when I called them from Smolensk, I was openly sent to hell with the motivation “you are not an organization or an individual entrepreneur at all, we have losses because of you and therefore we will not send you anything.” The hoses, by the way, cost almost 1000 rubles.
8. Copper hose, metric (not inch!) 8 mm - 1.5 meters and 6 mm - 8 meters: $40
In addition, to set up the gas system, a so-called MAP sensor was needed: an absolute pressure sensor in the intake manifold.
There was a voltage converter to power the laptop, and there was also a laptop. It was also purchased: tin with rosin inside, black electrical tape, bourgeois tape (wide and sticky) - three rolls, barrels for flaring fittings for KAMAZ fuel system lines to 6 and 8 mm in reserve (I spoiled them a lot) - 20 pieces at 5 rubles each . A tool called “flaringer” for different diameters of tubes - 450 RUR. Then I needed a couple of drills, pieces of cambric (I used heat shrink everywhere), a casing for the hoses to prevent chafing (I used scraps of insulation from home air conditioner hoses), clamps, cooling hoses and other small things that can be bought at almost any hardware store. In total, the final price slowly but surely grew to almost 21 thousand rubles. I also had a battery-powered screwdriver, which I used as a drill (very convenient).
3. Installation of the cylinder
———————————————————————————
So, the day “H” came: I put on camouflage (dirt is almost invisible on it) and went to the garage to install this entire structure... Boxes with pieces of hardware inside were stacked behind my back (there wasn’t enough trunk), banging against each other and rustling with bags, instilling a good mood. The month of May, beauty!
The first thing I did was install the cylinder. It was hampered by “ears” along the outer circumference of the cylinder—technological washers used for transportation by hoist at the manufacturer’s plant. They were not welded very securely, so I sawed off one with a hacksaw, and managed to break off the second with pliers. When the cylinder was tried on in place, places were found where it tightly touched the bottom (it did not do this around the entire circumference) and pieces of wide (several cm) cambric were placed there to prevent damage to the paintwork of the car and the cylinder against each other. Before installation, the inside of the cylinder needs to be cleaned from the debris that has accumulated there from the factory... I had a piece of paper lying around inside the cylinder.
The position of the cylinder was chosen in such a way that the hole with the multi-valve was located on the side of the movement; I chose the left side, because this was closer to the filler neck, where I planned to make a filling fitting. This is important when there is little gas left in the cylinder: so that it can reach the intake tube. If it is done in front, during acceleration all the gas will flow to the end of the cylinder and not enter the line, and vice versa. There is a much greater chance of getting in from the side. Next, a ventilation hole (a hole with a diameter of about 5 cm) and two holes for fastening (for 10-point bolts) were noted. The ventilation hole is necessary for safety reasons: the trunk floor and the top (sealed) lid form a chamber inside the cylinder where a multi-valve is installed. In the event of a gas leak (propane is heavier than air), it will flow onto the street under the car and dissolve in the atmosphere, rather than accumulate in the car. Using a drill and file, the holes were made and the edges were processed. The cylinder is installed and screwed to the bottom; a special short, but wide and thick plastic tube (tunnel), similar to a glass without a bottom, is inserted into the ventilation hole. The pole is slightly elevated compared to its “native” place, but this is only visible if you look REALLY closely
This is how the cylinder is located in the trunk (the trunk cover has been removed) The wire for the sensor was laid independently: a hole in the lid was drilled and sealed for it. The sealed cylinder cover has been removed. If you look closely, you can see the ground through the tinsel of copper pipes. This hole is a ventilation shaft. 4. Multivalve and level sensor
———————————————————————————
Next, a multivalve is inserted into the cylinder. It is secured with six (or eight, I don’t remember exactly) bolts around the perimeter. The bolts must be tightened in strict order in several steps and not very tightly, so as not to damage the sealing gasket under the neck of the multivalve. The procedure for tightening can be found in the instructions for the multivalve, but the meaning comes down to twisting “crosswise”. Before tightening, I lubricated the bolts a little with graphite so that they could be easily unscrewed if necessary (recommendation taken from the Internet).
The multivalve itself is a rather interesting design. It contains two fittings: a larger one (for an 8mm tube) for the filling line and a smaller one (for a 6mm tube) for the main fuel line. In this case, when filling, gas can only flow inside the cylinder (a valve is provided to prevent backflow). On the opposite side of the filling line: where the filling fitting is located, better known as the VZU (remote filling device), inside the VZU itself there is a backup valve that does not release the gas remaining in the filling line during refueling. It will gradually flow into the cylinder as the gas is consumed.
In addition, in the multivalve there is a flow valve in front of the flow (main) fitting. It is always open, but as soon as the gas consumption becomes very high (i.e. there is a gas leak on the face), it immediately closes and the gas leak stops. To open it again, you will have to close and open the manual valve. Manual valves are shut-off valves of a multivalve, with the help of which the gas in the cylinder can be cut off from the outside world at will. There are two of them: for the filling line and for the main one. They are little twisters, similar to copper ruble coins, only thicker. Why they are needed - I don’t really know, perhaps a tribute to safety norms and standards... Who knows. The cylinder, by the way, is fireproof in itself, can withstand temperatures over 400 degrees for half an hour or something...
In addition, the multivalve contains an emergency pressure relief valve: if the gas pressure in the cylinder exceeds all permissible parameters (this can happen if a full cylinder is severely overheated, for example, or in the event of a fire). In this case, the emergency valve will reduce the pressure to an acceptable level, and the excess gas will flow under the car and dissolve in the atmosphere.
In addition, the multivalve contains a float and a dial indicator indicating the level of liquid gas in the cylinder. In addition, a shut-off valve is connected to this float, which cuts off the filling line if the cylinder is filled to the maximum (if you carefully read above, you know that the maximum is 80% of the volume for safety reasons). This wonderful device is a multi-valve: there are countless valves in it, although there are only two lines: incoming and outgoing
A level sensor was purchased for this multi-valve: it is needed so that the fuel level indicator on the gas-gasoline switch button works. It is installed in a very non-trivial way: the convex piece of glass (where the fuel level arrow is located) is rigidly broken out of the multivalve, then the arrow itself and the cardboard with the scale are removed. Instead, the sensor is inserted there and screwed into the ear with a small screw. The sensor has a small free zone so that it can be adjusted more precisely. However, the level sensor turned out to be a rather stupid thing: the four-segment indicator is absolutely uninformative, and the sensor itself has a not very adequate characteristic (so inadequate that it was not possible to properly adjust the indication to its readings). By the way, Omegas Plus cannot work with “reverse sensors” at all (simple Omegas can), i.e. it needs a sensor that increases resistance as the gas level increases. As a result, I had to resolder it and configure it as a low fuel level sensor. That is, the indicator always shows a full cylinder, and when the gas is almost empty, the red indicator lights up (low gas level). Perhaps, if not a 50 kilo-ohm sensor had been purchased, but 10 or even less, it could have been configured. 50 Ohm (not kilo!) will also not work, according to rumors, but because the resistance is too low. If the sensor is not connected, the indicator will always show a full tank.
The multivalve is clearly visible on the left side. Let me note: in just 23 thousand km. The neck of the cylinder is covered with rust. But you can’t paint it, because... this will damage the gasket.
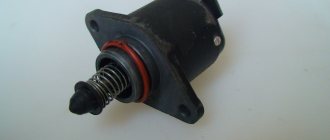
5. Solenoid valve.
———————————————————————————
After installing the multivalve (I installed the level sensor later so as not to interfere), it is necessary to install an electromagnetic shut-off valve. It lets through when the gas brains apply voltage to it and is locked when it is not. I installed the valve near the left shock absorber support: on the inside, under the hood, in the wing there are holes with an M6 thread. There was a bolt screwed in there that held the valve in place. This place is dry, clean, and it is easy to drag the copper pipe of the main there. Location of solenoid valve 6. Lines and VSU
——————————————————————————— Then it is necessary to install both lines from the multivalve. One is a gas station, the other is the main one. I recommend installing the gas station first, because... an 8mm tube is quite difficult to bend by hand, and bending it to the inlet of the multivalve, and then connecting it to it, is very problematic if there is also a flow line dangling nearby. To install the line, it is first stretched along the entire route, securely connected to parts of the body, and in places of contact it is necessary to pull the cambric over the tube so that the tube does not fray or damage the metal coating of the car. Only after this make the connection of the fittings (i.e., connect to the equipment). I also note that there should be compensation rings at both ends of the tube: 2-3 rings with a diameter of 10 cm (for a 6 mm tube). They serve to compensate for thermal (and other) stretching of the tube, and can also come in handy in a few years, when you next decide to undergo pressure testing or repair of your gas equipment: the connections can “etch”, and then a piece of the tube is cut off and connected again. For an 8mm hose, making compensation rings is very problematic due to insufficient space (the diameter should be 15 centimeters): such rings do not fit either in the well near the multivalve or near the VSU. I intentionally laid out the filling line so that, if necessary, it could be straightened out or even shifted to release the free end. The tubes need to be cut with a tube cutter (similar to a glass cutter), but if you don’t have one, just use a hacksaw for metal, and then process the edges. The method of connecting a copper line with fittings is as follows: a copper bolt is put on the accessible end of the copper tube, then a barrel. If the tube is not a metric size, but a similar one, but an inch one, then prepare for the fact that the bolt will not fit. Therefore, you need to buy a tube with a metric diameter. I bought it from the KAMAZ store. After you have put on the bolt and barrel, this end of the tube is flared with a flaring tool (although, theoretically, you can get damaged with a core). The size of the flare is so that it fits into the counter nut. After this, we connect and tighten, but not very tightly. While tightening, make sure that the tube does not rotate; the bolt on the tube must rotate. The principle is similar to connecting brake pipes, so I won’t write more about that.
I installed the filling line at the same time as the VZU, which I decided to place next to the filling neck of the gasoline tank. In general, there are several options: the VZU directly on the cylinder (very inconvenient), the VZU on the frame of the trunk, or inside it (also not a fountain) and the VZU outside the car (embedded in the bumper or under it) - also not very convenient, plus - noticeably with sides and spoils the view. But in my case, it is not visible under the gas tank flap. Truth: I spent almost the whole day to implement this idea, because... it was necessary to disassemble half of the car's interior, but under the hatch it turned out to be so cramped that the VSU lid was difficult to unscrew due to the gas tank cap. In addition, the VZU is held on the highway itself (albeit quite rigid) and on an elastic band under the gas tank flap (albeit quite dense). There was nowhere to screw the VZU with screws: there was simply no sane metal nearby, except for the outer part of the wing, but I didn’t bother making holes in it. However, as practice has shown, he stays there perfectly and “doesn’t ask to eat.”
It was not difficult to lay the supply line: under the bottom of the car, near the brake pipes (and the gas line) there are free sockets, which were used. I will only note that both lines came out of the cylinder under the car through the same ventilation shaft.
After installing the filling and supply lines, I checked the entire resulting system for tightness with low pressure: I filled the cylinder with compressed air using a compressor through a pressure 5 or 6 atmospheres... Well, I was just wondering. The system was filled, etching was not heard anywhere. Along the way, I checked the shut-off valves, the fill check valve and the flow valve. The consumable one simply checked: he applied 12 volts to the solenoid valve (opened it): it turned out to be a strong, but short zilch. Short, because The flow valve worked and closed the cylinder. I was happy for the Italian engineers, but then a thought struck me: the air needs to be vented from the cylinder, but how??? Here it is: open... I tried to open the filling valve (the one in the VZU - it is visible and its ball is visible, which you can press and the valve will open). But the valve in the multivalve did not release the air back. Figvam, as they say... I’m sitting scratching my head: how can I get this damn air from a cylinder? Actually, I came up with it. I closed the solenoid valve, closed the manual valve in the cylinder, opened the manual valve in the cylinder (I heard a muffled sound inside - this was the flow valve opening and the line was filling), closed it again. Then he applied voltage to the solenoid valve (the line became empty again) and began to slowly unscrew the manual valve until a characteristic hissing sound appeared. The air flow was small, the flow valve did not close, but the air escaped... True, he did it very slowly, and even hissed at me. I quickly stopped this disgrace: anyway, then check the system again. The VZU is to the right and below the neck of the gas tank. It has a soft (green) stripe on the side so that the VCU does not rub against the gas tank flap. This is what it looks like with the plastic protective cover of the VCU removed. It is very inconvenient to unscrew and tighten this cover. But the VZU is not visible from the outside
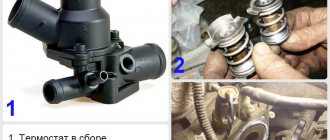
7. Gearbox
——————————————————————————— Next, I installed the gearbox. I chose a non-standard place for it: they are usually hung in the radiator area. I placed it under the windshield wiper box: it’s closer to the stove (the hoses are shorter) and it’s easier to get to it, and the savings on the copper tube are obvious. The length of the vacuum hose from the inlet to the gearbox was the same in both cases. I screwed up a lot with the installation of the gearbox the second time: the position of the gearbox in space (relative to the machine) must be strictly defined. How exactly - see the instructions in the general drawings (!!!), because There’s not a word more about this in the instructions. Specifically, my gearbox (LI02) should be installed with the outlet strictly forward along the movement of the car, and it should be at the top. If this requirement is not met, the gearbox will work, but very poorly: the pressure will jump very much (and under-jump), and so much so that the electronics with brains will not be able to compensate for it. This is expressed in a strong dip, or twitching at start, as well as when accelerating hard. In addition, every time the gas pedal was released, a muffled groan escaped from the gearbox. However, I dealt with such problems for quite a long time, naively believing that these were shortcomings in the system settings. After installing the gearbox correctly, everything immediately worked as it should, the moaning stopped
It is recommended to connect the gearbox to the cooling system using two tees, parallel to the stove. But after carefully studying the repair manual for my car, I found out that there was no faucet in the interior heating system, i.e. antifreeze constantly circulates through the stove. Therefore, I simply connected the gearbox in front of the stove using hoses from the GAZelle cooling system (16mm): they are sold by the meter. I completely threw out one “extra” hose in front of the stove entrance (of a complex shape). Where the inlet is at the stove, and where the outlet is, you can easily find out by the temperature of the hoses when the heater is working at full capacity. In addition: when installing the hoses, a little antifreeze may spill out, plus the capacity of the system has increased, which means it is necessary to add antifreeze to the required level (1.5-2 liters will be required).
In addition, it is recommended to install the gearbox below the coolant level in the engine (radiator). For me it was much higher. This led to minor problems when cutting into the cooling system: an air plug formed that did not want to deflate. It was possible to defeat it only by driving the car face up onto a steep hill and shaking the thick radiator hoses with your hands while the engine was running (and the heater was on). This unit did not cause any more trouble.
There is an emergency valve on the opposite side of the gearbox output. It will be activated if the reducer membrane breaks and gas begins to escape (until the flow valve in the multivalve operates). At this moment, the outlet pressure will rise sharply, and in order not to damage the gas injectors (more precisely, their sealed housing), the gas will be discharged through this valve. I connected a thin hose (from the windshield washer) to the outlet of the valve, tightened it with a clamp (so as not to tear it off) and brought it under the right wing (to the wheel) through the next technological hole.
To fasten rubber hoses, I recommend using metal worm clamps, but not Chinese ones, which are plentiful everywhere, but ours, domestically produced ZIL, or German ones (they work equally well and hold up perfectly).
Connecting and checking the part of the line from the solenoid valve to the gearbox does not cause problems; you can check it in the same way as before. The location of the gearbox in space and in the car
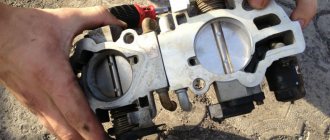
8. Injectors and insert into the manifold
———————————————————————————
The most difficult part: installing the injectors and cutting into the intake manifold. In principle, this is not so much a difficult part as it requires accuracy. First of all, we choose places for insertion. The holes for the fittings should be as close to the petrol injectors as possible, but there should be enough space to connect to the four rubber hoses coming from the injectors. Moreover, the nozzles should be as close as possible to the fittings (the length of each of the four hoses cannot exceed 15 cm, and they must be the same length). In addition, the instructions recommend placing the nozzles themselves vertically, with the outlet holes down.
Autogas - repair and installation of automotive gas equipment in Volkovysk, Belarus.
Setting up HBO
Setting up the 4th generation HBO should be done with the cylinder filled. First of all, all connections are checked. A soap solution is used for this. If there is a leak, bubbles will begin to inflate. Next, a computer and software are used. If you installed the LPG on the injector yourself, then the setup should be done at a service center.
As we see, it is possible to install the equipment, but it is better to entrust it to specialists. The number of “pros” is still much less than the number of “cons”. Only if you are completely confident in your abilities can you try to perform all the operations yourself. Sometimes even minor mistakes lead to engine failure. But the owner’s problems will not end there, since before using the car on the roads it is necessary to register it with the traffic police. If all this doesn’t scare you, then installing HBO yourself is possible.
Possible faults
Most malfunctions occur due to the fault of car owners themselves. In order to save money, they refuel with low-quality fuel, and also purchase components that do not meet the requirements. Bad fuel leaves a residue on all parts of gas equipment, so this breakdown can only be eliminated if all parts and filters are cleaned.
Equipment must be purchased only from trusted suppliers who can guarantee the quality of their products. For example, you can purchase a 4th generation Lovato gas reducer and various devices of this brand - this Italian company is the market leader. In addition, it independently produces all gas equipment and its components, for example, gas injectors.
You might be interested >> 2nd generation LPG high gas consumption
Also, breakdowns often occur when the driver tries to save on gasoline and does not warm up the vehicle to 30 degrees, but immediately switches to gas when starting. Because of this, the membrane begins to freeze and the system fails.