Replacing the radiator of the gazelle business stove
Gazelle until 2009. Removing the main heater radiator
Drain the coolant. We remove the shelf of the document section, disconnect the wiring harness connectors, and also remove the two fastening pistons on the right side of the heater trim (see “Replacing the heater valve,” p. 319).
Remove the glove box shelf (see “Removing and dismantling the instrument panel”, p. 312).
How to remove and install a Gazelle car heater
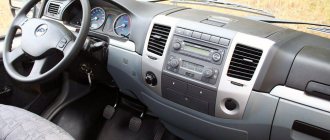
The heater of a Gazelle car consists of a plastic casing in which a radiator, two fans mounted on the electric motor shaft, upper, central and lower dampers and a control panel with three levers and switches are installed.
An additional resistor is installed on the left side of the heater, providing reduced rotation speeds of the electric fan.
1. Drain the coolant (see Replacing the coolant).
2. Having removed the protective shield of the main heater hoses and disconnected the hoses from the radiator, remove it from the main heater body (see Removing the main heater radiator).
3. Remove the instrument panel (see Removing the instrument panel).
Having remembered or written down the connection order, disconnect the wires from the central light switch.
Disconnect the plug block from the main heater switch
Disconnect the connector block of the auxiliary heater switch.
Using a screwdriver, pry up the spring bracket of the heater tap rod
Disconnect the heater tap rod from the control panel.
Using a wrench or a 10mm socket, unscrew the two bolts securing the windshield blower pipe.
It is enough to unscrew the bolt closest to the heater 2-3 turns.
Using the “8” head, unscrew the self-tapping screw of the lower fastening of the windshield blower pipe
Remove the right blower pipe with hose. We also remove the second heater pipe.
Disconnect the connector from the heater motor.
Remove the plug block from the resistor terminals.
Using a 10mm wrench, unscrew the bolt securing the plastic channel of the wiring harness.
Using a 12mm wrench, unscrew the four bolts securing the heater to the body.
The tip of the “mass” wire is installed under the bottom bolt.
Raising the heater slightly, remove it along with the brackets
Sealing gaskets are installed between the heater brackets and the body
The second way to remove the heater is without brackets
To do this, remove the electric fan and unscrew the two bolts securing the brackets to the heater.
Having raised the heater by 1–2 cm, remove it from the brackets by removing the tip of the “mass” wire from the bracket bolt.
We install the heater in the specified sequence:
— install the heater brackets with gaskets on the engine shield and tighten the bolts that secure them.
We “dress” the heater on the brackets, at the same time placing the loop of its fastening onto the body bracket.
We tighten the bolts securing the brackets to the heater and connect the wires and hoses.
Peculiarities
Replacing a Gazelle radiator with your own hands will require compliance with certain rules. To change the stove to an old model (older than the Business modification), it is not necessary to remove the entire panel. The part is located behind the central part of the torpedo, which will have to be dismantled. It is worth noting that the plastic protection is fixed to special fasteners (pistons).
Before proceeding with dismantling the element, it is necessary to drain the coolant, unscrew the clamps and remove the hoses. The part is screwed with three self-tapping screws. After removing the old element, you need to thoroughly clean the installation site of debris, scale and other contamination. At the same time as the radiator, the pipes should also be changed, which will extend the service life of the new element.
At the end of the work, new antifreeze or other coolant is poured in, the power unit is started and the entire system is pumped. To do this, you need to open the outlet valve.
FakeHeader
Comments 21
If it breaks, then my P194-3730 will be 600 rubles. Because it seems to me that it is no longer worth repairing twice. If it breaks, I think I’ll fix it first =))))
2 times is too much
When it breaks down after a reassembly, you go to the store so sad... You hand over 600 rubles with the following thoughts: Why did I bother with it... But sometimes it helps for a long time =)))
600, we have a minimum of 800. but you won’t waste experience
You don't have me =)))
600, we have a minimum of 800. but you won’t waste experience
By the way, there are different motors and different prices
When it breaks down after a reassembly, you go to the store so sad... You hand over 600 rubles with the following thoughts: Why did I bother with it... But sometimes it helps for a long time =)))
Yes, well, if the collector is not rubbed through) and is not burnt, then you can sort it out. And the brushes can be picked up from an angle grinder)) We have 900 by the way. And you need to smear a new one every once in a while - it’s been checked)))
2 times is too much
Tell me, the motor started to crackle as if the blade was catching something, I removed the glove compartment, the blades were moving left and right, what could it be?
but as always this doesn’t last long, six months a year and then remove and smear again (at least that’s how it is for me), but I decided to do it a little differently, maybe someone will need it www.drive2.ru/b/2570685/
thanks interesting approach
I recently saw that someone threw away the Carlson cooling system. I looked and the verifier itself was intact. And I have a Carlson with a broken fan and a whole motor. Came home, . opened it. And it’s just that the wire going to the brush was laid out unsuccessfully at the factory, and it shorted the insulation on it and burned out. that is, everything was accompanied by smoke. And so there is zero wear on the manifold, and it looks new. In general, the wire was re-soldered. Everything is working. And I think it costs about one and a half rubles...
1200 rub. for the photo report
We pay for photo reports on car repairs. Earnings from 10,000 rubles/month.
Write:
Old hoses or a leaky heater radiator cause antifreeze leaks in the Gazelle's cabin. And if this happens, you will have to buy a set of pipes and a stove radiator to correct the situation. For more efficient operation of the heater, they try to install a copper radiator, but if one is not available, then you have to buy an aluminum one.
To change the stove on a Gazelle (GAZ 3302 or 2705) of the old model, up to the Gazelle Business generation, you do not have to remove the entire panel, because the radiator is located behind the central panel of the dashboard and it is enough to remove only it. The plastic protection is secured with pistons.
Before unscrewing and removing the heater radiator, naturally drain the coolant, or if you are not afraid to douse the interior, then placing a container under the pipes, unscrew the clamps and tighten the hoses like this. The radiator of the Gazelle stove is screwed on with three self-tapping screws. Before installing a new heater, thoroughly clean the installation site of debris. If you do it for yourself, then when changing the stove, also change the pipes so that you don’t have to redo the job soon.
After all the work done, fill in new or top up coolant, start the engine and bleed the Gazelle engine cooling system (unscrew the bleeder screw, which looks like a faucet).
Replacing the Gazelle stove radiator
1200 rub. for the photo report
Old hoses or a leaky heater radiator cause antifreeze leaks in the Gazelle's cabin. And if this happens, you will have to buy a set of pipes and a stove radiator to correct the situation. For more efficient operation of the heater, they try to install a copper radiator, but if one is not available, then you have to buy an aluminum one.
To change the stove on a Gazelle (GAZ 3302 or 2705) of the old model, up to the Gazelle Business generation, you do not have to remove the entire panel, because the radiator is located behind the central panel of the dashboard and it is enough to remove only it. The plastic protection is secured with pistons.
Before unscrewing and removing the heater radiator, naturally drain the coolant, or if you are not afraid to douse the interior, then placing a container under the pipes, unscrew the clamps and tighten the hoses like this. The radiator of the Gazelle stove is screwed on with three self-tapping screws. Before installing a new heater, thoroughly clean the installation site of debris. If you do it for yourself, then when changing the stove, also change the pipes so that you don’t have to redo the job soon.
After all the work done, fill in new or top up coolant, start the engine and bleed the Gazelle engine cooling system (unscrew the bleeder screw, which looks like a faucet).
Aluminum radiators
The car owner himself can cope with replacing the heater radiator on a Gazelle without turning to a car service center for help.
But before changing the device, it is important to competently approach the purchase of an element to replace the old one. One option is an aluminum stove radiator.
Aluminum products outperform their copper competitors in terms of density. Plus, radiator channels with a larger width are used here, which increases the efficiency of heat transfer.
But we must not forget about the obvious shortcomings. A leak in an aluminum radiator can only be eliminated by removing the old component and installing a new one in its place. That is, aluminum products are considered non-repairable. And pouring various sealants inside only worsens the situation, first giving a short-term positive effect, then later clogging and clogging the entire engine cooling system.
Another objective disadvantage of aluminum structures can be considered rapid heating with simultaneous rapid cooling. This definitely does not speak in favor of the material. Although, if you need to quickly warm up the interior, aluminum still has a slight advantage. And since aluminum is not capable of holding work for a long time, this characteristic should be attributed precisely to the disadvantages.
Aluminum heater core
Replacement instructions with motor ZMZ-406
Replacing the Gazelle radiator yourself is quite simple. The following manipulations should be performed step by step:
- Disconnect the connector of the electric motor of the fan (EV), disconnect a pair of wires from its sensor.
- Loosen the clamp and remove the hose from the top and bottom of the pipe.
- Remove the steam exhaust element and remove the radiator.
- If necessary, you can replace the shock absorbing cushions.
- Unscrew the EV fastening nuts (4 pieces).
- Remove the electric fan and its activation sensor.
- Remove the plug and rubber seal.
- The drain tap and fixing bracket are removed from the old radiator.
- All elements are attached to a new part, which is mounted in the reverse order.
Question for the experts: how to remove the heater without removing the panels?
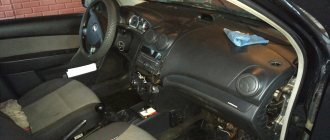
Removing the dashboard: Tools: set of keys set of screwdrivers tweezers Remove the front strut covers, 3 self-tapping screws on each side. Remove the steering column trim. We unscrew the screws securing the trim to the steering column, one at the top and bottom, and two self-tapping screws that fasten the upper and lower parts of the trim itself - it’s more convenient to do this with a long slotted screwdriver (unscrew the 2 screws at the bottom of the steering column trim) The steering wheel is very in the way remove the torpedo, so it is advisable to dismantle it, but without a remover it is difficult to do. Attention! The universal puller, which is sold on every corner, saying that you can use it to remove any steering wheel, is not suitable for this purpose, it is very large. You need to use “native”, Volgov or homemade. You need to remove the steering wheel like this: Unscrew the three screws on the side of the windshield and remove the horn switch. Unscrew the three screws securing the steering wheel trim; when you remove the horn switch, you will immediately see them. Then unscrew the nut securing the steering wheel to the steering column a few turns. Be sure to mark the position of the steering wheel in some way, so that later you can put it back in place as it was. Using a puller, tear off the steering wheel, and unscrew the fastening nut completely and remove it. All. We remove the ring of the console trim around the gearshift lever, it is secured with latches. We remove the ashtray with the panel of additional switches and the cigarette lighter assembly. To do this, unscrew the self-tapping screw located in the lower part in the center on the side of the gearshift lever, and pull the lower part towards you. Unscrew the bolt securing the cigarette lighter ground wire and remove the cigarette lighter connector. Remove the wires from the antenna control button (if anyone has one). I strongly recommend marking the removed wires and sketching out the connection diagrams; during assembly, this will make life much easier and reduce the number of swear words. We remove the decorative shields located on the sides of the ashtray (one self-tapping screw in the narrow front part). I also removed the console and air ducts going to the feet of the rear passengers. This is done like this: Remove the parking brake lever trim, it is latched, pull out the pin and disconnect the parking brake lever from the rod, unscrew the four bolts securing the parking brake lever (10mm socket wrench) and remove it. We unscrew the four console mounting bolts - two near the ashtray and one near each seat. Raise the console and pull it out. We unscrew the two bolts securing the brackets and remove the air ducts. We remove the air flow distributor to the feet of the driver and passengers. It consists of two halves, fastened together using latches located on the sides. And it is also secured with a bolt in the lower part, this bolt, by the way, we had to unscrew when we removed the “ground” of the cigarette lighter. Remove the fuse box cover; it is secured with latches. Unscrew the 4 screws securing the fuse blocks. Then there are two options: either remove all the wires, label them, and remove the fuse blocks, or simply, without removing the leads, push the fuse blocks inside so that they do not interfere. I preferred the first option. It’s long and tedious, but reliably, a couple of wires become disconnected - then look for which one goes where. We remove the block from the hazard warning switch. We remove the steering column switches. We remove the handles from the stove control levers; they are locked with small screws (I didn’t have these screws). It is also necessary to remove the decorative cover of these levers. Attention! The cover is secured from the INSIDE with two screws; to remove them you need to be patient and have a short slotted screwdriver. We remove the buttons for switching the speed of the heater motor, foglights and monitoring the serviceability of instrument lamps. We squeeze the switch from the inside with your finger, remove the wires, not forgetting to label them. Open the hood. disconnect the choke cable and the blinds drive cable, push them into the cabin. Remove the handles from the rear window heating switch and from the central light switch. To do this, you need to unscrew the tiny locking screws and simply unscrew the handles counterclockwise. Using tweezers, unscrew the nuts securing the rear window heating switch and the central light switch. And we push the switch rods inside. We unscrew the 4 clamps securing the wiring to the dashboard - one near the steering column, two in the center, near the radio compartment, and the last one near the fuse blocks. Using tweezers, unscrew the nut of the speedometer reset handle and unscrew the screw above the clock. We remove the decorative trim of the instrument panel; it is secured with latches located in the upper part. We unscrew the three screws of the left instrument block, disconnect the two connectors and wires from it (from the ammeter). We unscrew the three screws and remove the speedometer, disconnect the connector from it, and unscrew the cable end. There is a factory seal there, you will have to say goodbye to it. We unscrew two screws near the windshield, then two screws near the pillars, and two screws near the speaker grilles. We pull the torpedo towards ourselves. turn off the glove box lighting. We crawl under the dashboard and unscrew the nut securing the choke cable from the inside. Carefully pull out the cable. We remove the fastening of the blinds cable to the dashboard and carefully remove it. We remove the emergency light switch, it is latched. We take the torpedo out of the car.
How to install a Gazelle-business radiator
In this case, the task looks a little different; when replacing the element in question, you must perform the following steps:
- Loosen the clamp with a screwdriver and remove the hose connecting to the expansion tank, as well as a similar element of the upper pipe.
- Remove the fixing nuts and move the casing aside.
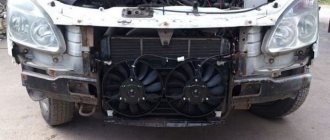
- Remove the radiator and fan casing.
- Remove the plug and mounting bracket.
- Replace these elements on the new radiator.
- Assemble in mirror order.
Collapsible radiator with intercooler for Gazelle Business with CUMMINS ISF2.8 engine
Radiator Gazelle Cummins ISF2.8 Cummins A073.00.010-21
Radiator Gazelle Business Cummins 2.8
Price 14,000 rub.
Modernization
The Gazelle car, popular in the domestic space, the installation of a heating radiator on which is not particularly difficult on your own, can be modernized in this particular part. The process of improving the node in question is described below.
Due to certain design flaws in the heating systems, the Gazelle car does not heat up very much; in winter it can be cold, especially when driving in open areas. This is due to the fact that cold air is constantly circulating in the central air ducts. Experienced drivers often seal them with tape or rags in cold weather. In fact, you can make sure that heat not only leaves, but also arrives.
To do this, you will need to install an additional radiator element at the inlet into a standard oven. The torpedo is removed, all hoses and cables are disconnected, the main radiator is dismantled and an additional analogue is installed on the air supply part. For example, you can use a radiator from a VAZ stove. The maximum that is required is to cut off the fittings.
Tuning efficiency
After the additional installation has been installed, you can also install an electric pump. It is mounted under the hood, behind the heater control valve and in front of the standard radiator.
You can turn it on directly from the instrument panel, you just need to display the corresponding button or toggle switch there. Both installed radiator elements are connected in series. When the additional pump is activated, the circulation increases and the hot coolant, passing through two radiators, perfectly heats the interior of the car. If it is very cold outside and the engine is rapidly losing heat, simply turn off the pump. After installing such a structure, as practice shows, the cabin is warm even at an outside temperature of minus thirty.
Below is a graphical representation of the size of the Gazelle radiator.
gazelle business stove radiator replacement
How to change the radiator of a Gazelle Business
For high-quality repairs, you need correct diagnostics, and to carry it out you need to know how the mechanism works and the principles of its operation. First, let's carefully examine the principle of operation of the heating system in a Gazelle . As in most cars, heating occurs due to heated liquid. Heat is a side effect of the engine running. Heating occurs due to fuel combustion and rubbing surfaces. Heat is removed by the cooling system to the atmosphere. During the cold season, this heat is used to heat the interior. For this purpose, the car is equipped with a heating system, which is an integral part of the cooling system . And the higher the temperature of the coolant in the engine cooling system, the hotter radiator .
Next, the fan blows air, which, passing through the honeycombs, heats up and spreads throughout the car interior. To control all parameters of the Gazelle heater, a control is installed. It is located on the center console of the car and has adjustments such as temperature, intensity and airflow directions. All controls are electronic and all drives are electric. This is very convenient: the driver does not need to be distracted from driving to change parameters. It is also possible to adjust the temperature automatically. Temperature adjustment is carried out by changing the amount of hot coolant passing through the heater. This controls the electric valve. The dampers are adjusted by gear motors.
Loan 9.9% and installments 0%
Diagnostics
After a detailed excursion into the device, you can talk about malfunctions, or more precisely, about the reasons why they arise. High-quality diagnostics are 50% of successful repairs. It is important to eliminate the cause of the malfunction, not its consequences. If cold air is blowing from the stove, there may be several reasons:
- Low coolant level in the cooling system.
- Airlock.
- The thermostat of the engine cooling system is faulty. It is responsible for warming up the engine to operating temperature and preventing the engine from overheating. You can check the correct operation of it by testing the pipes before the thermostat and after with the engine running but not warmed up. They should be of different temperatures (warm before the thermostat, and cool after).
- The electric faucet is out of order. To check this malfunction, you need to try the pipes before and after the tap. When the tap is fully open (with the handle in the hottest position), the temperature should be the same. It would also be a good idea to check the mesh filter at the inlet of the faucet; liquid should flow freely through the holes. If this is not the case, then it needs to be cleaned or replaced.
- Ambient temperature too low. At temperatures below -20° C, the car engine does not have the opportunity to heat up to operating temperature. You can close part of the cooling radiator (no more than 50%) to better warm up the engine.
- The heater core is clogged. The passage of liquid is difficult due to debris or scale.
Advantages and disadvantages
When replacing the radiator unit of a Gazelle car, you should take into account the conditions of use of the car and the climatic features of the region. Copper models are more expensive, but they are more resistant to ruptures and corrosion. In addition, they heat up quickly and hold the temperature well.
Aluminum variations are suitable for temperate climates where there are no sudden temperature changes. In harsh climates, it is better to use a modified model with an additional radiator and pump.
To independently replace the unit in question, you need to stock up on a set of screwdrivers, keys, pliers, new clamps, a crowbar or a small crowbar.
Completion
It is not at all difficult to replace the Gazelle radiator yourself. You should not ignore the timely maintenance of this unit, since it is responsible for the heat in the cabin. At the first signs of a leak or in case of obvious signs of structural wear, it is recommended to replace the part. By following all the indicated steps, even a novice motorist can handle this work.
How to remove the radiator of a gazelle stove?
In winter, the car's heater plays a major role; it supplies the interior of the car with heat, thereby providing a comfortable air temperature for the driver and passengers. The stove in our country plays an integral role in the car. In winter, not only a pleasant temperature in the cabin, but also safety depends on it, since without it our windows fog up or become covered with frost. A stove breakdown in winter is certainly a nasty problem that needs to be solved recently. So, let’s look at the design of the main heater of a gazelle car.
Main heater: 1 — bracket; 2, 4 — damper axis levers; 3 — bracket for fastening the drive rod shells; 5 — clamp; 6, 7, 17 — sheaths of cable rods; 8, 9 — damper drive racks; 10 — protective casing; 11 — OVU building; 12 — fan cover; 13 - seal; 14 — electric drive connector; 15 - screw; 16 — electric fan; 17 — two brackets for fastening the electric fan flange; 18 — thrust; 19 — heating radiator; 20 - gasket; 21 - cover; 22 - tap; 23 - hose
In most cases, in the summer, we close the tap (pos. 22) so that warm air does not flow into the cabin by gravity. With the onset of cold weather, we forget to turn it on and our stove does not allow heat into the interior. In this case, just open it and enjoy the warmth.
One of the most common problems when the stove
it works, but stops supplying warm air, this is a problem with the cable, the traction is weakened or completely lost. It is necessary to tighten the cable (pos. 19) so that when fully opened, the cable opens the damper one hundred percent and when fully closed, closes it. If such an operation did not help, then we check the inlet and outlet pipes; if the inlet pipe is warmer than the outlet pipe, then we can conclude that your stove radiator is clogged, it needs to be removed
and clean
replacing the heater motor on a gazelle business
Congratulations to everyone on the miracle machine. Ask the designer to do it himself. I'll tell you everything in order. The resistor electronic motor speed controller is located in the stove body and is cooled by the stove motor. Dust and moisture settle on it, at the end of which its circuit board closes and it burns out completely, and I also took the stove motor with me. The only way to protect against this disaster is to install a filter.
Without a filter, in two or three years everyone will face this disaster. I had a lot of dust on the resistor regulator in half a year, and it just melted all over. There are a lot of repairs for these resistors, but replacing stove motors is still rare.
But this is only for now, the only salvation is this CABIN FILTER, I AM INSTALLING IT FOR MYSELF URGENTLY. Okay, first things first. Photos from your phone, don't swear. We begin to disassemble the torpedo. Next, the torpedo was removed. Here is a motor speed regulator resistor. You can only get to it by removing the torpedo completely.
It completely burned out for me. When replacing it, the motor did not start. They brought a new motor, connected it separately, it works. We began to get to the stove motor. This is a separate song.
You need to remove the iron mount for the heater and dashboard, then disconnect absolutely all the wiring from the entire interior. (I thought terribly that it would never come back together.) We took the stove out of the car, this is what saltwater looks like without a stove.
How to remove the radiator of a gazelle stove?
In winter, the car's heater plays a major role; it supplies the interior of the car with heat, thereby providing a comfortable air temperature for the driver and passengers. The stove in our country plays an integral role in the car. In winter, not only a pleasant temperature in the cabin, but also safety depends on it, since without it our windows fog up or become covered with frost. A stove breakdown in winter is certainly a nasty problem that needs to be solved recently. So, let’s look at the design of the main heater of a gazelle car.
Main heater: 1 – bracket; 2, 4 – damper axis levers; 3 – bracket for fastening the drive rod shells; 5 – clamp; 6, 7, 17 – shells of cable rods; 8, 9 – damper drive racks; 10 – protective casing; 11 – OVU building; 12 – fan cover; 13 – seal; 14 – electric drive connector; 15 – screw; 16 – electric fan; 17 – two brackets for fastening the electric fan flange; 18 – thrust; 19 – heating radiator; 20 – gasket; 21 – cover; 22 – tap; 23 – hose
In most cases, in the summer, we close the tap (pos. 22) so that warm air does not flow into the cabin by gravity. With the onset of cold weather, we forget to turn it on and our stove does not allow heat into the interior. In this case, just open it and enjoy the warmth.
One of the most common problems when the stove
it works, but stops supplying warm air, this is a problem with the cable, the traction is weakened or completely lost.
It is necessary to tighten the cable (pos. 19) so that when fully opened, the cable opens the damper one hundred percent and when fully closed, closes it. If such an operation does not help, then we check the inlet and outlet pipes; if the inlet pipe is warmer than the outlet pipe, then we can conclude that your stove radiator is clogged, it needs to be removed
and cleaned
GAZELLE Replacing the heater radiator (stove)
Replacing the stove
on an old
gazelle
.
Replacing the GAZelle stove motor
GAZTEC.ru - Repair, painting, LPG, spare parts for GAZ, UAZ. Website: Our group VK: .
Replacing the heater radiator on a new Gazelle business panel, Cummins
VKTwitterOKYandex
video content
Rating: 4.0; Votes: 1 Replacing the heater radiator on a new panel Gazelle Business, Cummins Aleka Saken: Hello everyone, I have a Gazelle Business 2013. The problem is this: you start the engine, it runs for about 5 minutes and stalls. I took it to an auto electrician, did diagnostics, showed an error on the camshaft sensor, changed it, no change. What could be the problem? Has anyone encountered such a problem?
Date: 2019-06-26
← Do-it-yourself repair of a wheezing speaker without opening it
how to pull out the back of a car with your own hands using improvised means →
Related videos
SEASON 2021 - 2021 Construction of passenger cars.
• Video about trains
Victory Day! Railway on May 9 in Rostov-on-Don
• Video about trains
9.5 liters in an old car: the coolest restomod chevrolet nova '70
• Auto RU
I bought an armored cruiser from a bankruptcy auction. What happened to the Toyota Land Cruiser legend. Fox rules
• Fox Rules
Attention - new deception! Self-isolation for 10 years! Car troubles - diagram #6
• Maxim Shelkov - automatic selection
Freight and passenger trains at the station
• Video about trains
Comments and feedback:
Bolindger there was a question about the fact that the stove does not heat well and you asked the question whether the stove works normally at high speeds, I have the same problem, but you never addressed this topic, what is the reason if the stove does not heat, and heats at high speeds rpm (2.2.5t)
Anastasia Nikitina Cool video, thank you Question, the heater fuse does not light up immediately after some time, the original is 15 A, I set it to 25 A, it lasts a little longer, I’m going to get to the fan, but is it really necessary to remove the entire dashboard, please advise, thanks
New MosKow My friend, maybe you can give me a hint. A handle fell into the middle air duct, which is closer to the driver. The stove stopped. The stove fan does not turn. The dampers do not respond. What could it be? Torpedo Gazelle_Business.
Roman leopard, by the way, the stove from the Niva to the gazelle fits exactly the same, so it’s not difficult to change it, open the upper glove compartment and easily change the stove lads on wheels GAZELLE shuttle bus drivers suggested
Sergey Dudich Denis, you better make a video on replacing a stove motor in a business, just don’t cut it or speed it up, I wonder how much time it takes for one person and what are the nuances
Boris Matveev Denis, how can I disassemble the lower part of the heater housing without removing the heater? Is it possible or not? I just think there is some coolant left in there. ATP in advance.
Roman Leopard, finally, thanks for the great video, but I was racking my brains thinking about how difficult it would be to film. I DID NOT WANT TO DISASSEMBLE THE WHOLE PANEL AND THERE’S ONE, TWO AND IT’S IN THE HAT, bravo
Almaz Gaimaletdinov Denis I have such a problem the air is barely warm the hoses going to the radiator are warm what could be the problem thanks in advance Gazelle Kamisk
Marat Makhmadiev, hello, what is causing the disobedience of the table, the regulator of the stove, how to turn the lock over and everything will be a robotic stove at full speed, what happened to him?
Replacement procedure
Since copper and aluminum stove radiators for Gazelle do not differ in design, regardless of the selected element, the replacement procedure will be performed the same for everyone.
Instructions on how to remove the heater radiator and install a new element will be considered using the example of the Gazelle 3302, a 2003 restyling model. It is this modification that is considered the most popular, and after it the Business version appeared.
The key advantage is the fact that replacing the heater core will be carried out without incredibly complex dismantling work. The radiator is easy to remove and install a new one in its place without removing the panel. And this will definitely please Gazelle owners.
Carefully study the equipment of the new stove radiator. Quite often a small piece of sealant is attached to it. But in fact it turns out to be not enough. Some people use whole remains from an old stove radiator. Although a better solution would be to buy self-adhesive splen. It holds up well and lasts long enough. It is strongly not recommended to install the element without a seal.
Work is carried out mainly on the front passenger side. Therefore, the tools can be laid out on the floor or placed on the driver’s seat. Don’t forget about the light source, since you will have to perform the manipulations under the dashboard, and when making repairs in a poorly lit garage, a ceiling lamp will definitely not be enough.
- First of all, drain all antifreeze from the system. To do this, you can unscrew the lower pipe or drain plug. If you plan to reuse the same coolant, then use a clean container to drain it.
- There is plastic protection under the dashboard in the cabin. For this purpose, the Gazelle design provides special pistons for holding the panel. To remove them, pry the caps of the pistons with your fingers or use a flat-head screwdriver.
- Keep a small container on hand to drain any remaining coolant. Even with the most thorough draining, a little antifreeze or antifreeze still remains in the pipes and hoses.
- Before carrying out further manipulations, be sure to remove the negative from the battery, and also do not forget to unscrew the cap of the expansion tank. All this is done from the engine compartment of the Gazelle.
- Next, when access has become better after removing the plastic panel under the dashboard, loosen the clamps on the pipes.
- When you try to remove the pipes, they often break. There is nothing scary or surprising in this. But then you will have to buy a new set of stove pipes for the Gazelle, installing them in place of the old ones.
- Now the so-called pumping is removed. This is a tube with supposedly a valve. Many people think that this is the heater valve. But in fact, this is an element of pumping the stove. The valve is always on the return side, not the supply side. The screw is made in the form of a water faucet handle. If you unscrew it, you will essentially see a regular screw. Unscrewing it allows you to remove excess air from the stove.
- After removing the two pipes (inlet and outlet), you will see 3 fasteners on the stove body. They should be unscrewed one by one using a suitable tool. Usually the head fits, and the fastening itself is made in the form of a self-tapping screw.
- After unscrewing the 3 screws, remove the plastic cover of the heater radiator housing.
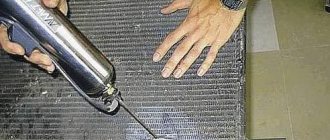
- Since residual cooling liquid will probably also leak from the radiator, do not forget to place a container under it to drain antifreeze or old antifreeze.
- When the liquid has gone into the container, grab the radiator with your hand and gently, without sudden movements, pull it towards you.
- Before installing a new stove radiator, be sure to get rid of all the debris that has accumulated inside the housing under the element. There will probably be a lot of it, so devote enough time and effort to this issue.
- Glue the splen seal on the sides of the radiator. This will ensure a better fit of the device in the socket and also eliminate vibration noise.
- Return the plastic cover of the heater radiator housing to its place.
- Tighten all mounting screws.
- If you change pipes, be sure to buy a new kit specifically for the Gazelle stove.
- Prepare a small amount of lithol and reliable clamps.
- Lubricate the inside of the pipe to a depth of about 2-4 centimeters with lithol and place it on the radiator and on the second fixation point.
- Make sure that the pump is located at the top. This can be easily determined by the presence of a screw on the pipe.
- Tighten all the clamps tightly, not forgetting to coat the joints with fresh lithol. This will provide a better seal.
- Due to not the most convenient access to the clamps, a ratchet will not hurt during installation. This will definitely speed up the tightening procedure.
It will be useful: They want to exclude transactions between private owners on the secondary market.
But the work is not completed. There is still a very important procedure to complete. Do not put the plastic panel under the dashboard back in place yet, since you need access to the bleeder screw on the upper radiator pipe of the heater.
Since the expansion tank cap has already been opened previously, in order to bleed excess air from the system, begin pouring the required amount of fresh antifreeze or antifreeze into the neck.
Now screw the cap back on and return the negative terminal to the battery. Having moved into the salon, start the engine of your Gazelle and keep the engine speed at about 2 thousand. At the same time, you need to reach the bleeder screw with your hand and open it a little. First, air will simply come out of there, then foamy liquid. As soon as full antifreeze begins to seep through the screw, without active bubbling, you have managed to bleed the system. The bleeder screw can be tightened and closed tightly.
To make sure there is no air lock inside the heater, after closing the bleeder screw, touch the heater pipes. If they remain cold after warming up, there is still air in the system. Simply repeat the previously performed procedure. If the pipes are heated, the cooling liquid circulates normally through the system, and therefore the heater should work.
All that remains is to start the stove itself. In a situation where warm air begins to come out of the air ducts and deflectors, and then it gradually becomes hot when you select the appropriate temperature, you did everything absolutely correctly.
Carry out a control check of all connection areas for the presence or absence of signs of antifreeze leakage. After this, you can safely replace the plastic panel and safely operate the Gazelle with a new stove radiator.
This is not to say that the procedure is incredibly complicated. There are nuances and rules here, compliance with which will ensure an excellent result achieved with your own hands. A car service center would definitely charge more than one thousand rubles for such work. So you get a working heater in the Gazelle, as well as additional experience to add to your own knowledge base.
How to remove the radiator?
First you need to turn off the engine and disconnect the ground from the battery. Then we can start working in the salon. In order to get to the heater radiator, you do not need to disassemble the dashboard. All we need to do is pull out the glove compartment. We pull out the lower glove compartment, behind it we see a casing, we pull it over ourselves. We turn off the tap (pos. 22), unscrew the clamps and remove the hoses (pos. 23) for supplying and discharging coolant (pre-tightened so that coolant does not flow). Then, using a 10mm wrench, unscrew the bolt (pos. 24) and pull out the cover (pos. 21). We see our radiator, it is secured with 2 bolts, we unscrew it and pull it to the surface. If you just turned off the car, and the radiator of the stove is cold, most likely it will have to be replaced.
But before that, it’s better to blow it out of the compressor, clean it inside and out, and then install everything in the reverse order. Don't forget to check the hoses (pos. 23). If this does not help, then you need to buy a new radiator. It is better to order spare parts in the GAZ online store, it supplies spare parts directly from the factory. This will help save money and time searching for parts. In the future, to prevent this from happening, it is necessary to periodically clean it inside and out.
There are times when the oven does not work due to air pockets in the cooling system. In such a situation, it is necessary to bleed air from the pipes adjacent to the carburetor; as a rule, this is the second highest point where air collects after the expansion barrel.
If all the above methods do not help you, you need to go to a service station. Remember, proper operation of the stove is not only warmth, but also safety.
Copper radiators
A number of Gazelle car owners, even if their old copper radiator fails, prefer to replace it with a product made of a similar material.
If initially all domestic cars were equipped with copper heater radiators, the situation gradually changed. Increasingly, factories are switching to aluminum analogues, which is done largely for reasons of economy.
Wanting to get a new heater radiator for the Gazelle, many car owners are faced with an unpleasant feature. There are fewer and fewer truly high-quality copper products on the market. This is explained by the fact that copper is actively replaced with all kinds of impurities. Now Gazelle radiators are copper-brass rather than pure copper. And this is a big drawback.
- The most obvious advantage of a copper product is its high heat transfer rates. This characteristic allows copper to be significantly ahead of aluminum.
- Also positive aspects include prolonged heating, followed by slow cooling. Thus, the heater saves resources by spending less energy on heating the Gazelle’s interior.
- Copper structures are also considered repairable. If a leak occurs, there is an excellent opportunity to solder the product. At the same time, the restored radiator will serve for quite a long time.
But not everything is so perfect. Copper also has obvious disadvantages.
The disadvantages definitely include a smaller number of stiffening ribs, as well as thinner internal channels, when compared with aluminum analogues. They quickly become clogged with scale, antifreeze decomposition products, etc. If you mix incompatible coolants, there is a high risk of causing severe contamination. Mandatory washing will be required, which does not always help.
Owners of Gazelle cars that have a copper stove radiator sometimes complain that the heating is too weak when the stove is turned on at idle. Sometimes there is even cool air.
Well, the key disadvantage, because of which Gazelle owners are increasingly looking towards aluminum radiators, is the high cost. Copper itself is more expensive than aluminum. Even if alloys are used rather than pure copper, such designs are significantly more expensive.
Therefore, every motorist planning to replace the heater radiator on a Gazelle must take into account the strengths and weaknesses of each option. Don’t forget about your existing budget and manage your money wisely.
How to Change the Heater Radiator on a Gazelle
How to remove the radiator of gas furnaces?
In winter, a car stove plays a key role by delivering heat into the car interior, thereby ensuring a comfortable temperature for the driver and passengers. The stove in our country plays an integral role in the car. In winter, this depends not only on a pleasant interior temperature, but also on safety, because without it our windows are foggy or covered in frost. Furnace failure in winter. this is certainly a vexing problem that needs to be addressed in the near future. So, let's look at the design of the main car heater.
Main heater: 1. bracket; 2, 4. levers of the lever axis; 3. bracket for fastening the drive connecting rod covers; 5. clamp; 6, 7, 17. cable sheaths; 8, 9. blind drive dampers; 10. protective casing; 11. ATS case; 12. fan cover; 13. seal; 14. drive connector; 15. screw; 16. electric fan; 17. two brackets for fastening the electric fan flange; 18. traction; 19. heating radiator; 20. masonry; 21. cover; 22. faucet; 23. hose
Often in the summer we close the valve (pos. 22) so that warm air does not enter the cabin. When the weather gets cold, we forget to turn it on and our furnace doesn't let heat into the cabin. In this case, just open it and enjoy the warmth.
Remove the heater radiator gazelle 3302 video
1200 rub. for the photo report
We pay for photo reports on car repairs. Earnings from 10,000 rubles/month.
Write:
Old hoses or a leaky heater radiator cause antifreeze leaks in the Gazelle's cabin. And if this happens, you will have to buy a set of pipes and a stove radiator to correct the situation. For more efficient operation of the heater, they try to install a copper radiator, but if one is not available, then you have to buy an aluminum one.
To change the stove on a Gazelle (GAZ 3302 or 2705) of the old model, up to the Gazelle Business generation, you do not have to remove the entire panel, because the radiator is located behind the central panel of the dashboard and it is enough to remove only it. The plastic protection is secured with pistons.
Before unscrewing and removing the heater radiator, naturally drain the coolant, or if you are not afraid to douse the interior, then placing a container under the pipes, unscrew the clamps and tighten the hoses like this. The radiator of the Gazelle stove is screwed on with three self-tapping screws. Before installing a new heater, thoroughly clean the installation site of debris. If you do it for yourself, then when changing the stove, also change the pipes so that you don’t have to redo the job soon.
After all the work done, fill in new or top up coolant, start the engine and bleed the Gazelle engine cooling system (unscrew the bleeder screw, which looks like a faucet).
We will show you how to replace the heater radiator (heater) in a Gazelle car with your own hands. We have a car with an old-style panel (which came before the Business). The reason for the replacement is that the old radiator has become leaky and antifreeze has become visible in the cabin. Before starting work, do not forget to release the pressure; to do this, open the cap of the expansion tank with coolant. When removing the pipes from the stove, they broke, so we will have to replace them as well. The new stove radiator comes with a rather weak sealing tape, so we advise you to buy some special material Splen in advance to seal the radiator so that it does not loosen. A lot of different debris accumulates in the heater radiator seat; before installing a new part, be sure to clean everything thoroughly.
Video of replacing the heater radiator in a Gazelle:
Reserve video for replacing the Gazelle heater radiator:
Replacing the heater radiator in a Gazelle is not as difficult as it seems; in most cars this procedure is much more tedious; you can easily do everything yourself without spending a lot of time.
We will show you how to replace the heater radiator in Gazelle Business and Cummins cars (new panel) with your own hands. We start by removing the lower part of the panel, to do this we unscrew the two 8mm screws on the sides, take everything out of the lower glove compartment, remove its door, using a flat screwdriver to pry up its brackets. Next, unscrew all the screws inside and under the glove compartment lid. Remove the glove compartment completely. Let's unscrew the white air duct that goes to the feet. Now we have good access to the radiator, loosen the clamps, remove the pipes, be prepared that about 300 grams of antifreeze will spill out, prepare a container in advance where you will pour it. We unscrew the 3 screws securing the heater radiator itself, they are turnkey 8. We take out the radiator itself. It is worth noting that the sealing tape does not come with all new stove radiators, so in our case it had to be removed from the old one and installed on the new one. For those who have a different panel, see Gazelle replacing the stove radiator (old panel) it will be a little more complicated, but the principle is the same. Before installing the pipes, lubricate them with casting, it seals them well, next time it will be easy to remove the pipes, unlike sealant.
How to remove the radiator of a gazelle stove? Photo and video.
Below you will find an interesting video
video clip.
Share your opinion and tell us on social media. networks. After all, How to remove the radiator of a gazelle stove
? - this is a very interesting topic, don’t you think?)) You can look at the reviews and opinions of other readers below, in the comments.
We will show you how to replace the heater radiator in Gazelle Business and Cummins cars (new panel) with your own hands. We start by removing the lower part of the panel, to do this we unscrew the two 8mm screws on the sides, take everything out of the lower glove compartment, remove its door, using a flat screwdriver to pry up its brackets. Next, unscrew all the screws inside and under the glove compartment lid. Remove the glove compartment completely. Let's unscrew the white air duct that goes to the feet. Now we have good access to the radiator, loosen the clamps, remove the pipes, be prepared that about 300 grams of antifreeze will spill out, prepare a container in advance where you will pour it. We unscrew the 3 screws securing the heater radiator itself, they are turnkey 8. We take out the radiator itself. It is worth noting that the sealing tape does not come with all new stove radiators, so in our case it had to be removed from the old one and installed on the new one. For those who have a different panel, see Gazelle replacing the stove radiator (old panel) it will be a little more complicated, but the principle is the same. Before installing the pipes, lubricate them with casting, it seals them well, next time it will be easy to remove the pipes, unlike sealant.
Video of replacing the heater radiator in Gazelle Business with a new panel:
Reserve video of replacing the heater radiator in Gazelle Business, Cummins new panel:
Here are such simple instructions, in my opinion, but on new panels the heater radiator is much easier to change than on old ones.
The inlet and outlet rubber hoses are suitable for the heater radiator.
When the heater tap is open, fluid is drawn into the radiator from the cylinder head, and discharged into the engine cooling system pump.
Heater Gazelle business device.
The tap is controlled automatically by the heater control unit depending on the selected temperature. In addition, the temperature of the air supplied to the cabin is regulated by a central damper, which, by turning, directs the air flow, or part of it, through or bypassing the radiator.
In addition to the central damper, there are a number of dampers that redistribute the air flow. The dampers of the Gazelle Business heater, unlike previous models, are controlled by gear motors, not cables. The control is carried out by the heater control unit. The electric heater fan is located inside the housing and to access it it is necessary to remove and disassemble the entire heater. Despite the fact that the fan electric motor is imported, this arrangement completely negates all the advantages of the heater.
The speed of the electric motor is regulated smoothly by turning the handle on the control unit, due to the electronic regulator located on the heater body. To access it, as well as access to almost all elements of the heater, you need to remove the front panel completely. The only thing that can be changed without removing the panel is the heater core. To change it, just remove the glove compartment.
We remove the panel from the gazelle .2005. Installation and removal of the Gazelle Panel. We remove the torpedo on the gazelle.
Subscribe to the channel. Gazelle repair
.
How to remove
a panel on
a gazelle
.
Gazelle stove repair n/a
Replacing the gazelle
2007.
Repair
After diagnostics have been carried out and the exact cause of the malfunction has been established, repairs can begin. Replacing a stove radiator in a Gazelle business has become easier than in previous versions. It can be done on your own in a small amount of time. To replace we need:
- Drain coolant from the engine cooling system.
- Unscrew and remove the lower panel on the center console.
- Remove the lower glove compartment from the passenger side.
- Unscrew the clamps on the pipes and remove them (there will be residual coolant in them, you need to take measures to avoid fluid leaking into the car interior).
- Unscrew the plastic cover, which is secured with three 8mm bolts.
- Now you can remove the radiator itself from its place (you need to remove it carefully so as not to damage the seal).
- We put the seal on the new radiator and assemble everything in the reverse order.
- After assembly, fill in coolant, start it and carefully inspect all joints and connections for coolant leaks.
- If no leaks are found, replace the plastic lower part of the panel and the glove compartment.
This work does not take much time and does not require extensive experience in car repair. You can carry out repairs either yourself or with the assistance of specialists. By following the above recommendations, you can accurately diagnose the cause of the breakdown, after which replacing the heater radiator will not be difficult.
Which heater radiator to choose and how to change it on a Gazelle car
The domestic automaker previously installed predominantly copper heater cores from the factory. The Gazelle car was no exception. But over time, the situation began to change. Whether this is good or bad is difficult to judge. All Gazelle owners have different opinions on this matter.
But it cannot be said that copper is always and in all situations the optimal solution for ensuring long-term and efficient operation of the heating system.
The experience of drivers and owners of Gazelles suggests that the factory heater radiator normally works for 3-5 years. Then gradually various problems begin to appear. As a result, the device begins to leak and its seal is broken. It is highly not recommended to use sealants for repairs. Sometimes the only way out of this situation is to replace the device.
Before replacing the stove radiator on a Gazelle, you should think about choosing a new part. And here a dispute arises between copper and aluminum models.
Aluminum radiators
The car owner himself can cope with replacing the heater radiator on a Gazelle without turning to a car service center for help.
But before changing the device, it is important to competently approach the purchase of an element to replace the old one. One option is an aluminum stove radiator.
Aluminum products outperform their copper competitors in terms of density. Plus, radiator channels with a larger width are used here, which increases the efficiency of heat transfer.
But we must not forget about the obvious shortcomings. A leak in an aluminum radiator can only be eliminated by removing the old component and installing a new one in its place. That is, aluminum products are considered non-repairable. And pouring various sealants inside only worsens the situation, first giving a short-term positive effect, then later clogging and clogging the entire engine cooling system.
Another objective disadvantage of aluminum structures can be considered rapid heating with simultaneous rapid cooling. This definitely does not speak in favor of the material. Although, if you need to quickly warm up the interior, aluminum still has a slight advantage. And since aluminum is not capable of holding work for a long time, this characteristic should be attributed precisely to the disadvantages.
Copper radiators
A number of Gazelle car owners, even if their old copper radiator fails, prefer to replace it with a product made of a similar material.
If initially all domestic cars were equipped with copper heater radiators, the situation gradually changed. Increasingly, factories are switching to aluminum analogues, which is done largely for reasons of economy.
Wanting to get a new heater radiator for the Gazelle, many car owners are faced with an unpleasant feature. There are fewer and fewer truly high-quality copper products on the market. This is explained by the fact that copper is actively replaced with all kinds of impurities. Now Gazelle radiators are copper-brass rather than pure copper. And this is a big drawback.
- The most obvious advantage of a copper product is its high heat transfer rates. This characteristic allows copper to be significantly ahead of aluminum.
- Also positive aspects include prolonged heating, followed by slow cooling. Thus, the heater saves resources by spending less energy on heating the Gazelle’s interior.
- Copper structures are also considered repairable. If a leak occurs, there is an excellent opportunity to solder the product. At the same time, the restored radiator will serve for quite a long time.
But not everything is so perfect. Copper also has obvious disadvantages.
The disadvantages definitely include a smaller number of stiffening ribs, as well as thinner internal channels, when compared with aluminum analogues. They quickly become clogged with scale, antifreeze decomposition products, etc. If you mix incompatible coolants, there is a high risk of causing severe contamination. Mandatory washing will be required, which does not always help.
Owners of Gazelle cars that have a copper stove radiator sometimes complain that the heating is too weak when the stove is turned on at idle. Sometimes there is even cool air.
Well, the key disadvantage, because of which Gazelle owners are increasingly looking towards aluminum radiators, is the high cost. Copper itself is more expensive than aluminum. Even if alloys are used rather than pure copper, such designs are significantly more expensive.
Therefore, every motorist planning to replace the heater radiator on a Gazelle must take into account the strengths and weaknesses of each option. Don’t forget about your existing budget and manage your money wisely.
Replacement procedure
Since copper and aluminum stove radiators for Gazelle do not differ in design, regardless of the selected element, the replacement procedure will be performed the same for everyone.
Instructions on how to remove the heater radiator and install a new element will be considered using the example of the Gazelle 3302, a 2003 restyling model. It is this modification that is considered the most popular, and after it the Business version appeared.
The key advantage is the fact that replacing the heater core will be carried out without incredibly complex dismantling work. The radiator is easy to remove and install a new one in its place without removing the panel. And this will definitely please Gazelle owners.
Carefully study the equipment of the new stove radiator. Quite often a small piece of sealant is attached to it. But in fact it turns out to be not enough. Some people use whole remains from an old stove radiator. Although a better solution would be to buy self-adhesive splen. It holds up well and lasts long enough. It is strongly not recommended to install the element without a seal.
Work is carried out mainly on the front passenger side. Therefore, the tools can be laid out on the floor or placed on the driver’s seat. Don’t forget about the light source, since you will have to perform the manipulations under the dashboard, and when making repairs in a poorly lit garage, a ceiling lamp will definitely not be enough.
- First of all, drain all antifreeze from the system. To do this, you can unscrew the lower pipe or drain plug. If you plan to reuse the same coolant, then use a clean container to drain it.
- There is plastic protection under the dashboard in the cabin. For this purpose, the Gazelle design provides special pistons for holding the panel. To remove them, pry the caps of the pistons with your fingers or use a flat-head screwdriver.
- Keep a small container on hand to drain any remaining coolant. Even with the most thorough draining, a little antifreeze or antifreeze still remains in the pipes and hoses.
- Before carrying out further manipulations, be sure to remove the negative from the battery, and also do not forget to unscrew the cap of the expansion tank. All this is done from the engine compartment of the Gazelle.
- Next, when access has become better after removing the plastic panel under the dashboard, loosen the clamps on the pipes.
- When you try to remove the pipes, they often break. There is nothing scary or surprising in this. But then you will have to buy a new set of stove pipes for the Gazelle, installing them in place of the old ones.
- Now the so-called pumping is removed. This is a tube with supposedly a valve. Many people think that this is the heater valve. But in fact, this is an element of pumping the stove. The valve is always on the return side, not the supply side. The screw is made in the form of a water faucet handle. If you unscrew it, you will essentially see a regular screw. Unscrewing it allows you to remove excess air from the stove.
- After removing the two pipes (inlet and outlet), you will see 3 fasteners on the stove body. They should be unscrewed one by one using a suitable tool. Usually the head fits, and the fastening itself is made in the form of a self-tapping screw.
- After unscrewing the 3 screws, remove the plastic cover of the heater radiator housing.
- Since residual cooling liquid will probably also leak from the radiator, do not forget to place a container under it to drain antifreeze or old antifreeze.
- When the liquid has gone into the container, grab the radiator with your hand and gently, without sudden movements, pull it towards you.
- Before installing a new stove radiator, be sure to get rid of all the debris that has accumulated inside the housing under the element. There will probably be a lot of it, so devote enough time and effort to this issue.
- Glue the splen seal on the sides of the radiator. This will ensure a better fit of the device in the socket and also eliminate vibration noise.
- Return the plastic cover of the heater radiator housing to its place.
- Tighten all mounting screws.
- If you change pipes, be sure to buy a new kit specifically for the Gazelle stove.
- Prepare a small amount of lithol and reliable clamps.
- Lubricate the inside of the pipe to a depth of about 2-4 centimeters with lithol and place it on the radiator and on the second fixation point.
- Make sure that the pump is located at the top. This can be easily determined by the presence of a screw on the pipe.
- Tighten all the clamps tightly, not forgetting to coat the joints with fresh lithol. This will provide a better seal.
- Due to not the most convenient access to the clamps, a ratchet will not hurt during installation. This will definitely speed up the tightening procedure.