Equipment and materials
It is recommended to carry out painting work in the warm, dry season, when the air temperature is +15 degrees and above. Initial repair work and surface preparation for painting require certain equipment and consumables.
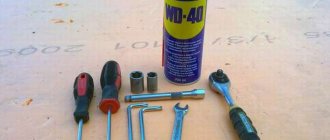
The tools needed to paint a car yourself in the garage include:
- a construction hair dryer to remove molding and other glued accessories;
- a grinding machine for removing the gloss of old paint and polishing new paint;
- vinyl drill attachment for removing old paint;
- spatulas;
- sandpaper;
- receiver;
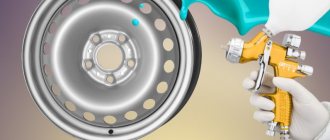
- spray gun;
- filters for filtering primer or paint;
- scotch-brite;
- planes for cleaning putty.
Consumables that will be needed for work:
- dye;
- degreaser;
- putty;
- primer;
- welding wire;
- antistatic wipes;
- masking tape;
- varnish;
- polish;
- solvent;
- rags;
- containers for primer or paint.
Mechanical removal of rust from a car body and do-it-yourself painting
To begin with, the area where there is rust should be thoroughly rubbed with a wire brush or sandpaper. In this case, you should be careful, since material that has been corroded is easily destroyed. When sanding the surface, you can use the wet or dry method. You can moisten the material with white spirit or kerosene. Grouting should be started with coarse-grained sandpaper, and finished with sandpaper with a finer structure. This allows for smooth surfaces.
The right workplace
Before starting work, you need to convert the garage into a workshop. Fulfilling the following criteria will allow you to paint your car efficiently and quickly.
Ventilation in a car painting room.
Basic requirements for the premises:
- Ventilation. Before you start painting, you need to ensure your garage has good flowing ventilation. When working with paint, harmful fumes are released into the air. Ventilation will remove harmful fumes and also help get rid of dust. Purchase or rent an exhaust fan that will remove the buildup of fumes and mists from the bottom of the garage. Provide air flow in the upper part of the room. Open windows and gates are not good ventilation when painting, since a gust of wind can blow dust onto fresh paint, and a draft leads to uneven drying of the paint.
- Room temperature from +15 to +20 degrees. To ensure this temperature, you can use infrared convectors such as UFO. Heaters are safe for painting and can quickly heat large rooms.
- Good lighting using portable spotlights equipped with halogen lamps. The surface of the entire car should be well lit. Your presence should not cast a shadow on the surface of the car.
- High quality electrical wiring. The heavy electrical load must be acceptable for the wiring.
- Cleanliness and tidiness. Before you start painting, wet clean the room and remove all items that may get dirty from the garage. It is recommended to hang wet rags that can hold the dust on themselves.
Painting interior parts
Painting interior parts is a labor-intensive, time-consuming process. It doesn’t matter if it is done by the owner of the car or by a specialist. Painting car interior parts allows you to refresh or change the color of the interior. Add a bright accent to it. Also, by painting parts of the car interior, the status and individual taste of the owner are emphasized. Painting of plastic car parts is also done when the plastic fades in the sun. It is also recommended to use painting of plastic car parts when replacing interior parts. The only way to avoid the appearance of “multi-colored spots” in the interior is to paint the plastic parts of the car.
1.Removal of parts.
When painting car interior parts, first disconnect the battery, then remove the covers, buttons, and handles. Then the antenna and audio system are turned off, the air and temperature regulators are disassembled. The wires are disconnected.
2.Priming.
Parts are primed with a special primer for plastic. You must follow the instructions and remember that some types of plastic are not designed to withstand chemicals. Violation will lead to damage to the part. There are parts that do not need to be primed at all.
3.Coloring.
All parts are painted using a spray or brush, on stands in painting boxes.
Painting car interior parts is a painstaking process that requires careful execution. Otherwise, after incorrectly painting car interior parts, the owner will receive not an exclusive creation, but a nightmare. The slightest failure to follow the painting rules will lead to a poor-quality result. Therefore, painting car interior parts is prohibited To trust amateurs, it is better to contact a specialized car dealership.
Preparing the car surface before painting
Having prepared the garage for painting work, you should move on to preparing the car itself. First of all, you need to thoroughly wash and dry the car, and, if necessary, carry out repair work.
Free the car from all accessories that are not part of the metal body: moldings, spoilers, bumpers, side mirrors, license plates. To avoid paint getting on the rubber seals in the doors or trunk, coat them with Vaseline. After painting, remove it with a rag.
Removing paintwork
To remove old paint and varnish coatings, mechanical and chemical methods are most often used. For mechanical cleaning, tools are used: scrapers, metal brushes, scrapers, emery stones. The mechanical method is the simplest, but it is labor-intensive and inconvenient in hard-to-reach places.
Rinse-off compositions are used for preliminary softening of durable paint and varnish coatings.
Auto repair plants use the method of immersing the body in a hot caustic solution and then rinsing it with hot water. To remove coatings from certain parts of the body, car enthusiasts use washes based on organic solvents.
You can prepare the simplest wash yourself. Dissolve 10 parts of finely planed paraffin at 70-80 ° C in 45 parts of xylene. After this, cool it to 45-55 ° C and, while stirring, add 45 parts of acetone. Cool the mixture to room temperature.
Preparing the wash is a fire-hazardous process, so it must be done in a water bath and not over an open fire.
Degreasing and putty
Before applying the primer, any uneven areas or dents on the surface should be filled. To eliminate deep defects, use a fiberglass-based product. Before application, it is necessary to clean the area with sandpaper and degrease with a solvent.
After this, sanding is done using a grinding machine or sandpaper. They degrease the car with a solvent and obtain an ideal surface on which primer and paint can be applied.
Padding
Scheme of painting work.
The primer is used to prevent corrosion, improve adhesive properties and level out small irregularities. Before application, the primer is filtered and the working surface is degreased.
Priming is done with a spray gun. First of all, the putty areas are primed, and then the entire surface is coated in several layers. Each layer must be thoroughly dried before applying the next. Avoid smudges and uneven spots when priming as they will be visible after painting.
How to protect your car from the negative effects of corrosion
To protect your car from the negative effects of corrosion, you must do the following:
- wash your car regularly;
- if there are no mudguards, it is recommended to install them;
- treat the car using special polishing agents;
- regularly inspect the car and treat problem areas;
- Remove any small stains that appear in a timely manner.
If the question of how to properly tint bugs and rust on a car is difficult for you, contact specialized auto repair shops. Specialists will conduct a full inspection of the car and help eliminate all problems. The effect will last for a long time. If corrosion is severe, you will have to repair the entire car, spending a lot of money.
Every car owner has encountered the phenomenon of rust forming on the body of a vehicle. You can remove red spots from the surface yourself using folk remedies. You can often hear the question: how to remove rust from a car body without damaging the paint? Unfortunately, this is not possible. After all, rust does not form on the surface of the paintwork, but on the metal.
Element protection
Spray gun device.
Lack of element protection is one of the main mistakes when painting a car. When painting, some areas and parts of the body must be reliably protected from paint getting on them. To do this, use masking tape and seal the elements with it.
Check the quality of the glued protection, as the adhesive tape comes off easily at the folds. Pay special attention to checking after abrasive soil treatment. It is best to change the seal completely.
Cleaning the body surface
Any parts that may interfere with the painting process (and these are various moldings and other decorative parts, locks, any seals) must be dismantled. If this is not done, during the washing process a large amount of moisture will accumulate under these elements, as a result of which corrosion will begin and the car will rot immediately after painting.
Many people neglect this and consider this action optional. But experts who know how to properly prepare a car for painting recommend doing just that - completely dismantling all unnecessary elements.
Before driving the machine into the work area, it should be thoroughly washed and wiped with a cloth. You should use a rag that does not leave lint. The dirt itself will only be removed under the influence of a strong and powerful jet.
Spray painting a car
Information on how to spray paint a car is very relevant. This painting method has a number of advantages and disadvantages.
Advantages of aerosol cans:
- the painting process is quite simple, since the paint is easily applied to any surface;
- there is no need for additional tools: brushes, rollers and others;
- The layer fits perfectly when applied correctly.
Among the disadvantages:
- there are no exact instructions on the packaging;
- the price does not always correspond to the quality, so test the can before use;
- The color in the picture does not always correspond to what is needed.
Before painting, the surface of the car must be prepared. After washing, drying, degreasing and wiping with a special solution, the body is ready for painting. Eliminate all defects, if any, using a primer.
Shake the can vigorously before starting work. Perform testing on any surface, following the instructions on the package. Aerosol paint is applied at a distance of 30 cm. The air temperature should be about 20 degrees. First, apply a base layer, and after that another 2-3 layers.
There should be a fifteen-minute break between applications. The drying time for the last layer should be increased to 20 minutes. Finally, varnish is applied using the same painting technology as the paint itself.
Failure to follow the rules will result in defects:
- peeling paint is a consequence of poor surface preparation;
- an uneven layer will result with high paint viscosity and strong spray pressure;
- rapid fading can occur if the putty is selected incorrectly.
Chemical method
Chemical rust removal is carried out using various reagents. Such products help prevent the development of corrosion in already damaged areas. At the moment there is a fairly large range of rust converters. The list of the most popular includes:
- Rust neutralizer marked VSN-1. After surface treatment, rust gradually transforms into a gray substance that can be quickly and easily removed with a rag.
- Orthophosphoric acid. This substance is not only sold in its pure form, but is also included in a variety of rust converters.
- Zinc spray, for example “Zinkor-auto”. This product allows you not only to remove rust from the surface of the body, but also to create a protective film.
Removing rust from a car body with phosphoric acid or special compounds is a simple process. At the same time, the surface is protected from further destruction. As for rust, it is converted into a substance harmless to metal.
Painting a car with liquid rubber
An alternative to existing car enamels and vinyl films is liquid rubber. With the advent of such a substance on the market, many disputes and discussions arose. Liquid rubber is more expensive than traditional dyes, but when applied correctly, it is much more practical.
Liquid rubber is an innovative coating for protecting car paintwork. In general, this is paint with rubber elements that is applied to the car body or its individual elements. Liquid rubber can create both a matte and glossy texture.
The nuances of car painting.
Types of liquid rubber:
- metallic;
- neon;
- chameleon;
- nacre;
- transparent;
- thermal.
Liquid rubber was invented as an alternative to vinyl film and auto enamel, while combining the properties of both.
To perform staining you will need:
- liquid rubber;
- liquid rubber solvent;
- masking tape, cardboard;
- spray;
- knife to remove residues.
Car painting technology:
- Preparing the car. The same steps are followed as in preparing for classic coloring.
- Preparing paint and sprayer. The instructions indicate the proportions for diluting rubber with solvent.
- Applying liquid rubber to a car.
Preparing the vehicle
In order to successfully remove rust from a car body with your own hands, you must carefully prepare all damaged areas. The vehicle should be washed thoroughly. This can be done manually or using mechanical means. It is recommended to use special sprayers. Dirt should be cleaned from the body inside and outside. The luggage and engine compartments should also be washed. This will allow you to thoroughly inspect the metal parts of the vehicle.
For better results, you can use car shampoo. This product allows you to remove not only dust and dirt, but also grease and salt. At the same time, car shampoo is able to protect the paintwork. This product contains no toxic components, formaldehydes or phenols.
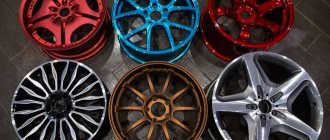
Painting a car in chameleon color
Chameleon paint creates an iridescent effect on the car. Paint is obtained by mixing several types of pigments. Layers of pigments create a mirror effect, and the shimmer depends on the thickness of the layer. Chameleon paint is very expensive, so it is recommended to entrust the work to a professional.
Painting requires three steps:
- Application of primer-tonor. It is best to use black or white pigment. Primer-tonor paint creates the main color, and the subsequent pigment will refract it.
- Applying the base layer. The overflow effect depends on its thickness.
- Special varnish.
Prepare good lighting in the room. Use a combination of halogen and fluorescent lamps. The first layer is applied with a sprayer at a distance of 40-50 cm from the surface. The first layer dries in 3 minutes; do not let the paint dry out. Remove dust with an antistatic cloth. The second layer is applied in the same way.
The third and fourth are at a distance of 30 cm. All layers are dried for 5 minutes. You can apply as many layers as you like. After all applied layers have dried, coat the work with a special transparent varnish, preferably twice.
https://www.youtube.com/watch?v=JySeHCNPSnE
Padding
At the final stage, primer is applied to the body. These compounds will significantly improve the quality of adhesion of the paintwork and painted parts. In addition, primers protect the metal from corrosion.
The primer is carried out in three stages. The first step is phosphating. Then, using leveling primers, minor defects are removed. At the last stage, the primer gives the surface an ideal appearance.
Experts who know how to prepare a car for painting advise applying the first layer of primer in a horizontal line. Moreover, each of them should overlap the previous one by 50%. The second is applied vertically and in a thinner layer. Each of them must dry for 10 minutes. There is no need to apply more than three layers. Next, the surface should dry for 2-3 hours. Then it is sanded and degreased.
So, we found out how to prepare a car for painting with your own hands in a garage.
Bottom line
When choosing a car paint job, you need to consider your budget and skills. When performing classic car painting, you should follow safety and cleanliness rules, create a suitable temperature and good ventilation. There are several types of car paints on the market.
Almost every one can be used independently when painting your car. It is recommended to comply with all requirements when preparing the premises and vehicle in order to avoid defects in work or poor quality results.
Share your car painting experience in the comments.
Car body putty
Car body putty
Before starting work, it is necessary to prepare not only putty, spatulas, but also a respirator to make breathing easier. Aligning damaged parts of a car body with putty by hand requires minimal experience. Watching a thematic video will provide a demonstration of this type of work. In any case, it’s worth knowing that it’s better to apply putty to your car in small portions: this way it dries faster and is easier to sand.
It will be possible to qualitatively prepare a car for painting using putty, depending on the depth of the dents. Small ones, up to 5 mm, can be leveled with soft putty. More serious defects on cars can be eliminated by reinforcing the paste with a fiberglass mesh. This type of work can also be done with your own hands and does not require special training.
Puttying, as part of preparing your car for painting, eliminates delays in work. Putty is a plastic material, easy to apply, but dries quite quickly. For this reason, a single, small volume preparation is recommended.
The finishing putty will almost complete the preparation of the car for painting, but all that remains is to sand it and apply primer.
How is a body part repaired at a service station?
Take, for example, the fender of a car. If the damage is minor (not requiring replacement of the wing with a new wing), then the damaged wing is straightened, puttied, primed, and then painted in a paint booth. All!
No cataphoretic coating. And this process of painting a car is the same for all repairmen, whether in Uncle Zhora’s garage or at a state-of-the-art service station.
In the place where the factory cataphoresis or galvanized film is damaged, a corrosion center will certainly form, which after some time will raise a layer of putty and paint. The paint will begin to peel and corrosion will come out (bugs, caries, corrosion points).
If the craftsmen at the station offer to replace the wing with a new one, then also keep in mind that the new wing will not serve you for a long time, even if Uncle Zhora paints it “as if for himself.”
Body parts that go on sale are coated at the factory with a simple shipping primer, which serves to protect the metal during transportation, but does not protect against corrosion at all. A painted new wing (without factory treatment) will last you a maximum of 2 years and will rot right through.
There are the following statistics for the painted wing:
- treated with cataphoresis coating (factory-made), withstands exposure to salt fog in the chamber from 1500 to 2000 hours;
- does not have a cataphoresis coating, through corrosion in the salt fog chamber appears after 90 hours.
Therefore, any body repair will be short-lived. More expensive repairs will last a little longer (due to more precise painting technology) than repairs from Uncle Zhora.