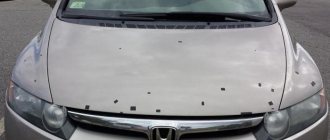
Unfortunately, most of the roads in Russia and the CIS countries do not have particularly high-quality surfaces. Of course, on highways and highways, as well as on roads in large cities, the asphalt is often quite even and smooth. But even this cannot protect the car from fine gravel flying from under the wheels of cars in front. And if you often ride on country roads, then the wear of some external parts increases even more. This is especially true for the optical system: the headlights are located quite low, so they are easy to scratch and even break. To avoid this, a special technology for booking headlights with film is usually used. You can glue it not only with the help of service station specialists, but also with your own hands.
About the film
Protective film for headlights is often used as tinting. The best way for a car is factory tinting, which has a light transmittance of 95% or more. In industry it is applied by spraying. This allows for certification. Such minor tinting will not cause a fine. When applying film to headlights yourself, it is necessary to take into account the coefficient at which permissible standards will not be violated. Without fear, you can stick on a protective coating with the ability to transmit a light beam of at least 85%.
Headlight armoring - what is it?
The procedure is carried out in order to protect the glass from impacts from stones flying from under the wheels of cars. Previously, grilles were used for these purposes, which were installed on top of lighting fixtures. But they had a lot of disadvantages: an unpresentable appearance that spoiled the exterior of the car, as well as too large cells that could not protect the headlights from fine gravel.
Headlight bars will not protect your car from pea gravel.
Now, protective grilles have been replaced by a special film, with which you can armor the surface of the headlights and protect it from mechanical damage.
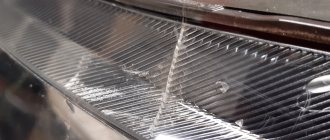
headlights are armored using a special anti-gravel film
For owners of expensive optical systems, booking headlights is almost a mandatory process, because repairing glass or replacing lenses will cost much more than gluing a film.
Characteristics of protective film for car headlights and taillights
The film is divided according to various criteria, for example, functionality, color, additional features.
Functionality:
- for toning;
- shockproof.
Colors:
- transparent, without color characteristics;
- colored, such as red, blue, yellow, etc.
Additional characteristics:
- chameleon;
- with gloss;
- with a matte surface;
- with a sticky layer - self-adhesive.
The film has such advantages as:
- ease of cleansing;
- practicality in operation;
- wear resistance;
- not picky when fastening.
Some people think that covering headlights with film is an expensive undertaking. Polishing or varnishing is, of course, much cheaper if we take into account a single application. However, such manipulations require periodic repetition, which is much more expensive.
What to do if protection needs to be removed
Even the best quality armor coating will someday need to be replaced. There are some nuances when removing anti-gravel film.
First of all, you need to heat the film. To avoid temperature fluctuations, ensure that the entire vehicle warms up slowly and evenly. To do this, it is enough to place it in a garage, the air in which is not lower than 20 °C. If you are performing surgery in winter, install heaters in the room. Within 2–3 hours the film will reach room temperature.
Now you will need a hair dryer. You can use a regular household one if it can heat up to 60–80 °C. Otherwise, it is better to use an industrial one. To properly remove the film, please read the following instructions carefully.
- Direct a stream of air onto the film.
- Carefully pry up the shortest edge so as not to damage the surface of the headlight.
- Begin to carefully peel it away from the surface. In this case, the angle between the film and the headlight should be approximately 30°.
- After the final removal of the film, clean the surface of the headlight from any remaining adhesive.
- Rinse it with clean water.
Now you can install a new anti-gravel coating or leave the headlight in its original condition.
Video: how to remove protective material from headlights
Buying and installing an anti-gravel film will cost you much less than replacing a headlight. And if you carry out this process at home, you will save even more. At the same time, gluing armor is not a complicated process at all, if you know certain nuances and follow all the rules. In addition, the surface to be treated does not have a particularly large area, which greatly simplifies the work. In other words, don't be afraid to try making things yourself. You can do this quite well.
How to choose a film?
The film protecting the headlights is selected based on a number of parameters:
- Thickness. This parameter directly affects the protection of glass optics. Sand chips, gravel stones and other abrasives will not cause harm, as well as excess moisture and chemicals.
- Transparency factor. This parameter directly depends on the first one. Before purchasing protective film for headlights, it is necessary to clarify the light transmittance of the vehicle's optics, which is provided by the manufacturer. This must be done to avoid getting fined.
- Stretch percentage. Determines the amount of material that will be consumed when pasting headlights.
Film color
The film can perform not only protective functions, but can also stylize your car by changing the color of the headlights. It comes in different colors. The color of the film must be permitted by law.
Tinted headlights reduce the visibility of the car on the road. Therefore, when darkening, sufficient light transmission must remain. In addition to the darkened one, it is popular to stick a yellow film.
Yellow
In the 1930s, selective yellow light was used on many cars. Early research has shown that yellow lights are less likely to blind other drivers, making them safer.
While yellow light improves visibility in rainy or foggy conditions, it provides poor illumination in clear weather. Filters used to create selective yellow light reduce brightness. Many cars today only use yellow lights for their fog lights. Yellow film has light transmission up to 86%.
Advantages and disadvantages
The obvious advantages include the following aspects:
- It is easy to apply the film yourself, so the cost savings are obvious.
- High-quality glass protection, scratches and chips will not appear.
- Damaged headlight glass may return to its original appearance after being covered with film.
- The light passes through evenly.
- The color of the film can be chosen to suit your taste. Then it will perform not only a protective function, but also please the eye.
- There are types of coatings that can be polished.
- Long-term use does not lead to wear or deterioration of color.
- The ability to create a perfectly smooth surface.
If we talk about shortcomings, there are only a few of them. Firstly, with the lights turned off, the car is practically invisible. Secondly, the cost of the source material makes you wonder whether this manipulation is necessary.
Important nuances
After you have booked your car headlights, you need to avoid getting the film wet for two days. Do not wash your car or leave it outside in rainy weather.
The film will deteriorate faster if you wash the surface with powder or abrasive agents, so use soap for washing. Also, do not direct the jet of a high-pressure apparatus at the headlights.
Global manufacturers promise that the material will last about 5–7 years, but in Russian road conditions this period is reduced to 3–4 years.
To correctly make headlight film reservations with your own hands, we recommend that you first watch training videos.
Unfortunately, most of the roads in Russia and the CIS countries do not have particularly high-quality surfaces. Of course, on highways and highways, as well as on roads in large cities, the asphalt is often quite even and smooth. But even this cannot protect the car from fine gravel flying from under the wheels of cars in front. And if you often ride on country roads, then the wear of some external parts increases even more. This is especially true for the optical system: the headlights are located quite low, so they are easy to scratch and even break. To avoid this, a special technology for booking headlights with film is usually used. You can glue it not only with the help of service station specialists, but also with your own hands.
Do-it-yourself film covering of headlights
To do the pasting yourself, you need to have a certain set of tools:
- paper knife;
- rubber or plastic squeegee with felt (felt) coating;
- spray;
- solution: liquid soap with water;
- hair dryer, which is usually used by builders;
- degreaser (window cleaner or alcohol are excellent, you can use white spirit);
- clean and dry rags.
Before starting work on covering headlights with anti-gravel film, it is necessary to decide exactly how the process will take place. For example, will the entire surface of the optics be covered or will only the “eyelashes” on the headlights be treated? You can also select several color options for the film and create an application combination.
Technology for self-installation of armor on headlights
To make a reservation, you need to prepare the following materials and tools:
- Film for pasting.
- Detergent.
- Industrial hair dryer. Instead, you can use a regular household one.
- A construction or stationery knife with replaceable blades.
- Scissors.
- Dry, clean rags.
- Rubber spatula.
- Surface degreasing agent. Typically, alcohol is used.
When everything is assembled and prepared, you can begin installing the armor on the headlights. The sequence of work is as follows:
- If it is possible to remove the headlights, then it is better to do so. If dismantling is difficult, you can carry out all the work on the machine.
- Wash the optics thoroughly using detergent and a cloth. Wipe dry.
- Cut out the blank from the film. It should protrude 1.5–2 cm beyond the edge of the headlight.
- Place the workpiece on the glass. Lightly heat the film with a hairdryer, it will take the shape of a headlight.
- Degrease the surface with alcohol.
- Vinyl film has two layers. The first is the film itself, and the second is the protective layer. Separate the protective layer by 3-4 centimeters and glue the film onto the surface of the headlight. Lightly heat with a hairdryer and smooth with a rubber spatula.
- Gradually, in strips of 3–4 cm, seal the headlight to the end. It is necessary to ensure that there are no air bubbles under the film. If there are any, remove them with a spatula.
- Trim the film around the perimeter, leaving 3–5 millimeters. Using a hair dryer, fold the edge. Remove excess vinyl with a knife.
- Reinstall the headlight if it was removed.
As you can see, the process of booking optics is simple, but it requires accuracy and cannot be rushed.
The working process
Taping a headlight with film is carried out in several stages:
- The working surface must be thoroughly washed and degreased.
- The places where the film will be pasted must be dry, for which the optics must be wiped with a clean rag.
- The material is applied to the headlight and the shape is outlined. It is necessary to leave an allowance around the edges of five to seven centimeters.
- A part is cut out of a common piece of film according to the prepared shape.
- The surface of the optics is generously wetted with soapy water.
- The prepared piece of film is applied to the headlight. Moving from the central part to the edges, the material is evenly smoothed using a squeegee. This manipulation should be done to get rid of air bubbles and excess solution.
- The pasted film is dried with a hairdryer while constantly smoothing with a squeegee.
- In order for the bends to stick evenly, the film must be heated with a hairdryer so that it becomes more elastic.
- Once the work is completed, the excess is trimmed off with a knife.
Headlight tinting options
Headlight tinting can be done in different ways
But before you start choosing the appropriate method, it is important not to forget about the legality of such tuning. The fact is that when passing a state technical inspection, problems may arise due to the low throughput of the glass of the headlight optics
Therefore, you should not abuse the darkening.
Tinting headlights with varnish
You can tint headlights using special varnishes and paints. They come in different colors, which allows for harmonious tuning.
For tinting front optics, tinting varnish is best suited. It is designed specifically for darkening headlight lenses, but has a high price.
The main advantage of varnish tinting will be the low cost of work.
Among the disadvantages of this tinting option, the following points should be noted:
- low light transmittance of the varnish,
- irreversibility of the consequences (it is impossible to remove the varnish without damaging the optics),
- fragility of tinting,
- Only a professional painter can apply the varnish evenly,
Film tinting of headlights
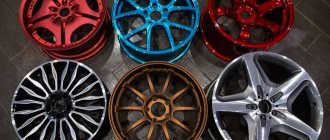
You can darken car optics using a tint film. It is also available in a wide range of colors (example in the photo above), so choosing the best option will not be difficult. Film tinting of headlights has a number of advantages:
- The film can be removed at any time without damaging the headlight (like removing tinting). This will help, if necessary, resolve a conflict situation with traffic police officers on the road.
- Applying the film will not only perform a decorative function. The coating will protect the lighting lenses from clouding and scratches.
- Uniform transmission of light ensures good transmission, which entails maximum preservation of lighting brightness.
- A perfectly flat surface is formed. If necessary, high-quality film can be polished.
- Thanks to its resistance to ultraviolet radiation and precipitation, the tinting will last for several years.
The only disadvantage of tinting headlights with a film coating will be the higher price of such tuning compared to tinting with varnish.
How to reserve headlights with polyurethane film - Petro src=»https://i.ytimg.com/vi/zMkmCnTcF3M/maxresdefault.jpg» class=»aligncenter» width=»1280″ height=»720″[/img] Removing the film from headlights, and in general from any surface. AutoSmile - armored film
Adviсe
- When the work is finished, but the coating is not so perfect, for example, there are bubbles, you need to take a needle and carefully pierce them, squeezing out the air. Then use a squeegee to smooth the surface again.
- In order not to overpay for the material, you should contact stores that specialize in selling car accessories. Experienced sellers who know automotive optics can tell you what size cut to purchase.
- When squeezing out excess liquid from under the film, do not be afraid to apply force. Most types of films are equipped with a protective layer that must be removed upon completion of work.
- If the headlights have a convex shape, such as those on a Nissan Beetle, then aligning the film along the edges can be difficult. It must be thoroughly warmed and stretched.
- If you don’t have confidence in your own abilities, have never had to cover headlights with film, or simply don’t have the necessary equipment, then you should entrust the work to a specialist.
Many people ask why soapy water is needed. Experts give a simple answer: a soap solution prevents the film from sticking to the glass instantly and firmly, which allows it to be moved around the optics. The liquid is squeezed out from under the film from the center to the edges. If you change direction, you cannot avoid creases.
Instructions for armoring and polishing a car body with film
Before starting work, it is necessary to prepare the vehicle according to the instructions:
- A mandatory point is to maintain a constant temperature of up to 22 degrees, and a complete absence of drafts.
- The car must be clean, free of dirt and dust.
- After pasting the armor film on a car made of polyurethane, it must dry for 12 hours. And only after that you can make adjustments to small details.
- The paintwork must be undamaged.
- For the coating, water or, better yet, a soap solution (any dishwashing detergent) is used; it does not allow the coating to stick before it is leveled.
You can book a car with film yourself if you strictly follow the instructions:
- Degrease all parts of the machine that will be coated with abrasive clay or white alcohol.
- The surface body is wetted with a soap solution, then protection is applied. The covering elements must be cut out in advance in accordance with the dimensions of the surface to be pasted.
- The surface is leveled using rubber spatulas, expelling water and air from under the film. Remaining material is carefully removed.
- The final stage is processing the edges and heating the material with a hairdryer. After this manipulation, the surface of the car will reliably adhere to the protective film.
When asked whether it’s worth booking a car with film, you can safely answer, of course, it’s worth it. This innovative technology will help preserve the appearance of the car for years, and most importantly, protect and extend the life of the car.
About additional benefits of booking
By themselves, the protective films used to protect headlights do not have any particular strength, but due to the uniform distribution of the load when hit by a stone or other object, the headlight can maintain its integrity and not even get chipped or scratched. Ill-wishers will also not be able to damage the glass of your headlights if they try to scratch them.
The armored film applied to the headlights protects the surface from dust and dirt, which can cause damage when washing the glass. In addition, the film will greatly facilitate the process of washing headlights, which will allow you to keep them clean, and clean headlights illuminate the roadway much better at night.