There are many reasons for painting a car, be it the owner’s desire to change the color of the car or the presence of damage or corrosion on the surface of the body. However, before the painting procedure, it is imperative to remove the old coating. Removing paint from a car is carried out in several ways; choosing the most optimal one is up to the car owner. But the choice is also influenced by many factors, such as the degree of damage to the paintwork, the availability of certain tools or equipment, as well as financial capabilities.
Do-it-yourself car painting - how to remove old paint
There are a lot of reasons that make it necessary to paint a car, but still, if this process is destined to come true, you need to learn how to perform it correctly. We will look at how to do this correctly and accurately in this article.
Important! If the paint is old, but there is no damage to it, new paint can be applied to it (let’s say, to “upgrade” and improve the appearance of the vehicle).
Removing paint from a car by sanding
You need to start with P80 abrasive. If there are layers of putty under the paint, then you can use a coarser abrasive, up to P40. But you need to be careful, since such a large abrasive easily grinds the metal, making it thinner.
I repeat, if there are no thick layers of putty, then using a grinding wheel with a P80 abrasive grade will be safer for the metal. It removes paint quite well and is not too aggressive on metal.
If the paint layer is very thin and the car has not been repainted many times, then a good option would be to use sanding discs with P180 - P400 abrasive.
When using an orbital sander, you need to set the rotation speed correctly. Too high a speed may heat up the paint. The grinding wheel will become clogged and will need to be replaced prematurely with a new one.
Basic Paint Removal Methods
The most common ways to perform this operation include:
So, let's consider the first option: its purpose is to remove the paintwork using high temperatures.
- So, initially it is necessary to remove elements from glass and plastic.
- Then you should heat the surface with a gas burner or a hair dryer (do not bring the tool closer than 5 centimeters to the body). Please note that the temperature of the heating element should not exceed 700 degrees Celsius above zero.
- After such an impact on the paintwork, it will swell and be ready for removal.
- The paintwork must be removed carefully and carefully, using a spatula.
- The final stage is washing the technical equipment, which will completely remove all contaminants.
Important! This process should be performed either outdoors or in a well-ventilated area. Remember that heated paint is quite toxic and its effects can adversely affect your health.
The second method is mechanical, that is, the paintwork is removed in the following way:
- First of all, you need to be equipped with an angle grinder.
- After purchasing this tool, install the attachment. It could be a wire brush or an emery wheel.
- Remove paint with slow movements.
- Follow this procedure until you see the desired result.
At the same time, it is important not to overdo it - pressing too hard can lead to poor quality work. In this case, the main thing is patience and the desire to achieve better results.
Yes, this method is quite expensive (since it involves the purchase of a special tool), but nevertheless it is the fastest and easiest.
And the last method is chemical, which includes a special liquid for removing paint from a car.
So, you will need the following materials:
- turpentine;
- acetone or solvent;
- special material for removing paintwork;
- alkaline paste.
Initially, you need to decide on the choice of paint remover. Afterwards you need to apply it to the body using a special brush. Leave the product for 1-2 hours (depending on the product you purchased), after which remove the already softened paintwork with a spatula or scraper.
Important! Having removed the paintwork, you should not forget that the solution continues to act (which can subsequently lead to the destruction of the metal). That is, immediately after removing the paint, the vehicle body should be thoroughly washed and coated with a degreaser in order to avoid the troubles described above.
When performing this procedure, remember that if the temperature is too high, the chemical will dry out before it softens the car's paint. Also, if the temperature is too low, it will simply freeze. Therefore, having chosen this method, it must be performed at room temperature (which averages +22 degrees Celsius).
Remove paint using a chemical method
The chemical method involves removing paint from a car using a washbrush and a special product:
- caustic soda (25-30%);
- alkaline paste;
- solvent 646 or 647;
- washes (SD (sp), SD (ob), AFP-1);
Solvent 646
As auxiliary tools you will need a spatula, a stiff brush, and a scraper.
If you prefer caustic soda, the calculation must be carried out according to the generally accepted rule: the amount of product is proportional to the layers of old paint. In addition, it is necessary to provide a reserve, since the solution flows from the vertical surface of the machine.
Sequence of work:
- using a wash brush, evenly distribute a 25-30% soda solution over the surface of the car;
- leave for 10 to 12 hours, depending on the condition of the surface, thoroughly rinse off any remaining paint with hot water;
- If necessary, repeat the process to remove all layers of paint from the car.
It is practiced to apply a paste containing a slightly alkaline solution, organic and mineral substances:
- spread the paste into a thin layer with a brush;
- leave for an average of 2 hours, rinse thoroughly with water;
- To achieve the desired result, apply the paste to the car body three times.
Traditionally, products are applied to the surface with a brush, and after a certain period of time the paint is removed with a spatula or brush.
Chemical paint removal
Modern paint removers can significantly speed up the painting of a car. Traditionally, the manufacturer recommends using them in three stages with an interval of 3-4 minutes. There is an opportunity to purchase a product that only needs to be applied once, which will make it easier to remove the paint yourself. A varied assortment of special products is accompanied by detailed descriptions regarding use. Follow the manufacturer's recommendations and, if necessary, consult a qualified professional.
Other methods
There are also a number of other ways to remove paintwork from a car yourself, which we will now share with you.
Laser
It is not advisable to use this method on your own: firstly, it is expensive (as regards the purchase of special equipment), and secondly, it will require special skills. It is best to turn to professionals - it will be relatively inexpensive and will take a minimal amount of time. The advantages of this method include:
- almost silent operation;
- simplicity and speed of execution;
- high-quality coating removal;
- complete safety;
- absence of harmful odors, dust and dirt.
It is worth noting that the speed of removing paintwork using this method directly depends on the color of the TK coating. Dark paint is removed much faster than light paint.
Dipping
Performed exclusively in professional automotive workshops. Individual parts or an entire car body are dipped into a special solution. The next stage is washing and purging. As a result, the paintwork is completely removed, and a primer is used to protect the metal in order to avoid corrosion.
Folk remedies
For this purpose, initially equip yourself with a 30% caustic soda solution. Apply it to the vehicle body and leave for 12 hours. Afterwards, rinse with a stream of hot water. Note that if there are no problems with horizontal surfaces, then horizontal ones will not keep you waiting: since the car solution will constantly drain from doors and other horizontal areas, you will need a large amount of soda, as well as time to fully complete this procedure.
Now you know how to remove paint from a car using various materials, products and tools. If you carry out the operation according to our advice, the process of removing paint will go quickly and without harm to your health.
Modern means for removing paint from car bodies
Every year, interesting new products appear on the market of automotive accessories and materials that allow you to put your car in order. Third-party paint on a car’s paintwork is one of the popular troubles that many car owners encounter. Today we will look at both classic and proven means, as well as new methods of removing paint.
So, pay attention to these modern tools:
- Special paste for removing scratches (deep polishing). This paste must be used correctly, otherwise the protective layer of the paintwork can be erased. You can buy polishing paste at any store that sells products for working with paintwork.
- Clay for cleaning cars. This is a new product that contains a special type of clay and wax. Judging by the reviews of many motorists, clay actually helps to remove foreign paint, while keeping the original paintwork intact.
- Spray cleaner for brake pads. With this tool you can very carefully remove a new layer of paint, no matter what type of paint we are talking about. The spray must be applied very carefully; damage to the varnish of the original paintwork of the car is possible.
Other products that are actively recommended on forums can greatly harm the original paintwork of the car. You should check the effect of the product on the paintwork of your car in one of the inconspicuous areas before you start scrubbing the paint using one of the proposed methods. Unfortunately, the paintwork of different cars can react to impacts differently.
How to remove “foreign” paint?
Someone in a white car polished my bumper and there was this strip of paint left: (who knows what you can use to erase “someone else’s” paint so that my paint remains in place?) Well, I don’t want to paint the whole bumper) or maybe they can do it somewhere?
try nail polish remover. spray wipes off with a bang
As if she could scrub hers too.
A rag and gasoline galoshes. Someone else's paint just stuck in chunks, it didn't stick. She will wipe herself off.
Will everything be fine with the paintwork? Will it remain in place?
As if she could scrub hers too.
A rag and gasoline galoshes. Someone else's paint just stuck in chunks, it didn't stick. She will wipe herself off.
as if there is no acetone there. If you don't try too hard, everything will be fine.
I cleaned such a scratch without damaging my LP in 5 minutes with microfiber and an abrasive polish
Gasoline does not dissolve paint) A can of galoshes costs 50 rubles at the hardware store.
It still removes the varnish.
Car polish and three to a positive effect.
I always cleaned it with regular solvent. Wipe it off and it will be clear that it has paintwork.
I wiped it off with gasoline somehow. everything was fine . the main thing is not to overdo it)
from any bodybuilders for a nominal fee or for creepy eyes.
If you don’t forget to add hardener to the varnish, nothing will happen)
As if she could scrub hers too.
A rag and gasoline galoshes. Someone else's paint just stuck in chunks, it didn't stick. She will wipe herself off.
Yes. Preferably in color or colorless. Tested more than once. Scrubs with little effort.
So, she got used to someone, and now she’s asking how to hide the traces of a crime =))))))
Yes, right away with a gas burner. Or 80 grit sandpaper. He'll wipe it off too. And then it will also be clear what’s wrong with the paintwork.
Last edited by Maker; 12/22/2012 at 18:40.
If you are afraid of damaging your coating, then try, without extra effort, from microfiber, with water, and nail polish remover, to solvent. I scrubbed the same thing with either 5 or 7 thousand, everything came off perfectly.
Using alternative means of removing paint from the body
If you don’t want to experiment with using a solvent, you can use other methods of removing foreign paint from the body of your car. Among the tips and tricks you can find both crazy options like sandpaper and pouring water, and quite effective creative methods for removing paint. Before applying any advice, it is important to think about whether this method will be effective, whether it will help remove all the unpleasant moments from the body without damaging the paintwork. If in doubt, it is better to read information about the method on the Internet. But you should not use methods that seem suspicious to you. This can be detrimental to the appearance of your car, and repairing the damage from such methods will be very expensive. The most practical advice in this case is the following:
- use nail polish remover without acetone - theoretically, this is a very good option for removing paint that has not dried too much;
- apply gasoline and rub it with a soft cloth into the damaged area - some types of paint can be dissolved with fuel;
- polish the car with different types of polishes, including abrasive materials, but it is important not to remove too much paint layer;
- Carry out aggressive professional polishing of the car body at a car wash or another specialized company providing these services;
- use a viscous, fatty liquid for scrubbing, for example, diesel fuel or sunflower (possibly olive) oil in combination with microfiber.
There are a huge number of recommendations, but not all of them will help in your case. In each situation, body damage will be individual, and it is worth proceeding from the characteristics of your problems. Sometimes you can get by with water and a soft cloth, sometimes you will have to use abrasive polishes. However, you can use any method - it will be very difficult to make it worse than it is. In the worst case scenario, you will have to raise money to paint part of the body. This is an unpleasant process that should be performed by professionals. But before that, you can try another guaranteed working method of removing paint from the body.
Tags: wash the paint, painted the car, ruined the paint, incidents
Comments 87
If the vandals have worked recently, the paint from the spray can is in most cases washed off with regular gasoline.
Cool video! Very informative! Thank you!)))
Catch the vandal and face lynching, and film everything on video, let the country laugh on YouTube)))
Everything would be fine, the video is useful, but somehow the story drags on for a very long time. a little shorter
There is another recipe: we catch a vandal, wear it in the blood, moisten a sponge with this and pass fresh electrolytes over the car.
nefras copes well with this kind of crap...
One fine winter day I accidentally looked out the window. A boy of about 12 years old walks through the parking lot where my car was parked, and as he passes by my car he takes out a spray can from his bosom and starts making art. Out of rage, I opened the window and screamed (later I thought that I should have caught him), he ran away. When I came out, I discovered a black stripe all over my side, went home, took nail polish remover from my wife and filled it with warm water. The liquid did a good job, after which I rinsed everything with warm water.
Yes, I had to catch it. Better yet, shoot a video and then fuck off
gasoline washes off all the spray can crap)))
hello everyone, I had a chance when I came to the parking lot and had to go to one place and saw that the driver's door along with the glass was painted over with spray paint with a rag, nothing happened on hand, there was no solvent or anything like that, I could wash off the paint from the means I had at hand, I had gasoline, I decided to try it and washed off like in the advertisement Mr. Proper
Yes, as a rule, all the cans of solvent are washed off in an instant, then a light run of polish and that’s it. or sandpaper 3000 and polish. 2000 assholes probably
I scrubbed it with dimexide without straining
cool video! Signature, I always liked your video, but here’s an anecdote, at least in the subject in print))
Thank you for the video! I love it like and repost!
You can add a preventative method to the methods of removing paint, i.e. If the car is covered with wax or polish, then the paint will stick to it very badly, similar to rolling drops of water and will be removed much easier. Maybe even just a karcher.
Yes, graffiti lovers! I saw a chiropractor once, they brought a Mazda! We hit the car and it’s an offensive word for the boy, but he’s straight! When the serviceman asked his girlfriend: “What, did they write the truth?” . To which she replied: “I didn’t notice anything like that about him!”, and immediately blushed. The service was a result of friendly laughter!
Thank you, Uncle Olezhek!
paint is nonsense, but if the doors were foamed with polyurethane foam, it would be worse.
Yeah. Foam with acetone only... along with paint, if you're unlucky.
paint is nonsense, but if the doors were foamed with polyurethane foam, it would be worse.
dimexide to help
very useful video. Respect to Oleg!
At first I thought “how to wash my ass”, looking at the slut’s ass
I can't think of anything better than polishing. The professional did the polishing himself and came to us more than once with a similar problem.
Candy has been painted, look
please write what color is the paint on the bumper
Spray paint dissolves well with 95 gasoline. On a moped, the tank is painted like this, so it can easily be printed on your pants when gasoline gets in. But I can’t say anything about the coating; I didn’t have to wash it off completely.
The topic is very relevant, but this also happens www.drive2.ru/l/6567666/. Now I’m thinking whether to wash it or repaint it))) These are four-legged matters)))
It’s better to tell me how to wash off the paint with which the markings are applied. Which cannot be wiped off with solvents or anything else. And paint from a can is garbage.
Road paint with gasoline washes well, even better than 647 solvent... I reap debtors firsthand ))))
I tried with gasoline and everything else. And nothing.
This means it’s not road grade, because we dilute the paint with gasoline, and at the end of the season we wash the car and equipment with gasoline.
A VAZ six came to me, a “black mat” on both sides from a spray can, which had been there for a long time. A dry rag made of natural fabric + about an hour of fussing and only well-adhered stains of paint remained. Same rags, only with water. In order to rub for a long time and not matte. The varnish has of course matted, but too unnoticeably. One could assume that nothing happened. But this was possible because the car's paint had faded a little around the inscriptions.
Household paints like PF-115 are washed off with white spirit with a bang, I washed off paint from a spray can with acetone (painted unevenly), I bought it at a hardware store...
when the moronic hard workers painted the fence with a spray gun and painted a dozen nearby cars, I washed mine with acetone and 646 solvent. Everything has been washed, the coating is in place.
It's good that it's there. From 646 it can become matte
Yes, friends, I didn’t expect so many options to come up with. This is really helpful. I even took note of how it would be more convenient to paint the number. I liked the idea and there is no need to paste it over
Oleg they are painted like this at the factory, the roller goes according to the number in the machine
it’s nonsense to wash off the paint, try to wash off the lipstick)))), and it’s very convenient to paint the numbers with an ordinary thick rubber roller for wallpaper, apply black color to the roller in a thin, even layer and follow the number, the bumps become black and there’s no mess
It’s fun with a roller. And it will be evenly measured. I'll take note
the main thing is that the number is even
It’s fun with a roller. And it will be evenly measured. I'll take note
Why a roller, a permanent marker, the license plate, like the car, is 15 years old, but it’s like new)
I’m all for 2000, because after the first touch-up experience, I removed all the shagreen with further polishing
Dimixid, in the pharmacy for 50 rubles. Just try not to pour too much on the bare plastic and wipe it off immediately.
Is it alcohol based?
how strong I am in chemistry is not exactly alcohol) dimethyl sulfoxide. I used it to remove super glue from the paint; the previous owner glued the windshields in places with super glue)) I saw a video of how they use it to remove paint from a car.
80 gasoline. shoots with a bang. the native (factory) paintwork doesn’t give a damn about it, but paint from cans comes off in 1-1.5 passes. personally tested. I removed paint from glass, rubber seals and the body itself.
I washed it with carburetor cleaner, but it corrodes the skin on my hands, so I need to protect it with something.
Sanding and “not damaging the varnish” is a strong statement. T.S. has experience?
2000 skin before polishing - free...
Sanding and “not damaging the varnish” is a strong statement. T.S. has experience?
2000 is very small and we remove dust from it after painting, so there is nothing to be afraid of, the main thing is to do it carefully
Whoa... well, if there are minor flaws, then yes. And when the whole car is painted with pussy, and at the same time it is for a 10-year-old basin, it will be a bit difficult to carefully wipe it down with sandpaper IMHO.
It’s easier to go over it with a rubbish-shaped polish than to crawl around the car with sandpaper...
White spirit works great with fresh paint
we're not talking about fresh stuff here
Well, fresh, in my opinion, one or two days.
no, dear, fresh is when you pull it with your finger, everything that is dry. it's not fresh anymore)))
Well, fresh, in my opinion, one or two days.
Yes, after 21 days the paint is considered to be completely polymerized. But the bumper has also been painted a long time ago, and the varnish has still dissolved a little.
You can’t use any solvents on our cars - the paint will definitely come off - I just washed it off with gasoline on my old car, and my neighbor in the garage across the street on a two-room car also washed off the paint from the roof with gasoline...
Most likely his roof was made from cylinders and painted.
That’s what I’m talking about - our cars are always a surprise...
Most likely his roof was made from cylinders and painted.
Love it from the balloon!
I’m the same type, there’s just a whole side on the 9, along with glass, handles, etc. painted it)))) I remember the paint then was Empils PF-115 yellow, so he had it washed at the car wash using kerosene and a powerful Karcher)
And for what, if it’s not a secret?
One madam was drawn by an envious colleague on a white car with a black marker. washed with a fine felt attachment on a Dremel and 646 solvent
The marker is easily washed off with alcohol without any dremels or felt, just with a napkin!
yeah, that's boring, the hostess probably didn't try it. I just smeared it even more)
Well, try it yourself! Pure alcohol! Well, if you smear it with something, then I don’t know!
I’m telling you, I tried it with alcohol. it doesn’t wash off - it just gets ruined even more. Maybe if the car is under varnish, then that’s a different matter.
Well, try it yourself! Pure alcohol! Well, if you smear it with something, then I don’t know!
At work, we make marks on the parts with a marker for the welder. When he degreases them with alcohol, all the inscriptions are washed off without any residue. And just use a file to f*ck it up.
Some markers are resistant to alcohol, but will not resist fat - any fat (for example, sunflower oil) removes the alcohol-resistant marker once. Moisture- and alcohol-resistant cosmetics are removed in the same way: in middle school we had wild pranks - catching each other (meaning guys) during recess, keeping three people together and applying lipstick. She didn’t clean it with anything - water and soap, alcohol - everything was on the side. only I (who studied chemistry and knew that substances in everyday life are water-soluble, alcohol-soluble and fat-soluble) guessed that you could go to the canteen, soak a cotton swab in sunflower oil and wipe off all this obscenity in 1 minute.
How and with what to remove old paint from a car with your own hands
Good day! I want to share with you how I managed to remove this incomprehensible application in the form of paint. I went to the store where I usually buy everything for painting, from peppers to paint. He asked for something good that would eat away quickly. They suggested this remedy.
EN 7600 For paint and primer removal
+ of this product is that it does not eat putty, only paint, primer and the like... The price tag is 450 rubles. After shaking the jar, I poured everything into a plastic bottle (which later turned out to be in vain, the bottle was not intended for chemicals. Next time I filled the jar from under the Nescafe.)
sq. bottle This is where we stopped without using chemicals.
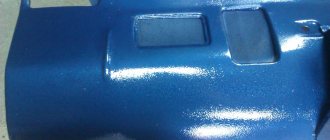
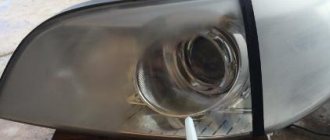
We take a brush and apply this slurry to a not very large area, because... it shouldn't dry out. As soon as it is applied, the paint literally begins to peel off in places before our eyes; you need to let it sit for 5 minutes. So that the entire layer of paint is saturated and peels off...
not everything swells...
swelling in places Then we take a spatula and begin to tear it off. Where it has not come off, repeat the procedure.
left side Hands hurt from the spatula, because the paint comes off with difficulty, but underneath it you just need to apply it to the ground, and in a minute you can remove everything with a rag to the metal (although there is also a layer of factory paint). Having completed the left side, I began to work on the right.
right
apply and wait
We remove everything with a spatula. Well, we continue to rip off the whole machine)))
left-hand side
right
It came off the roof in parts, and in some places it didn’t come off the doors. Well, there is a heavy artillery for this, such pieces can already be ground. It took about 2 days to completely remove the old paint. BE CAREFUL WITH CHEMOS! When it gets on your hand it starts to burn. Rinse with water, otherwise it’s not pleasant and your hands turn red later.
Author: Anton Kondakov, St. Petersburg
Chemical paint remover
Chemical paint remover
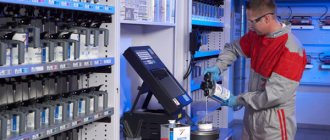
Paint remover is applied with a brush and an aerosol can. It is sold in liquid or gel form. Usually two cans are enough to treat the entire medium-sized body. Depending on the type of paint and its thickness, the remover lasts from 10 minutes to an hour. The paint will begin to bubble and peel. You need to wait the sufficient amount of time specified in the instructions. The paint should soften.
After exposure to the remover, the paint can be scraped off with a spatula.
After removing the peeling paint, the chemical elements of the remover continue to act. Before priming, you need to wash, sand and degrease the surface to neutralize any remaining remover. You need to pay attention to the seams and joints, since the remover is not easy to remove from there. Before applying the remover, it is better to seal these places and then clean them mechanically.
Do not apply the remover on a hot day. It will dry out before it does its job. But you can use one method that will prevent the paint remover from quickly evaporating. After treatment with paint remover, you can cover the body with plastic film. When using this method, the process of exposure of the paint to the chemical composition will proceed faster.
At low temperatures, the remover acts slowly. Thus, it is better to use this remedy at room temperature.
Depending on the thickness of the paint layer, after exposure to the product and scraping, some of the paint may remain. Washing off the paint usually removes the top layer and, if the body or individual parts have been repainted many times, then, in this case, you need to repeat the application of the wash and subsequent scraping.
You can also remove paint using a metal sponge. Small residues can be easily removed with Scotchbrite.
When removing paint in hard-to-reach places, you can use a wire brush. Do not use wire attachments on your drill. After chemically removing paint, it is safer to remove peeling paint by hand. This way, paint soaked in remover and chemical residues will not fly around.
Chemical remover contains toxic substances that are hazardous to health. Skin and eyes must be protected by wearing protective gloves and goggles, and there must be good ventilation in the workshop where it is used. If there is no active ventilation, then you need to keep the door open.
Local car painting: the main stages of repair without removing parts
Car body repair is always a troublesome task. At one time we already talked about how this event can be significantly simplified by using PDR technology. But it is suitable only when the paintwork is not damaged. Today we will tell you how to use local painting technology to eliminate minor defects associated with damage to the paintwork.
Just let’s define right away what local repair is. Many people mistakenly think that there is a painting of the entire car, but there is a local painting, that is, painting of only one of the body elements. This is wrong. Local painting is the restoration of the paintwork of not a body element, but only a part of this element. That is, if your bumper bumped into an obstacle, your fender scraped against a post when leaving the parking lot, a supermarket cart hit you on the door or trunk lid - in all these cases, you can only paint the damage itself. But why this method is better than taking and painting the entire element, let’s figure it out.
Let's start with the fact that this method is much simpler and faster than painting the entire element. Judge for yourself. There is no need to waste time dismantling certain parts present on this body element, just as there is no need to remove the element itself. For example, in order to paint the entire front bumper, you will have to remove not only it from the car, but also the license plate, fog lights, moldings, radiator grille, headlight washers, etc.
The bumper will have to be completely matted, degreased, primed, sanded, degreased again, and only then painted and varnished - in general, you will spend a lot of time on it, despite the fact that the damage itself can be the size of a matchbox. As a result, it will take several days to completely repaint the element and return it to its place, but to carry out local painting it only takes a few hours.
The economic component of this event should not be neglected. Why would you spend money on extra paint and other consumables “for the whole element” if you can get by with only the necessary amount for touch-up? And preparing to paint the entire body part, and not just the “contact patch,” will be much more expensive.
Local painting, if done by professionals, reduces the resale value of the car significantly less than having it “dropped” if the buyer figures out that something has been painted entirely. After all, a car with a factory coating on the secondary market is valued more than a “coating”.
It should also be borne in mind that sometimes the cost of local painting does not exceed the deductible, and therefore there is no need to contact the insurance company to receive funds for repairs. In addition, this will save you a lot of money when you subsequently conclude an insurance contract, because you had no claims under the previous contract.
And so that you know how this is done and do not blink when you are offered this type of paint restoration, we will briefly describe the main stages of this repair.
First of all, the car, of course, is washed. Taking a dirty car to work is bad manners for real professionals. After the bodyworker has completed the preliminary restoration of the element, the painter takes over it. The damaged area is covered with the original paint. How far the workplace will “extend” beyond the boundaries of the damage is decided by the painter. As a rule, this is 5–10 cm. Damage is considered “successful” if it borders on the stiffeners, then work is carried out without going beyond their boundaries. Subsequently, this will simplify the task of visually masking the transition of paint from the repair site to the non-repaired area. If this is not possible, the master determines the boundaries based on highlights in entire areas. They make it possible to understand whether the “neutral territories” are affected by the preliminary repair or not, and if they have minor changes in geometry, they are also puttied and painted.
After pasting, the painter begins to remove the old paint. A prerequisite is the complete removal of the old paintwork directly at the repair site, even from the smallest recesses. This is done in order to subsequently avoid detachment. How tightly this or that “lake” fits after straightening is unknown, therefore, everything needs to be removed down to the metal, otherwise the new paint will come off the body from the old one.
Next, the repair site is putty, and this is done with quite a lot of force on the spatula in order to squeeze out, if possible, all the air bubbles and thereby eliminate possible shrinkage of the putty in the future. After drying, the putty is sanded in a circular motion with coarse sandpaper. The smoother the surface becomes, the finer the sandpaper grit should be used. Moreover, the sanded area should also include some of the original paint that was not affected by the repair. In the future, the soil will lie better in this place and thereby improve the adhesion of the new paint to the factory one.
After the surface has been perfected, washed and blown with compressed air, it is primed. After the soil has dried, the surface is sanded again to remove shagreen. Then they start painting. The first coat is dusted, followed by a thicker coat of paint. Each subsequent layer comes with a slight overlap of the first. Usually painting occurs in two or three layers. After the layers of paint have dried, the dust from the “clean” parts is removed with a special napkin, and the transition area is treated with a so-called “transition” solvent, which blurs the boundaries of the transition, making them invisible. If the color is metallic, then after the “base” has dried, it is covered with varnish with a slight approach to the non-repairable surface. And so that the transition of the new varnish to the factory one is not visible, its border is “blurred” by the “transitional” varnish. After the paint (or, in the case of metallic, varnish) has dried, the surface can only be polished, and the local painting is considered complete. As a result, with an ideal color selection, only a specialist will be able to find the place of repair, and even then with difficulty.
The use of modern consumables and infrared drying lamps allows you to spend about 4–6 hours on repairs using this technology. As for the price for local painting, it is now in the range of 3,000–5,000 rubles, depending on the area of repair. By the way, if the “wound” occupies more than 30% of the area of the part, then it makes sense to think about completely repainting it. Otherwise, LAN becomes unprofitable.
How to remove old paint from a car. Three options for solving the problem.
If you plan to restore the paintwork of your car, then in any case you will need to remove the old paint from the car. Of course, if the old layer of paint holds well, then you can leave it, only matte the surface and apply a primer. But both with complete and local paintwork repairs, you will in any case need to clean the car of paint, and if you plan to do everything yourself, then without knowledge of all technologies it may take you a lot of time and effort at this stage of work. We will try to offer you some of the most effective solutions to this issue.
What is needed to carry out the work?
Tools and consumables will largely depend on the method you choose for removing the coating from the car body, as well as on the type of part that you plan to restore, whether it be wheels or a car bumper. But there is a basic set that you will need.
- Personal protective equipment. Goggles, gloves, respirator and protective clothing.
- Grinding machine and abrasives grades P220 and P400.
- Water.
- Spatula.
- Brushes.
- In some cases: paint remover, sprayer with compressor, etc.
You will also need detergents to pre-clean the surface from dirt and dust.
Basic ways to remove paint from a car
Based on their technology, there are three main approaches on the market: chemical, mechanical and thermal.
Each method has both pros and cons. In order to use the chemical method, you will need to buy paint remover and a brush to apply it to the surface of the car body. You will also need a spatula.
When machining, a grinding machine and abrasives of various sizes are used, sometimes sandpaper with a block to remove the coating in hard-to-reach places.
For heat treatment, you will need a good industrial hair dryer or blowtorch complete with a scraper and a stiff metal brush.
Chemical method
This is one of the effective options for removing paint from a car. Its essence is simple, you apply the material to the surface with a brush, wait 10 - 20 minutes and then use a scraper to remove the old layer of paint. After you apply the chemical composition to the problem area of the body, its reagents will begin to destroy the enamel resin and it will begin to move away from the metal surface.
There are two types of such paint remover:
- Organic product based on turpentine and acetone. It dissolves the dried film of paint and makes it possible to remove it with a scraper.
- Acidic or alkaline composition. It contains aggressive components that corrode the paintwork.
There are also cases when formic or phosphoric acid is used to clean paint from a car. Chemical compounds are often used to remove paint in hard-to-reach places where it is impossible to reach with a grinding machine.
Remember about personal protection when working with chemicals; do not allow this material to come into contact with the skin or other parts of the body. To do this, use goggles, gloves, a protective suit and a respirator.
If you locally need to remove a small area of paint, then for these purposes you can use white spirit, solvent No. 648 or R-4.
Work technology:
- We put on protective equipment.
- We dismantle plastic and rubber linings that may be damaged by exposure to chemicals. Cover the glass with film.
- Using a brush, apply the product to the car body.
- Wait the period specified in the instructions, usually 10 - 20 minutes, and remove the paint layer with a spatula.
- For those areas where paint remains, you can repeat the procedure or clean it with a sanding machine.
- Washing the car body with water.
At this point all work is completed.
Mechanical method
This is a more labor-intensive option for removing acrylic paint from a car. To implement it, use a grinding machine and, in rare cases, for local repairs, sand the surface manually using sandpaper.
The technology of work is as follows:
- We put on personal protective equipment, including a respirator.
- Remove the old paint layer using a sander with abrasive P
- We sand the surface again with P400 abrasive.
- In hard-to-reach places, paint can be removed either with sandpaper or chemical compounds.
- Surface washing.
Mechanical methods for cleaning old paintwork include sandblasting, which uses a compressor and a sprayer that supplies air with sand under high pressure and thus, acting on the car body, removes a layer of paint.
Thermal method
This is another option for removing paint from your car.
Typically, the surfaces to be treated are removed from the body, all plastic linings are removed from them, and under the heat of an industrial hair dryer, gas torch or blowtorch, the paint layer is heated and then removed with a scraper. The technology looks like this:
- We put on protective equipment.
- We dismantle the part itself and all the plastic and rubber linings.
- We heat the surface in strips of 2–5 cm and immediately remove the old material using a spatula.
- Car wash
At this point, the heat treatment is completed, and you can proceed to the next steps.
What about plastic?
In addition to the metal elements of the car body, the task is often to remove paint from plastic parts, which also need restoration.
In this case, both chemical compounds and heat treatment will not suit you. The only solution is a mechanical cleaning method. But there are moments here too. It is better to scrape off the material manually in order to control the depth of removal and prevent heating and damage to the plastic itself when working with a sander. Do not use an angle grinder for these purposes; it has high speeds and due to heating it can melt the plastic.
That's all, we've looked at the most commonly used methods for cleaning old coatings in practice. What method did you use? We look forward to your comments below.
General description of technology
When faced with paintwork damage, not everyone knows how to properly paint over chips. First, you need to understand how serious the damage is: a shallow defect, which can be removed with polish or a special pencil, or a deeper chip. Secondly, it is important to choose the right material. If the technology is followed, the chip site will be invisible.
The process of painting a chipped area after preliminary preparation
If a chip or scratch is deepened, then the restoration process involves several stages:
- A layer of soil is applied to the prepared area.
- After the primer has dried, you can begin applying paint.
- The final stage is the application of varnish, which allows you to completely hide the defects, as well as make the repaired area completely identical to the rest of the surface.
- Applying wax will give the entire car an even shine.
Minor scratch
If you decide to touch up chips on your car yourself, prepare some simple materials and tools. You can remove a small, shallow scratch using a soft art brush. It is suitable for applying varnish and enamel.
You can also use a special pencil for touch-up. It costs about 150 - 200 rubles. The color palette allows you to choose a shade for almost any car.
Pencil for masking small scratches
There are also factory kits for touching up chips and scratches. Their main advantage is an exact match to the body color. In addition to a small bottle of paint, such a set contains varnish. This allows local repairs to be carried out with the highest quality possible and without visual differences. Such a kit will cost around 1000 rubles.
If the damage to the paintwork is deep, then you should follow a certain algorithm:
- Prepare the surface for work.
- Apply a layer of primer in the area of the recess and allow it time to dry completely.
- Sand the surface.
- Paint the area and apply varnish.
Fresh small chip
To carry out partial body repairs, it is necessary to select materials that completely replicate the main factory paintwork. If the vehicle is painted with acrylic enamel, a similar shade and paint should be used.
This is what abrasion on paintwork looks like
Things are more complicated with the selection of metallic paint. Even after polishing, the difference in shades is often noticeable. If the driver is satisfied with this picture, you can repair the chip yourself. The painting process consists of several stages:
- The area in need of repair is covered with tape. Be sure to paint it so that there are no marks.
- Using sandpaper R 1500 or R 2000, the area and edges of the chip are sanded to a matte state.
- The enamel is carefully applied with a brush. It should dry completely within 10 hours. If you use an infrared lamp, the drying time can be significantly reduced.
- The painted area is rubbed down with R 2000 abrasive.
- The treated area is thoroughly polished, the masking tape is removed, and the entire body part is completely sanded. This allows you to make the paint transition as invisible as possible.
With the correct selection of paint and adherence to repair technology, you can achieve the best result, which will not be noticeable during visual inspection. With metallic you will have to tinker longer.
Final polishing process
Deep chip with rust stains
Such damage occurs as a result of stones falling into the car, flying out from under the wheels of the vehicle in front. A deep chip leads to damage to the paintwork down to the metal, which causes the formation of pockets of corrosion. It is not advisable to repaint the entire part. As an alternative, we can consider local painting of the element with a transition.
If there is a dent, it can be removed using universal automotive putty, and then sanded until a perfectly smooth surface is achieved.
We turn to specialists to remove someone else's paint from the body
One of the most correct options for removing foreign paint from the body of your car is to contact a specialized auto repair center. This could be a universal service station or a specific body center. In such places, specialists know very well what to do with any damage to your car. Foreign paint will be removed with special polishing wheels and unusual polishes. This will be the softest for paintwork and the most effective way to get the most positive result. Among the important features of the process of professional removal of foreign paint from your car are the following details:
- study of damage that needs to be repaired professionally;
- deciding on the most harmless paint removal methods for paintwork;
- implementation of the first steps to remove the paint, recording the results; based on experience, making other decisions to completely neutralize the damage; polishing the damaged area with special polishes to achieve the desired effect;
- bringing the entire body part to the required visual quality;
- if necessary, preparing and painting parts of the body part.
As you can see, our specialists offer a full range of services to remove various damages from the body of your car. This will allow you to both neutralize small problems and work with significant difficulties. As a last resort, professionals will simply remove all the paintwork from the part, and then paint this part with a preliminary high-quality selection of paint. Such repairs may be the most expensive, but will help eliminate absolutely any damage caused by foreign paint. In other cases, removing paint from the body may leave its own traces. This is a very important point that stops many car owners from carrying out body restoration processes on their own. We invite you to watch a semi-joking video with practical tips for removing paint from a car body:
Emergency option using scrap materials
If the chip was received on the way, and there is no time to eliminate it using technology, but you do not want pockets of corrosion to appear, then you can use auto plasticine or simple tape. The damaged area is simply sealed with the specified materials. This allows you to protect the part from moisture and further damage until the owner has time to restore the paintwork.
Autoplasticine is an emergency measure if you can’t paint over a deep chip in the near future.
Very often we touch up chips on cars with our own hands. This avoids the need for expensive body repairs. By following a number of simple steps you can eliminate:
- a small, shallow scratch;
- fresh small chip;
- deep chip with rust spots;
- make an emergency using available means.
As a result of local repairs, the attractive appearance of the body and the integrity of the paintwork will be completely restored.