Why does the gearshift lever rattle on Kalina?
The main reason for this problem lies in the very design of the attachment of the lever to the rod. To put it mildly, it is not perfect, but it can be corrected at minimal cost and in just a few minutes of time.
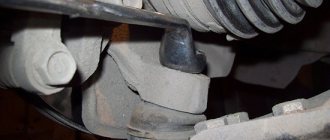
So, first you need to lift up the lever casing, and then unscrew the fastening nut, which is already shown in the photo below almost completed:
When the bolt is removed, we also remove all the washers and the metal sleeve. And this whole damn thing looks like this in parts:
So, the reason for the rattling is that when connecting this entire structure, a small gap appears between the parts, which is the source of strong vibration.
To achieve a smaller gap, it is necessary to slightly grind off the metal bushing, which prevents these washers from being compressed more tightly. I would like to warn you that you need to grind very carefully and very little, literally 1 mm. If you overdo it, then the lever will move with very great effort.
As a result, after connecting the bushing with washers into a single structure, as was shown first, we get a picture when this gap has decreased:
I messed up a little and sanded a little more than necessary (which I warned about above). As a result, when the fastening nut is tightly tightened, the lever moves tightly when switching. But I loosened this nut a little, literally half a turn - it shouldn’t come off!
When everything was done, I started the car and gave good speed, and there were no sounds from the lever. But to be sure, I decided to take a ride. I accelerated to about 70 km/h in third gear and left the gas pedal. Previously, in this situation, the rattling was simply terrible, and the only salvation from this was a hand on the lever! Now there is not a single hint of extraneous sounds or vibration.
Anyone who has not yet eliminated a similar defect on their Kalina can use this advice, just grind the bushing minimally. It’s better to improve it a second time than to screw it up the first time!
Below is material from an old article that talks about a similar problem, but it is easily solvable and is a thing of the past!
Many owners of the Lada Kalina very often have the following problem: when accelerating, as well as when braking the engine, the gear lever begins to rattle. A similar problem arose with my Kalina after about 15,000 km of operation.
At first, these extraneous sounds did not irritate me much, but every day the rattling of the gearbox lever became stronger, and to be honest, it’s not very pleasant to listen to it every day. I decided to tackle this issue. So, eliminating the cause can occur in different ways, depending on the complexity of the problem.
Fortunately, in my case it was enough to pry and remove the upper cover of the lever, on which the gearbox diagram is extruded. It is better to pry off this cover with a thin screwdriver so as not to damage the plastic parts. After we managed to remove it, we wrap its inner circle with a thin strip of electrical tape and insert it back. After this, this lid fits much tighter and does not rattle.
Of course, there are other sources of extraneous sounds, but for me everything worked out as simply and quickly as possible. The picture above shows exactly what needs to be wrapped with electrical tape.
In this article I will talk about possible causes and malfunctions due to which the reverse gear on the Lada Kalina does not engage. You will also learn how to find and fix a malfunction in the reverse gear locking mechanism with your own hands.
- Before you start drastic actions and disassemble “anything and everything”, check the gear shift lever itself, this may be the reason. The linkage and cardan are quite often the cause of this breakdown. The splines could also be worn out or the clamp loosened. In this case, you will need an inspection hole.
- A faulty release bearing is an option. Although it is unlikely, since in this case all gears without exception would be engaged with a characteristic crunch and with great effort.
- Reverse gear may stop engaging due to problems in the reverse gear locking mechanism; in order to confirm or refute this, remove the gear shift knob along with the dashboard between the seats and perform a visual inspection.
Eliminating rattling gearshift lever
I decided to update an existing article that was written more than a year ago. In that case, the rattling of the gearshift lever was not particularly strong and was eliminated quite simply, which will be written about at the very bottom.
In the meantime, I want to give a short instruction on how to eliminate lever rattling on Kalina. For this I needed the following accessories:
- Open-end wrench or socket wrench 13
- Pliers
- Electric sharpener
REQUIREMENTS AND SUGGESTIONS
Figuring out what and how we could improve, we agreed on one thing: not to touch the gear part, namely the shafts, gears, and synchronizers. Otherwise, huge financial costs will be required to launch a new gearbox into production - without high-precision equipment, it will not be possible to ensure the proper quality of engagement, operation and synchronization.
Main elements of the VAZ-2181 gearbox:
2 - secondary shaft;
4 — fifth gear fork;
6 — reversing light switch;
8 — gear shift mechanism;
SYNCHRONIZER
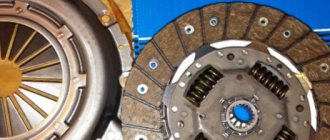
The first samples were equipped with a three-cone synchronizer. But calculations have shown that double-cone, cheaper ones, can withstand the required torque with a margin (see pictures). Among other advantages, they made it possible to get rid of the problematic cone on the gears of the first and second gears, which is in contact with the synchronizer ring and requires high precision in manufacturing. The ring set now creates two friction surfaces for smooth and efficient synchronization. In addition, the German manufacturer (Ho¨rbiger) applies an additional coating to the intermediate ring, which reduces wear and ensures stable operating parameters, including the required coefficient of friction.
Structure of VAZ-2110 (A) and -2181 (B) gearbox synchronizers:
2 — intermediate rings;
4 — synchronizer clutch;
6 — clamp;
SWITCH MECHANISM
The new mechanism is a separate module. It can be installed last and removed if necessary without disassembling the box. This is technologically advanced not only in production, but also in repair. Already at the concept stage developed by the VAZ team, a selector grill appeared in it, clearly repeating the gear shift pattern and setting the lever stroke when selecting gears. The mechanism includes a lock against accidental reverse gear, which is only accessible from neutral.
The characteristics of the mechanism were selected on the original simulation stand. The tester sits down on the seat and begins to go through the gears, while the automatic system imitates the shift pattern, forces and lever strokes implemented on a specific production car. You can also upload your own settings. Don't like an overly tight lever? A couple of taps on the keyboard and the effort is reduced. So, step by step, we selected the optimal settings for the “eighty-one”. The computer processed the data and produced parameters for constructing an accurate mathematical model, according to which those very tricky central plates were made.
ROPE DRIVE
The single-rod gear shift drive was replaced by a cable. The unpleasant vibrations on the lever are gone, there is less play, and shifting is clearer.
Lightweight aluminum German gear forks are equipped with anti-wear shoes made of plastic. Previous parts were cast from steel, and to reduce wear, a bronze layer was applied to individual parts, which wore off over time and tinted the oil with golden powder.
VAZ-2181 is the first AVTOVAZ gearbox for which a computer calculation of all parts subject to loads was performed: crankcases, forks, levers, etc. Thus, the design was not only optimized, but also made more reliable.
1 — gear selector levers;
3 — selector grid;
5 - central three-dimensional plate.
Repair, features and technical specifications
Inside a VAZ 21118 car, like any other, there is always a gearbox. For a model such as Kalina 1118, this device is a mechanical type design, which is equipped with one reverse stage, as well as 5 forward stages.
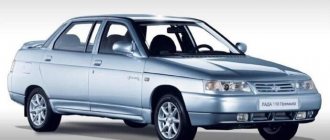
Gearbox from Lada Kalina.
In Lada Kalina, the gearbox is structurally combined with a differential, the main gear. Transmission differential repair should also take this into account.
The mechanism body of the VAZ Kalina car is presented in the form of three aluminum copper crankcases:
Special sealants are applied between them when assembling and repairing the gearbox.
Gear selection mechanism for VAZ 1118, VAZ 2190 gearboxes
Dear customers, in order to avoid errors when sending the gear selection mechanism for the VAZ 1118 gearbox, please indicate your car model and year of manufacture in the “Comment” line.
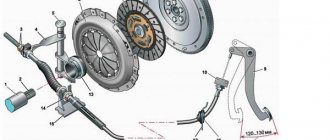
Any car of the VAZ family has a gear shift mechanism, which consists of a gear shift lever, a ball joint, a rod, a gear selection rod and a gearbox.
The gearbox is designed to change the torque developed by the engine in order to obtain different traction forces on the drive wheels when starting the car, accelerating, moving and overcoming road obstacles; changes in vehicle speed and direction; the possibility of driving the car at low speeds, which cannot be provided by the engine, and disconnecting the engine from the transmission for a long time when parked or when the car is moving by inertia (coasting).
The VAZ 1118 gearbox is a two-shaft, five-speed gearbox, which is combined with a differential and a main gear, and is activated by a lever located in the car's interior.
The gear shift mechanism is used to change gears in the box and is controlled by the driver using a lever from inside the car. To prevent spontaneous gear disengagement, a reaction rod is introduced into the gearbox control drive, one end of which is connected to the power unit, and a ball joint clip is attached to the other end.
The gear selection mechanism is made as a separate unit and is attached to the plane of the clutch housing.
1 – gear selection lever (forward); 2 – guide axis of locking brackets; 3 – axis of the gear selection lever; 4.11 – spring; 5 – retaining ring; 6 – reverse fork axis; 7.12 – blocking brackets; 8 – reverse fork; 9 – gear selection lever (reverse); 10 – gear selection mechanism housing
In the housing 10 (of the gear selection mechanism, two axles are mounted. On axis 3 there is a three-arm gear selection lever, two locking brackets 7 and 12. The other axis 2 passes through the holes of the locking brackets, securing them from turning. The gear selection lever arm 1 is used to engage gears forward gear, lever arm 9 is for engaging reverse gear, and the third arm is acted upon by the gear selector rod lever. A fork 8 for engaging reverse gear is installed on axis 6.
The oil level in the gearbox (gearbox) of VAZ 1118, VAZ 2190 should always be “at level”. After all, even a slight drop can ruin fifth gear. A gearbox is not an engine; the oil in it does not “burn” and disappears only due to leaky seals.
Technical features of the gearbox
The drive gear block is engaged by the input shaft. This is important to consider when repairing a gearbox. As for the input shaft itself, a constant clutch is created for it with the front gear elements that perform similar functions.
When repairing the secondary shaft, we must remember that it has a hollow structure. It is thanks to this that the oil reaches the driven gears without any problems.
Inside the mechanism you can also find driven bearings and synchronizers. When replacing the backstage on your own, this part can also be replaced. This also requires repairing the gearbox driveshaft.
The design of the gearbox is such that repairs cannot be done without the use of special circuits. In this case, the radial clearance on the roller bearings is no more than 0.07 millimeters.
Repairing the gearbox is also a rather complicated process. Especially considering that 0.04 millimeters should not exceed the same figure, but for ball analogues.
Location of the checkpoint backstage on the Lada Kalina.
The oil sump is responsible for supplying oil. It is located in the area of the front bearing, fixed behind the output shaft. Major repairs often affect such details. If you select the desired thickness of the rings, it will be possible to adjust the tension indicator. The dimensions of the seals are easy to find in the instructions; these parts can be replaced without problems, even at home.
When repairing the gearshift knob, you must remember that the driven gear of the gearbox on this machine is attached to the differential flange. Through the saloon, the atmosphere is combined with the box itself, located at the top of the structure we are considering.
Lever repair is not the only operation that needs to be carried out from time to time. Sometimes it is necessary to replace bearings; this is done when extraneous noise appears. A gearbox repair kit must be purchased if excess noise becomes noticeable when pressing or releasing the clutch pedal.
All control drive elements of the Lada Kalina gearbox.
The repair manual says that the box is controlled using a drive, which consists of several elements:
- Switch rod.
- Spherical bearing.
- Lever arm.
According to the manual, cable structures are always equipped with jet traction, then the gears do not turn off on their own. One of the ends of the rod is connected to the lever, and the other to the motor. If the seals of the internal joints are faulty, it is necessary to carry out independent repair of the gearbox. But before replacing them, you need to completely change the oil. The front wheel drive is completely disconnected.
Servicing the gearbox involves using a screwdriver to remove the necessary parts. But you will need to purchase a mandrel with the necessary parameters in order to carry out the pressing.
Three axes are present on the shift system. One axis is equipped with a three-arm lever for selecting and disengaging gears. There is no gearbox on the second axle, but there are brackets that block rotation. After every 75 thousand kilometers, this design is completely changed. Gearbox lever play should also alert you, as should failure of other parts.
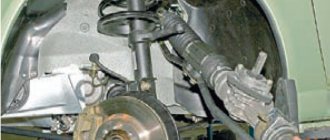
Installing a gearbox driveshaft from Kalina
This is a popular modification, which consists of installing a backlash-free cardan from Kalina on the VAZ 2110 , which is installed on the gearbox rocker.
Since the cardan is a hinge without play, it helps to reduce the lateral travel of the lever, and the clarity of gear engagement also increases. What other changes can you expect after such tuning? The correct name for the cardan shaft from Lada Kalina is: Gearbox control drive rod joint (without backlash). Catalog number 1118-1703160. In common parlance - a glass. The price is about 350 rubles.
A video that makes it clear what the difference is between the standard VAZ 2110 universal joint and the Lada Kalina joint :
Removal and installation of the gearbox
Servicing the gearbox assumes that the mechanism will have to be removed and its position changed. Before doing this, you need to install the vehicle itself on the lift. The ignition must be turned off completely and the parking brake must be used.
How to repair a gearbox? To do this, disconnect the minus terminal from the battery. The hood must be opened completely. Any manual on gearbox repairs writes about this.
The oil filler cap is also removed. It is necessary to install the previous item after the screen is removed. The gearbox requires loosening the clamp responsible for fixing it. The inlet pipe hose must be disconnected from the corresponding sensor. Gearbox lever play requires the same actions in practice. Then you need to unscrew the air intake nut.
The repair progress further depends on the specific malfunction.
Gearbox Lada Kalina after dismantling and disassembly.
The gearbox can be installed in its original place after the 1st speed repair is completed. SHRUS-4 lubricant is applied to the outer surface of the corresponding bushing in the clutch in a very thin layer. This will also help if the gearbox is loose. The pin fixing bolts are removed from the steering knuckles.
Wear of the box and fastenings
Often lever play occurs due to a faulty box. Most often this is due to the fastening of the scenes. When the mechanical part wears out, the free play of the rocker and, accordingly, the lever increases. Often this problem first appears in some gears, but over time it spreads to all speeds. Therefore, if play appears, make sure that the gearbox is in good condition. If necessary, repairs will need to be made.
If the lever does not dangle, but at the same time during movement it vibrates, making a rather unpleasant sound. The reason is most likely in the mountings of the pillow. If they are damaged, the gearbox begins to vibrate. Which in turn is transmitted through the scenes to the lever. This can be treated by replacing the box mounts.
. There are not many reasons for lever play. Some of them are created by the drivers themselves. For example, replacing the original lever with a part from another model. There are several answers to the question of what to do if the gearshift lever on a VAZ 2109 and 2110 is loose. How to fix a problem in a particular case depends directly on the reasons that caused it.
How to remove the gearbox
The fork fixing bolt and nut must be unscrewed after the input shaft stopper has been removed. The same thing will have to be done if it is necessary to replace the short-throw gearshift link.
The spline must be removed from the secondary shaft. The box assembly diagram assumes the reverse procedure.
Removing the gear shift mechanism drive may be necessary when replacing faulty parts (for example, to replace a torn drive rod boot, damaged drive rod). The sequence and number of operations indicated below can be changed depending on the purpose of the work.
To complete the work, you will need an assistant, as well as an inspection ditch or overpass.
Removal and disassembly
1. We prepare the car for work.
2. Clean the threads of the clamp bolt with a wire brush. We treat the junction of the rod with the hinge and the bolt with penetrating lubricant.
3. 13 mm wrench , loosen the tightening of the clamp bolt nut.
4. Unclench the clamp with a screwdriver and move it along the rod. Unclench the rod with a screwdriver.
5. After wiping the junction of the rod with the hinge with a rag, we mark the relative position of the drive rod and the hinge.
6. Disconnect the rod from the hinge.
7. Disconnect the torque rod from the base of the ball joint of the gear shift lever.
8. Inside the car, use a thin slotted screwdriver to remove the plug from the gear shift lever handle.
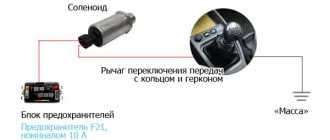
9. 13 mm socket wrench , unscrew the nut securing the handle bolt and remove the handle from the gear shift lever.
10. Using a screwdriver, we remove the cover from the floor tunnel lining and turn the cover inside out.
11. Disconnect the wiring harness from the reverse lock solenoid switch.
Loosen or cut the plastic clamp.
12. Remove the switch from the gear shift lever.
13. Remove the floor tunnel lining.
If necessary, you can unscrew the four bolts securing the gearshift lever support to the body (see below) and remove the drive assembly.
14. 13 mm wrench , unscrew the nut of the bolt securing the linkage to the lever, holding the bolt from turning with a second wrench of the same size.
15. Remove the bolt from the lever. We remove the lever from the traction fork. We remove the metal and plastic washers, take out the metal spacer sleeve.
16. To compress the drive rod, lubricate it with soapy water and remove it from the hole in the cover.
17. 13 mm socket , unscrew the three bolts securing the bracket to the body.
We unscrew the fourth bolt securing the bracket with a spanner of the same size (access to it from above is blocked by the air duct).
18. Remove the bracket and drive rod cover. We replace the torn cover.
19. We remove the gear shift lever support from the hole in the floor tunnel.
20. Use a puller to compress the locking ring of the ball joint of the lever and remove it from the base of the support.
21. Remove the lever from the base of the support.
22. Using a screwdriver, remove the top sealing ring.
23. Remove the support from the lever.
Assembly and installation
We assemble and install the drive in the reverse order. Before tightening the gearshift mechanism drive rod clamp, adjust the drive (see below).
Adjustment
1. We loosen the tightening of the drive rod clamp of the gear shift mechanism (see paragraphs 2-4 above).
2. We lift the lower part of the gear shift lever cover (see point 10 above).
3. We move the gear shift lever so that its lower part is perpendicular to the floor surface, and the lever handle is located from the right seat cushion at a distance approximately equal to 1/3 of the distance between the front seats and hold it in this position. In this case, the assistant, moving the clamp 2-3 mm from the end of the rod, tightens the clamp nut.
4. We install the cover in place and, by trying to engage the gears, make sure that the gear shift mechanism drive is working.
VAZ 2114 rocker repair - How to adjust the rocker on a VAZ 2114, varieties, repair
In order for the vibration of the VAZ 2114 gearbox handle to cease to exist, you need to have a couple of tools in reserve:
- Socket wrenches 13 and 10
- New drawstring cover
- Overpass or pit in the garage
- A smart friend who will help you tune the stick
- You can stock up on thread locker, but you can do without it (this thing is attached to the side of the box itself).
It will take a little time, about half an hour to eliminate troubles and the same amount to adjust.
First way
Progress of the adjustment process:
- Sketch, remember, remove or measure, but make sure that after installation everything is in its place: namely, at a certain distance from the passenger and the console.
- Now you can crawl under the car and begin to unscrew the fasteners for inserting the bushing into the lever tube (also called the rocker) using a 13-socket, and remove the lever.
Backstage VAZ 2114
- Then, remove the cover from the cross. Be prepared for oil to pour out. You can put the container in advance if you really feel sorry for him. Then pour it back. Well, unscrew its fasteners to remove it.
Drawstring without cover for VAZ 2114
- That's it, now we need to install a new clamp - this is the bolt that secures the cross. You can, of course, clean and tighten the old one, but it is not so expensive that you need to save on it. And new things always inspire greater confidence in the future.
We will put the actions in the opposite direction with some deviations:
- After putting the stick in place, inserting the bolt and tightening it, putting the cover in place, you need to engage 4th gear. This will drive the bushing into place - into the rocker (lever).
- Then, put it in neutral. This is where a friend comes in handy: he places it, and you tighten the fasteners. At this moment, you can adjust the position of the stick, move it in the desired direction under you.
- Well, then try the result. If you are not satisfied with how the gear knob is positioned on the VAZ 2114, you need to bring the adjustment to fruition.
Second way
The second reason for the rattling is the bushing, which is located on the lever itself. In order to get rid of this nasty sound you just need:
- Open-end or socket wrench 13
- New bushing
- And a little patience
The process itself will also take no more than half an hour. The work itself will have to be carried out in the interior of your car. The action plan is:
- To get to the bushing, you need to remove the skin from the gear knob.
Gearbox lever VAZ 2114
- Using the wrench you have, unscrew the nut and pull out the bolt.
Unscrew the nut on the VAZ 2114 gearbox lever