Car Repair Instructions
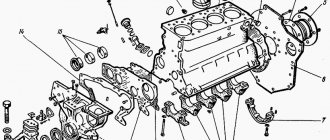
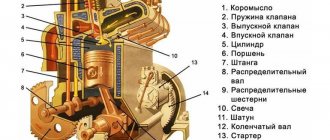
Crank mechanism.
1. Connecting rod cover; 2. Bolt securing the connecting rod cover; 3. Connecting rod; 4. Piston; 5. Thermostatic piston plate; 6. Oil scraper ring; 7. Lower compression ring; 8. Upper compression ring; 9. Expansion spring; 10. Piston pin; 11. Connecting rod bearing shell; 12. Thrust half rings of the middle main bearing; 13. Main bearing shells; 14. Channels for supplying oil from the main bearing to the connecting rod; 15. Crankshaft rear oil seal holder; 16. Rear crankshaft oil seal; 17. Pin for TDC sensor; 18. Mark (hole) TDC of the pistons of the 1st and 4th cylinder; 19. Scale in the clutch housing hatch; 20. Mark VM-G of pistons of the lth and 4th cylinders on the flywheel rim; 21. Washer for flywheel mounting bolts; 22. Clutch locating pin; 23. Flywheel toothed rim; 24. Flywheel; 25. Crankshaft; 26. Plug for crankshaft oil channels; 27. Front crankshaft oil seal (pressed into the oil pump cover); 28. . Camshaft drive toothed pulley; 29. Generator drive pulley; 30. A. Marking of the piston category by the hole for the piston pin; 31. B. Marking of piston class by outer diameter; 32.S. Marking for repair piston size; 33. D. Alignment mark; 34. I.Marks for setting ignition timing; 35. II.Marking of the crankshaft main bearing caps (supports are counted from the front of the engine).
The crank mechanism serves to convert the translational movement of the piston under the influence of the expansion energy of fuel combustion products into rotational movement of the crankshaft. The mechanism consists of a piston with piston rings and a pin, a connecting rod, a crankshaft and a flywheel.
Piston 4 is cast from high-strength aluminum alloy. Since aluminum has a high temperature coefficient of linear expansion, to eliminate the risk of the piston jamming in the cylinder, a temperature-regulating steel plate 5 is poured into the piston head above the hole for the piston pin.
Pistons, just like cylinders, are sorted into five classes based on their outer diameter:
| Class | Piston diameter VAZ 2108/21081 | Piston diameter VAZ 21083 |
| A | 75,965-76,975 | 81,965-81,975 |
| B | 75,975-75,985 | 81,975-81,985 |
| C | 75,985-75,995 | 81,985-81,995 |
| D | 75,995-75,005 | 81,995-81,005 |
| E | 76,005-76,015 | 82,005-82,015 |
The piston diameter can be measured to determine its class only in one place: in a plane perpendicular to the piston pin at a distance of 51.5 mm from the piston bottom. In other places, the piston diameter differs from the nominal one, because The outer surface of the piston has a complex shape. It is oval in cross section and conical in height. This shape makes it possible to compensate for the uneven expansion of the piston due to the uneven distribution of the metal mass inside the piston.
Annular microgrooves up to 14 microns deep are applied on the outer surface of the piston. This surface promotes better piston break-in, as oil is retained in the microgrooves. At the bottom of the piston pin bosses there are holes for oil to pass to the piston pin. To improve lubrication conditions, two longitudinal grooves 3 mm wide and 0.7 mm deep are made in the upper part of the pin holes, in which oil accumulates.
The axis of the hole for the piston pin is shifted by 1.2 mm from the center plane of the piston towards the location of the engine valves. Thanks to this, the piston is always pressed against one cylinder wall, and knocking of the piston on the cylinder walls when passing through TDC is eliminated. However, this requires installing the piston into the cylinder in a strictly defined position. When assembling the engine, the pistons are installed so that the arrow on the top of the piston points toward the front of the engine.
By weight, pistons are sorted into three groups: normal, increased by 5 g and decreased by 5 g. These groups correspond to markings on the bottom of the piston: “G”, “+” and “-“. On an engine, all pistons must be of the same mass group in order to reduce vibration due to unequal masses of reciprocating moving parts.
Spare parts are supplied with pistons of nominal sizes of only three classes: A, C and E. This is enough to select a piston for any cylinder during engine repair, since the pistons and cylinders are divided into classes with some overlap. For example, a class C piston may be suitable for class B and D cylinders. The main thing when selecting a piston is to ensure the required installation gap between the piston and the cylinder -0.025-0.045 mm.
In addition to nominal size pistons, repair pistons with an outer diameter increased by 0.4 and 0.8 mm are also supplied as spare parts. The heads of the repair pistons are marked in the form of a square or triangle. A triangle corresponds to an increase in outer diameter by 0.4 mm, and a square by 0.8 mm.
Piston pin 10 is steel, tubular in cross-section, pressed into the upper head of the connecting rod and rotates freely in the piston bosses. According to the outer diameter, the pins are sorted into three categories every 0.004 mm, corresponding to the categories of the pistons. The ends of the fingers are painted in the appropriate color: blue for the first category, green for the second and red for the third. Piston rings provide the necessary seal to the cylinder and conduct heat away from the piston to its walls. The rings are pressed against the cylinder walls under the influence of their own elasticity and gas pressure. Three cast iron rings are installed on the piston - two compression rings 7, 8 (sealing) and one (lower) oil scraper ring 6, which prevents oil from entering the combustion chamber.
The upper compression ring 8 operates under conditions of high temperature, aggressive effects of combustion products and insufficient lubrication, therefore, to increase wear resistance, the outer surface is chrome-plated and has a barrel-shaped generatrix to improve run-in.
Signs of piston wear
On average, a piston replacement on a VAZ 2109 is required every 150,000 km. The car owner should pay attention to warning signs that indicate the need to change the rings.
- The car began to require more fuel.
- Compression measurements showed a value of less than 10 atmospheres.
- There is less engine oil.
- Replacing oil seals does not help eliminate oil leaks.
The VAZ 2109 piston group is a set consisting of a piston, piston rings mounted on it, a piston pin and its fasteners. There are three grooves on the surface of the piston for rings.
Two compression rings are responsible for the tightness of the space above the piston. They maintain normal compression and also prevent oil from entering the combustion chamber.
The oil scraper is responsible for removing excess oil from the cylinder walls, thereby reducing fuel consumption. Only a film a few microns thick is left inside the cylinder liner to lower the piston. Well, the pin, which is inserted transversely inside the piston cavity, attaches the connecting rod to the piston.
Removing the pistons from the cylinders
To carry out the work, we go to an inspection hole or overpass and prepare a set of tools:
- spanners;
- torque wrench (determines the degree of tightening of the bolt);
- mandrel for crimping rings;
- a set of feeler gauges for determining the gap.
Replacing piston rings on a VAZ 2109 begins with disconnecting the negative terminal of the battery. To provide access to the crankshaft from the pit, remove the lower crankcase cover. There is a gasket at the junction, it will need to be replaced with a new one. Using a 10mm wrench, detach the oil receiver from the main shaft cover and the oil pump housing.
Next, we detach the exhaust pipe from the bracket under the bottom. Since the bracket is also attached to the body, unscrew the fastening bolts. We bend the ends of the locking plates of the nuts that secure the exhaust pipe and the intake manifold. We unscrew these nuts, as well as the nuts on the clamp, and remove the clamp. Next, the receiving pipe and the resonator pipe must be unfastened. Access is open from below; all that remains is to unscrew the nuts of the connecting rod screws and remove the connecting rod caps so that the connecting rod can be knocked out from below.
We move under the hood. After unscrewing the nut and washer that secure the air purification filter, and unfastening the 4 clips, remove the filter cover. We take out the filter element and its housing. Then you need to disconnect the air intake hose and the pipe on the valve cover. To remove the valve covers, it is necessary to unscrew the nut securing the accelerator drive cable.
Next, remove the front timing drive cover, loosen the tension roller and tighten the belt. You can dismantle the camshaft pulley by prying it up with a screwdriver. Now your goal is to bend the rear cover away from the cylinder head so that the cylinder head comes out from under the end of the camshaft. To do this, unscrew the fastenings of the cover and water pump.
We take out the tips of the high-voltage wire of the spark plugs, disconnect the wire block from the distributor. By unscrewing two screws we remove the distributor cover with wires. To completely remove the distributor, disconnect the interfering hose from the vacuum corrector, unscrew the nuts, and remove the bracket. Then disconnect the fuel pump and carburetor hose and remove the fuel pump. Next, disconnect the thermostat hose clamps and dismantle this device.
To unscrew 10 cylinder head bolts, use a 10mm hexagon. After pulling out the bolts and washers, finally disconnect the cylinder head. We remove the sealing gasket and always replace it. We clean the upper surface of the cylinder block from oil, dirt deposits and traces of the gasket.
We move into the pit. And, lightly tapping with a hammer, remove the piston assembly with connecting rod from the cylinder. We repeat the procedure with the three remaining pistons.
Installing new rings
For ease of work, clamp the connecting rod in a vice. We use tongs or our hands to separate the locks, and then remove the 2 compression rings. Next, we dismantle the oil scraper, as well as its expander. After removing the worn elements, we clean the seating grooves from carbon deposits. Using a set of feeler gauges, we check the gaps between the ring and the wall of the corresponding groove.
For each of the rings, permissible clearance standards are established.
| Elements | Gaps |
| upper compression | 0.04—0.075 mm; |
| lower | 0.03–0.065 mm; |
| oil scraper | 0,02–0,055. |
We begin the installation with the oil scraper ring expander. Then the oil scraper itself, then the lower compression and upper ones. After this, the rings need to be “run in” along the landing grooves. They should rotate freely in their places and not bite. If there is any biting, grind the parts using fine-grained sandpaper.
When installing, you need to be very careful with the second compression ring. It is rigid, less elastic and can break. Installation of piston rings is carried out only using pliers. The lower compression ring must be installed with the chamfer facing down. If there is an inscription “TOR” or “VAZ” on the oil scraper ring and the upper compression ring, the edge with the inscription should be on top.
When installing each of the rings, first we open the lock, put on the ring, put the lock on the piston, and lastly put it on with the back of the circle. After installation, you need to set an angle of 45 degrees between the upper compression ring lock and the piston pin axis. Relative to this lock, the lock of the lower compression ring is set to 180°. We orient the last ring with the lock at 90° from the topmost lock.
Now we mount the pistons into the sleeves strictly in the direction of the arrow pointing to the crankshaft. In this case, the inner surface of the cylinder, the piston itself and the rings are lubricated with oil. Mandrels are put on the rings, and in steps of one ring the piston is tapped into the cylinder. We put the liners on the connecting rod from below, before wiping the connecting rod bed, the cover for the liner dry and lubricating it with oil. The crankshaft connecting rod journal should also be lubricated. We mount the cover on the connecting rod and tighten the nuts with a torque wrench (torque 5 kgf/m).
Then install a new gasket and put on the cylinder head cover. The bolts on the cover are tightened strictly in a certain sequence and not immediately to their full strength. Tightening occurs in four stages. The first one is tightened to a torque of 20 Nm (2 kgf/m), the second one is tightened to 69.4–87.5 Nm (7.1–8.7 kgf/m). The third step is to turn the bolts one by one by 90°. During the fourth approach, turn another 90°.
Be sure to check the length of the bolts. If it is more than 135.5 mm, replace the bolts with new ones. Having replaced the rings, attach all the parts to the motor in the reverse order.
Piston ring sizes: table (VAZ)
VAZ-produced cars are equipped with engines of the following types:
- 2101/2103/ 2105/2106 (VAZ classic);
- 21213/21214/2130 (Niva);
- 2108/21083 (VAZ 2108-09-099);
- 2111/2112 (VAZ 2110-11-12);
- 21114 (VAZ 2113-14-15);
- 11186 (Lada Granta);
- 11194 (Lada Kalina).
There are also many other modifications of internal combustion engines, all VAZ engines are four-cylinder in-line, with a total number of valves of 8 or 16. VAZ engines have several standard cylinder sizes:
For each size, a repair increase of 0.4 and 0.8 mm is provided; factories produce repair pistons and rings of the first and second repair sizes. Piston rings with a diameter of 76 millimeters are available for engines:
The first repair size of the PC for these motors is 76.4 mm, the second repair size is 76.8 mm. Pistons, as well as 79 mm piston rings, are produced for internal combustion engines:
All these motors also have two repair PC sizes - 79.4 mm (first repair) and 79.8 mm (second repair). The most common PC size is 82 mm; many modern VAZ cars use a piston group of this exact size. Piston ring diameter 82 mm can be found on engines:
The VAZ internal combustion engine also has deviations from the typical dimensions, for example, on the 11194 engine with a volume of 1.4 liters, pistons and PCs with a diameter of 76.5 mm are installed; this internal combustion engine is equipped with the Ladv Kalina. There is also a non-standard power unit 1800 cm³ VAZ-21128 with a nominal cylinder diameter of 82.5 mm, but the engine is not mass-produced by AvtoVAZ.
Functions of piston rings
Piston rings are designed to perform the following functions:
- Sealing the piston space while maintaining pressure with the upper compression rings.
- Heat removal from the walls of the sleeve.
- Reduced oil consumption.
Checking the clearance in the locks inside the cylinders
The piston ring lock is the joint between two ends that are capable of being compressed to hundredths of a millimeter. The ends have a straight or oblique cut, with a rectangular profile section.
When placing the rings in the grooves, the joints are placed at an angle of 120° (if 3), and with two rings - at 180°, which limits the leakage of gases and oil into the crankcase, under the piston.
Oil scraper rings are designed to remove excess motor lubricant from the cylinder walls. They are designed to leave a thin layer of film on the mirror, so small that it is measured in microns. The design provides radial, through slots through which the oil removed from the walls is drained into the crankcase.
Available in cast iron with slots or extensions. They represent two rings (upper, lower), a pair of radial or axial expanders.
About the thermal gap
Locks are considered a common element of the rings, since the goal is to compensate for thermal expansion during operation. Locks undergo gas pressure, temperature loads, and other inert influences. This tension is absorbed by the tiny distance between the ends of the rings.
Why is the thermal factor needed?
Let’s imagine the absence of a gap between the spans of bridges, railway rails or expansion joints on main pipelines. Solar heating and expansion, for example, of the metal of rails that do not have a gap during installation, lead to their inevitable bending with all the ensuing consequences.
In the case of piston rings, the lack of butt clearance leads to breakage of the piston.
So, the free rotation of the rings eliminates butt contact inside the piston groove. The design includes cuts to prevent jamming from overheating. This feature contributes to a tight contact with the cylinder mirror.
The permissible joint interval does not exceed 0.3-0.6 mm. With a small joint gap, for example 0.2 mm, heated parts can leave marks on the cylinder.
By the way, preference is given to parts with oblique cuts at the ends. Straight ends have a lot of pressure on the walls, which prematurely damages the liner, causing oil leakage.
Review of popular models of piston rings VAZ 2109 – 2115
There are many companies that produce piston rings, as well as many fakes, and there is simply not enough time to look through them all. Therefore, let's look at those manufacturers of piston rings that differ from others in normal quality and price. The first thing I want to recommend is piston rings.
We recommend: What to do if your diesel engine stalls
Piston rings from .
These companies produce piston rings for VAZ cars of various diameters and are perfect for us. They are most likely produced in China, because the original ones will cost much more. But this does not mean that everything is so bad, their quality is excellent. I still recommend the rings, because their price is much lower than that of Mahle, and the quality is the same, so why pay more and overpay for the brand.
The upper compression ring of these manufacturers is chrome-plated steel, but its copper-plated one, which is clearly visible in the top photographs. The second compression ring is black and made of cast iron, but the ring from it has a darker color.
I recommend using metal oil scraper rings, because, unlike box-type rings, they fit perfectly in the cylinder, are resistant to overheating (they do not lose their spring properties) and their main advantage is that they work as two rings independent of each other. The rings are box-type, very afraid of overheating. When they overheat, they lose their spring properties and do their job poorly. And one more serious disadvantage: they require very careful running-in. At the slightest deviation from the running-in conditions, the working edges of the ring may break off in some places and allow oil to leak through.
Of course, there are other manufacturers of piston rings, but as usual they are complete fakes and sometimes it’s not possible to choose quality ones
Thermal clearance requirements
Functional requirements for thermal clearance include:
- Heat removal from the piston at the moment of ignition of the mixture . Otherwise, the piston will burn out under the temperature of the combustion chamber.
- Piston space sealing function . The resulting pressure should evenly press the rings against the cylinder walls. Achieving such touch requires setting the correct distance.
- Requirements for oil scraper discs responsible for supplying the required amount of lubricant. Compliance with this rule keeps oil and gasoline consumption at the level of factory standards.
Options
Set gaps on rings
The established gap should correspond to 0.6-0.3 mm, and the side gap between the wall should not exceed 0.08-0.04 mm.
The value comes from the fact that exhaust gases act on the rings from the inside of the groove, pressing them against the wall. The coordinated functioning of compression and oil scraper rings allows for complete combustion of the mixture. This depends on how they are placed in the piston groove.
Therefore, a small value between the ends after warming up will lead to scuffing of the cylinder mirror.
The gap is measured with a feeler gauge and is regulated at 0.2-0.5 mm. For VAZ model engines, a value of 0.25-0.04 mm is provided on the sealing rings. Oil scrapers have 0.25-0.5 mm.
The first ring on top (compression), as loaded from alloy cast iron, is sprayed with chromium. The porous coating of this metal is capable of holding the required mass of engine oil.
Plasma coating of a layer of molybdenum on the rings promotes wear resistance and low friction with the cylinder.
Memo
The lock on the separator is painted blue
When choosing a repair size, you need to be guided by the product designation, including the engine model, kit number, product size. Additionally, the markings, which are located in a certain place of the product (close to the end), are checked. Expansion springs with a ground surface are carefully considered.
Gap in the lock
The slot in the piston ring is usually called a lock. This gap is necessary, but it also creates an obvious problem - at this point gases from the cylinder can easily penetrate into the crankcase. Therefore, it must have a minimum width during assembly, but not zero - due to the uneven thermal expansion of the cylinder, ring and piston, the lock may collapse, after which the ring will break.
For each specific engine, based on both the materials and the operating temperature range, the minimum thermal gap in the lock is set - when assembling the motor, we check the gap in the lock so that it is not less than the lower threshold of the rating.
Wear of the ring and cylinder leads to the fact that the ring “diverges”, the gap in the lock increases, as pressure losses increase and oil penetrates into the combustion chamber. Based on this, the maximum gap size is set, if exceeded, the ring is replaced with a new one.
Let's compare the nominal clearance values for different engines:
- VAZ-2108: 0.25-0.45 mm;
- GAZ-24: 0.25-0.6 mm;
- Honda CR-V (K20A4 engine): 0.2-0.35 mm.
What do these numbers tell us? The minimum gap limit in the new ring lock for domestic engines is close, but the maximum is higher in an engine with a lower degree of boost: the pressure loss remains tolerable. For the Japanese motor, the materials are better selected, the cooling of the upper ring is more efficient, so the minimum size is reduced, and fewer “liberties” are allowed during assembly. The maximum limit for troubleshooting is different - on VAZ engines it is 1 mm, GAZ - 1.2 mm, while on a Honda the upper compression ring is considered worn out already at a gap of 0.6 mm, with which it would still be possible to assemble a new twenty-four engine "Volga".
We recommend: Filling the spark plugs with gasoline: why and how to start the engine
The gap in the lock is an important indicator when troubleshooting a motor. By moving the ring to different heights, where the cylinder wears out differently, you can find out the degree of wear without a bore gauge: at the top, where the ring does not come into contact with the walls, the cylinder retains its nominal diameter, and it is in this place that the gap in the lock reflects the wear of the ring. Going lower, the ring widens, indicating an increase in the diameter of the cylinder closer to the middle, then narrows again. Roughly, but quite indicatively, we calculate the difference in cylinder diameters at different heights, starting from the measured gap.
Suppose the nominal diameter of the cylinder is 78 mm, which corresponds to a circumference of 122.522 mm. The measured gap in the lock when installing the ring at the top is 0.4 mm, the length of the ring itself is 122.122 mm. Now we lower it to the center of the cylinder and measure the gap of 0.8 mm - from a circle of 122.922 mm we get a diameter of 78.25 mm. This method does not take into account the fact that the cylinder becomes barrel-shaped or ovoid, and in the middle the ring is not adjacent to the walls with its entire surface. However, the change in the gap in the lock indicates to us that the engine problem is not wear of the rings, which are easy to replace: the cylinders will need to be bored.
When is it time to change rings?
There are three piston rings on the VAZ 2109. They are not closed rims that are located on the outer wall of the cylinder in special grooves. These parts serve to seal the combustion chamber, regulate oil flow and improve heat transfer through the cylinder wall. Two compression valves prevent gases from the combustion chamber from entering the crankcase, and an oil scraper valve removes oil from the cylinder walls and prevents it from entering the combustion chamber.
Wear of piston group parts occurs after approximately 150 thousand kilometers due to the action of gases and friction of metal parts. They need to be changed if the following symptoms are present:
- compression drop;
- increased fuel consumption;
- the appearance of bluish smoke in the exhaust gases;
- increased oil consumption.
Purchased larger piston rings
If you accidentally bought larger piston rings (for example, the cylinders were bored out for the first repair, but the seller made a mistake and gave piston rings for the second repair), naturally these rings will not fit into the cylinder.
First, you can exchange them with the seller who sold you the rings.
Second, you can carefully sharpen the edges to size.
Third, you can make a lock on these rings, but you must be good at using a file and this work requires patience and perseverance, I made such locks on piston rings, the compression increases and the engine pulls better.
Rice. Homemade locks on the piston ring
If you decide to make locks on the rings, then do them like this: insert the ring into the cylinder so that the ends of the rings overlap each other, draw a line along the upper edge of the ring with an awl, this will let you know how far the edge of the ring extends. Next, use a file to make the locks in the rings as shown in the figure, check the locks on the rings like this, measure the height of the ring with a caliper, divide by two, this will be the size of the height of the lock, after be sure to check that the locks in the piston do not jam, put the ring on the piston and crimp the ring with your fingers so that the locks are engaged, if the locks fit tightly, then sharpen the height of the locks a little more, the locks should overlap each other freely.
Step-by-step replacement instructions
Piston repair work must be performed on an inspection ditch, lift or overpass.
What will you need?
To repair a VAZ 2109 engine with your own hands, you need the following tools:
- a set of keys;
- set of heads;
- funnels;
- extension cords;
- torque wrench;
- set of probes;
When purchasing piston rings for the VAZ 2109, you should take into account the material of manufacture and their width. It is better to purchase original products to avoid fakes.
Stages
- First of all, you need to dismantle the cylinder head with your own hands.
- Then you need to remove the engine oil pan.
- After rotating the crankshaft, install it so that the connecting rod mounting nuts extend as far as possible.
- After unscrewing the fastening nuts, remove the connecting rod caps.
- Using a hammer, tapping lightly, remove the piston with connecting rod from the cylinder.
- Having opened the gap with your fingers, you need to remove all three products from the groove in turn and dismantle them from the piston. Together with the oil scraper, its expander is removed.
The table shows the maximum values of the gaps between the part being replaced and the groove walls.
- When installing, all parts should be thoroughly lubricated with oil.
- Installation of products begins with the oil scraper. First, the expander is installed - a special spring with a lock. Then the product itself is put on her. The expander lock and the oil scraper ring gap must be opposite each other.
- The lower compression ring has a groove and a tooth. When installed, they should be at the bottom of the part. On the upper surface there is usually an inscription “vas” or “tor”.
- The upper compression ring is installed in the same way - with the lettering facing up.
- The sequence of putting on the parts is as follows:
- first, the lock is released so that the part can easily fit onto the piston;
- then the lock itself starts;
- the remaining part is installed.
After installation on the piston, all parts need to be oriented. The installation axis of the piston pin should be 45 degrees with the lock of the upper compression ring. The lock of the next product should be at an angle of 180 degrees with respect to the previous one. Thus, the angle between the oil control valve and the upper compression valve will be 90 degrees. Then the pistons and rings are pressed out with a special mandrel and inserted into the cylinders from which they were removed. Next, we perform the reverse assembly with our own hands.
After replacement, the VAZ 2109 piston rings must be run-in. In this case, you should not load the engine, drive on roads with long ascents, and change gears correctly.
Video “Installing piston rings”
This video shows the process of installing piston parts: how to install and what to pay attention to.
With a sufficiently high mileage of a VAZ 2109-2108 car, compression in the cylinders begins to drop, and engine oil consumption becomes more and more. This is primarily due to excessive wear of the piston group, namely the compression and oil scraper rings, as well as the cylinders themselves.
During normal operation, the VAZ 2109-2108 engine can easily travel about 300,000 km without major repairs, and there are many owners who can confirm these facts. But often those who like to drive have to repair the engine after the first hundred thousand. This procedure can be performed independently in a garage, of course, if you have the necessary tools. And you will need the following:
Of course, if we talk about all the procedures that will need to be performed in order to get to the pistons, then you will need a lot more tools. The above is a list of those that are needed directly to unscrew the connecting rod cap and remove the piston with rings from the cylinder.
First we perform the following steps:
- Removing the cylinder head
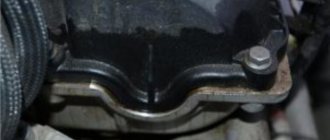
- Removing the engine oil pan
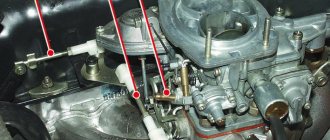
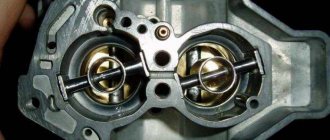
So, next we unscrew the two nuts securing the connecting rod cover, as shown in the photo below:
Then, without any problems, remove the connecting rod cover by hand:
Then we turn the engine crankshaft so that the connecting rod is strictly in the center of the cylinder, this will make it more convenient to remove the piston. Next, we take a hammer and use its handle to gently tap the bolts on the connecting rod, thereby pushing it out of the cylinder:
It should easily jump out of the cylinder from the reverse side:
Then you can proceed directly to dismantling the piston rings. To do this, carefully pry up the edge of the ring and remove it from the groove, as clearly demonstrated in the photo below:
Then, also carefully remove the ring in a circle to the end:
We similarly perform a similar procedure with the remaining rings. Now you can insert the ring into the cylinder and check the gap between its two ends:
The optimal gap should be from 0.25 to 0.45 mm.
The maximum permissible wear is considered to be within 1 mm. If it is larger, this indicates an urgent need to replace the rings with new ones, and also check the cylinders; it is possible that they need to be bored out. If the cylinders have not been bored and the old pistons are in good condition, then they can be left without replacing them with new ones. But in this case, it is imperative to clean the grooves from carbon deposits, and the piston itself.
Then we put the new rings back on the piston. It is worth keeping in mind that the joints of all rings are located in different places around the piston. When installing, be sure to lubricate the rings and the cylinder itself with engine oil, and it is best to use a special mandrel.
On the VAZ 2108, piston rings are replaced if there is a high consumption of oil or fuel. In this article we will try to analyze step by step the entire process of replacing rings and piston on a VAZ 2108 and other car models of this type. Replacing the piston VAZ 2108 is carried out immediately after removing and disassembling the engine.
Thermal clearance of piston rings
PCs are spring discs with one cut - when installed on the piston, they expand, and in the sleeve they are pressed tightly against its walls. In order to achieve maximum compression of the working mixture, the cylinder walls must be as smooth as possible (without defects), and the shape of the internal cavity must be perfectly round. On the piston, the PCs are placed in special grooves, moreover, they are not seated tightly, and on a cold piston they move freely in the grooves.
Piston rings have thermal clearances:
The clearances must be certain; if they are larger or smaller than the required value, the piston group will quickly fail. One should take into account the fact that when heated, the metal expands, and if the thermal gap of the PC is too small, the piston group will begin to overheat. With large gaps, tightness is not ensured and power losses occur.
For passenger cars, as a rule, the following clearances are established:
- between the grooves and the PDA - from 0.02 to 0.08 mm (for the upper ring the gap should be slightly larger);
- between grooves and MPC – from 0.05 to 0.06 mm;
- at the junction - from 0.25 to 0.5 mm.
As wear occurs, the gaps in the PC increase, and they should not exceed:
- between the ring and the groove – 0.15 mm;
- at the junction – 1.0 mm.
Removing the engine
The engine on a VAZ can be removed if you have the necessary tools. In addition, you need to have a special lifting device available that will help remove the engine from the compartment. You can, of course, do without it, but then you need additional workers. So, let's start:
- remove the hood;
- cover the front fenders of the car with soft blankets so as not to damage the paint when removing the engine;
- drain the radiator;
- disconnect all electrical wires from the distributor, as well as from the oil and temperature sensor and carburetor;
- remove the fuel supply hose;
- unscrew the exhaust manifold pipe (muffler);
- disconnect the battery terminals;
- remove the starter;
- the air filter housing is removed;
- disconnect the generator wires;
- unscrew the engine from the gearbox;
- use a screwdriver to loosen the clamps of the heater radiator pipes;
- remove the accelerator pedal linkage;
- remove the carburetor choke cable.
After carrying out the above work, you need to go down into the inspection hole or under the overpass:
- remove the clutch master cylinder;
- unscrew the gearbox;
- remove the protective casing;
- unscrew the engine bolts;
- We hook the engine with belts and lift it up.
At this stage, engine removal is complete. Let's move on to its analysis.
Engine disassembly
Replacing the piston on a VAZ 2108 is carried out only after complete disassembly of the engine. Started:
- remove the fuel pump;
- remove the ignition distributor;
- take out the generator;
- remove the water pump;
- remove the oil filter;
- remove the breather cap along with the dipstick to check the oil;
- remove the oil pressure sensors;
- remove the crankshaft pulley;
- remove the flywheel;
- remove the tin plate;
- unscrew the three engine cover bolts;
- remove it;
- take the key 10 and unscrew the cylinder head cover;
- remove the gasket;
- dismantle the chain drive;
- remove the sprockets and chain;
- remove the crankshaft gear;
- unscrew the nuts of the gas camshaft housing;
- remove the cylinder heads;
- remove the pan;
- remove the rear oil seal housing;
- remove the oil pump;
- remove the drive shaft along with the oil pump gear;
- remove the oil separator;
- dismantle the crank mechanism;
- remove the cover;
- remove the connecting rods with the piston;
- remove the main caps;
- remove the crankshaft;
- remove the spacer rings;
- remove old liners.
How to replace rings yourself
Attention: Replacement of piston rings on a VAZ 2108 is carried out after installing new crankshaft liners. As mentioned above, we remove the pistons and connecting rods. On the lower heads and connecting rod caps we see steel-aluminum type liners. They are threaded in such a way that they do not turn. They are kept from this by locks that fit into the slots of the beds.
So, replacing piston rings on a VAZ 2108 is carried out as follows:
- take the connecting rod and clamp it in a vice;
- after decompression, remove the old rings (upper and lower compression).
It should be remembered that when installing new rings, the top mark should be directed towards the bottom of the piston. The mark is often the name of a company or simply a car model, applied to the ring by the manufacturer. It also happens that instead of an inscription, an edge or chamfer is used. So, in this case, you need to install the ring with this chamfer down. Replacement of VAZ 2108 pistons continues:
- the old oil scraper ring is removed;
- The expander is also removed.
Attention: Replacing pistons on a VAZ 2108 involves knocking out the pin located in the piston. To do this, place the piston on some wooden support and knock out the pin with a hammer.
- we collect everything in the reverse order;
- We take a new piston, which we select by class (the class is marked with a letter, and the piston category with a number).
Now you need to be able to correctly adjust the gap between the cylinder and the piston.
- For completely new parts, the gap should be 0.05-0.07 mm. If any of the parts are worn out, the gap may be no more than 0.15 m.
- In addition, replacing the piston on a VAZ 2108 should be carried out so that the finger enters the hole with the force of only the thumb. Also, it should not fall out of the piston if it is in a vertical position.
- install rings;
- take a feeler gauge and check the gap (or rather, it is advisable to check the gap with a set of special feeler gauges).
Attention: The ring gap should be between 0.25 and 0.40 mm. If the gap is larger, the ring must be replaced. If the gap is smaller, we arm ourselves with a needle file. We carry out the following operation: we grind off the ends of the ring, but only very carefully.
This video shows everything thoroughly. It is recommended to watch it before starting the operation yourself.
- install the rings into the piston grooves;
- We begin the orientation process.
This operation consists of correctly positioning the rings at an angle to each other. The photo below clearly shows what angle they should have:
So, you need to install them yourself, as required by the instructions:
- the upper compression ring is oriented at an angle of 45 degrees (the angle should be directed towards the piston pin axis);
- the lower compression ring should be rotated relative to the upper one in the complete opposite direction;
- the oil scraper ring lock is adjusted to 90 degrees relative to the other rings (as for the joint of the expander, it should be located on the lock side of the ring itself);
- take the upper head of the connecting rod and heat it to 240 degrees (to do this, we clamp it in a vice and process it with a special tool);
- pre-cool the finger in ice water;
- the piston is put on the connecting rod;
- using a mandrel, the finger is pressed into the hole;
Mistakes made during installation
Oddly enough, even professionals often admit them. These include:
- installing new rings on a worn engine;
- installation of piston rings on one side, which leads to gas breakthrough.
It is worth noting that the numbers and letters on the connecting rod and cover must be located on the same side. The special mark “P”, which is located on the piston, should be directed towards the front of the cylinder block. This step-by-step instruction will help you master complex techniques for installing new piston rings on a VAZ 2108. Usually the price for such services from professionals is very high, since the process involves dismantling and disassembling the engine and a lot of complex steps. But armed with the necessary knowledge and a good tool, even motorists just starting repairs on their own can safely get to work.
How to determine the size of the rings by the piston of a vaz
Many domestic and imported cars use repair pistons manufactured at the production facilities of the Kostroma manufacturer of piston groups, Motordetal-Kostroma. This company produces pistons with a diameter from 76 to 150 mm. Today the following types of pistons are produced:
- solid cast;
- with thermostatic insert;
- with an insert for the upper compression ring;
- with oil cooling channel.
Pistons produced under the specified brand have their own designations. In this case, information (marking) can be applied in two ways - laser and micro-impact. First, let’s look at specific examples of markings made using laser engraving:
- EAL - compliance with the technical regulations of the customs union;
- Made in Russia - direct indication of the country of origin;
- 1 - group by mass;
- H1—diameter group;
- 20-0305A-1 - product number;
- K1 (in a circle) - sign of the technical control department (QCD);
- 05/15/2016 - a direct indication of the production date of the piston;
- Sp 0.2 - gap between the piston and cylinder (temperature).
Now let's look at the designations applied using the so-called micro-impact, using specific examples:
- 95.5 - overall diameter size;
- B - diameter group;
- III - group according to finger diameter;
- K (in a circle) - quality control (quality control) sign;
- 04/26/2017 - direct indication of the production date of the piston.
It is worth noting here that for the production of different pistons, different aluminum alloys with alloying additives are used. However, this information is not indicated directly on the piston body, but is recorded in its technical documentation.
4. To determine the clearance, measure the diameter of the cylinder (see subsection) and the diameter of the piston, which is measured with a micrometer in a plane perpendicular to the piston pin axis, at a distance of 51.5 mm from the piston bottom.
5. Use a feeler gauge to measure the gap between the rings and grooves on the piston in several places around the perimeter. If the clearance exceeds the maximum permissible (see table), replace the pistons with rings.
6 measure the ring lock gap. You need to insert the ring into the cylinder and push it with the piston so that the ring fits without distortion. If the gap exceeds the maximum permissible, replace the ring (see table). If the gap is less than 0.25 mm, carefully file the ends of the ring with a file.
Gap in piston ring locks: (table)
Nominal - 0.25-0.45mm Maximum permissible - 1.0mm
designations on the piston: 1st repair – triangle, 2nd repair – square. Designation of the group by weight: normal - “G”, increased by 5 grams - “ ”, decreased by 5 grams - “-”.
17. Rotate the piston rings so that their locks are located at an angle of 120° to each other. Nominal sizes of cylinders and pistons:
Engine model VAZ-21083 size group-E cylinder diameter-82.04-82.05mm piston diameter-82.005-82.015mm
To select pistons for cylinders, calculate the gap between them. The clearance is defined as the difference between the measured diameters of the piston and cylinder. The nominal gap is 0.025-0.045 mm, the maximum permissible is 0.15 mm. If the gap does not exceed 0.15 mm, you can select pistons from subsequent classes so that the gap is as close as possible to the nominal one. If the gap exceeds 0.15 mm, bore the cylinders to the next repair size and install pistons of the corresponding repair size.
I didn't understand here.
The nominal clearance is the clearance that should be between the cylinder and the piston, right? it is written to be 0.025-0.045mm. those. I'll push a 0.025mm feeler gauge between the piston and the cylinder wall and it should fit, right? but not more than 0.045mm. those. A 0.046mm feeler gauge is already a big gap. but then the next line says that the maximum permissible gap is 0.15mm. As I understand it, the main thing is that the gap should not be more than 0.15mm, right? This is the maximum gap obtained. Why then does it say 0.045mm in the first sentence? As if between 0.045 and 0.15 the distance is large...ok. further it is written that if the gap does not exceed 0.15mm, then you can choose larger pistons so that the gap is closer to 0.025-0.045... again stupid. I don’t understand why? 0.15 is the maximum gap and should not be exceeded, but here it is written that if it is not exceeded, then install more piston so that it becomes even smaller... further it is even more interestingly said, if the gap is more than 0.15, i.e. what a big dammit! then sharpen the cylinders to the following dimensions. here is the only understandable and logical thing. Either there is a typo or I don’t know, but still the distance between 0.025-0.045 and 0.15 is large... someone explain to me what this means. I understood the following: the gap should be in the range of 0.025-0.045, this is zbs. but it can be more, the main thing is not more than 0.15mm! if it is more, then we sharpen the next repair size and change the piston, I got a 0.25mm feeler gauge ((((((and group E. the last one((((also a square on the piston(((