Main signs of a faulty clutch drive
The clutch in a car serves to connect and disconnect the engine with the transmission, this is necessary to engage a gear, downshifting or upshifting. The connecting unit between the gearbox and the motor can be mechanically or hydraulically driven:
- mechanics are controlled by a cable;
- The hydraulic drive has a main and working cylinder.
Any drive can be adjusted, and with the help of a rod or cable, the clutch pedal (PS) can be raised higher or lower.
Each clutch must have a small free play; if it is too large, then:
- PS picks up at the very end of the pedal stroke, and there is not enough squeezing to change gears normally;
- the car starts to move even if the pedal is at the very floor;
- If the gearbox is in a low position, the gearbox may fail.
If the PS is raised too high and there is practically no free play of the pedal, other problems arise:
- the car slips and accelerates poorly;
- The clutch disc (CD) starts to burn, and it does not provide a reliable connection between the internal combustion engine and the gearbox.
The main signs of a faulty mechanical drive (cable):
- the squeeze is very tight, or when pressed the pedal does not press at all;
- The PS is completely lowered, it lies on the floor;
- The pedal is very easy to press.
The cable drive may have the following causes of malfunction:
- the clutch cable (TC) has soured in the cage, so it is difficult to “move” in it;
- The vehicle has become unraveled, and pieces of wire prevent the cable from moving in the braid;
- the cable simply broke.
The hydraulic drive also has its own faults, and there are signs of a faulty condition:
- the pedal fails the first time, and begins to take off only from the second or third stroke;
- The PS becomes “cotton”, the efficiency of squeezing disappears;
- somewhere in the middle of the stroke the pedal becomes stuck.
Just like in a cable drive, the PS can be pressed very easily or not pressed at all. Main faults in the hydraulic drive:
- working cylinder leaked;
- bypass the valves in the master cylinder;
- All brake fluid has completely leaked out;
- the rod is out of adjustment (the locknut has become loose, the adjustment has been disrupted).
Checking and adjusting the clutch of a Gazelle car
Gazelle commercial vehicles are equipped with a hydraulic clutch drive. On this machine, the free play of the pedal can be adjusted in only two ways:
- lengthen or shorten the rod located at the PS itself in the car interior;
- Place an extended or adjustable rod between the slave cylinder and the clutch fork (BC).
As the clutch disc wears, the free play of the pedal begins to increase, and in this case, adjustment is required. If this free play is too large (more than one third of the total travel),
its regulation is carried out by a rod in the cabin:
- the locknut is loosened;
- the rod is unscrewed in the direction of increasing the stroke;
- When the pedal is raised to the desired height, the rod is fixed by tightening the lock nut.
If the DS is already very worn out, but it is necessary for it to still serve, you can install an extended rod or an adjustable rod between the working cylinder and the fork (for example, from a UAZ SUV).
You can check the condition of the Gazelle parts by external inspection; to do this, you need to put the car on a pit or a lift, and inspect it from below:
- the clutch slave cylinder (CSC) must not have any leaks;
- The aircraft should not have cracks or bent.
Checking the correctness of the changes made
To confirm the correctness of the results of the adjustments made, it is necessary to check the operation of the clutch assembly with the car engine running.
To do this you need:
- Start the engine and put the car on the handbrake.
- Depress the clutch and engage gear. The lever should move easily to any position, and the speed should not increase.
- Smoothly release the pedal until the crankshaft speed begins to decrease. In this case, the drive must be at a distance from the floor of at least 1/3 of the free play.
- Disengage the clutch and turn off the engine.
After this, the correct adjustment of the sensor is checked while driving. If the speed does not increase when the clutch is turned off, and the machine does not jerk when turned on, then the adjustment has been carried out correctly. Otherwise, you will have to perform all the procedures again.
Clutch adjustment Lada Kalina (Priora)
On Lada Priora and Kalina cars, a mechanical clutch drive is installed, the release is carried out by a cable. As the DS wears, the free play of the pedal increases, and then adjustment is required.
The cable adjustment on Lada models is done under the hood; it is carried out with two nuts that are attached to the gearbox bracket. We adjust the clutch as follows:
- dismantle the air filter housing, it prevents you from getting to the cable;
- loosen the nuts and tighten the cable, unscrew the nut in the picture below with the arrow, and tighten the other nut. Thus, we remove the increased stroke and bring it back to normal;
- After making sure that the pedal is pressed normally (the free play is adjusted), tighten the nuts with force.
Regulation of the VAZ 2110 vehicle is carried out in the same way as on the Lada Priora or Kalina; the clutch on the “nines” and “eights” is also adjusted.
Clutch adjustment on UAZ SUVs
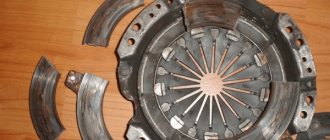
On older models, such as the UAZ 452 “Loaf” or the UAZ 469 “Kozlik”, regulation is carried out using a rod, which is located between the fork and the working cylinder. On many UMZ engines of these machines, a claw clutch is installed, and adjustment can also be made using claw-type levers, which are located on the clutch basket (drive disk).
It should be noted that foot baskets are installed on KAMAZ, ZIL, GAZ-53/3307 trucks.
You can adjust the paws both with the basket removed and as part of the car. On the removed parts, we perform the operation in the following order:
- install the basket with the DS on the flywheel, tighten the basket with bolts;
- loosen the adjusting nuts;
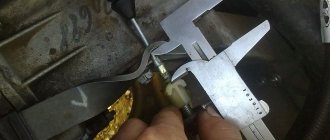
- Using a caliper we measure the distance from the end of the levers to the flywheel, using the adjusting nuts we set the same distance;
- according to the book instructions, the distance between the flywheel and the foot should be 51.5 mm, provided that the thickness of the disk is 9.5 mm;
- we lock the nuts; at this point the adjustment procedure can be considered complete.
You can also adjust the paws directly on the car without removing the clutch. We proceed as follows:
- put the car in a pit, remove the lower clutch housing pan;
- We take a wooden rod 70-80 mm long, use a ruler or caliper to mark a distance of 51.5 mm on the rod, it can be a little inaccurate, but we still make the final adjustment using a rod;
- turn the flywheel so you can get to the foot;
- Unlock and turn the adjusting nut, set the rod to 51.5 mm;
- We turn the flywheel further and do the same procedure with the other two legs;
- Before putting everything back together, we sit behind the wheel, start the engine and check how the car behaves while moving away;
- If everything is fine, don’t forget to lock the nuts and put the tray in place.
When the legs of the UAZ drive disk are worn out, some car owners, in order not to repair the basket and drive a little more, place washers of the same thickness under all its mounting bolts.
There is another way to adjust the paws, but it needs to be done by two people. The work is carried out as follows:
- one of the participants in the operation sits on the steering wheel and squeezes the clutch all the way;
- the second participant rotates the flywheel, unlocks the tabs, makes adjustments, setting the gap between the flywheel and the clutch disc to 1.5 mm; for this you will need a set of feeler gauges that are used to regulate the valves in the engine;
- the gap may differ slightly from 1.5 mm, it is important here that all paws are adjusted to the same distance;
- Having completed the adjustment, we check the clutch, trying to move off. If the car starts moving smoothly, lock the nuts and put the lower crankcase pan in place.
It should be noted that although the latter method is considered popular, nevertheless, such adjustment is the most accurate.
All about UAZ SUVs: solving clutch problems
In the article on how to adjust the clutch on a Patriot, you will learn all the intricacies of replacing and adjusting the UAZ Patriot clutch in normal garage conditions.
In what cases is the clutch replaced, what can it be connected with? This material reveals such topics as the principle of operation, as well as types of clutch and their advantages on Patriots, what parts are included in the clutch mechanism and operating features. Also, why do you need to adjust the UAZ clutch, detailed photos and video instructions for adjusting the clutch and adjusting the UAZ Patriot clutch sensor and malfunction errors. After this, you can safely go and make a diagnostic card for your car.
Checking and adjusting the clutch on a VAZ 2107 car
Just like on many vehicles, adjusting the free play of the VAZ 2107 clutch pedal is done from inside the car. It is adjusted with an adjusting screw, which is located next to the PS; according to the instructions, the free play should be from 30 to 35 mm. But not all drivers like to do what is written in the instructions, and many adjust the pedal based on their preferences.
The second adjustment is made by the rod, which is located between the control center and the fork. The lock nut on the rod is loosened, and the rod is adjusted to such a length that it moves freely at a distance of 4-5 mm.
Adjustment
Sometimes it is necessary to adjust the UAZ clutch, which consists of changing the position of the clutch pedal. For this purpose, the main cylinder has an adjustment unit.
The pedal travel is adjusted by changing the length of the pusher.
- The pusher is disconnected from the pedal.
- The nut of the pusher assembly is loosened.
- The eyelet turns in the appropriate direction, achieving the desired result.
- The nut is tightened and the pusher is connected back to the pedal.
The free play of the pedal cannot be adjusted. Only the full stroke is adjusted, which should be in the range from 13 to 17 centimeters.
Replacing the UAZ Patriot clutch
Features of Renault Logan clutch adjustment
Renault Logan cars are equipped with a cable drive; exactly the same cable is present on the Renault Sandero model. This drive comes with all manual transmissions, regardless of engine type.
The cable is adjusted with a nut located on the cable itself, it is located next to the clutch fork. According to factory conditions, for an unworn DS, the cable should have a length between the gearbox bracket and the fork 86 plus or minus 5 mm; what the distances should be is shown in the figure below.
Over time, the clutch disc wears out and becomes thinner. Because of this, the PS rises, and the free play needs to be adjusted.
In order to adjust the pedal stroke, use a 10 wrench to loosen the lock nut, hold the hex key with a 7 wrench, and turn the adjusting nut.
Having established the required position of the Logan PS, we fix the cable tension with a locknut. We check the car while driving; if the free movement is not satisfactory, we repeat the operation.
How to adjust pedal free play on Nissan cars
As the clutch parts (disc and basket) wear out, the free play changes, and therefore requires adjustment. On a Nissan car, the clutch drive can be different - mechanical and hydraulic, so the PS adjustment is carried out differently. For example, a cable is installed on Nissan Sunny cars in bodies N13 and N14, Almera, Primera; Qashqai, Tiida, Almera Classic, Note, Maxima cars are equipped with a hydraulic drive.
However, a hydraulic drive can also be installed on Sunny or Primera, much depends on the type of engine and model generation. Nissan “hydraulics” are usually equipped with cars with more powerful internal combustion engines (2.0/ 2.5/ 3.0 l); cars with 1.4/ 1.5/ 1.6 l engines come with a clutch cable.
On a Nissan N14 car, the cable is adjusted in the area of the clutch fork; the adjustment mechanism is located at the very end of the cable.
The same cable is installed on the Almera, and in order to shorten it when the DS linings are worn out, car owners add washers, and in this case it is no longer secured with a lock nut.
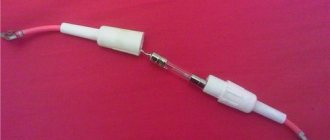
Like on a Hyundai car, the GCS on Nissans is located next to the pedal; these parts are connected to each other by a rod on which there is an adjustment.
To adjust the free play of the PS on the Nissan Almera N16 ( />
What you need to know about clutch malfunctions
- If, during the operation of the car, the PS gradually begins to move upward, most likely the lining of the driven disk is worn out.
- When the clutch slips, the interior smells of burnt linings (ferodo). Checking the wear of the linings is quite simple: put the car in “handbrake”, start the engine, squeeze the clutch, add gas, and smoothly release the throttle. If the engine barely slows down, the disc pads are worn out. If the internal combustion engine stalls, the clutch is fine.
- Slipping can occur not only due to worn friction linings of the disc, oil can get on the basket and disc. To check your guess, you need to place the car on a lift or pit and perform an external inspection of the engine and gearbox from below. Oil enters the clutch through the gearbox input shaft oil seal, through the rear oil seal of the internal combustion engine.
- If the PS is stuck, then it could be: the fork has become sour, the piston has jammed in the working cylinder, the fork has flown off the release bearing hub (on ZMZ-402, UMZ engines of various models).
- If the PS has become “wobbly”, and in order to change gear normally, you need to depress the clutch pedal twice, it means that the master cylinder valves have begun to bypass. In this case, repair of the main circulation system or its replacement is necessary.
The principle of adjusting the clutch of UAZ 3303
A familiar classic
UAZ cars have been popular in Russia for decades. They have always been distinguished by high maneuverability, reliability and good control quality. The UAZ model range is constantly expanding, developing and improving. Everyone knows that cars are assembled from several thousand parts, and when the car is in use, it may be necessary to replace any, perhaps even the smallest part, which nevertheless plays a very large role in the life of the car.
There is an opinion that the clutch is one of the most vulnerable points in a UAZ car. The real cause of the problem is that the clutch of the UAZ 3303 and other cars of this series is adjusted incorrectly. Very often, the maintenance of the mechanism is not given enough attention and its importance is not realized. With proper and timely care of the diaphragm clutch installed on the car, it will work perfectly for a long period of time, at least five years exactly, and even with rather merciless operation.
Setting up the UAZ Patriot clutch sensor
The sensor is designed to generate a signal about the state of the clutch (on or off) and transmit it to the electronic control unit. When receiving a command to disengage the clutch, the automatic system reduces the amount of fuel injected into the cylinders, thereby reducing the engine speed when the load is removed.
If the sensor is faulty or incorrectly installed, the speed during gear shifting will increase, and when the clutch is engaged, the car will jerk. If there is an on-board computer, error message 0704 will appear on the screen. Incorrect operation of the indicator will affect not only the quality of the vehicle's movement, but will also increase the likelihood of failure of the damper springs.
The clutch contact sensor is located in the passenger compartment and is located above the pedal.
To adjust it you need:
- loosen the sensor fastener;
- move the sensor to the desired position;
- tighten and tighten the nuts.
A correctly adjusted indicator should give a command to reduce the fuel supply at the moment the clutch begins to disengage.
Adjusting mechanisms
Parameters after adjustment
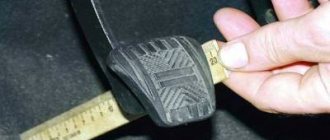
It is generally accepted that correct adjustment of the clutch can ensure its greatest reliability . First, you need to measure the amount of free play at the drive pedal, which disengages the clutch. If the clutch has a diaphragm spring, then the recommended value should be in the range from 5 to 30 mm. After pressing the pedal all the way, it is necessary to measure its full stroke, the recommended value of which should be approximately 16.5 centimeters. This size can be determined using an ordinary ruler.
If it is necessary to change the position of the pedal, we adjust the length of the pusher, which is located in the master cylinder. This adjustment is carried out as follows: unscrew the lock nut with a wrench, begin to rotate the rods, using pliers. This way, the desired pedal position is established, which will be more convenient. Ideally, a 13 key can be used for this operation.
It should be noted that the clutch with a diaphragm spring does not need to adjust the release mechanism, since the spring itself can provide optimal values. In other words, adjusting the clutch of the UAZ 469, UAZ loaf and UAZ Patriot will not be difficult. Clutch baskets can be purchased at specialized stores.
When does the Patriot clutch require adjustment?
The clutch on the car we are considering, as on any other modern car, is one of the most important. If this mechanical unit is faulty, then you will not be able to operate the UAZ Patriot. When an SUV is used quite actively, various clutch parts begin to deteriorate, and in some cases they need adjustment. It is important to use the car and its clutch correctly, then the unit can serve properly for 60-80 thousand. km run. Many will now ask the question: what does it mean to use a car wisely? This means that it is necessary to regularly carry out preventive maintenance, as well as adjustment of the mechanism we have designated. It is important to remember that on a UAZ Patriot, direct adjustment of the clutch pedal must be carried out either annually, or after mileage every 20 thousand. km.
There are other moments when adjustment of the unit is required: for example, noise arises, or when the pedal is fully depressed, jerking occurs, when there is slipping, when the free play of the pedal is quite small. In such cases, it is necessary to carry out repairs and preventive maintenance in order to identify and eliminate the causes of defects.
What is the essence of adjusting the mechanism? It is necessary to adjust the amount of direct full travel of the clutch pedal. Not everyone knows that the free play of the pedal is the distance that the pedal of the mechanism must travel without any resistance. On the UAZ Patriot, there is no way to adjust the so-called free play; it is always achieved structurally, but it is important to know that it is always approximately 8-30mm.
The main signs when clutch pedal adjustment is necessary:
- When identifying when the clutch is driving.
- When slipping directly at high speeds.
- Vibrations appeared.
Considering the Patriot, which has a 409 engine installed, we indicated all the signs that require adjustment of the mechanism. Next, we’ll look at how to adjust the clutch with your own hands.
Maintenance
Get regular maintenance
To service the clutch basket of UAZ vehicles with a diaphragm spring, professional skills are not required. First of all, the clutch must be kept clean, regularly removing any dirt that has arisen. Bolted connections need to be tightened periodically.
It is necessary to constantly check the volume of working fluid that is in the master cylinder. It should be about 1.5 centimeters, but below the top edge of the cylinder. In this case, the tank is filled using the installed mesh filter. It is used to prevent the entry of unnecessary objects and substances. Typically, the UAZ 469 clutch slave cylinder does not require any additional, special manipulations.
Removing air from the drive hydraulic system
Quite rarely, but it happens that the clutch needs bleeding. This can be understood from the fact that it does not turn off completely and the pedal is not pressed so softly. Bleeding is the removal of air from the hydraulic system. This process is carried out when the liquid in the tank is at a normal level.
During work, it is necessary to remove the rubber cap located on the bypass valve and install a hose in this place. Then the other end of the hose is lowered into a 0.5 liter container containing brake fluid in a ratio of 1:3.
Afterwards, the bypass valve must be turned one turn while another person presses the pedal all the way. You need to press the pedal until the air bubbles stop being released. The bypass valve must then be tightly closed.
Some UAZ owners may recommend tightening the bypass valve after each pedal press. This will help to significantly increase the pumping speed and achieve complete neutralization of air. Usually the air disappears from the system after the third or fourth repetition of the operation.
UAZ cars are very reliable. It doesn't take much effort to fix clutch related problems. You can carry out all the work yourself or contact a technical service. Clutch repair or adjustment is not an expensive service. As the owner of one of the UAZ series of cars, you need to carry out timely and constant care of the car, since an unscrupulous attitude can lead to severe pollution and lead to a number of difficult-to-solve problems.
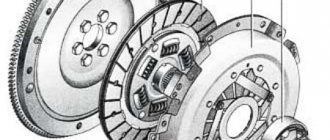
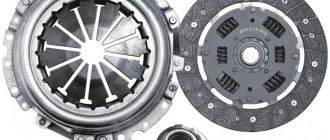
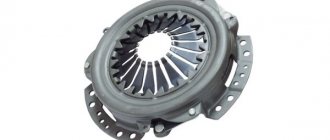
Pressure springs are installed between the clutch casing and the pressure plate and have heat-insulating washers on the pressure plate side. The clutch release device consists of release levers mounted on the pressure plate, a clutch release clutch with a thrust bearing mounted on the gearbox input shaft bearing cover, and a release fork mounted on the clutch housing.
The driven disk is mounted on the splines of the input shaft. The pressure plate, under the action of springs, presses the friction linings against the flywheel, and the resulting friction forces allow torque to be transmitted from the engine crankshaft to the gearbox input shaft.
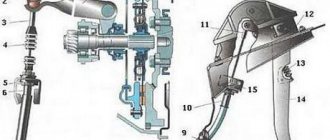
Clutch control drive UAZ-469.
The drive is a system of levers and rods that connects the clutch release fork, coming out of the clutch housing, with the clutch pedal at the driver's workplace. The clutch pedal is secured with a pin at the left end of the pedal shaft. With the clutch pedal on the shaft, the brake pedal is freely installed. The upper position of the pedals is determined by the emphasis on the buffer on the inclined floor of the body.
To lubricate the pedal assembly, a grease nipple is installed on the shaft. The drive lever is connected to the intermediate lever using an adjustable rod. The intermediate lever on the axle is locked with a spring ring and lubricated through a grease fitting. The smaller arm of the intermediate lever is connected to a pusher, which, with its spherical end, rests against the heel of the clutch release fork. Springs select gaps in the mechanism and hold the parts in position - the clutch is engaged.
Maintenance of spring lever clutch UAZ-469.
Maintenance consists of cleaning dirt, tightening bolted joints, adjusting and lubricating. After driving on muddy roads, clean the hole in the bottom of the clutch housing. Lubricate the clutch release bearing in a timely manner through the grease cap located on the right side of the clutch housing.
Adjusting the spring lever clutch mechanism of the UAZ-469.
This is done with the clutch pressure plate removed in the following sequence:
1. Install a driven disk template in the form of a 9.5 mm thick ring between the plate and the pressure plate. Secure the assembled pressure plate to the housing with six bolts.
2. Adjust by tightening and unscrewing the adjusting bolts until the size is 51.5+-0.75 mm - the distance of the bolt heads from the surface of the plate. The difference in distance from the plate to the bolt heads should not exceed 0.2 mm.
3. After adjusting, lock the lever bolts by bending the edge of the lever into the groove of the bolt shank.
Maintenance of the UAZ-469 clutch control drive.
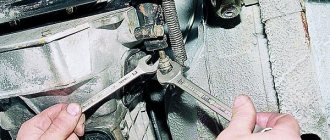
It comes down to adjustment and periodic lubrication of friction units through two grease nipples. The clutch release drive is regulated by changing the length of the rod by unscrewing and tightening the nuts securing the rod to the square head of the pin. The need for adjustment may arise due to wear of the friction linings.
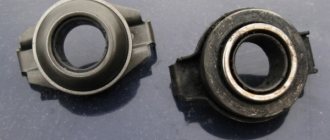
For normal clutch operation, the gap between the bolt heads of the release levers and the clutch release bearing is required to be within 2.5-3.5 mm. This corresponds to a stroke of the outer end of the clutch release fork of 3.5-5.0 mm and a free stroke of the clutch pedal of 28-38 mm, measured along the pedal platform. The full travel of the clutch pedal is 150+-10 mm.
UAZ clutch basket tabs
Replacing the clutch.
One of the beautiful summer days, changing gears on the UAZ became unbearable - crackling, crunching and grinding of the release bearing, interrupted by pressing the clutch pedal. It’s decided - we check the transmission. We carry out disassembly:
1. We build a mini-rack with a winch - for ease of work;
2. We demonstrate driveshafts;
3. Using a cable from the winch, we fix the gearbox with the transfer case;
4. Jack up the engine (we didn’t do it quite right, but the pan was not deformed, and the intended functionality was completed);
5. We unscrew the gearbox (together with the transfer case) from the cushions and from the engine bell, and also remove the frame strut - for ease of operation.
6. Remove the box from the bell studs and cushions - lower the unit to the ground/floor.
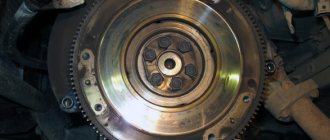
7. We dismantle and diagnose the clutch basket, release bearing and clutch disc, as well as the release fork.
8. At first glance, the basket squeezing feet are worn out. There is no reason to restore the cart as opposed to purchasing a new one. The release bearing is inoperative! The fork burst, a little more and it would have stopped squeezing the bearing. The clutch disc is functional, of course, the thickness of the friction layer is different from the new one, but not critical.
9. Because there was free access to the bearing installed in the flywheel, they decided to immediately replace it... But dismantling it was very problematic... they stuffed newspaper and rags into the hole, but it didn’t move at all... We completely clogged the hole with wet rags, then tamped it down with soap, hit the improvised hole with a hammer "finger" - no result. So we went on the offensive: One man with a sledgehammer stands between the seats, and I hold this “finger”, one blow, two blows - Hurray, the bearing has gone. The worst thing was that the sledgehammer passed a few centimeters near my head and made a ringing sound upon impact.
10. Now we go to the store with a shopping list, it seems like nothing complicated, but the unqualified staff couldn’t sell me a universal clutch basket the first time, saying that it didn’t fit! After that, I come back, take all the dismantled parts and go to the store to show them and compare them with the new ones.
11. We purchase a constant rolling bearing for the release mechanism (the old one fell into two parts during dismantling); we purchase a petal basket (“Trial LLC,” a friend of the ATP, said that it has proven itself well on work machines. And there was no choice of petal ones.); We decided to weld the squeeze foot because... the remake did not inspire confidence; We bought a new clutch disc, but then returned it because... in diameter it was inferior to the old one, and in the thickness of the friction lining...; the crankshaft bearing, dismantled, as it turned out, was picked up from the tractor and was marked: 180x303; in the UAZ store there was only a standard one, I had to buy it due to lack of time to search...
12. Now the reverse process... Install the crankshaft bearing, filling it and the hole with lubricant. We install the basket with the clutch disc, DO NOT TIGHTEN it, the disc should move a little.
13. We weld the release foot, press the constant rotation bearing onto the release mechanism.
14. We clean the gearbox shaft from dirt, “fill” the release mechanism with grease and mount it on the gearbox shaft.
15. We install the box, for centering we need the movement of the clutch disc that is not tightened by the basket... After installing the gearbox, we tighten all the bolts of the clutch basket...
16. And we carry out further actions in the same way as dismantling... There is nothing complicated
Clutch adjustment
I did it this way: with the engine running, I brought the squeezing foot with the bearing until it touched the disk (a half-whistle/grinding sound appeared), then I released it a little until the grinding noise disappeared. The adjustment process is completed.
The car has changed, the extraneous whistle of the release has disappeared, and the speeds began to turn on smoothly, softly - like on a “foreign car”, but with double squeezing and without a grinding sound at the included speed...
After this event, the car has already covered more than 1000 km, no complaints, only positive emotions.
During operation, the Bosal towbar burst and broke off, and the mounting bolts also “stretched”...
In connection with the replacement of the “burnt” ZMZ-410 with the “contract UMZ-4218”, a problem arose with the clutch. On mine there was a petal one,
and on the donor there is a claw.