Types of camouflage painting
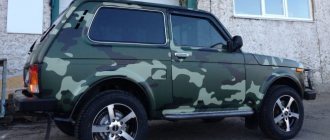
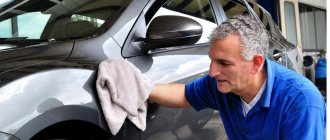
Camouflage is a method of camouflage inherent in military uniforms, weapons and equipment. It is precisely for the ability to camouflage a car against the background of the environment that camouflage coloring is highly respected among those who like to hunt and fish: a car can literally blend into its surroundings.
Despite the existence of traditional brown-green-yellow colors, there are other camouflage options - winter, urban, forest and many others. They differ in color, type of pattern, and method of application.
For the final coating, varnishes with the following effects are used:
- glossy - gives shine in the sun, which eliminates camouflage, is often used to comply with fashion trends;
- matte - ideal for creating camouflage coatings for hunting, fishing, and military purposes.
It’s worth taking a closer look at the options for camouflage colors and pattern types to choose the one that’s right for you.
Traditional camouflage
This is a pattern in the classic khaki style, combining non-staining, discreet dusty earth tones with marsh and brown. Gives the car a real military look, ideal for camouflage, but poorly suited for urban conditions and everyday driving.
Geometric camouflage
This pattern is often called chopped. It provides an original design effect - “crushing” the silhouette of an object into parts. Most often, geometry is used on sports cars with a low body height. Also, a similar color is used by the US Army on fighter aircraft. Traditionally, gray, black and white colors are used to create decor, but in unusual versions you can even find pink and purple inserts.
Urban camouflage
Intended for driving in city conditions, it has a number of specific features: the predominance of gray, blue, white, the presence of angles and straight lines.
Digital or pixel camouflage
This design is incredibly stylish, rare, it resembles a combination of small squares that imitate digital pixels, which are noticeable when you magnify the monitor screen. The appearance of the car will look blurry relative to the terrain, despite the angular outlines of the decor. Color combinations can be similar in tone or contrasting - at the request of the owner.
Forest or hunting camouflage
Forest camouflage is a pattern based on dark green, beige, black spots with smooth, soft lines. It is most often chosen by hunters; it is also used to paint military equipment. A type of forest camouflage includes images of grass, vines, shrubs, and savannas.
Winter camouflage
The pattern within winter camouflage imitates nature during the cold season. The most popular colors are gray, white, blue in the form of blurry spots on a light background. Corners and edges can also be used, but in a minimal amount.
White camouflage
It is a subspecies of winter camouflage with the difference that the predominant color is white. It is usually applied by those who hunt in the taiga forest in winter, as well as for military purposes in the North.
Sand camo
Sand camouflage is also called “desert storm”. The main shades here are brown, yellow, and beige. The coloring is popular in the prairies, used by the military in the corresponding area. For application, they resort to the technique of spraying layers in different ways, and then they make the final finishing of the pattern with an airbrush.
Who is usually interested in camouflage film?
Camouflage film is a great solution for hunters and fishermen, as well as fans of the always fashionable military style - real winners.
Autocamouflage is a full-color vinyl consisting of 2 layers:
Film with printed texture.
A protective transparent film that protects the design from fading and scratches.
Full wrapping of Cadillac Escalade with camouflage film with design (3-color Metallic)
Camouflage vinyl film can be successfully used for wrapping both cars and trailers, boats or other equipment you use for hunting and fishing.
It fits perfectly on any, even the most “problematic” surfaces, so it is possible to completely wrap a vehicle for maximum camouflage and “merge” with the environment.
Full wrapping of BMW 430 with mother of pearl print (geometric camouflage)
Also, camouflage vinyl film reliably protects the paintwork, serving as a “shield” from all possible “troubles” that await the car’s coating in difficult conditions of country trips.
Camouflage colors
There are seven basic colors offered by different camouflage paint manufacturers. This:
- black;
- brown;
- light green;
- olive;
- sand;
- khaki;
- grey.
In addition to standard tones, brighter colors are also used in the camouflage technique: white, blue and even pink, although they are intended only to add style to the car, but not to camouflage it. Typically, three colors from the list are selected to paint one car, although there may be more if desired by the owner. Masters also use other shades to give the drawing originality:
- light gray dust;
- beige;
- yellow-olive;
- brown skin;
- bronze green;
- anthracite;
- gray-olive;
- bitumen black;
- dark grey;
- bright gray etc.
Digital camouflage for a car
This film has a spectacular and, at the same time, discreet pattern. If you don’t purposefully focus your gaze on the upholstered car, you may not notice any features. Not surprising, because, first of all, it is camouflage. The main colors used in the drawing are green, brown and black. There are also a number of other colors available. As a result, from spring to autumn, the car merges with the surrounding space (trees, earth, bushes, etc.).
In city conditions, a car covered with such material is visible to all road users. Presenting no danger on city roads, the car stands out from the general background with its spectacular appearance.
Stencils for camouflage
How to paint a car camouflage with your own hands? For this purpose, the easiest way is to use special stencils. No less often, blanks are used in specialized services and tuning studios, although the price of professional painting in camouflage will be quite high. You can find a variety of stencils on the Internet, print and cut them out:
- blurry spots;
- outlines of animals;
- grass;
- branches;
- net;
- cells;
- "blots";
- leaves;
- stripes;
- geometry, etc.
It is better to print several identical stencils so as not to transfer them, but to immediately cover a large surface area. You can also create a drawing yourself, then cut it out and apply it in the same way. In addition to paper, for this technique of painting a car, you can take a transparent film, which is used by airbrush masters. It is a little sticky, so it is very convenient to work with. The required shapes are cut out of the film, glued to the base, and after the paint and varnish material has been applied and dried, they are removed.
Making a vinyl stencil
A very common material for making stencils is vinyl films. To paint a car in a forest type of camouflage with large spots, you can cut out a stencil by hand. You just need to take a large piece of vinyl and cut a large irregularly shaped hole in it with smooth transitions.
To avoid obvious repetition, it is better to cut out not just one stencil for one car, but several - then the spots will be at least slightly different.
If we are talking about a complex drawing with small elements of a complex configuration, you can use a plotter. If you have skills in working in the design programs Corel Draw or Adobe Illustrator, you can create a pattern layout yourself. It must have curved lines, not contain intersections of lines, and it must be carried out in accordance with the requirements that will be put forward to those who will carry out plotter cutting.
If you don't have the skills to use curve software, you can find ready-made layouts online.
Camouflage stencils
Choice of colors for camouflage
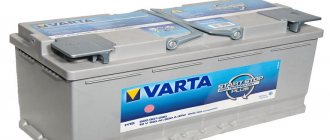
It is most convenient to use paints in cans, produced by many companies specializing in auto enamels. There are even special series of camouflage colors from which you can choose the right ones. Most paints have a matte finish when dry, although glossy options are also easy to find. The most popular paintwork materials for camouflage painting are described below.
Paint Motip Enamel camouflage
The Motip Camouflage aerosol line is sold in 400 ml cans and includes specially designed colors to create a “military” look on any surface. The paint helps to camouflage a car for hunting and fishing; it is also suitable for hunting equipment and accessories that a person carries in the forest. The finished coating is resistant to gasoline, other chemicals and atmospheric factors.
Painting "Raptor" in camouflage
Painting with "Raptor" - a high-quality polyurethane paint - is widely used among lovers of off-road driving. This material provides reliable protection of the body from salts, aggressive chemicals, mechanical stress, temperature changes, and UV radiation. The “military” coloring gives the equipment a memorable, but at the same time camouflaging design. The coating will adhere remarkably well to plastic, bumpers, mirrors, radiator grilles, and will prevent water and dirt from getting into the gaps between plastic and metal parts.
Gun paint KRYLON Camouflage
Krylon Camouflage is a matte anti-reflective paint designed to simulate protective and camouflage finishes. It is intended for creating coatings on cars, sports, hunting or fishing equipment and inventory. All shades of this harmoniously selected range are close to nature and therefore guarantee perfect camouflage.
The paint has excellent adhesion to plastic and metal even without prior priming. The finished coating will be resistant to water, durable, and can withstand mechanical loads well. The paintwork dries in just 15 minutes, which is very convenient for use outside a car repair shop. A second coat can be applied after a day. Final polymerization occurs after 7 days.
Preparation of paint, materials and surface
Typically, a camouflage pattern is applied to the factory body coating, which will serve as a base. Paint consumption is 5-6 cylinders for a medium-sized car. In addition to paint, you need to prepare the following tools and consumables:
- sandpaper;
- painting spatula;
- soft rags;
- construction tape;
- solvent, gasoline, alcohol;
- newspapers.
It is best to paint a car in a well-ventilated garage or outside, and then only on a clear sunny day. As preparation, cover with newspapers and seal with masking tape all elements that cannot be painted - glass, handles, rubber seals, headlights. Afterwards, the surface of the car is degreased using solvents, after making sure that they are safe for existing paint (it is better to use regular alcohol or gasoline).
Painting or film. What's better
Covering a car with film has a number of obvious advantages over painting. The advantages of vinyl camouflage are as follows:
- low price;
- wide availability;
- efficiency of application;
- ease of replacement.
Price
Compared to painting, applying pixel film costs several times less. Especially if we are talking about incomplete coverage. Vinyl for the hood, roof or trunk will cost disproportionately less compared to painting these parts of the body.
Fast application of digital camouflage
Painting a car, if done well, requires many preparatory steps. First, you need to choose the right color so that the part to be painted does not contrast too much with the color of the factory coating. The painting process must be carried out in a special room with the proper level of ventilation and ideal cleanliness. All parts that cannot be painted must be coated with protection to prevent paint from entering.
All the mentioned circumstances disappear in the case of pixel camouflage film. The only condition is the presence of a non-cold box. Pasting with pixel film in the summer can be done even in an ordinary garage. The surface of the car body is degreased and the vinyl application process can begin. No other preparations that take time or effort are required. The car can be driven immediately after the wrapping process is completed.
Availability of digital camouflage film
Today, in any part of Russia you can buy self-adhesive camouflage vinyl. Important properties of the film include the ability to preserve the design. If the vinyl has reached the end of its service life or is damaged, it can be replaced with a new one with an identical pattern.
Removing Film
The car is periodically put up for sale. To keep the look as neutral as possible, digital camo can be easily removed. The best way to remove the coating is to use a hair dryer. With its use, vinyl peels off most easily.
Body coating protection
Digital film is quite elastic and dense. These qualities have a positive effect on the operation of the machine. Vinyl protects the coating from scratches and other defects that affect uncoated areas of the body surface.
Applying paint
Stencil painting is the easiest way to apply camouflage, although in this case all the spots and patterns will be exactly the same. There is an option to use different stencils, although this method will increase the time spent on painting. The procedure for painting a car is as follows:
- stick the stencil on the surface of the car;
- apply aerosol paint, placing it 20 cm from the body (movements should be smooth and have a diagonal direction);
- wait until the paint dries;
- remove the stencil, repeat all manipulations in the following areas.
Masters advise applying dark spots first, which will serve as a basis for lighter ones. When applying a stencil, it is important to avoid creases and damage to the paper - in this case, the paint will end up under the workpiece, and the design will look untidy. The decor looks original, in which large spots extend from one part of the body to another.
Method of painting camouflage without a stencil
This method is more difficult; it requires skill and patience from the performer. First, choose a pattern and color scheme. After preparing the machine, painting is carried out as follows:
- Using narrow construction tape, large spots are formed on the surface of the body, making sure that the strips lie without creases;
- cover the spots with newspapers, giving the lines smoothness, and also glue them with tape;
- apply the darkest color from the can and let the paint dry;
- remove tape and newspapers, form spots to match the second color (they should overlap the first);
- apply paint in the same way;
- repeat the work a third time, applying the lightest shade.
After painting, the body is varnished. To do this, car varnish is combined with a solvent and the body is sprayed in several layers. After the varnish has dried, you can begin operating the car, making full use of the masterpiece you created with your own hands.