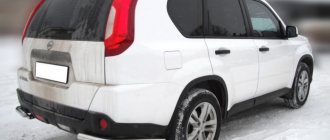
How to widen the wheel arches of a car with your own hands
Today it is very popular to install wide-profile tires on car wheels. This type of tuning has become widespread among car enthusiasts. This is explained by the fact that in this way the adhesion of rubber to the road surface improves, and thus the driving performance of the car improves.
However, this type of tuning leads to the fact that in some cases, when the rim width is increased very much, it is necessary to widen the car's wheel arches.
DIY fenders for arches
If we talk about the goal that we pursue by widening the wheel arches of a car, we can name 2 main factors:
- protection of the body from dirt, dust and stones flying from under the wheels;
- improving the appearance of the car.
For this purpose, you can purchase universal fenders or make arch extensions yourself.
Anti-corrosion treatment of car wing
We removed the wing, which will help us explain the reasons for the corrosion. On the wing, at the point of contact with another part, we see the manifestation of corrosion. Often its spread is explained by simple laziness to remove and process the wing. The second option is that the wing can still be removed, treated with primer, coated with paint, and it looks like the job has been done.
But after a month or two, corrosion begins to appear again. In this case, the assumption arises that either the materials failed or the work was not done well. But in fact, the reason is different: you can see that corrosion begins to appear outward from the inside.
Now you can imagine, if we looked at one small bubble in an enlarged form and saw how much dirt there was in it, then in the place where there is constant sandblasting from the wheels (you can even see how much sand there was in the wing), how much dirt can accumulate there. Therefore, before you start treating the front part of the wing, you always need to first treat the source of corrosion.
Ready-made fenders
On sale you can find ready-made overlays that allow you to widen the wheel arches of your car. You can find the following options in stores:
- Universal rubber pads. Sold in rolls. They are usually used by owners of off-road vehicles. However, rubber pads do nothing to improve the external aesthetics of the car - they only serve to protect against dirt and stones. Therefore, they are not very popular among car owners.
- Fenders made of plastic. They are attached to the arches using self-tapping screws.
- Fiberglass body kits are covers that are mounted on arches with self-tapping screws. The surface and gaps are covered with putty, after which they are painted to match the main color of the car.
If such overlays turn out to be unsuitable for some reason, you can make arch extensions with your own hands.
Car wheel arch extensions
Work plan:
2) Thoroughly degrease the surface and take extra
3) We dilute the epoxy resin with the hardener in accordance with the instructions; when working with epoxy, you must avoid inhaling its vapors and getting it on your skin! (I assumed both while I was alive, but I’m not sure that my body thinks the same way)). You don’t have to rush, its polymerization time allows!
5) We soak the fiberglass in epoxy resin with a thinner and place it all on the degreased surface of the arch being repaired; if possible, we do this procedure from the inside (through the trunk). This composition dries in about a day
6) The next day we sand the resulting surface and level it with putty and sand it even to the plane of the body
7) The renovation is almost complete! All that remains is to prime, paint and treat with anti-corrosion agent! You can carry out this procedure yourself if the painting element is not large, but it is still better to entrust the car to professionals because the risk of ruining everything at this stage is great
We expand the wheel arches of a car using polystyrene foam
Expanded polystyrene is great for widening the wheel arches of your car. It has the following advantages:
- affordable price;
- non-hygroscopic;
- low specific gravity;
- excellent machinability;
- high compression resistance;
- non-flammability.
The process of working with polystyrene foam in our case is as follows:
- Using Macroflex we glue the foam pieces to the car body.
- Using a knife and sandpaper, we give the material the desired shape.
- We apply resin to the treated polystyrene foam.
- We overlap the fiberglass, making sure that there are no air bubbles.
- We wait for the fiberglass to dry and perform puttying.
- We grind the dried putty, fill all the irregularities with filler and wait for it to dry.
- We sand again and treat with a primer.
- After the primer has dried, we paint the arches to match the color of the rest of the car.
DIY wheel arch covers
Priming and painting the repaired part
A primer is applied to the sanded putty, if possible in two layers. After the soil has dried, the surface is sanded for the last time with sandpaper No. 600, removed from dust and painted with a well-selected high-quality auto enamel.
If everything is done correctly, the product comes out no worse than new. And repairing a car fender with your own hands becomes not such a scary thing.
This material will help you learn more about how to repair a car and remove corrosion from it yourself.
Using sculptural plasticine
If you were good with plasticine in school, you can use this skill to fashion extensions for your car from it. The algorithm consists of the following stages:
- Contact areas of the body are covered with construction tape.
- Sculptural plasticine is glued to adhesive tape, and overlays are formed from it. This is quite painstaking work - you need to ensure the correct shape and symmetry.
- Once you are satisfied that the shape suits you and both sides look symmetrical, you can coat the resulting pieces with epoxy resin and fiberglass. At least 3 layers should be applied.
- After drying, remove the plasticine from the mold.
- Fix the resulting products with self-tapping screws on the body of your car.
- Next - perform puttying, priming and painting, as described in the previous section.
DIY wheel arches
Application of polyurethane foam
Another suitable material for forming wheel arch extensions is polyurethane foam. Working with it is quite simple, and the algorithm looks like this:
- We use standard plastic fenders as a basis - we divide them into parts and fix them with self-tapping screws on the car body.
- First, from below, and then from above, we blow out layers of polyurethane foam.
- We wait until it dries, after which we give it the desired shape using sandpaper and a knife.
- For strength, we coat the resulting fenders with epoxy and fiberglass, as described above.
- Next we putty, sand, prime and paint as indicated in the previous sections.
DIY arch extensions
The use of wide-profile rubber on cars and SUVs is accompanied not only by a change in appearance, but also by severe contamination of the car body. Wheel arch extensions or, as they are also called, fenders, allow you to level out these negative aspects. You can implement your plans in different ways.
Inflated wheel arches perform two main functions at once:
- Protect the fenders and doors of the car from damage to the paintwork by stones thrown from under the wheels,
- They give the appearance of the entire body an attractive and “muscular” appearance.
At the end of the article, watch the video instructions on how to make arch extensions with your own hands.
There are several popular methods that are used by motorists to increase wheel arches.
Preparatory work and straightening
The first step is to carefully remove the wheel in the area of the damaged wing. We clean the inner surface of visible dirt. We place a wooden block under the jack extensions. This will allow the dent to be squeezed out from the inside without damaging the paintwork. Movements should be smooth.
Using a hammer with a rubber attachment and a mallet, carefully remove visible creases and small dents. Manipulations are carried out gradually from a large depression to the edges of the defect. Use a rubber mallet to smooth out the visible boundaries.
Universal and original fenders for arches
On sale there are both universal wheel arch extensions and original body kits.
- Universal rubber fender flares are sold in roll form. They are usually used by SUV owners. But these additional elements for the body can only fulfill one of the assigned tasks. Rubber fenders will protect the arches from the effects of stones and sand, but they cannot improve the appearance of the car, which is why they are not widely used in car tuning.
- Universal plastic fenders are found on sale in the form of curved blanks. They are mounted to the arch using self-tapping screws.
- Fiberglass body kits can often have defects, both in configuration and in the quality of cutting. Only those motorists who are not afraid of dirty work with putty can install such expanders.
- When installing, it is important to initially accurately attach the material to the arch with self-tapping screws.
- The wing is first protected with masking tape, after which the “blown” arch is puttied.
- After drying, the surface of the fender is smoothed with sandpaper and painted in the body color.
Body manufacturing
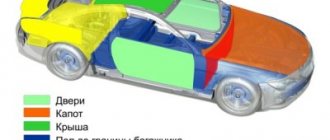
Perhaps the most complex and time-consuming process when creating a car is making the body. After all, it consists of a huge number of parts. The weight of the body is half the weight of the entire car. In addition, the body is subject to significant loads when the car moves from the suspension, the weight of passengers and luggage, pushing forces during movement, the action of wind and precipitation, etc. The shape and outline of the body, its surface and coloring must meet modern aesthetic requirements, and the interior provides the necessary comfort for passengers.Therefore, when manufacturing a minicar, one should achieve simpler body shapes, avoiding its pretentiousness, and reduce various chrome decorations, ornaments and inscriptions to a minimum. The modern direction in body design involves simplifying their shape. The main indicator of the body shape is its proportion, smoothness and cleanliness of the surface, harmonious coloring, convenient location, reliable and neat fastening of lighting and other fittings, instruments and other components.
To obtain a body with good shape and surface, a certain sequence should be followed in its design. The layout drawing discussed in previous sections of the book is taken as a basis. The external contours of the body are drawn by applying transparent paper (tracing paper) to the layout drawing. Then, using these contours, several sketches and drawings are drawn up to select the most appropriate design.
To further develop the body shape, a grid with squares of 40x40 mm is applied to the layout drawing and tracing paper, which corresponds to dimensions of 200x200 mm on a scale of 1:5 (Fig. 40). It helps a lot when choosing a body shape to make models from plaster or plasticine based on these sketches. The contour lines of the body should be in the form of curves, since planes on the surface of the body are undesirable, because they visually appear mostly concave. In addition, convex panels are more rigid than flat ones, which is an important factor for ensuring the strength of the body.
Rice. 40. Layout drawing on the grid
After the final selection of the body shape, for the convenience of its manufacture, it is advisable to make a life-size drawing on plywood sheets or on sheets of thick paper. This drawing can be composite, since the connecting link of its individual parts will be a mesh. Such a drawing is called a plaz drawing or simply a plaz drawing. A series of sections are drawn onto the plaza, as on a topographic map, and then the design of the power circuit and chassis. Typically, there are three projections on a plaza drawing: side view, top view and front view. It is convenient to take templates from the plaza onto tracing paper, which can be used in the manufacture of the body. The scale grid applied to the plaza, the layout drawing and each template allow for the coordination of individual body elements.
Often the shape of the body is determined by the material from which it is made, as well as the type of car. If, when building a body, ready-made cladding and body parts of standard cars are used, this will also affect the appearance of the car, since it will be necessary to adapt to the already existing dimensions of individual elements of the body structure.
If the body is made of sheet aluminum or steel sheets, as well as with plywood and veneer lining, you will need to make its frame either from wood, steel pipes, or from profile material. To make a wooden frame, you need beech, maple, ash and oak. But since these species are expensive, they can be replaced with birch, larch and pine. The wood must be well dried to prevent subsequent warping, weakening of joints, and loosening of nails and screws. In addition, parts made from properly dried wood retain their shape and are easy to process and glue.
In Fig. 41 shows a wooden body frame. You see that the prepared frame parts are connected to each other by butt joints: half-timber, symmetrical tenon and dowel joints and are necessarily glued together. For these purposes, carpentry, casein or bakelite glue can be used, as well as any synthetic glue used for gluing wood. It is better to use casein glue with the addition of lime to increase water resistance. Strongly curved parts must be made either composite with glue from individual elements, or glued together from slats and plywood.
Rice. 41. Construction of a wooden body frame
To give greater strength to the connections of individual parts, nails, screws or bolts with a round head are used. It is necessary to strive to ensure that screws and bolts are installed flush. To protect the frame from loosening and distortion, fittings are used in the form of strips, gussets and angles made of sheet steel 33 mm thick. A square or gusset is attached to the frame using screws or bolts if two fitting parts lying opposite each other on the sides of the frame are pulled together. To strengthen the angle, an additional wall-strut is welded to it, which is a kind of stiffening rib. The frame details include recesses (rebates) for door rebates, recesses for floor panels, as well as cutouts for door hinges, locks and other parts. The joints between metal and wood must be coated with varnish or anti-corrosion paste. Then the frame should be primed and painted.
The cladding is secured to the wooden frame with nails or screws.
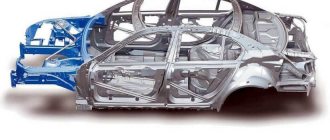
Tubular body frames are made either from steel pipes (in this case it is best to connect them by welding), or from aluminum and aluminum alloys (it is very convenient to connect them with kinks). Pipes for the frame can be taken from bicycle frames, vacuum cleaners, metal ski poles, old children's beds, strollers. The frame does not necessarily have to follow the contours of the body surface, since the lining is attached to it at several points. To do this, when manufacturing the frame, it is necessary to provide for the installation of special platforms, gussets, and angles, which simultaneously serve as reinforcing elements. In addition, if the pipes are steel, door hinges, lock cylinders, and plates for attaching the inner lining are welded to them.
If in the process of manufacturing a tubular frame it is necessary to bend the pipe, then the workpiece is filled with sand, closed at the ends with wooden plugs, and then the bending points are heated with a blowtorch and bent according to the template, tapping with a wooden hammer. Pipes of small diameter can be bent without heating, but sand filling is required to avoid local deformations (flattening).
Aluminum pipes, which can only be welded by a welder with a special device and fluxes, are best connected with kinks. To do this, the end of the pipe is flattened or a slot is made in it, into which a plate is inserted and riveted. The plates of two pipes are pushed together and riveted. You can connect two pipes using a rod on which they are placed tightly and secured with bolts or screws. In addition to platforms and gussets, to attach the outer cladding and interior trim, it is necessary to weld or rivet platforms for attaching the body floor and seats.
The frame made of thin-walled profiles resembles a conventional factory body structure; it is very difficult to make on your own. Each part is made from a profile of a constant section with cutouts, which are made on a special machine.
All frame parts, except for the roof gutter, are straight, since the body shape should be simple. The prepared parts are connected to each other by welding, riveting or bolting. In places where door fittings are installed (door hinges and lock cylinders), reinforcements are welded to the manufactured profiles. In those places where the cladding does not adhere to the frame, intermediate parts are installed. For the manufacture of the frame and body cladding, sheets of low-carbon steel with a thickness of 0.6-3 mm are used. Of course, with good skill, you can make individual frame elements yourself using simple tools. If you do not have such a skill, then frame elements from thin-walled profiles should be purchased at a spare parts store and a body of your own design should be assembled from these elements.
When manufacturing bodies with a wooden frame, especially with a frame made of thin-walled profiles, we recommend using the book by Yu. A. Dolmatovsky “Fundamentals of Automotive Body Design”* as a guide.
* (Yu. A. Dolmatovsky. Fundamentals of car body design. M., Mashgiz, 1962.
)
Perhaps the most acceptable method in amateur automobile construction is the production of bodies in the form of molded shells based on pre-prepared models made of wood veneer, several layers of fabric or paper and laminated plastics.
When making a body from wood veneer, you must first make a wooden blank in the shape of the body or a thin frame. The wooden blank must be detachable from several parts so that after the construction of the body shell is completed, they can be removed. Veneer cut into strips (thin slices of wood) is placed on a blank and nailed down with nails (preferably without heads) so that it covers the entire surface of the model. Protruding pieces of veneer are cut off. Then a second layer is applied to the glue, but in a different direction and also nailed, placing pieces of cardboard under the nail heads. When the glue dries, the nails are removed and the next layer of veneer is applied. The finished veneer shell is cleaned to obtain a smooth surface and covered with canvas or calico. After that all that remains is to putty and paint.
A shell with a thickness of 3-5 mm is strong, but still it is necessary to install frame bars along all its contours. Panels of doors, hood and trunk lids are cut out with a jigsaw or hacksaw from a finished shell or made separately. The shell can be made from several layers of paper or fabric, having previously placed frame bars in it. Such bodies are quite durable, light and cheap to manufacture. In addition, they can be given any desired shape.
The development of the chemical industry and the emergence of new materials make it possible to produce beautiful, durable bodies from various plastic materials that are not inferior in some respects to metal ones and even surpass them. Such bodies are lighter than metal ones, less susceptible to corrosion and easy to manufacture. One of the materials that is not inferior in its properties to steel, but is better at resisting corrosion is laminated plastic based on fiberglass. It uses polyester, phenol-formaldehyde and other resins as binding materials.
Fiberglass plastics resist dynamic loads well, have a high damping ability to dampen vibrations, have good electrical insulation properties and excellent noise insulation qualities, as well as low thermal conductivity.
For amateur automobile construction, a contact method for manufacturing parts and entire bodies and fiberglass on a matrix form made of wood, gypsum metal, plywood, plastic and other materials is acceptable.
Parts made of fiberglass based on polyester resins are not heat resistant enough and ignite faster, but they are cheap and have good mechanical properties. Fiberglass made from epoxy resins has greater strength, but they are much more expensive and the resin is more scarce. When a glass base is impregnated with phenol-formaldehyde resin, a material with good heat resistance and mechanical strength is obtained. In addition, fiberglass plastics based on this material have the lowest cost of raw materials.
To create a fiberglass body, you must first make a life-size model, preferably from clay, since it is the cheapest and most accessible. If the chassis is assembled, then install it without springs and springs on a pre-calibrated horizontal surface. Stops are placed under the front and rear axles to protect the tires from overload. Two longitudinal wooden beams are installed and secured close to the inside of the tires, to which a formwork frame made of rectangular wooden beams is nailed and sheathed with boards.
Clay is applied to the formwork moistened with water and the model is given the desired body shape. Then headlights, sidelights, decorative radiator trim (if equipped) and other decorative trim parts are installed on the model. After which the surface of the body is finally leveled. Since it is best to produce parts from fiberglass in a negative way, i.e., so that the inner surface of the mold is the outer surface of the products, which makes the latter smooth, it is necessary to remove the plaster matrix molds from the finished model of the body. To do this, formwork for plaster forms is arranged around the model. Since it is impossible to make a continuous gypsum matrix mold for the entire body, it is made in separate blocks.
Thin tin plates are used to enclose an area—a certain part of the mold—then a “splash” of 0.5-1.5 cm thick gypsum is applied to the enclosed area. For strength, reinforcement from wire 6 mm thick is molded into it and the layer of gypsum is adjusted to 5-6 cm. When the gypsum has hardened, remove the metal plates, carefully lubricate the ends of the manufactured gypsum block with grease or technical petroleum jelly, fence off the next section and mold it.
The connector of the plaster mold is carried out in the same sequence. The gypsum blocks, generously moistened with water, are carefully rocked and removed from the clay moth. Then they are thoroughly dried and put into matrices, from which fiberglass body parts will be made. The inner surface of the mold is polished with a fine copper mesh, painted with nitro enamel, coated with polyphenyl alcohol and dried until completely dry.
To remove the product from the mold without damage, a separating layer of polymer materials is applied to the prepared working surface of the mold with a wide brush, which is insoluble in binder resins and does not have adhesion to them. To create such a layer, cellophane, polyethylene, polyamide and other polymer films, as well as film-forming solutions, are used. The latter include various aqueous-alcohol solutions of polyvinyl alcohol, gasoline solutions of polyisobutylene and silicone rubber, various polishing pastes and mastics, which, after drying, form a thin film of an anti-adhesive layer on the surface.
Fiberglass plastics are made from glass mats, various glass fabrics, especially satin weave, impregnated with polyester maleate resins of the brands PN-1, PN-2, PN-3, PN-4, etc. The amount of binder resin in fiberglass during contact formation is 60-70%.
We can recommend the following recipe for the binder composition in parts by weight:
Resins PN-1…………………………………………………………………………………100 parts of resin curing initiator - isopropylbenzene hydroperoxide (hyperiz)…………..3 parts of process accelerator curing - cobalt naphthenate in the form of an 8% solution in styrene.....8 parts
To reduce the flow of low-viscosity resin from vertical and inclined surfaces, so-called thixtrope additives or thickeners are used in an amount of up to 5% by weight of the resin. Such thickeners can be: finely ground silicon dioxide, iron, chromium and zinc oxides, as well as polyvinyl chloride resins.
Let us describe the technology for manufacturing parts from fiberglass. A resin with a high content of initiator and curing accelerator is applied over the anti-adhesive layer on the working surface to create a front, decorative hard layer of fiberglass. It can be pre-painted, which eliminates the need for further painting of the finished surface of the body. To obtain such a colored resin, inorganic dyes or pigment varnishes are added to it. Common pigments used include chrome green and yellow, cadmium pigments, ultramarine, zinc dioxide, lithopone, titanium dioxide (in the form of rutile), iron oxide pigments, etc.
For the first decorative layer you should use: PN-1 resin - 100 parts by weight, initiator (isopropylbenzene hydroperoxide) - 6 parts by weight and accelerator (cobalt naphthenate) - 8 parts by weight. This layer not only creates a smooth, shiny surface, but also further protects the glass filler from moisture and chemicals.
After a short exposure for 15-20 minutes. Apply a regular layer of polyester resin. Glass mat or fiberglass is placed on it, which is then carefully rolled into shape with a roller, similar to what is used in photography, and rubbed in with the end of a brush. When the glass filler is sufficiently saturated, a layer of binder is again applied to it and a layer of glass filler is again laid, which is rolled and rubbed in with the end of a brush. Such layers can be applied from 4 to 9 to obtain a panel thickness of 2-4 cm. Many layers can be applied along the edges of the shell to create the necessary strength. After applying all the layers and rolling them thoroughly, the product is kept for 10-12 hours. at a temperature of 10-20°C. After that, the fiberglass is removed from the mold and kept for several days in such a position so that its shape does not change.
During the manufacturing process of the body, metal parts, support platforms for attaching the car frame and individual chassis and suspension components can be glued into it. The surface is painted, if colored resins have not been used, with nitro paints after finishing work on the edges of the product.
BF glue can serve as a good binding material for the manufacture of fiberglass. It adheres very strongly to fiberglass and produces fiberglass with good qualities.
Epoxy resins are also used as a binder component. Our industry produces several grades of epoxy resins, of which ED-6 grade resin is mainly used for the preparation of fiberglass.
Products made on the basis of epoxy resins are first dried at room temperature and then heat treated at a temperature of 120-150°C. A plastic body made of fiberglass based on epoxy resins is not uncommon. For example, it was manufactured at the Kharkov Road Institute and other places.
When making a plastic body, you should remember the safety rules. It is most convenient and safe to work in the summer outdoors or under a canopy (in warm sunny weather). If work is performed indoors, it should be well ventilated to prevent high concentrations of harmful fumes. It is best to wear rubber gloves on your hands. You can also protect them from chemically harmful substances with silicone cream.
Smoking and using open flames near work sites is prohibited to avoid fire. When working with fiberglass, glass dust getting on the body causes irritation and itching. Therefore, the sleeves of a jacket or shirt should be tied and the collar buttoned tightly. After finishing work, wash your hands and face thoroughly with warm water and soap.
In addition to the outer cladding and inner lining, the car body has windows and doors. According to technical specifications, the front windshield must be unbreakable, made of triplex or stalinite. Therefore, it is best to use ready-made automobile glass.
The glass is secured in the body using a rubber profile of a special cross-section, used in standard cars. For reliable fastening, it is important that the contour of the opening strictly matches the contour of the glass.
It is also better to make all other windows, except door ones, blind, installing plexiglass or glass plates in them in rubber sealing profiles. In the body doors, either sliding glass should be made in a frame made of a steel profile, which is not difficult to make on your own, or sliding glass without a window frames that are best taken ready-made from production cars.
It is best to make two doors in the back of a homemade car. They must have a body (with a frame or consisting of outer and inner panels), hinges, a lock with a cylinder on the body pillar, guide pins, buffers, a glass opening limiter and glass with grooves for its movement. It is best to use a door from a Zaporozhets or Moskvich car. When installing and adjusting the door, its position should be fixed with hinges, a lock, spikes and buffers. The gap between the door and the body at the top and sides should be 5-7 cm wide, and at the bottom 10-13 mm. It is covered with a rubber seal, which also serves as a buffer.
Locks, buffers and guide pins must be taken from Moskvich, Zaporozhets, GAZ-69 cars and SZA motorized strollers. Currently, front hinges are widely used, which prevents the door from opening itself when the car is moving, since the flow of oncoming air presses it against the body. The hinges are attached to the body pillar and to the door using screws (with a wooden frame), bolts, and to reduce air resistance and give the car a better appearance, the hinges are usually installed flush. Door opening limiters, which protect the hinges from breaking or bending, and the outer door panel from contact with the surface of the body, are made of a belt or dense fabric folded several times.
Now let's look at the method of making the seat. Let us remember that it must exert minimal specific pressure on the human body and at the same time dampen some of the vibrations that are transmitted to it through the body. This is especially necessary for cars where it is not possible to obtain a suspension that provides sufficiently good body vibration characteristics.
In Fig. 42 shows the main parts of the seat. It consists of a tubular frame 5, which can be made from pipes with a diameter of 20-25 mm with a wall thickness of 1-1.5 mm, a slide 6 for adjusting the position of the seat and elements that ensure a comfortable seat for the passenger, the least pressure and damping of the resulting vibrations. The frame and slides serve to secure the seat in the body and mount other elements on them. The required frequency and amplitude of vibration are ensured by the selection of seat springs.
Rice. 42. Main parts of the seat: 1 - pillow; 2 - back; 3 - upholstery; 4 - mattress; 5 - skeleton; 6 — sled; 7 - springs
The seat is covered with a cover or upholstery 3 made of leatherette and other dense upholstery fabric. With open bodies, it must be upholstered in leather, leatherette or autobeam. Spring elements in seat cushions can be replaced with rubber belts stretched over the frame, blocks of sponge rubber or porous plastic (foam rubber), as well as inflatable rubber balloons. In this case, there is no need for special shock absorbers.
Another seat design recommended in amateur automotive construction is shown in Figure 43, b. The seat consists of a tubular frame on which rubber bands cut from old car inner tubes are stretched. It turns out, as in the first case (Fig. 43, a), a springy lattice, on which a mattress made of spongy rubber, foam rubber, cotton wool, or wool is then placed. The whole thing is covered with upholstery material on top and secured to the frame with screws or lacing.
Rice. 43. Recommended seat designs for microcars: a - with a metal spring frame; b - with a springy frame made of rubber bands; c - semi-rigid type on a sheet frame
You can make a semi-rigid seat. To do this, panels are made on the seat frame from sheet metal, plastic, wood veneer, which should have the shape of a seated person. Then a mattress 25-35 mm thick is placed on the panels and upholstered (Fig. 43, c). Ventilation holes should be made in the panels, which, by the way, are also necessary when constructing soft seats.
Rear seats that do not require adjustment can be made without a special frame by securing individual tubes or panels into the body shell, onto which the remaining elements are then placed and reinforced.
After final assembly of all body elements, installation of seats, placement of necessary devices, the interior of the body should be upholstered. It includes the following operations: headliner, doors, side panels, front wall, pillars and rear side panels.
The cut-out headliner is secured using strips of pressed cardboard, to which it is nailed. These strips are attached to the windshield and rear window frames with metal screws. Across the upholstery, on the inside, strips of fabric folded in half are hemmed with a hidden seam, which form covers for threading the upholstery fastening rods. The side edges of the upholstery are nailed through the seam, under which the edge of the doorway seal is also placed. Previously, strips of pressed cardboard are reinforced along the edges into the body elements. The edging consists of a rubber cord and a cover made of leatherette or durable woven fabric.
The upholstery of the rack is glued onto a strip of cardboard and, together with the edging of the door opening seal, is nailed to strips of wood or pressed cardboard, secured in the grooves of the rack with special claws. The upper part of the upholstery is made of cloth or thick upholstery fabric.
The door upholstery is glued onto cardboard, and the lower part is made of leatherette, leather or other durable material that resists mechanical stress and is easy to clean. The joint between cloth upholstery and other material is covered with a metal overlay or stitching. The upholstery is folded over the edge of a cardboard sheet and covered with a strip of leatherette or leather. The upholstery assembled with cardboard is secured using metal screws with facing washers. With a wooden body frame, the upholstery is reinforced with nails. If the body is open, then all the upholstery must be made of a material that is not afraid of moisture.
Having considered the basic provisions for the design and manufacture of bodies for minicars, we will dwell on some features of the body designs of already created cars. The simplest and at the same time providing sufficient rigidity and strength of the structure are open sports-type bodies that do not have doors.
A body without doorways can be made not only open (sports type), but also closed with a sliding top.
The top cap of the body can be made not sliding, but tilting, as, for example, on the body of a minicar shown in Fig. 44.
Rice. 44. Hood
The low body height of microcars and the small size of the doors often make it difficult for passengers and the driver to get in and out. To avoid this, the door fastening design should be changed. Install the hinges at the top of the body so that the door swings upward when opened. This is how, for example, the body doors of the “Frisky” (Fig. 45) and “Chaika” cars were made. However, these designs have a drawback: the doors are poorly sealed. A similar defect is to some extent observed on the side doors of other cars.
Rice. 45. Hinged door
To ensure that the door fits on one plane and thereby improve the seal, in some models of minicars the doors are located in the front part, for example, on the Izetta and Belka cars (Fig. 46). The body in this case is single-door, which increases its rigidity and strength. But this design also has a significant drawback: the car controls and instruments located at the front of the door panel have additional hinge devices so that they can be folded back together with the door and not interfere with passage into the passenger area.
Rice. 46. Front door location
In home-made minicars, you can use a sliding door design, similar to the one made in a taxi car manufactured at the All-Union Scientific Research Institute of Technical Aesthetics (VNIITE). When opened, the door moves backward using an electric drive. Of course, this drive can also be mechanical. The disadvantage of such doors is that they can become jammed during impacts and body distortion. The body of the Cinderella car is made of millimeter steel sheet. To give the body panels the required shape, a special simple device was used. It consists of a round log with a diameter of 130 mm, through which two bolts pass along the edges, attracting a thick wooden beam. Handles-levers are fixed in the log. The steel sheet is clamped in this device with levers and rolled onto the log, giving the sheet the desired rounding radius. In the places where the body wings transition to the hood and trunk lid, taken from the Moskvich car, steel sheets are bent into wooden models using a special tool used in tinsmithing when working on the manufacture of the body.
A simpler body is the microcar, developed by the designers of the Moscow Automobile Plant named after. Likhacheva. The frame of the body is made of boards and, when assembled, is a box capable of absorbing all the loads when the car is moving. The frame is assembled from pre-prepared shields: two sidewalls, front and back parts and a bottom. The panels are assembled from tongue-and-groove boards with glue and reinforced with a steel welded frame made from 20x20 mm angles. The front and rear suspension units, assembled on special subframes, are mounted on the frame. On top and sides, after the final installation of the chassis components, the frame is sheathed with either plywood or a thin steel sheet. Thus, the body is given the desired shape.
The body frame of the "Eaglet" car is made of slats fastened with a duralumin corner. The outside of the frame is sheathed with thin steel sheets in separate panels. These panels make up the two front and two rear fenders, the hood and the trunk. The car has one door located near the driver's seat. The interior upholstery of the body is made of plywood. The body floor is made of sheets of multi-layer plywood.
It is possible to make a body with a removable light awning similar to the motorized strollers of the Serpukhov plant, or with a convertible-type body, when only the light top of the body roof moves, and the side windows along with the edging remain in place.
The important thing in the design of homemade microcars is that the body of each of them is unique, unique, and here the imagination and design skill of the car enthusiast can unfold. Therefore, by citing certain design features of various body models, we do not impose the final version of the design solution on the reader, so as not to hamper his initiative. Let each model be original. Of course, one should not forget about simplicity and expediency.
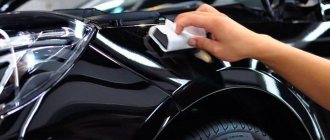
During the manufacture of the body, it is necessary to make headlights, side lights, brake lights, license plates, mud flaps, and buffer devices. When the car is finally assembled and all its components are adjusted, it is necessary to paint it, after first cleaning the surface from rust, scale and greasy stains, and wipe it with acetone. This process is quite complicated.
Painting is best done with nitro paints using a spray gun. If you don't have a special paint sprayer, you can use the paint attachment that comes with your vacuum cleaners. The car is painted using the following technology. Using a spray gun, apply primer M-160 in a thin layer. This layer is allowed to dry thoroughly, after which the surface of the body is sanded with No. 00 emery cloth. Then, with a steel spatula, individual areas of the body are greased to level the surface. After the local compound has dried, it is sanded using waterproof sandpaper No. 220 with water. If you find areas that have been sanded down to metal, prime them again, followed by drying and grinding.
After priming with liquid putty No. 175, apply the first layer using a spray gun, then dry for 15 minutes, after which the second layer is applied. When it dries, they begin sanding with waterproof sandpaper and water, wiping it dry and drying again. After this, a layer of nitro paint with M-647 solvent is applied. The first coat of paint is called revealer. After drying it for 12 minutes. correct defects on the surface of the body using nitro putty No. 702 and sand with sandpaper No. 280 with white alcohol, then wipe the surface with a rag and dry again.
After this, four more layers are applied with nitro paint of the desired color, with natural drying after the next layer for 20 minutes. When the last painted layer has dried well, the surface of the body is sanded with waterproof sandpaper No. 360 with water. After this process is completed, the polished surface is washed with sand and wiped with suede. Apply polishing paste 290 to the dried and degreased layer and begin to polish the painted surface. Degrease the surface by wiping it with gauze soaked in M-401.
If the body is painted with nitro enamels, then the preparatory operations are the same as described above, and painting is carried out using the following technology.
Using primer No. 138, apply the first layer of enamel using a spray gun. After drying, it is sanded with waterproof sandpaper and then dried. Then a second layer of enamel is applied, and when it dries, a third. Painting the surface, as in the previous case, is followed by polishing with a special paste.
It must be remembered that the surface of the body after painting must be smooth, without cracks or paint smudges. It should not have uneven borders when painted with different colors, unpainted areas, and especially no traces of corrosion.
DIY arch extensions
You can expand the wheel arches yourself using various materials. As a rule, all homemade fenders for arches are made of fiberglass. However, the basis of such expanders may be different.
Below we provide a brief description, and at the end of the article there is a video that clearly shows how you can make fenders for arches with your own hands.
Arch extensions based on polystyrene foam (foam)
A good material for increasing the volume of wheel arches is polystyrene foam. The sequence of manufacturing styrofoam-based fenders will be as follows:
- Pieces of the required size are glued to the surface of the body using “macroflex”.
- After the glue has dried, the foam styrene is processed with an electric knife and coarse sandpaper.
- The treated surface is covered with a layer of resin and fiberglass to add strength.
- The pieces of fiberglass are laid overlapping each other; it is important to remove any air bubbles that appear in a timely manner.
- When the fiberglass layer is dry, a rough putty is applied.
- The dried surface is smoothed with sandpaper.
- Existing sinks are filled with a finishing layer of putty.
- If necessary, several more layers of fiberglass are applied, followed by puttying, sanding, priming and painting.
Making fenders for arches using sculptural plasticine
Fender flares can also be made from fiberglass using sculpting clay.
- The working surface of the body element is previously covered with masking tape.
- Softened plasticine is spread on the wings. First, the material is rubbed into the masking tape in a thin layer, and then the volume of the arch is created in large pieces.
- The most difficult job will be giving the arches a symmetrical shape.
- Next, epoxy resin and fiberglass are applied. The number of layers must be more than three.
- After drying, the resulting expander matrices are removed along with the plasticine. The inner surface of a homemade fender is cleaned of plasticine.
- All that remains is to fit the parts in place and attach them to the arches using self-tapping screws and sealant.
- The final stage will be the same finishing operations of grinding and applying paints and varnishes.
Arch extensions based on polyurethane foam
To make a mold for expanding the arch, you can also use polyurethane foam as a base.
- The base is made from universal plastic arches. The plastic is cut into pieces and attached to the wing with self-tapping screws.
- Polyurethane foam is applied immediately inside the arch, and then outside.
- When the foam has completely hardened, the arch is trimmed to the required geometry using a utility knife and sandpaper.
- The next step will be to reinforce the structure using fiberglass and resin. A minimum of 2 layers of fiberglass should be applied.
- All that remains is finishing (sanding, priming and painting).
It makes sense to widen the wheel arches only when the car has wide tires. Blown arches will not only change the design of the car, but will also save body parts from chips and damage.
How to expand the body
The most passionate lovers of car tuning are often unable to dwell on the achieved results of restyling and strive to modify their “iron horse” beyond recognition, right down to its size... If only there was a desire, one could create a “Mercedes” from a “Cossack”. So, let's expand the body.
Creating a body extension yourself is not easy, but it is economical. If you turn to professionals, the costs increase significantly, but the result is worth it.
Every day an insurance product called “extended compulsory motor liability insurance” is becoming more and more popular. What is it, is it advisable to purchase this insurance? 1 Surely, every car owner knows that currently, according to current legislation, the maximum compensation for compulsory motor liability insurance is 120 thousand rubles. Unfortunately, no driver is immune from unpleasant incidents on the road. Fine, […]
UAZ is one of the most popular domestic cars that Russian car enthusiasts take for off-road use. However, there is no limit to perfection, and after the factory you still need to work on the car so that it can overcome a ford, drive through the taiga, and not get stuck in a deep rut. One of the fundamental changes to a car is its lifting – that is, raising [...]
A presentable appearance and excellent performance of the car body are ensured by regular preventive maintenance. Following simple recommendations will save a lot of money on cosmetic and major body repairs. Proper car maintenance allows you to avoid problems such as corrosion, damage to the paintwork, and malfunction of individual parts. 1 At the forefront of all body care activities is regular washing, before […]
Do you know when the first gasoline car was patented? This happened more than a hundred years ago - in 1885, and it was invented by the German engineer Karl Benz. Years have passed, but the car still consists of the same components as before, but only slightly modernized. 1 The main parts of a car are the engine, body and chassis. All […]
AlL8 › Blog › Metalshaping. Making a wing with your own hands. Part 1.
Well, dear readers, today I will begin to introduce you to the boundless world of metalshaping. And if you still don’t know what it is, then I’ll explain to you. Metalshaping is the forming of sheet metal products. For example; You have a pickup truck from the 60s, but it doesn’t have rear fenders. This is where Dr. Watson and I come in and make you these same wings from a regular straight
sheet of body decoper 0.8
See how it's done, it's very simple.
First, let's get a pickup truck. We will need it to make a model of these same wings.
As you can see in this photo, he really doesn't have enough wings.
So. We start with the mating plane. we make it from 2 or 3.
then we build a frame on it. Bend the wire on your knees or anything else that will be under your arms/legs. the wire should be taken more thickly
, why - it will become clear a little much later. in the photo the wire is 4k, in my opinion... it was my mistake, because... the frame, bastard, bent as it wanted...
we build up the “bones” and with the help of a semi-automatic welding machine we ultimately get a mock-up frame.
This completes a serious milestone in wing construction. Congratulations!
Then the patterns are removed from the layout. Any seamstress can teach you this, you just need to find her and ask her about everything in detail. I used newspapers\marker\scissors\magnets to remove patterns. Yes, my friend, don’t be surprised by the presence of magnets on this list. They will be needed to attach that same newspaper to the frame (you used wire with magnetic properties, right?) while removing patterns. element-by-element patterns should have an overlap of 2-3 cm, which will become clear later.
I divided the wing into 5 elements: bottom front, bottom rear, middle, front cheek, rear cheek.
and began to transfer newspaper patterns to the decopier. routine
in the following posts I will tell you how to get this from a straight sheet
Source
Wheel arch extensions
Surely, many have seen wheel arch extensions or linings on various cars, more often SUVs. Many people think that these details serve as some kind of decorative element, however, the function of arch extensions is not limited to this. Let's try to figure out what widened wheel arches are, what is their main function and how to make them yourself?
Why are wheel arch extensions needed?
Off-road driving or frequent visits to rural areas necessarily requires further car washing. The fact is that wide-profile tires, most suitable for driving on such terrain, protrude significantly beyond the car’s arches. All the dirt collected on the tire treads, when the wheel rotates, flies towards the body, as a result of which it becomes quite dirty. To combat this problem, many SUV designers have made the vehicle body significantly wider by increasing the protrusion of the wheel arches.
This improvement did not apply to all cars. Many models are produced on ordinary narrow tires, which insatiable drivers are sure to replace with wide-profile ones. The wheel arches, in turn, remain the same size, which makes it necessary to increase them.
Increasing the width of the wheel arches is now possible with special linings that attach to the car body and make it a little wider. Wheel arch extensions are produced as car accessories and are installed outside the factory.
Ways to widen wheel arches
There are two ways to increase the width of the wheel arches. The first is to install special car linings, and the second involves making these parts yourself, based on the driver’s taste preferences.
Wheel arch extensions found on sale can be of three main types:
- Universal . For universal extenders, there is no clear restriction on the make and model of the car. They are sold in the form of special rubber rolls, which are adjusted to the arch of the car and attached to the arch from the reverse side. This extender allows you to protect the car body from the ejection of small pebbles or dirt, but it has a rather significant drawback for drivers - an ugly design. Their execution worsens the appearance of the car, which is why such arches are used only by SUV drivers. However, the ugliness of these parts is offset by the low cost.
- Universal plastic pads . They have a more advanced design and look good on many cars. There is already a limitation on the make and model of the car, since they are manufactured only in special sizes. Installing an extender from one car to another model is not possible. Fastening to the body is carried out using self-tapping screws. For all their aesthetic advantages, these arches do not protect the body well from dirt and are best used as decoration.
- Fiberglass arch extensions . They are a perfect addition to the body and have some installation difficulties. They are made from rough material, the appearance of which is far from comparable to the commercial one. Such expanders are also fastened using self-tapping screws, but the surface of the linings is cleaned and a layer of putty is applied to them. After which, the part is aligned with the body and painted in the color of the car body. Thus, the result is a wheel arch extension that becomes one with the body and invisible to the naked eye. Installing such an overlay will require additional painting experience.
Individual tuning. Making a plastic hood and wings
For car enthusiasts who are particularly sophisticated in tuning, sometimes it’s not enough just to put a plastic splash on the hood or fenders. More sophisticated tuning can be done by making them entirely from fiberglass. Here a wide field for creativity opens up: all elements can be solid cast and flow logically from the surfaces of the hood and wings, you can make the first decorative layer of carbon fiber “under varnish”, etc. But here you cannot do without sacrifices: the original fenders and hood will serve as a model for the plastic ones, the paint on them will be damaged, and you will have to repaint it if you plan to use them further. Additional holes may also appear on them.
We can create these parts without a matrix, but we will have to try. The crust that we will remove from the tin parts will be 2 mm larger than the entire side. Therefore, in order for the new parts to fit into place just like the old ones, they will need to be redrawn.
Let's start with the hood. Create a scale sketch of the future part, combining the intended contours with the actual geometry of the factory hood. Check whether the original hood sits well in its opening; if not, you need to straighten it, because the cast from it will sit the same way. Now remove the hood, disconnect the canopies and power accumulators. Remove all wires and tubes from the reinforcement boxes. Goodbye old man, you won't come back here again!
All-plastic car parts (photo: mastercomposit.com.ua)
Matte the original paint on the front and back of the hood. Now make holes in the tin where the “nostrils” or “gills” will be. Apply additional elements made of fiberglass profiles or polyurethane foam, attaching them to the putty. Sand all parts using R40 sandpaper. If you plan to make new stiffeners on the front of the hood, draw them with a marker. Apply the rib on only one side of the line, carefully cleaning off the excess that has crawled beyond this border. When the required rib height is reached, level the rib with sandpaper and putty on the other side. Now you just need to apply the putty evenly, the edge will not “run away” anywhere. Finish the transitions from the surface to the holes. Now sand the entire front surface of the hood with finer sandpaper, say P240. Cover it several times with disposable PVA release agent, or Norslip. After the separator has completely dried, apply 2 mm of laminate to the entire surface. If the hood has both “nostrils” and “gills”, the openings of which are directed in different directions, then the openings of one of these elements do not need to be covered with laminate, otherwise the crust will not be removed. Make the edge of the laminate on a line where there is still no obstruction to removing the peel in one direction.
How to make wheel arch extensions with your own hands?
If for some reason you cannot purchase extenders in the store, you can make them yourself from various materials. Most often, the linings are made of special fiberglass, but there may be a different base. Each material has its own installation method.
- Styrofoam. Polystyrene foam is a lightweight material that can be easily cut. Cut into the required shape and follow the following procedure:
1. Attach the workpiece to the car body using “macroflex”. Adjustment to the required shape can be done after the glue has dried using a special electric knife. After this, sand the surface of the foam using sandpaper.
2. To increase the strength of the foam, it must be coated with a layer of resin and a thin layer of fiberglass. Try to lay the pieces of fiberglass overlapping each other and remove any bubbles that form in time. Otherwise, there is a risk of seriously damaging the workpiece.
3. After the last two layers have dried, apply putty to the surface to be treated. Once it is dry, sand it down so that its shape is even and flows smoothly into the body of the car. It is quite possible that while you are leveling the surface of the future expander, small cavities may form. All this is eliminated with another layer of putty and processed again to a smooth state. This procedure is carried out until the surface is completely leveled, and after which a primer and paint material in the color of the car are applied.
- Sculptural plasticine. Arch extensions can be made not only from polystyrene foam, but also from special plasticine.
DIY car fender repair: final straightening
Work must be carried out carefully, with minimal force applied to the surface of the wing. Try not to overdo it, otherwise the metal will stretch until a through hole is formed, after which you will have to use electric welding. Measure the efforts made and, most importantly, learn to “feel” the metal. The technology of the final stage of straightening is the methodical elimination of large defects, gradually reducing them to smaller, minimal ones.
Upon completion of straightening, the entire surface to be leveled should be treated with sandpaper. First you need to use No. 80, it is advisable to clean the surface of the wing to the metal.
Body extension
Dear VladimirVS, hello. I have read a large number of topics on this forum, but still, I still have questions about registration for you.
1) The expansion affected the rear fenders, doors, sills and trunk. 2) The car was converted from a sedan to a coupe. 3) Custom bumpers were made. 4) The neck of the gas tank has been moved. The integrity of the neck has been preserved, only the location and hatch have changed. 5) New side windows were made from plexiglass, covered with a protective film on both sides. 6) The color of the car has been changed.
Manufacturing took place with the help of a qualified welder. The technical aspects of the car were not touched upon, only the visual ones. I studied the procedure (viewtopic.php?f=2&t=2194)
Questions: Is such a conversion possible? Where can I see an example of filling out an application to the traffic police?
- Registration: Apr 2009
- Posts: 3431
Re: Body extension
A comment
- Registration: Apr 2011
- Posts: 20
Re: Body extension
Thank you for your quick response.
3) The bumpers were made “by hand”. Accordingly, there is no certificate. In my opinion, the bumpers comply with UNECE regulations No. 26. 4) It is necessary to take photographs. I will write a “mini-report” soon. 5) Glass, I assume, complies with UNECE rules No. 43, because were manufactured by analogy with certified glass. The fact is that I was officially refused by production, citing the refusal as being too small a batch. As if: “We won’t take on such an order, because... The minimum order should be 30 thousand rubles.” Therefore, glass was made in the same production, only “on the left”, through a familiar glazier. Accordingly, I cannot obtain a certificate for them.
I would be very grateful for your advice!
A comment
- Registration: Apr 2011
- Posts: 20
Re: Body extension
Fuel tank neck: The neck is a bowl with two tubes. The first is intended for direct fuel filling, the second is for feedback from the engine and air release when filling the gas tank. Initially, the neck was in its standard place, on a rubber suspension and connected to the fuel hoses using clamps. In this regard, it was not difficult to dismantle the product, which preserved the integrity of the rear wing. When the neck was moved to the upper part of the “visual extension of the body,” there was no change in the integrity of the product. The fuel hoses were extended using oil/gasoline resistant pipes from a GAZelle car and secured with clamps. The visual transfer length is approximately 100mm. The neck has been tested and meets all original specifications. Welding work was carried out while maintaining safety requirements.
Owner reviews
Plastic fenders for Kalina
( author ):
Everything fits into its standard places and fastenings. On the one hand, I actually had to drill out a little the hole for the mount in the door opening (under the fender liner) and that’s it! The gaps are comparable to the factory ones, nothing bulges or sticks out anywhere. The rubber seals between the fender liners and the wing also fit like originals.
Now they are from a different manufacturer (also plastic) - there is a gap in winter/summer and there were problems with installation, but there are no major problems either.
Plastic fenders for Kalina
( author ):
Regarding the installation, and precisely setting the gaps, I had to work hard. Adding to the inconvenience was the fact that the wings had already been painted, so we had to act with extreme caution.
The gap near the headlight was too big, so I reduced it using a pre-purchased seal, which is very universal and fits quite a lot of places. There is nothing wrong with the gap near the door.
I had to slightly drill out the mounting holes under the hood, but nothing critical.
Personally, I like everything, I’ll adjust the gaps a little later and everything will be absolutely fine
Plastic fenders and hood for Kalina
( author ):
Wings... Through each segment of a certain length there are some points. But these are minor things. The gaps are just terrible. I spent a long time finishing it with a hairdryer... in the end it was smoother, but not particularly smooth. On the left side there’s some kind of horror... Near the hood it’s even tinny). With the doors, too, not everything is smooth in terms of gaps. And then the bumper mounts... The bumper that will stand will not fit into them and the mounts themselves are liquid... Having installed the original steel fenders, I realized that the plastic hood is also not entirely smooth. There is no locking pad inside the hood. It was decided that the plastic kit would be sold at half the price). In the end, I found the original, in a factory cataphoresis.
Conclusion
: Car owners respond differently to plastic body parts. Much depends on the manufacturer. Therefore, before purchasing, read the reviews of the specific company that will produce components for you. And also make sure that this manufacturer has a certificate of conformity for the plastic parts you are interested in.
Where can I buy
: In our online store (Authority Plast Plus products, it is a manufacturer and supplier of parts to AVTOVAZ).
Have you installed plastic body parts on your car?
Source