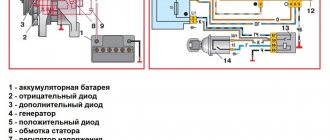
Description and purpose of thresholds on the VAZ 2107
The body of the VAZ 2107 is frameless, that is, the overall rigidity of the body is ensured only by its parts. Conventionally, these details can be divided into three parts:
- front elements: hood, fenders, bumper and radiator grille;
- rear elements: rear apron, trunk lid and rear fenders;
- middle part: roof, doors and thresholds.
Thresholds are an integral element of the side of the “Seven” body.
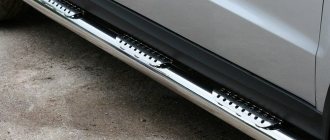
The thresholds on the VAZ 2107 are long steel plates with a C-shaped section
These are long C-section steel plates located under the lower edge of the doors and adjacent to the car's fenders. The sills are attached to the body using spot welding. And if the driver decides to change them, he will have to cut them off.
Purpose of thresholds
Novice car enthusiasts often think that the functions of the thresholds on the VAZ 2107 are purely decorative, and the thresholds are needed only to give the car body a presentable appearance. This is mistake. Thresholds have other functions besides purely decorative ones:
- strengthening the car body. As already emphasized above, the VAZ 2107 does not have a frame. The thresholds, welded to the body and wings, form a kind of power frame. Moreover, it is quite strong, since its side elements have their own stiffening ribs (which is why the threshold plates have a C-shaped section);
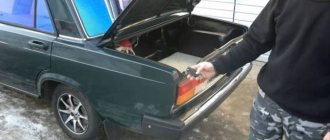
- providing support for the jack. If the driver of the "seven" urgently needs to lift the car using a jack, then to do this he will have to use one of the jack sockets located under the bottom of the car. These sockets are pieces of square pipe welded directly to the car sills. If the “seven” did not have thresholds, then any attempt to lift the car with a jack would lead to deformation of first the bottom and then the car door. A jack could easily crush it all;
Jack sockets are welded to the thresholds of the “Seven”, without which the car cannot be lifted - protective function. Thresholds protect car doors from stones and dirt flying from below. They are also used for their intended purpose: they serve as a support for passengers getting into the car.
Reasons for replacing thresholds
The thresholds of the “seven”, like any other part, become unusable over time. Here's why this happens:
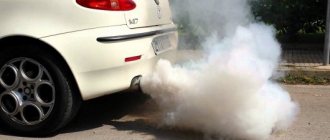
- corrosion. Since the rapids are located close to the ground, they are the ones that absorb dirt, moisture and chemical reagents that are sprinkled on icy roads. All these things negatively affect the condition of the thresholds. Their design is such that moisture that gets inside cannot evaporate for a very long time. Therefore, in the thresholds, pinpoint foci of corrosion first appear, and then it spreads over the entire inner surface of the threshold. Over time, the threshold may rust through;
Because of road reagents, the threshold of the “seven” has rusted through - mechanical damage. The driver may accidentally hit the threshold against a high curb or other obstacle. A stone or something else might hit the threshold. As a result, the threshold is deformed, which leads to a serious violation of not only the geometry of the body, but also its rigidity.
If the owner of the “Seven” is faced with any of the above, then he has only one way out: change the thresholds.
Reasons for replacing thresholds
Rotten thresholds on the VAZ 2107 are a matter of time. To extend the life of these body elements, you need to know the reasons why such an unpleasant problem as corrosion destruction occurs. The reasons why the threshold on the VAZ 2107 rotted are as follows:
- Corrosion - the underbody and sills are exposed to maximum moisture, which is the cause of damage to body elements. Moisture that gets inside the space of a part cannot evaporate for a long time, so a process such as corrosion occurs. The element deteriorates at an accelerated rate when it is exposed to water and reagents that are sprinkled on roads during icy conditions. The first thing that occurs is pinpoint corrosion, which is also called “saffron milk caps”. They are the first harbingers that you will soon need to resort to repairs.
- Mechanical impacts - damage to the car body can accelerate the process of rotting. This type of damage includes impacts from rocks, curbs or vehicles. When the device is deformed, the geometry of the body is disrupted. Mechanical damage causes damage to the paintwork, allowing moisture to enter and destroy the metal surface of the body.
If one of the above reasons is observed, then the driver will soon need to have the devices repaired. Repair most often involves replacing them. When replacing, you need to weld the thresholds, so you will need a welding machine.
What is needed for replacement
Replacing thresholds on a VAZ 2107 is a rather labor-intensive procedure, but almost every car owner can do it with his own hands. To repair thresholds, you will need to first prepare tools and materials. These include:
- Power tools - drill, grinder and welding machine.
- Primer and paint.
- Clamps - at least 4 pieces.
- Special joint sealant.
- New elements that will be installed to replace old ones.
These are the basic tools and materials. Additionally, you will need hand tools and supplies. During the work, it may be necessary to replace the amplifier if it is rotten. You can determine its serviceability after removing the old thresholds on a VAZ 2107 car. In this case, corrosion spots or holes will be detected on the amplifier. Let's look at how to remove and replace car body parts below.
Procedure for replacing thresholds on the seven
How to replace thresholds on a VAZ 2107 is described in detail in the material. We begin to carry out work, for which the following sequence is observed:
- Old rotten thresholds must be removed using a grinder. To do this, it is recommended to first remove the front and rear doors and drive the car onto a one-way overpass.
- After this, the condition of the threshold amplifier is checked. The amplifier looks like a steel plate with holes. If this plate shows signs of corrosion damage, then it is necessary to replace the entire amplifier or weld the damaged part.
- Using a grinder and special wheels, you will need to clean the surfaces for welding work. To do this, you will need to remove all unevenness and dirt.
- If amplifiers are being replaced, they must first be tried on and adjusted to the installation location. To do this, corresponding holes with a diameter of 4-6 mm are drilled every 50-70 mm.
- The amplifier is welded to the car body. The joints must be cleaned, and then the entire surface of the element must be treated with an anti-corrosion agent.
- After this, you can begin installing new thresholds on the VAZ 2107. The new element is tried on, after which it is fixed using clamps or clamping pliers.
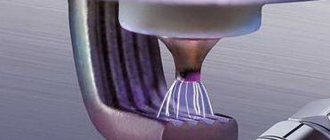
- Holes are drilled through which the welding connection will be made. Any type of welding is suitable for the job, but it is better to use a semi-automatic welding machine, since the thickness of the metal thresholds does not exceed 1 mm.
- Next, welding is applied. First, we weld the part in the drilled holes around the perimeter, and then you need to weld the part to the car pillar. It all depends on the experience of the welder. The neater the seam, the less work will need to be done after welding.
- After the part is welded, you can begin cleaning the seams. After cleaning, you need to coat the joints with a special joint sealant.
- Now you need to putty the joints. Putty is needed to level the surface of the thresholds with the surface of the car body.
- At the final stage, the part is painted. It is important to take your time here and adhere to all technologically recommended deadlines. After painting, you must also wait until the paint is completely dry.
About local threshold repair
The need for such repairs arises when the threshold is not rusty, but simply deformed due to the impact so much that a hole appears in it. In this case, the car owner can resort to local repair of thresholds, which consists of straightening the deformed area and then welding it.
This task may seem simple to some, but it is not. Because local repair of thresholds requires special equipment and extensive experience working with a welding machine. A novice driver usually has neither the first nor the second. So there is only one way out: seek qualified help from a car service center.
Local repair sequence
Let's consider in general terms what exactly auto mechanics do when they get a "seven" with crumpled and torn sills.
- Hoses with small hydraulic devices are inserted through the hole into the threshold. Then pressure is applied to these mini-jacks from the compressor, and they begin to squeeze the crumpled section of the threshold outward, straightening it.
- Then one or more small anvils are installed under the raised section of the threshold and careful manual editing of the threshold begins using a special hammer. This is a very lengthy and painstaking procedure.
- After the deformed area is completely leveled, the hole in the threshold is welded. This can be either welding the torn edges of the threshold, or applying a patch if too large a piece has been torn out of the threshold and it is impossible to weld the edges.
About homemade thresholds
If for some reason a car owner is not satisfied with the quality of factory thresholds, he makes the thresholds with his own hands. However, it is worth noting that in the vast majority of cases there is no need to make thresholds yourself, and here’s why:
- Today the range of ready-made VAZ thresholds in stores is very wide. They can be different both in the type of anti-corrosion coating and in thickness. All a car enthusiast needs to do is look hard;
- making a high-quality threshold yourself is not an easy task, despite the apparent simplicity of this part. A novice car enthusiast is unlikely to be able to cope with this task, since it will require not only the skills of a welder, but also serious skills of a mechanic and tinsmith.
Nevertheless, there are car owners who are not deterred by the above difficulties, and they begin to invent. Here's how it happens:
- homemade thresholds are made from square steel pipes, carefully cutting them lengthwise;
- After cutting, the pipe is given the appropriate shape. The pipe is cut and adjusted to fit the cut out part of the threshold. This is a very lengthy procedure, since the tubes are usually the thickest. And giving them the desired shape requires considerable effort;
The threshold on this “seven” is made of a square steel pipe, cut lengthwise - upon completion of the fitting, the threshold is welded to the body according to the same scheme as mentioned above.
Plastic thresholds
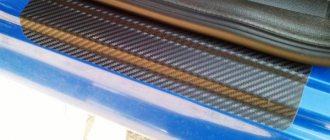
The VAZ 2107 is a rather old car, which is no longer in production at the moment. Nevertheless, the “seven” is still popular in our country to this day, and many drivers want to somehow make their car stand out from the crowd. Very often, a so-called body kit is used for this, which includes plastic sills (sometimes these parts are called sill moldings, sometimes plastic overlays, it’s all the same thing). The function of plastic thresholds is purely decorative; these details do not solve any practical problem.
A set of factory plastic thresholds for the VAZ 2107, which can be purchased at any tuning spare parts store
Particularly advanced drivers make plastic thresholds themselves. But for this you need to have special equipment for working with polymer material, plus you need to get the industrial polymer itself somewhere, which is not so easy. Therefore, car owners take the easier route and simply buy plastic thresholds; fortunately, there is no shortage of them now. But when choosing pads in a store, you should consider several nuances:
- In addition to purely aesthetic qualities, attention must also be paid to the mechanical properties of the thresholds. The linings purchased should not be too hard, because such products quickly crack, especially if the machine is operated in cold regions of the country. For this reason, fiberglass overlays should be abandoned;
- The best choice for the “seven” would be plastic linings with the addition of synthetic resins. These linings are flexible and do not crack due to temperature changes or exposure to road chemicals.
As you might guess, plastic thresholds are installed on top of standard steel thresholds. Here's what you need to install them:
- paint matched to the color of the car;
- black primer for plastic;
- electric drill;
- set of self-tapping screws;
- marker;
- set of plastic thresholds.
Sequencing
The most important point: at the initial stage, accurate markings for the screws are extremely important. The success of the entire installation of overlays depends on it.
- The trim is applied to the standard threshold, and the holes for the screws are marked using a marker. It is necessary to ensure that the overlay is pressed tightly against the standard threshold during the marking process. The help of a partner will be very helpful. If you don't have a partner, you can secure the pad with several clamps for the tightest possible fit.
Before installation, the overlay should be carefully tried on and assessed for any cracks or distortions. - After marking, the trim is removed, and holes for self-tapping screws are drilled in the standard threshold.
- The standard threshold is carefully cleaned of old paint. A layer of new primer is applied to the cleaned surface. After the soil dries, the threshold is painted.
- When the paint has dried, the plastic trim is screwed to the standard threshold with self-tapping screws.
- If the paint on the surface of the standard thresholds is not damaged, then you can do without stripping them and subsequent repainting. Simply drill the designated holes and then prime them.
The plastic door sill is carefully fitted and mounted on self-tapping screws - Before screwing the trim to the threshold, some drivers apply a thin layer of lithol to it. This helps prevent rust from forming under the trim and maintains the integrity of the paint finish. The same lithol is applied to the screws before screwing them into the thresholds.
DIY threshold repair
Repair of thresholds without complete or partial replacement of parts is carried out in the following cases:
- Small areas of corrosion on the outer panel.
- Dents from mechanical damage.
- Renewing the anti-gravel coating and painting after winter if the paintwork has peeled off due to exposure to salt reagents and electrolyte.
Depending on the defect, the repair method is selected. Since the sills on the seven are not removable, it is advisable to place the car on a flat, high surface or lift it with a jack.
Before repairs, the condition of the hinges on the doors is checked. The displacement of the elements and the skew of the door indicates that the amplifier and connector are rotten and the body is deformed. Then a complete replacement of all parts is necessary.
For minor corrosion damage, repairs proceed in the following stages:
- Use an angle grinder (grinder) to remove the old paint.
- The surface is cleaned with emery. If there is a through hole, then it is necessary to cut out or knock out the waste metal and check the condition of the amplifier.
- The surface is degreased and primed.
- The hole is sealed with fiberglass and epoxy glue.
- If there is no through damage, automotive putty is used.
- After drying, a layer of anticorrosive is applied, and then the part is painted with enamel.
To repair dents, a reverse hammer and a spot welding unit are used. Required tools:
- spotter for spot welding;
- reverse hammer;
- straightening hammers;
- primer;
- degreaser;
- sandpaper R-80;
- bitumen mastic;
- auto enamel.
Removing a dent yourself is carried out in the following steps:
- The end of a reverse hammer is welded onto the edge of the dent using a spotter.
You cannot draw if the metal around the edges of the welded hammer is red; you must wait up to 10 seconds until the surface cools down.
- Gently tap, returning the metal to its original state.
- The hammer is moved 5 mm further along the perimeter of the dent, and the procedure is repeated.
- Simultaneously with the drawing, the metal is straightened with a hammer.
- At the service station, straightening is carried out with a stop and rings, which are welded to the place of deformation.
- The surface is processed with a grinder, the welds are cut off.
- Sanded with sandpaper.
- The threshold is primed. After the soil has dried, a thin layer of putty is applied to the surface, leveled, and checked with a ruler.
- It is treated with anti-gravel and painted at the final stage.
During repairs, experienced motorists, if there is a through hole, pour anti-corrosive oil from an aerosol can into the box. The product will ensure reliable preservation of rust from inside the part.
If, when removing a layer of paint, corrosion is detected on more than 50% of the surface, it is recommended to replace the element; repairs can only be used as a temporary measure.
Anti-corrosion treatment of thresholds
Treating thresholds with special compounds can significantly extend their service life. Here's what's required for this processing:
- safety glasses, rubber gloves and a respirator;
- electric drill with a metal brush;
- fine sandpaper;
- water;
- degreasing composition (usually white spirit is used);
- clean rags;
- construction hair dryer;
- anti-gravel bottle.
Sequence of operations
The anti-corrosion treatment itself does not take too much time. Much more time is required for preliminary preparation of the machine.
- The car is washed, special attention is paid to the thresholds during washing.
- After complete drying, the machine is installed on a pit or on an overpass (an overpass is preferable, since you can do without a flashlight there, but when working in a pit you will definitely need a backlight).
- Use a drill with a metal brush to remove all pockets of rust from the thresholds. The sills are then sanded with sandpaper, after which a thin layer of rust converter is applied to them.
- After drying, the surface of the thresholds is degreased with white spirit and dried.
- All parts of the body adjacent to the sills and not requiring anti-corrosion treatment are sealed with masking tape.
- Several layers of anti-gravel (at least three) from a spray can are applied to the thresholds. In this case, the can must be shaken periodically and kept at a distance of 30 cm from the surface to be treated.
The can of anti-gravel should be kept thirty centimeters from the threshold - The applied coating is dried with a hair dryer. The heating temperature should not exceed 40°C.
- After drying the thresholds, the masking tape around them is removed. You can drive a car no earlier than 3 hours later.
Step-by-step replacement process
- Start by completely disassembling the interior, removing seats, upholstery, and carpets.
- For ease of operation, dismantle the doors.
- Protect your car windows from sparks when welding and using an angle grinder.
- Disconnect the battery terminals and place the vehicle on a pit or tipper.
- Take the new threshold and place it on top of the old one. Next, use a marker to mark the lines along which you will cut the old threshold. From the factory, the edges of the threshold go under the front and rear fenders and are welded with an overlap.
- After drilling, use a knife to separate the threshold from the body along the resistance welding line.
- Drill out the resistance welding points and separate the amplifier from the body.
- Assess the condition of the connector and replace it in whole or in part.
- After welding the connector, clean off any minor rust with a grinder and prime everything with epoxy primer.
- Prepare the amplifier for welding, cut and prime where necessary.
- Drill holes at the resistance welding points at the top and bottom. Next, clean the soil in the weld areas and weld the amplifier.
- After welding, clean everything and prime with epoxy primer.
- Prepare the threshold for welding, cut it to size and drill holes at the resistance welding points.
- Clean the transport primer from inside the threshold and prime the threshold with epoxy.
- Install the threshold on the body and secure it with body pliers.
- Make “pot mitts” and slowly scald the threshold around it.
In our case, in addition to the threshold, the pillar between the doors was also damaged, so two patches were welded onto it. Clean the weld seams and clear the transport soil from the threshold. - Prime the threshold with epoxy primer and let it dry thoroughly.
- “Stuff” the groove on the ground with Scotch Brite and apply sealant to the welds in the right places.
- If necessary, fill the face welds.
- Apply external corrosion protection using an air gun.
- After all work has been completed, apply an anti-corrosion compound to hidden cavities.
The process of replacing VAZ 2107 thresholds is clearly shown in this video:
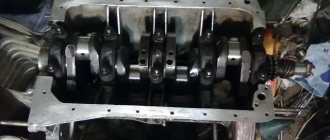
Strengthening thresholds
When purchasing thresholds for the “seven”, the driver also receives a pair of amplifiers. This is a pair of long rectangular plates installed under the thresholds. There is a row of holes in the center of each plate. The diameter of each of them is about 2 cm (sometimes it is more). The thickness of the amplifier itself rarely exceeds 5 mm. It is clear that such a structure cannot be called durable. It is for this reason that many car enthusiasts prefer, when replacing rotten thresholds, to install new, homemade amplifiers that are more consistent with their name. In this case, any available material is used. The most commonly used are rectangular steel tubes. That is, the narrow edges of two identical pipe sections are welded, resulting in the structure shown in the photo below.
Threshold reinforcement welded from two parallel rectangular pipes
This pair of pipes is welded to the body instead of a standard amplifier, after which the thresholds are installed according to the standard method outlined above.
Thresholds from a profile pipe on a VAZ-2107. One year later
Good day to all! About a year ago I posted an article and video on replacing thresholds with a profile pipe. The article is one of the most read on the site, and the video has mysteriously already received more than 200 thousand views, despite the terrible quality of the footage. That’s actually why I decided to continue this topic, namely to talk about how homemade thresholds feel after a year of using the car. But first, let me remind you what was done and how it was done, and why it was needed at all.
If you don’t want to read, you can watch the following video, which repeats the content of the article:
Why a square pipe and not repair thresholds?
It’s not difficult to find body parts for classics, in particular sills, on sale. Yes, and they are inexpensive. Only their quality leaves much to be desired. I have heard this many times from different people. As you understand, I don’t want to change the thresholds so that they rot in a year. This is largely why it was decided to weld a 60×60 profile pipe instead of the thresholds.
Also, the decision was influenced by banal curiosity - I was just wondering what would come of it all. The idea itself is not new. I have repeatedly seen how the thresholds on the Niva are changed in a similar way.
And of course, one cannot help but admit that simply welding a pipe without worrying too much about aesthetics is somewhat easier than fiddling with repair thresholds.
How to replace thresholds with a profile?
Everything is extremely simple here:
- We roll the car on its side;
- We remove the remains of the original threshold;
- Cut the profile pipe to the required length;
- We adjust it to the place;
- We weld the pipe to the entire remnants of the threshold, the bottom, side members and everything else that is possible.
- We clean the welds and cover everything with bitumen mastic.
These stages are discussed in detail in the above-mentioned article, so we will not consider them in detail now. So, what's the bottom line...
Thresholds from the profile after a year of operation
As it turned out, the thresholds feel great, as does the car body as a whole. There are no visible deformations, the doors open and close normally, nothing has fallen off anywhere. The places where the thresholds are welded to the body elements are in perfect order. The only thing that slightly spoiled the overall picture was the crumbling bitumen mastic in places and rust that appeared in these places. The rest is in perfect order.
And this is all taking into account the fact that the replacement was carried out, to put it mildly, unprofessionally, almost in the field and with a complete lack of experience in body work. Of course, everything could have been done much more accurately and with better quality.
However, there were no problems with homemade thresholds during the year. Let's see what will happen next.
Conclusion
I already talked about this in the article on replacing thresholds, but I’ll repeat it again: you don’t need to take all of the above as a guide to action. This is just one way to replace rotten thresholds, perhaps not the best. But as practice shows, it is quite functional.
Internal chrome trim
Threshold covers are installed not only outside, but also inside the cabin. The internal linings are a set of four chrome plates with mounting holes for self-tapping screws. In some cases, there may be no holes, and then the linings are simply glued to the threshold.
A set of internal sill plates; there are no holes in these sill plates
In addition, some overlays have a car logo. All this is in great demand among drivers who decide to further decorate their car. Installing the overlays is not particularly difficult: the overlay is installed on the threshold, marked with a marker, then holes are drilled for the screws and the overlay is screwed on. If the trim is installed with glue, then everything is even simpler: the surface of the thresholds and trims is degreased, a thin layer of glue is applied to it, and the trims are pressed down. After this, the glue just needs to be allowed to dry.
Sometimes the name of the machine or manufacturer is applied to the internal linings
So, the thresholds on the VAZ 2107 can be changed on your own. All you need for this is to have minimal skills in handling a welding machine and an angle grinder. But to perform local threshold repairs, the car owner, alas, will not be able to do without the help of a qualified auto mechanic.