From time to time, replacing a Lada Largus lamp becomes one of the mandatory procedures. The reason for this is that it becomes unusable, which in the dark is not only uncomfortable, but also life-threatening.
Timely replacement of lighting bulbs is the key to comfort and safety on the road
Of course, the service life of this lighting element directly depends on its quality and varieties. Although the terms of use are also important here. Indeed, with constant shaking while driving, it will often be necessary to replace not only the low beam lamp on the Lada Largus, but also the dimensions, brake lights and high beams.
Standard replacement procedure
- Replacing the low beam lamp, as well as the high beam, begins by disconnecting the on-board power supply. This precedes all electrical repair work. In this case, a special switch is turned or the negative terminal is disconnected from the battery, which avoids accidental short circuits or erroneous connections during installation.
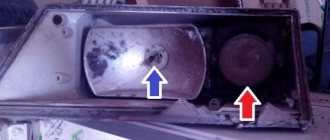
- The place where the Largus lamp will be replaced is determined. There, the rubber plugs covering the electrical components are removed, and two metal antennae are opened in front of the car owner, fixing them in the reflector. They are separated so that the used parts can come out of their seat without damaging the housing.
- Next, you need to disconnect the plugs from the wiring that was previously disconnected. Here it is worth paying attention to the order of arrangement, otherwise, during the installation of new parts, everything can be mixed up and they will have to be changed again.
- After connecting the plug with wiring to the new parts, they are mounted in place and secured with antennae. You should try not to touch the flasks with your hands, as this can lead to their rapid failure.
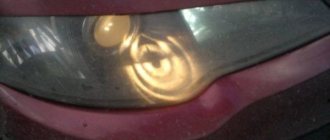
- If the light is dim during lighting, and the headlights flash when you turn on the headlights, then it is imperative to restore the contacts of the wires with the vehicle body. This is especially true for a marker lamp, because the fat that gets there begins to evaporate when heated and can cause ignition.
- At the end of this procedure, you need to put on the rubber plugs and secure all the parts in their places. After this, the car will be ready for use and the driver does not have to worry about malfunctions of the Lada Largus lighting fixtures.
Replacing light bulbs on Lada Largus - photo, video of replacement
Constant use of the car will one day lead to the need to replace light bulbs on the Lada Largus. This is easy to do at a specialized service station, but you can do all the necessary work yourself. To achieve the desired result, you need to carefully study the instructions. This is due to some nuances that should be taken into account when replacing light bulbs on a Lada Largus. Let’s talk about all these subtleties of work in more detail.
What kind of lamps are in the headlights of Lada Largus?
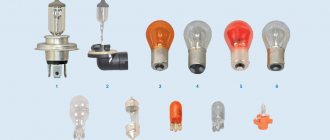
All lamps that are used for outdoor lighting in Lada Largus can be divided into 3 categories:
You also need to understand what kind of light bulbs are needed to replace in a Lada Largus car:
For low beam, use an H-4 bulb with a power of 12V, 60/55W;
For dimensions, you need to take a W5W lamp with a power of 5W;
For the front turn signal, use a PY21W bulb;
The fog lights have H-11 lamps with a power of 12V, 55W.
Replacing low and high beam bulbs on a Lada Largus
Any replacement of light bulbs must begin with turning off the power. These actions are required for working with electrical equipment of a car. The power is disconnected by turning a special lever or removing the terminals from the battery. This way you will completely eliminate short circuits caused by improper connection of wires. You need to understand that one bulb is used for the low beam of Largus, and the second for the high beam. The average lamp operating life ranges from 2-4 thousand hours. You can gain access to the left light by removing the battery.
- Turn the lid counterclockwise;
Installing the working light bulb in the Largus lantern is carried out in the reverse order. Remember that you should only hold the lamp by the base, and it is advisable not to touch the bulb. As a last resort, you can wipe the light bulb with a lint-free microfiber cloth. You can watch the correct process of replacing a low beam light bulb in the video:
Replacing side light bulbs on Largus
If it is necessary to replace this lamp, the entire lamp must be removed. This is the only way to ensure access to the side lights of Largus. After dismantling, we disconnect all power wires with extreme care and attention. After disconnecting the power from the battery, you need to remove the front bumper, which serves as additional protection for the dimensions. Ideally, work is carried out with sterile gloves. If the device was accidentally touched, it must be treated with a lint-free microfiber cloth.
- We remove the fender liner by removing the fasteners;
- We remove the socket with the light bulb by turning it in the direction of the clock, and for the right side you need to turn it in the opposite direction;
- Remove the burnt out lamp from the base.
To replace the backlight on Largus, turn the socket counterclockwise. Then carefully connect the 2 wires to the battery. And now all that remains is to install the working lamp and carry out the assembly. Installing all components in place is carried out in the reverse order and does not take much time.
Stop signal
The principle of replacement is similar to the installation of the above-mentioned lamps, but it has its own nuances. Here, first, the trunk lid is opened and its decorative panel is removed. So, in order to replace the brake light, you must first of all clear the approach to the wing nuts.
After removing them, the entire headlight is turned out, which would be very problematic to do on your own. After all, you need to bring out its upper and lower parts at the same time so that they do not become a surprise. After unscrewing the screws, access to the lamp is open. The failed part is replaced, and all the previously listed steps are performed in the reverse order.
PTF lamp (fog lamp)
There is no access to the lamp from the engine compartment, so replacement is made from below.
- Remove the fender liner by removing the screws;
- Disconnect the block from the lamp by pressing the lock;
- Remove the lamp by turning it a third of a turn counterclockwise.
Install the lamp in the reverse order.
Attention! In practice, replacing lamps in a Largus headlight is much easier. In other words, it is not at all necessary to remove the battery and fender liners (lockers). If you get the hang of it, you can access all the headlight bulbs from the engine compartment.
Let us remind you that other operating and repair instructions for Lada Largus are in this category. It is convenient to find the answer to your question based on the content.
Dimensions
A special feature of this procedure is the preliminary dismantling of the headlight unit, under which the side light lamps are located. After this, it is necessary to disconnect the wires from the battery, which is done with extreme care.
Removing the front bumper will allow you to get to the cover that protects the dimensions. Since they come into contact with other light devices, it is advisable to carry out all procedures using sterile gloves. If any device has been touched, it must be wiped with a clean, lint-free cloth.
To replace the side light bulb in Largus, the socket of the old part is turned counterclockwise. The black and yellow wires connect it to the battery, so it turns off from them. A new part is installed in this place, and assembly is carried out in the reverse order.
How to install fog lights?
Before starting the procedure for installing a set of fog lights in the Lada Largus bumper, we carry out a number of preparatory manipulations related to preliminary checking the correct connection of the wires and the functionality of the products, and also stock up on the necessary tools, the set of which is very simple.
The installation procedure is simple, so we can safely proceed to its implementation.
We open the hood and de-energize the network by removing the terminals from the battery. Now you can remove the front bumper, which will allow you to correctly install and connect the fog lights, as well as secure the wiring. We unscrew the screws from below that hold this element to the body of the LADA Largus. We do the same with the bolts under the hood and the screws in the wheel arches
We pay special attention to the two bolts hidden in the corners of the bumper, since without their “surrender” it will not succumb to removal, because the wings will not “set it free”. To defeat these fastening components we will use a screwdriver. During manipulation, carefully move the fender liner so that it does not interfere with our actions
We remove the bumper carefully, pulling it straight forward (in the direction of travel). Next, having conveniently positioned the bodywork, we dismantle the plugs. On the inner surface of the bumper we unhook the fixing components, after which the plugs are easily removed. We place new PTFs in the bumper niches and begin to securely fasten them. This is done using screws with which we fasten the lighting devices to the body element. Now we lay the wiring along the inner cavity of the bumper and fix it with tape and clamps. We do this on both sides of the body element. We fasten the negative wires to the body, which acts as the “ground” of the Lada Largus car. We install the bumper and secure it with the specified list of fasteners, proceeding in the reverse order. Next, you will need to bring the end sections of the PTF wires into the engine compartment area. When laying, we also use fastening ties. We move into the cabin and select a place to attach the pre-purchased PTF power button. The button itself can be embedded into the desired area of the panel, which will be more aesthetically pleasing compared to fixing it on the surface of the interior element. The ends of the wiring attached to the button terminals are directed to the mounting block with relays and fuses. Remembering the cable ends of the PTF, we also bring them to the area where the unit is located, which is located on the left side of the steering column. We act according to the instructions included with the optics kit. We carry out all switching manipulations, connecting the wires as indicated in the instruction diagram. Finally, we check the functionality of the new lighting devices and, if necessary, adjust the correct direction of the light beam.
Conclusion
You need to make it a rule to regularly change not only the lamps, but also monitor other lighting elements. After all, the process of reducing their brightness occurs slowly and the driver simply does not notice the deterioration in road lighting.
The side lamps for a Lada Largus car are very dim bulbs, so after they burn out or even without waiting for it, you can replace the side lamps with LED ones! The LED light bulb is very bright and economical! The price is for 1 piece. T-10 lamp socket. Also, this light bulb can be installed in the ceiling lamp, in the glove box, trunk lamp, room lighting, wherever the T10 socket is used.
How to choose a lighting element?
The standard version of the configuration provides for the use of halogen lamps with an H4 base. This device contains two threads, each of which is responsible for its own light (naturally, near and far). Today's auto accessories market is able to offer its customers several analogue lamp options, structurally based on the following technologies:
Advice! When choosing lamps for your LADA Largus, lean towards the offers of specialized trading entities. The market is full of cheap analogues with Chinese ancestry. They cannot boast of reliability, and the effectiveness of such products is negligible. A useful point here would be to take into account the light characteristics of the lamp.
The most efficient lighting components are diode products. They can be installed not only as low or high beam devices, but also as marker optics or turn signals.
Note that an important advantage of a lamp using diode technology is its high ability to save energy. This factor is directly dependent on the manufacturer and the quality aspects of the product.
Important! During replacement, we remember their location, which will prevent incorrect installation and the need to repeat this manipulation.
How to replace the lamp?
Replacing a low beam lamp in a LADA Largus is not a complex procedure, which is quite feasible for inexperienced owners. Here you will need a simple set of tools. The right headlight will cause some difficulties, since the battery is located nearby. In general, this point can be easily eliminated. We will tell you how to change the lamp.
The lamp responsible for low beam in the Lada Largus has a rubber protective cover. This element can be easily moved to the side using manual force. This is done simultaneously with the removal of the power supply wire block.
The sequence of actions is as follows:
- We turn off the power to the on-board network by removing the terminals from the battery or turning the switch, which is structurally present in the Lada Largus. This mandatory action implies ensuring electrical safety during the full range of manipulations.
- We remove the rubber pad that covers the electrical component.
- Now carefully move aside the pair of metal antennae that hold the lamp in the socket.
- We disconnect the cable plugs with which the lamp is connected to the on-board network.
- We mount the new lamp in the designated socket and securely fix it.
- We connect the cable block to the electrical network.
- Finally, we return the rubber protective plug to its original place.
- We install all other previously removed components in their original places. Now you know how to change lamps.
How to change the low/high beam lamps on Largus, as well as the dimensions
A note about what kind of lighting lamps are installed in the Largus headlights;
which of them are low/high beam, and which are responsible for the side lights. How to change lamps yourself. How much do originals and analogues cost in Yaroslavl Good day, future and aspiring gentlemen Largusovod!
On Largus, the low/high beam and headlight lamps often burn out. At least for 70 thousand I have already changed it five times on each side.
The following light bulbs were installed on my car:
1. Low/high beam: halogen, Osram H4 12v 60/55w. (art. 64193). Price from 109 rub.
There are many analogues. Here are some of them:
370 rub. General Electric (34454)
117 rub. Valeo (032007)
2. Front dimensions: halogen baseless 12V Osram (art. 2825). Price from 17 rub.
26 rub. Lynx (L12805)
9 rub. Fortluft (2825)
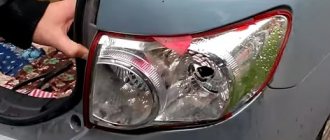
3. Rear dimensions: two-pin with filament, base BAY15D. Beacon 12V P21/5W.
from 56 rub. Fortluft (7528)
They burn out less often. I changed it only once in the right headlight. This is what she looks like:
How to replace headlight bulbs
1. First, remove the protective cover. It turns a little, then a small latch is released.
2. The block with wires is removed.
3. Remove the rubber protective sleeve.
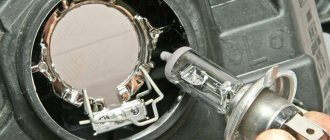
4. The lamp is pressed U -shaped clamp. It needs to be pulled to the side and back.
5. Take out the lamp. Remember its orientation. Two teeth at the bottom, one at the top. And if you look at it from the side of the headlight, the inscription (marking) will be on top.
6. Install a new lamp. You should not take it with your bare hands, as greasy marks from the pores will remain on the bulb and the lamp will fail faster. This applies to all halogen lamps. It is better to hold it by the plinth or use a microfiber cloth.
About related faults
A lighting device for any purpose that refuses to perform its function can signal to the owner of the Lada Largus that the fuse is faulty. If it is discovered that the jumper in the fuse link has burned out, then such an element requires unconditional replacement, which also means replacing the marker light bulb. This is quite easy to do. The mounting block is located on the left edge of the interior panel in close proximity to the unit for switching the modes of lighting devices. Here are the inserts numbered F1 - F39. Fuses numbered 9 and 10 are responsible for ensuring the operation of the low and high beam, respectively for the left and right headlights of the Lada Largus car.
Insufficient contact at the terminals in the fuse block can also cause problems with the normal functioning of the head optic components.
Important! When installing the lamp, do not allow your fingers to touch the glass bulb, since marks can significantly reduce the effectiveness of the product and lead to its premature failure.
There may be cases of premature burnout of the contact inside the lamp itself or banal oxidation of contacts with the ground. The last option can be easily eliminated. To do this, it is necessary to thoroughly clean the contacting surfaces of the cable lugs. A wire brush will do.
If these methods do not give the desired result and the functionality of the Lada Largus lighting devices is not restored, then you will need to contact professionals for a more thorough diagnosis of the causes of the malfunctions and their subsequent elimination.