In this article we will look at how to pull out the spar. Let's look at the rules of pulling and what tool is used to eliminate the deformation of the spar.
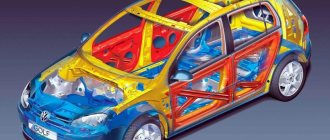
Spars are the load-bearing structural elements of a car body (see the article “Structure of a load-bearing car body”). They are located in the front and rear parts of the body. Structural load-bearing structures should be straightened first when body deformation is eliminated.
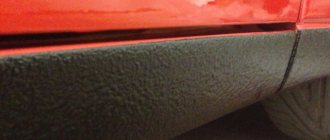
The initial inspection of the damage is carried out on the external body panels. By the unevenness of the gaps and the changed position of the body panels, the displacement of structural elements can be determined.
A more detailed inspection may require disassembling the damaged part of the car.
The content of the article:
- Replace or pull out a damaged spar?
- Securing the car body before pulling out the side member
- Measuring distances between body control points
- Pulling out the spar
- Spar constriction
- Rail saver repair tool
Replace or pull out a damaged spar?
First of all, you need to decide whether to repair or replace the spar.
The decision to replace the spar should be made based on the degree of damage. With a smooth, not sharp bend, the spar can be repaired to a condition comparable to the whole.
On this car, the right side member (in the left photo) was restored, and the left one (in the right photo) was replaced.
Sometimes both front side members, during a side impact, simultaneously (since they are connected to each other by the bumper reinforcement and the lower beam) are displaced a considerable distance, but are not even damaged. In this case, it is enough to secure the car and pull out both side members using lateral action (hydraulic extension or winch).
The left spar, which cannot be restored, was replaced.
The right spar has been straightened. If there is a sharp bend (with an acute angle), or loss of its basic shape, it will be difficult to repair the spar to the condition it had before the accident.
Replacement can be either complete or partial. With a partial replacement, only the part that is not suitable for restoration is replaced. You can read more about replacing the spar in the article “Replacing the front spar”. The spar after repair should have the same rigidity as before the accident. If the strength of the spar is weaker or the spar becomes more rigid, this may affect the accident safety of the car. The airbags will deploy a little earlier or a little later, which is unacceptable.
Design
The body is based on elements of increased rigidity, which provides the car frame with the necessary strength. The first bodies were made on the basis of a rigid frame. The technology is still applicable in the production of SUVs. However, frame bodies have a serious drawback - the car acquires a large mass.
Spars serve to lighten vehicles and are included in the frameless layout of the vehicle. They are power elements that are located on the sides of the bottom of the car.
It is these parts that take on most of the structural loads: from vibrations during movement and from the weight of the vehicle. The car's handling and cornering behavior depend on the rigidity of the power elements.
If the front spar is damaged, it should be repaired immediately, since the slightest displacement is enough for the engine to detonate.
Functions
The main functions performed by the spar are:
- reduction in total body weight;
- increased torsional rigidity, which improves car handling;
- increasing body safety. Power beams are capable of damping (resistance to vibrations), which allows them to smooth out impacts during an accident;
- strengthening the underbody of the car;
- distribution of the total weight of passengers and body weight;
- creating a shock-absorbing effect.
The presence of side members in a car also has a significant drawback: if they are damaged, the body structure changes.
Main types
The spars are installed in different positions, which depend on the type of car:
- Parallel and horizontal.
- Horizontally and at an angle.
- Curved elements arranged vertically.
- Curved power beams placed horizontally.
Horizontal parallel beams are installed on trucks, while on SUVs they are placed at an angle, due to which the steering axis of the wheels is larger. Elements curved vertically allow the car's center of gravity to be lowered. The vehicle's horizontally curved side member improves passive safety in the event of a side impact.
Malfunctions and repairs
When load beams are deformed after an accident or improper repair, the driver notices bald tires on the side of the elongated part. This situation occurs due to incorrect wheel alignment. Main spar malfunctions:
- The part burst. In this case, it is partially or completely replaced. Especially in the case of beams located at the front. To replace the part, you will first have to align it and then cut it out.
- The element is bent in the deformation zone. In this case, it is corrected on a special stand.
Such malfunctions of the power beams lead to changes in the position of the engine, disrupt the geometry of the suspension, and impair steering control. It is important to check beams even after a minor accident.
Correcting the deformation of the car side member can only be done on a carolin test bench. Most of the car will have to be disassembled. If the main structural elements remain intact, it is possible to partially replace the spar using gas welding. However, this method cannot restore the factory quality of the part, since the strength after repair will decrease.
If you have a ladder frame, it is easy to change the spar, except in cases where the part has gone too far in the supporting body. It is important that the new element has the original dimensions of the deformed beam. Features of partial replacement:
- In case of minor damage, the deformation zones have a small extent, so you can limit yourself to partial replacement of the part in places of severe creases and metal tears. Such a replacement can only be carried out in areas that do not bear the load. The damaged areas are cut out with a grinder, and new elements are welded in their place.
- Complete replacement. Often the damage is so great that the spar can no longer perform its functions. Since such damage cannot be repaired, the beam is pulled out to a state as close as possible to the original, and then cut off from the fastenings.
Taking into account the condition of the body, various restoration measures are chosen.
Disassembly
To extract the power element, several tools are prepared, since the work ahead is complex and lengthy. Necessary equipment:
- Bulgarian;
- welding equipment;
- gas-burner;
- sander;
- a hammer that will be used for straightening;
- stand;
- sealant-based tape;
- body repair table;
- spatula with primer.
Before repairs, remove all body parts that block access to the damaged spar. Wiring and electrical appliances are removed from the area being repaired.
How to pull out a spar with your own hands
Before work, you should check in which direction the spar needs to be pulled. At home, the procedure is carried out as follows:
- The machine is secured with chains to the stand. The gripping area is cleaned and a clamp is installed.
- Then a chain is attached to it and the spar stretching begins.
- They make a smooth stretch, simultaneously giving the damaged part its original shape.
- Since the spars are made of high-quality steel, for maximum stretch, they are first tensioned. Then, leaving the part under tension, add force and hold it again.
- Use a grinder to cut off the unrepairable parts of the beam.
- They try to stretch out the power element, simultaneously giving it its previous geometric shapes.
Securing the car body before pulling out the side member
The vehicle must be stationary when the side member is pulled out. The body must be secured and the attachment points must be able to withstand the pull-out load.
If there is a slipway in the workshop (see the article “Types of slipways”), then the body is secured to the flange at the bottom of the sills on both sides. In some cases, in order to withstand the pull-out load, the vehicle may be additionally secured at the points where the suspension components are attached to the body, capable of withstanding the load.
Fastening the car body to the slipway using the sill flange before pulling it out.
Usually the car is fixed at 4 points, closer to the edges of the thresholds. These are reinforced places that can withstand the load. To do this, the car is lifted and placed on special clamps, which are then tightened. In this way, special jig clamps hold the vehicle in place during pulling.
In the absence of a slipway, you need to calculate where the car can move during the pulling force and make stops on the opposite side (in the case of a lateral pulling force). Stops should be placed in places that will not deform when pulled. Usually, emphasis is placed to the place where the spar is damaged (at its base or closer), and you also need to fix the rear of the car so that it does not move. You can tie one of the car parts with chains to fixed mounts in the workshop. In the case of a slight pulling force aimed at eliminating deformation of the spar length, the machine can be tied with chains to the body loops intended for transportation.
Metal memory: how to combat it using a slipway
On average, pulling out the body will cost 10–15 thousand.
Even in minor accidents, the geometry of the power structure of the car body is sometimes disrupted, which greatly complicates the process of high-quality restoration. Without qualified editing, it is unlikely that you will be able to set even gaps between the outer panels and correct wheel alignment angles. And if the angles are not set, the car will begin to pull away on the road, the tires will wear out faster and more unevenly.
Complex treatment
The slipway is a platform or racks on which the body is rigidly mounted. And at least one “goose” that clings to the damaged part of the car’s skeleton and creates a pulling force (usually up to 10 tons). In fact, the process is the opposite than during a collision.
Working with a slipway requires extensive experience and high professionalism. For example, you need to clearly dose the load and its direction and place the “goose” at the right angle, otherwise you can easily tear the metal and even welds. Sometimes a combined approach is necessary. That is, the master has to load a certain element of the body with a “goose” and at the same time adjust it with a hammer.
Working with a slipway requires extensive experience and high professionalism. For example, you need to clearly dose the load and its direction and place the “goose” at the right angle, otherwise you can easily tear the metal and even welds. Sometimes a combined approach is necessary. That is, the master has to load a certain element of the body with a “goose” and at the same time adjust it with a hammer.
Measuring distances between body control points
Measuring the distances between control points must be done before, during and after pulling. Measuring the geometric parameters of the body helps determine the direction of pulling. Measuring while drawing helps to check that the drawing is correct. Measurements after pulling show the correctness of the final result. Measurements can be taken with a tape measure or a special ruler to check the geometry of the body. You need to take diagonal measurements and length measurements between points. You can read more about measurements in the article “Checking body geometry”. It is advisable to have data on the distances between test points, which can be found in repair manuals.
An example of a diagram with the location of control points and the distances between them.
The test points must be returned to the original factory position. An error of several millimeters is allowed.
What will you need for work?
Let us immediately make a reservation that stretching the spar is a rather painstaking process and requires special knowledge and skills. You can’t do this procedure so simply, “on your knees”. We will need a number of specific tools: an angle grinder, welding, a gas torch, a grinder, a stand equipped with grips and templates. And also - a hammer for straightening, sealant tape, primer and spatula, a special table for body repair.
If you are already scared, or many of the names are unfamiliar, then you don’t have to continue. For all the other brave souls: let's continue the process.
Of course, our repaired part must be freely available. Therefore, it is extremely necessary to remove all “interfering” body and chassis parts from the path. But first of all, you should turn off the power supply and hide the wiring from the repair site.
Next, we remove the body parts and remove the wheel arch. As a result, the spar is freed. You can proceed to the next stage of work.
Pulling out the spar
- Pulling the spar involves the use of hydraulics (see the article “Hydraulic stretching in body repair”) or a winch, mechanical clamps and chains. You need to have a slipway, or concreted hinges in the workshop, or other fastenings that can withstand the load when pulling.
- You need to study the damage and understand in which direction you need to pull it. Next you need to secure the body as described above. Then install the pull-out clamps and chains.
- To attach the chain to the side member, special clamps/grips are used (for more details, see the article “pulling the car body”). The area where the grip is attached must be cleaned beforehand. Various clamps/grips are used, which are attached to the damaged spar; a chain is attached to the clamp, through which pulling is performed. The size and shape of the grip are selected depending on the location of attachment and the force that will be applied to it.
- It is necessary to install the exhaust clamp correctly, along the vector of the exhaust force, so that it does not move under load and damage the spar.
- For ease of access to the damaged area, it may be necessary to remove some body parts.
- Do not remove damaged parts before pulling. When the control points are in place, then you can change the adjacent damaged elements.
- Even if the spar needs to be replaced, it is better to first stretch it out as much as possible.
- The damage is repaired in the sequence and direction opposite to its occurrence upon impact. Therefore, it is necessary to determine the direction of the impact and in what sequence the deformation occurred.
- Approach the pulling process as if you were doing it with your “bare” hands. This will help you understand how many sequential actions and in what direction you need to do to straighten the spar to its original position.
- A single pull is performed for minor damage. For more severe damage, several gradual tractions may be necessary. Multiple tractions are necessary when damage occurs in multiple directions (length, width and height).
- First, the damage to the length of the spar is repaired, then the spar is shifted to the desired horizontal position, then its height position is adjusted.
- When pulling the spar with a winch and there are no special fastenings at different heights, the height of the pulling action can be adjusted by placing bars or boards of the required length under the chain.
- When lifting up or lowering part of the spar, its part up to the bend may need to be fixed.
- In modern cars, the structural elements of the body are made of high-strength steel, because of this you should not try to pull out the damage in one stage. Instead, the spar alignment must be done sequentially in several stages. The sequence should consist of pulling, then holding the spar under a pulling load, then adding force, holding again, and so on.
- Hydraulics must be applied slowly and gradually. Look at the result. If alignment is not correct, change the angle or direction of impact and try again.
- When applying lateral force to a displaced spar using a hydraulic brace, place a block of wood or part of a hardwood board between the spar and the brace so that the point load is dissipated over a large area and the spar is not deformed at the point where the force is applied.
- Pull out gradually and periodically measure the position of the spar relative to the control points.
- A curved front spar often requires simultaneous forward and side pull. That is, when pulling forward, you need to help the spar by pressing on it from the side, at the bend.
A curved front spar often requires simultaneous lengthening and lateral force at the bend.
- When stretching, you need to tap the bulges around the bending area to remove tension in these places. Tapping should be done with a light straightening hammer and many light blows. Do not tap the fold directly, which will only increase the deformation. Sometimes you can tap through a wooden block in hard-to-reach places, and also to distribute the impact over a larger area.
- You can heat stubborn areas with a torch. When using heating, the metal must cool on its own, without forced cooling. The side members on modern cars are made of high-strength steel (HSS), which loses its strength when heated, so manufacturers do not recommend the use of heating.
- In some cases, in order to remove folds on the spar, it is necessary to cut out an access “window” to its reverse side, which then needs to be welded back. There is a modern tool that can straighten the irregularities and folds of the spar from the inside, which avoids cutting out an access “window” for tapping the folds and heating the spar for easier straightening. We will look at this tool in this article below.
Required materials and tools
I would like to warn you right away that the further possibility of using the car depends on a high-quality hood, so this problem should be taken seriously.
We will need the following tools to pull out the car body:
- powerful electric grinder (impeller);
- welding machine;
- gas stove);
- grinding machine with a full set of discs;
- a stationary stand with the necessary template and chain grips (they are easier to work with);
- metal spatula and automotive primer;
- sealant tape;
- straightening hammer for metal;
- You will also have to find a table for the make of your car with data about the factory body geometry.
When the entire list has been collected, you can begin to work.
Spar extension
Spar constriction
Since structural elements have a certain elasticity, after they are pulled to the desired parameters, they tend to return a little when the pulling force is weakened.
Restretching means extending the damage slightly beyond the original control point location. Thus, the reupholstery helps compensate for this return. When the pulling force is weakened, the spar returns to the desired position.
Re-upholstering should be done carefully, with constant control of dimensions. It is better to try to tighten it a few millimeters, then loosen the force, measure the distances and, if necessary, increase the size of the waist.
Sequencing
Before starting work with a VAZ car, you need to remove all the parts that stand in the way of the spar. It is also necessary to disconnect wires and electrical devices in vehicles. After all these manipulations, you will see the spar itself and can now easily reach it. Next, let’s begin the extraction process itself, fix the car and cut off the heavily damaged parts of the part with a grinder - this must be done carefully using a protective mask and gloves.
We attach the chains to the spar and make a smooth tension, at the same time giving it its original appearance. After you have cut off the “unnecessary” parts and made a hood, check whether the car door can be closed correctly. If the door closes as it should, then you are on the right track, otherwise you will have to manipulate the tension several more times.
Further in the work, using the table of technical characteristics of the VAZ car, we restore the geometry of the points of the body spar. To make it easier to set dots in such conditions, you can use colored tape to mark those same dots. It is necessary to pull out the spar so that the adhesive tape marks coincide with the marks indicated in the technical specifications. Don't forget to check if the side members and wheel arches are parallel.
Using a straightening hammer, you can correct part of the wheel arch and other dents that appeared during work. The next step is to remove the old sealant coating by heating it with a gas torch. If during work small irregularities and surface roughness arise, then using a grinding machine you can get rid of them yourself.
If you are confident in your abilities, then you can safely get to work and pull out the spar on a VAZ car with your own hands, but if you have even the slightest doubt, then it is best to contact a qualified and experienced professional at a service station.
Replacement video
» alt=»»> The installation site is thoroughly cleaned, welding residues are removed, and the new spar is attached to the body by spot welding. Upon completion of welding work, everything must be carefully checked.
And finally, some useful advice. If you have never had to deal with body repair before, and even something as serious as aligning a side member, it is better to entrust such an important task to specialists.
Source
What is a spar in a car, what does it look like, where is it located and how to pull it out
Almost everyone who deals with cars has at least once heard the word spar, but not everyone knows what kind of part it is and where it is located.
The spar acts as the main strength element in the car body and is a box made of metal profiles. To put it differently, this is a regular pipe with a rectangular cross-section, which is made of durable materials and alloys. In fact, it is the skeleton of the car that gives the body rigidity.
The word spar itself is derived from the French longer - to go along.
The spars can be divided into right and left; they run along the entire length of the car, located on both sides. You can just as often hear the expression front spar and rear. The spars are connected to each other by cross members of various shapes.
This part is exceptionally durable, capable of withstanding heavy loads that are formed not only from the vehicle’s own weight, but also when it is filled with passengers and luggage.
Over time, the spars can become deformed as a result of constant exposure to heavy loads; the metal can become tired, crack, and rust.
In road accidents, it is also subject to frequent damage and can greatly change its geometry. If the deformation is not significant, then the pulling method is used for simple structures. Although now there are complex models, mainly on foreign cars, which are also energy-absorbing elements. » alt=»»> Below we will look at how to pull out the spar with your own hands, and whether this can be done in a garage.
Causes of damage
As we have already found out, the spar absorbs the bulk of the shock absorption when driving; manufacturers specially develop special designs for this part so that it absorbs all the kinetic energy and takes on the entire impact force in an accident. But even if the car has never been in an accident, the spar may crack over time from driving on our roads.
If you notice that the car is starting to pull sideways, or the doors are not closing well, the rubber is rubbing against the body - these are the first signs that the spar is cracked or misaligned. But don’t panic, how to pull out the spar is described in this article, and you can solve this problem yourself or turn to the services of a car repair shop. In today's article we will look at the method of drawing out a spar with our own hands using the example of a VAZ car.
Spar deformation
To damage or bend the spar, it is not necessary to make a head-on collision at “crazy speed”; this can also happen in a light collision, as a result of which the entire car body changes its geometry.
Changing parameters
The spar, like other parts of the car, is subject to heavy loads and as a result, breakdowns or wear are possible. Since this is an important part of the vehicle, it becomes clear that in the event of a breakdown, literally everything stops working as intended.
For example, if the wing of a car is torn off, it continues to move, but if a spar breaks, it will no longer be able to drive. Then increased wear of the rubber occurs, the body begins to break, and the car itself is difficult to drive.
Geometry check
For this procedure, it is necessary to mark control points on the spar itself and related parts. And then check it at the stand using the body repair table. The points of the cored side members should coincide as much as possible with the points shown on the stand. Afterwards, the unevenness of the side members must be sanded using a grinder disc.
It is also imperative to monitor the parallelism of the wheel arches in relation to the side members. Also follow safety rules when performing work. Wear safety glasses to avoid injury from sparks to your eyes.
Welding, straightening: It is necessary to carefully straighten adjacent surfaces and the wheel arch. To do this, we use a straightening hammer and a mandrel. Check for tight fit. Align the welding edges. When welding, we follow safety precautions.
Once again we check the compatibility of the doors and the locks to ensure that they open well. We apply sealant, anticorrosive agent, and primer to the corresponding repaired parts. Finally, we paint the bodywork. We assemble the car, put on and screw in all the parts removed for repairs, and the question of how to pull out the spar with your own hands can be considered closed.
Bench hood
We fix the car on the stand. This must be done in the places where the manufacturer’s welds are made. Next, we carefully pull out the damaged spar to parameters resembling the original ones. When the preliminary stretching is done, we use a grinder to cut off the parts of the spar that are most damaged and the need to replace them is an urgent problem.
It is not recommended to extend the spar more than necessary. And after carrying out this procedure, you must try to open/close the doors to check the compatibility of the gaps and the condition of the hinges (if necessary, adjust and bend them to the normal position).
Next steps. Next, you need to clean the primer and sealant from the spar that has undergone repair. To do this, you need to warm them up thoroughly with a gas burner or a technical hair dryer. Then it will come off easily (use a steel spatula for further cleaning). Attention: when working with the burner, you must observe fire safety, trying not to burn the plastic parts and interior trim. From high temperatures, they can quite possibly burst into flames!
Location
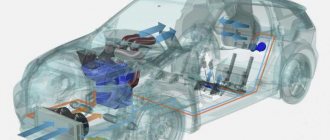
In a typical monocoque body of a passenger car there are two front and two rear side members, tied to the load-bearing structure of the body floor.
If they are connected, then we can talk about an integrated frame, but this is rare, usually only on large luxury cars and limousines.
For other bodies, the connection between the front side members, engine shield, vertical pillars, sills and wheel arch mud flaps is sufficient.
At the front and rear, subframes are attached between the side members, on which the suspension, steering and power units are mounted.