How to determine piston wear
Checking the cylinder and piston
The cylinder and piston are checked by visual inspection for uneven wear, cracks and damage. In addition, the measurement checks the wear of the piston and compares it with the wear limit value given in the Repair Manual. Even if the amount of wear is found
is given in the Repair Manual. Even if the amount of wear is within acceptable limits, the piston must be replaced if there is damage or uneven wear. Likewise, even if there is no damage or uneven wear, the piston must be replaced if its wear exceeds the allowable amount.
• Scratches and other damage on the piston surface
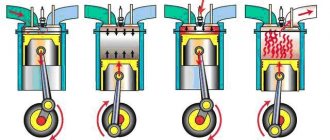
If the combustion process is disrupted, unacceptable deformation or damage occurs on the piston crown and on the hot zone. Moreover, if the piston operates under harsh conditions or the oil has lost its quality, then signs of severe wear or cracks appear on the surface of the piston.
• Uneven wear and damage to the piston ring grooves
Uneven wear of the groove leads to strong vibration of the ring, which causes increased oil consumption and blow-by of crankcase gases. Not only the measurement of wear, but also a visual assessment of its uniformity is of great importance.
• Clogged drain holes
The oil scraper ring removes excess oil from the cylinder wall, which enters the cylinder by splashing from the crankshaft crankcase. The oil that the ring scrapes from the cylinder wall returns to the crankcase through the drainage holes in the lower groove under the ring. If the drainage holes become clogged, the oil begins to burn. Some pistons have drain holes at the bottom of the ring groove.
• Measuring the outer diameter of the piston
As the mileage increases, wear on the piston friction surfaces increases. With severe wear, the gap between the skirt and the cylinder increases - this leads to an increase in the noise of the running engine and an increase in oil waste. The location for measuring the skirt diameter and the wear limit value are indicated in the Repair Manual. If the wear is more than acceptable, the piston must be replaced. Further, if the piston wear is within acceptable limits, but after measuring the cylinder diameter it becomes obvious that the gap between the skirt and the cylinder still exceeds the permissible value, then the piston needs to be changed if this will help return the gap to normal.
• Checking the cylinder mirror
Almost always, the upper part of the cylinder wears out faster than the lower part due to uneven friction conditions between the rings and the cylinder in height. In addition, the cylinder wears faster in the direction perpendicular to the axis of the pin, since in this direction the piston presses on the cylinder more strongly. The cylinder never wears evenly: the wear profile has the shape of a funnel with an upward expansion and an oval shape in plan view. The ledge that forms at TDC of the upper compression ring can be assessed visually and by touch with your finger. Next, measure the diameter at the top, in the middle zone and at the bottom, in two planes: parallel to the piston pin axis (X) and across the piston pin axis (Y). These measurements will determine the taper and ovality of the cylinder. If there are scratches, burrs on the cylinder bore, or wear exceeds the permissible value, then the cylinder must be bored to accommodate repair size pistons (if available). If for some reason the cylinder block does not allow boring, then the block must be replaced.
• Checking the piston pin and pin boss holes
Both ends of the piston pin work inside the piston bosses, and the middle part works in the upper end of the connecting rod. To check wear and the actual clearance, you need to measure the diameter of the piston pin in the places where it works in the holes and the diameters of the corresponding holes.
If the result of one of the measurements is outside the permissible limits, the piston and pin must be replaced.
The wear pattern of the bore in the piston boss depends on the operating conditions of the engine. Uniform wear practically does not occur - it usually has an oval shape. For this reason, the diameter of the hole must be measured in two planes: vertical and horizontal (X and Y). If the result of one measurement is outside the acceptable limits, then the piston and pin must be replaced.
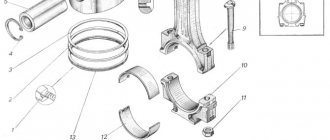
Measure the diameter of the hole in the upper end of the connecting rod in a vertical plane, since wear is always greater in this direction. If the result of one is outside the acceptable limits, then the connecting rod must be replaced.
Since the oil in the piston-pin and connecting rod-pin friction pairs is provided by an oil wedge of a certain thickness, if the gap increases beyond the permissible value, the listed parts must be replaced. Replacement is mandatory, even if the wear of an individual part in a friction pair has not exceeded the permissible value. Calculate the size of the gaps in the friction pairs listed above and replace the parts if the size of the gap exceeds the permissible value.
* Checking the upper plane of the cylinder block for warping
If warping occurs on the top plane of the cylinder block, the compression of the cylinder head gasket will not occur as desired. Where the specific pressure on the gasket is below normal, a breakthrough of coolant or, even worse, exhaust gases may occur. In most cases, the troubles mentioned above occur due to warping of the upper plane of the cylinder block, improper tightening of the cylinder head bolts, warping of the lower plane of the cylinder head, or due to a combination of these reasons.
In single-cylinder engines with small displacement, warping of the upper plane of the cylinder block is rarely the cause of gas joint breakthrough. Although for multi-cylinder engines the cause of gas joint problems is mainly warpage of the bottom plane of the cylinder head and improper tightening of the head bolts, the top plane of the cylinder block must be checked.
Using a straight edge, check the top plane of the cylinder block for clearance and measure the gap with a flat feeler gauge. If warpage exceeds the permissible value, replace the cylinder block. If warping of the cylinder block is detected, then there is a high probability that the cylinder head is also damaged. Check for warpage and cylinder head.
How to replace the piston yourself?
In order to check the condition of the cylinder-piston group and diagnose possible malfunctions yourself, certain skills and knowledge will be required.
Inspection and replacement of pistons can be done without removing the engine from the vehicle.
- Start disassembling the cylinder head by draining the oil inside
- After dismantling the head and pan, carefully analyze the condition of the cylinder head gasket; if it causes concern, remove the gasket and remove any debris stuck to the block
Be sure to remove carbon deposits from the top of the cylinder (for example, with a file), otherwise you will not be able to remove the piston and determine its possible malfunction.
- Measure the cylinder diameter using a bore gauge; make sure there are bores: while turning the crankshaft, watch for the presence of deep grooves located in a vertical position
- Dismantle the entire pan: unscrew the fasteners on the engine cushions, lift it, unscrew the bolts on the pan and pull out the pan
- Drain the remaining oil and inspect the bottom for metal debris (rings, chain guides, etc.)
- If you don’t find anything metal at the bottom of the pan, carefully inspect the oil film - if it doesn’t start to sparkle in the light, it means the liners are worn out and need to be replaced
- Carefully remove the piston assembly with connecting rod and rings, check its condition: if there are deep burrs on the skirt, burning of the bottom and surface in the area of the upper compression ring is observed, wear of the upper groove for the piston ring is more than permissible - replace the piston
- To separate the piston from the connecting rod, remove the retaining rings from the holes in the bosses, use a press to remove the piston pin and separate the piston from the connecting rod; if necessary, use the same press to remove the bronze bushing
The piston, pin and bronze bushing work in close contact and therefore usually need to be replaced together.
- Before assembling the piston-pin-connecting rod set, make sure that the paint markings applied to one of the piston bosses, the ends of the pin and the upper head of the connecting rod are made with the same paint - this means that they have the same hole diameters
- Connect the piston to the connecting rod, first checking them for parallelism of the axes (this is done using a test device with indicator heads)
- Press your finger into the holes of the piston bosses and the upper head of the connecting rod (do not use impact techniques to avoid damaging the connecting rod); insert retaining rings into the grooves of the bosses
- Insert the pistons with connecting rods into the cylinder liners
How to find out the wear level of a car engine
Let's start with the fact that the total mileage of a car does not always indicate the actual condition of the most important components and assemblies (engine, transmission, steering elements, attachments, etc.). As for the power plant, in some cases it becomes necessary to determine engine wear, for example, when buying a used car. It is important to understand that a motor that is heavily worn is not always necessarily bad, but also noisy, knocking, etc.
Determining the degree of engine wear by indirect signs
First of all, checking the internal combustion engine must begin with an analysis of engine operation. As already mentioned, normally, difficulty starting, tripping during operation, knocking, noise and other extraneous sounds, vibrations, etc. are not allowed. However, even the presence of certain deviations does not necessarily indicate that the engine is worn out.
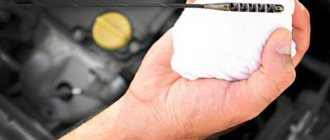
If experience is not enough to accurately determine the source of noise or other causes of failures, then, first of all, you should pay attention to technical fluids and their condition. The check should begin with engine oil. An important indicator is lubricant consumption. If the engine begins to “eat” oil, and you need to add about 1.0 liters per thousand kilometers, then severe wear of the CPG is quite likely (taking into account that the engine is dry, there are no oil seals or gaskets leaking).
Additionally, you should check the exhaust, since the presence of gray or blue oil smoke from the exhaust pipe will also indicate the cause of increased lubricant consumption. At the same time, unscrew the oil filler cap with the engine running. If smoke is clearly visible, then this is another sign of problems with the piston group and cylinders.
All of the above signs may indicate that the engine has problems with the piston rings, and the cylinder walls may be worn out. It is also possible that oil is consumed as a result of the need to replace valve seals (valve seals).
At the same time, it becomes clear that in some cases the engine can still be “revived” in the future with minimal investment (spacing the rings or replacing them, installing new valve stem seals, switching to a more viscous lubricant), while in others the power unit must be disassembled and overhauled (boring/lining the block, replacing pistons, etc.).
Checking the condition of pistons and valves without disassembling the engine
The causes of such malfunctions may be burnout of the cylinder head gasket, burnout of valves or pistons. In this case, oil enters the combustion chamber, carbon deposits form on the cylinder liner and valves, which wears them out faster, and the valve timing is disrupted. Burnout of the gasket allows gases to escape outside the engine, which is accompanied by a loud whistle, or if it burns out between the cylinders, the gases enter another cylinder, disrupting the mixture, since the power strokes differ between the cylinders. In addition, burnout of the gasket risks mixing the engine oil with the engine coolant, as a result of which the mixture foams and the engine stalls after a short period of time, and all this foam stagnates throughout the engine. When a piston burns out or severe wear of the piston rings occurs, exhaust gases enter the crankcase and dilute the oil, which thereby disrupts the lubrication of all rubbing parts. Many service station workers, together with car owners, check the cylinder compression, and if it is normal, then the cylinder is fine. This is not true at all. Good compression indicates the serviceability of only the compression piston rings, while the oil scraper rings may not do their job well, leaving oil on the cylinders that mixes with the combustible mixture.
To make sure what exactly is wrong, you need to remove the cylinder head, remove the camshafts, inspect the condition of the valves, valve stem seals and pistons, that is, all the parts will need to be inspected visually. This process is quite labor-intensive and time-consuming. Everything can be done in vain if the cause of such a malfunction, for example, turns out to be worn valve seals, when replacing which, dismantling the cylinder head is not necessary. For such cases, there is a clever way to do without removing the cylinder head.
The car is placed on the handbrake and the drive wheel is raised on a jack. It is advisable to install wheel chocks under the wheels, because there is a high probability that the car can drive away without a driver. The car shifts into gear closer to straight line. On five-speed transmissions, this is generally considered third or fourth gear. You can, of course, engage any other gear, but from my own experience I will say that it will be difficult and long to rotate the crankshaft this way.
Checking the engine piston and connecting rod group
Naturally, without special equipment, that is, “by eye”, it is difficult to determine engine wear using the methods described above. It is possible to detect that there is a problem, but it may be difficult to determine the exact cause. Taking these features into account, the next step in checking is the most common actions:
It is important to understand that engine compression depends on many factors and conditions. For example, a decrease in the indicator can occur not only due to problems with the CPG, but also as a result of problems associated with the timing belt. More precisely, compression drops when a valve burnout occurs; problems with the valve seats lead to a decrease in compression.
To measure, the pressure gauge is connected to the exhaust pipe in the pan. At the same time, it is very important to seal as tightly as possible the remaining holes and cracks both in the pan and in the engine. You will also need to have a special attachment for a pressure gauge, as well as technical documentation for a specific internal combustion engine model.
Naturally, many small service stations will not perform such an operation. If we are talking about checking a used car before purchasing, most likely the seller will also refuse the request to carry out diagnostics using the specified method. In the end, all that remains is to measure the compression, taking into account all possible errors and various nuances to obtain the most accurate results.
- If we talk about measuring the oil pressure in the engine, this is somewhat simpler, and the method itself allows you to determine the approximate condition of the connecting rod bearings, crankshaft journals, etc. To solve the problem, the oil pressure sensor is unscrewed, after which a pressure gauge is connected to this place through an adapter.
The obtained oil pressure results are then compared with those indicated in the technical documentation for a particular engine. At the same time, the most accurate data is not so important; a certain error on the pressure gauge is quite acceptable. The fact is that wear of the engine and its connecting rod group is indicated by a fairly significant deviation from the norm (about 15-20%). If this is the case, then the power unit will soon need expensive repairs.
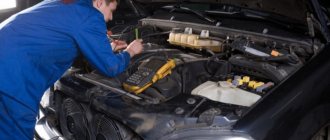
Diagnostics of the cylinder-piston group of gasoline and diesel engines - Autochemistry EDIAL (EDIAL)
Diagnostics of the engine cylinder-piston group: quickly and reliably determine a malfunction in its operation. A correct diagnosis is not even half the battle; in many cases, making an accurate diagnosis is the lion's share of the entire repair. The repair itself may simply consist of replacing a “penny” sensor or, for example, restoring a soured contact and will take a matter of minutes.
The main thing is to figure out what the cause of the “illness” is: an electrical malfunction or the engine hardware is to blame, due to its wear and tear or contamination.
Electronic diagnostic systems (scanners, motor testers) allow you to effectively identify faults in the following systems:
Ignition system
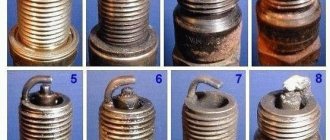
- Determining the condition of spark plugs and spark plug wires (carbon deposits, breaks, breakdowns)
- Determination of operating modes and malfunctions of the ignition coil (turn-to-turn short circuits, monitoring correct connection, breakdown)
- Diagnostics of ignition system sensors (inductive, hall)
- Determination of ignition timing (without strobe)
Fuel supply system
- Electrical check of fuel injectors (turn-to-turn short circuits of injector windings, duration of the injection phase, etc.)
- Checking the operation of temperature sensors, throttle position, oxygen sensor, mass air flow sensor, etc.
- Checking the operation of actuators (idle air control, etc.)
Gas distribution system
- Estimation of relative compression across cylinders in starter crank mode
- Measuring compression in dynamics (with the engine running) and in cranking mode
- Determining whether the timing belt is installed correctly
- Valve operation monitoring
Power and charging system
- Checking the operation of the generator and battery charging system
In fact, a scanner, motor tester or gas analyzer cannot help the mechanic determine the condition and degree of wear of the engine cylinder-piston group (CPG), give him an objective picture of the quality of the repairs performed, or provide the mechanic with information that allows him to predict the residual life of the CPG.
Methods for diagnosing CPG
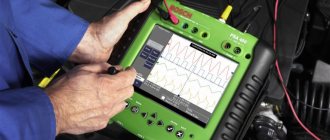
Measuring cylinder compression is the most common engine diagnostic tool. Of course, no mechanic can do without a good old compression gauge. The information obtained with the help of this simple device is certainly important and necessary, but it is still insufficient to identify the reasons that cause deviations in the compression value in the cylinders from the nominal values.
The disadvantages of the compression meter are known; the device has a large error (up to 10%). In addition, it is not difficult to deceive: the oil that remains on the cylinder walls when the oil scraper ring is worn out seals the compression rings, and an excessive amount of fuel blurs the oil wedge, reducing the amount of compression. In such cases, the device readings may not coincide with reality.
Also, compression indicators are affected by the crankshaft starting speed and engine temperature. With a discharged (depleted) battery, the loss of compression averages 1-1.5 atm. In addition, the compression performance of a worn CPG will be strongly influenced by factors such as resistance in the intake pipe, oil temperature, parasitic volume of the adapter device (PU), etc.
Here are two typical examples: the compression in a carburetor engine with high mileage was 11-12 atm, which corresponds to the norm for a new engine. At the same time, oil consumption due to waste exceeded 1.2-2.0 kg per 1000 km. In another example, the engine of a car with low mileage had a compression of about 7 atm due to a malfunction of the fuel supply system - a large amount of fuel entered the cylinders, which washed away the oil from the cylinder walls.
The lack of diagnostic information leads to unjustified loss of time, and therefore reduces the profitability of the auto repair shop. It often happens that due to “coking” of the rings or a loose valve fit, the entire engine is disassembled without being able to determine the reason for the disruption of its normal operation. Although it is enough to replace the valve stem seals or try to “soak” the rings with special additives.
Assessment of the condition of the CPG based on the crankcase gas flow rate has insufficient accuracy due to the influence of gas leaks through the stuffing box seals. It is possible to minimize the impact of leaks only by forcibly suctioning gases from the crankcase to ensure atmospheric pressure in it when measuring flow, which is very labor-intensive. The indicator readings are also affected by the level of vibration of the internal combustion engine.
In addition, this method does not allow an individual faulty cylinder, much less, to determine the root causes of a decrease in the performance of the CPG, and is generally insensitive to leaks through the valve. For these reasons, devices that assess the condition of the CPG by the flow of crankcase gases were quite rightly called indicators.
Diagnostics with a “pneumatic tester” (determining the amount of leakage through the combustion chamber) allows you to identify a specific faulty cylinder. The piston of the cylinder being tested is set when the crankshaft is slowly cranked to the compression or expansion stroke (with the valves fully closed). Compressed air is supplied to the cylinder and the pneumatic tightness is assessed based on the pressure difference at the inlet and inside the combustion chamber. This method can only be implemented in stationary conditions with a source of compressed air (compressor) and a lift.
Disadvantages of the method:
Firstly: it is necessary to set the piston in at least two positions - in the middle and at the end of the compression stroke. Technically, it is quite difficult to carry out this operation, especially if the engine is equipped with an automatic transmission, such a car cannot simply be pushed back and forth; a lift will be required.
Secondly: when checking the last cylinders, we will get worse results, due to leakage of some of the oil from the surface of the liner into the crankcase by the time of checking.
Thirdly: only leakage through valves can be reliably assessed. This method does not reliably indicate the current condition of the rings or liner wear.
Fourth: this method is quite labor-intensive, since diagnosing each cylinder takes quite a lot of time.
Conclusion: many methods for diagnosing the cylinder-piston group provide very little information!
Vacuum method for assessing the condition of the cylinder-piston group and predicting the residual life using an AGTS or APC device
Using a cylinder tightness analyzer (AGT) or a cylinder pneumatic tightness analyzer (APT), it is possible to reliably accurately (without disassembling the engine) separately assess the technical condition of the entire valve mechanism, cylinder liner, compression and oil scraper rings.
Diagnostics with this device is no different from measuring compression. All measurements are carried out during the process of “scrolling” the engine with a starter or starting device through spark plug or injector holes. The advantages of AGC are the simplicity of the diagnostic process and at the same time the high information content of the measurement results.
The advantage of the device is that no matter what condition the battery is in, its condition will not affect the quality of diagnostics. There is no need to know the nominal compression value for each engine in order to compare it with diagnostic results. You only need to know the brand of fuel the car runs on.
The diagnosed parameters are checked against diagnostic diagrams for a given type of fuel, and the condition of the CPG is assessed. Diagnostic diagrams have been developed for AI-76-80, AI-92-95-98, and diesel fuel. And if the car alternates operation on gasoline and gas, then the diagram for this brand of gasoline should be used.
Due to the timely detection of defects in the components of the CPG, the Cylinder Leakage Analyzer (CLA) allows you to avoid unreasonable repairs of the CPG, make fuller use of the engine resource, and carry out routine maintenance in a high-quality manner. Working with AGC does not require special technical training ; the analyzer is quite capable of both experienced diagnosticians and beginners. The equipment of the AGC device is described in the article: “Cylinder Leak Tightness Analyzer (AGTs)”. APC is a gasoline version of the AGC device (it can only diagnose gasoline internal combustion engines due to its design).
What's the result?
So, now you don't know how to determine engine wear. Moreover, it is optimal to use not one, but several methods described above. You can even perform a number of checks simultaneously (for example, measuring compression is combined with checking the spark plugs). The main thing is that all operations are performed correctly.
If there is a need to repair the internal combustion engine, it will not be possible to accurately assess its condition only by indirect signs (loss of traction, knocking, noise) or by measuring compression and oil pressure. In order to accurately determine the degree of engine wear, it is necessary to disassemble the power unit. Next, the engine is troubleshooted, after which a subsequent overhaul is carried out or a major overhaul of the engine is performed.
Compression in a car engine: what it affects and how to check. How to check compression without a compression meter, take readings using a device.
How to determine a burnt engine valve yourself. The main symptoms of a burnt valve, exact clarification of the causes of engine tripping. Diagnostics, useful tips.
High compression in the engine and the main reasons for increased compression. Why does compression also decrease across the cylinders? Tips and tricks.
Features and procedure for independently measuring the exact compression of a diesel and gasoline engine. Compression “cold” and “hot”, malfunctions.
Diesel engine compression indicator. The main reasons and main signs of decreased compression. Starting the engine with insufficient pressure in the cylinders.
Problems starting a diesel engine. Signs of low compression and causes of malfunction: timing belt, cylinder mirror, piston and rings. We measure the compression.
Signs of piston ring wear
The heart of the car is the engine, the individual service life of which consists of many indicators. Its production properties depend on the quality of its constituent parts, timely replacement of oil and filters, and whether technical inspection is carried out on time.
In an engine, the piston rings wear out first. As a result of ignoring the first signs of wear and tear, the pistons and then the crankshaft fail, which leads the car to expensive repairs. The question arises:
What tools are needed to replace pistons
The following set of tools is required to replace a piston engine:
Of course, you need to prepare a new set of pistons. It is recommended to pay attention to the quality of the rings and the appearance of the packaging - manufacturer’s name, material. The rings should be marked to indicate the top side. In order to maximize the service life of the pistons, an anti-friction coating is applied to the skirts of the products. For example, a suitable option is Modengy solid lubricant.
How to determine the degree of piston ring wear
The main action that needs to be taken in this case is to look at the exhaust gases coming out of the muffler when the car is running, at idle speed.
- The appearance of black smoke means that some of the gases, instead of making pushing moments of the piston, have leaked through the worn compression rings into the engine crankcase. In this case, the pressure in the cylinders drops and a loss of engine power occurs.
- The possibility of over-enrichment of the incendiary mixture is also manifested by the presence of black smoke in the muffler, but is accompanied by popping sounds.
- White smoke indicates moisture or condensation, especially in cold weather. On a warm engine, the appearance of white clouds from the muffler indicates wear of the oil seals, valve guides, and oil rings of the engine PG.
- The appearance of blue smoke with a bluish tint is evidence of oil entering the combustion chambers, seeping through valve stem seals, valve bushings or through a worn piston group.
Next you need to pay attention to the spark plugs, or rather to their condition. Oil deposits and the presence of oil on the spark plug threads indicate a violation of the mixture formation cycle in the combustion chamber, which is wear on the piston rings or cylinders.
Then you need to check the condition of the air filter, carefully inspect for oil in its housing and the air outlet corrugation. The presence of signs of its presence indicates wear of the PG.
You should look at the installation locations of oil seals, gaskets, and seals of the unit. Are there any oil leaks? If such a phenomenon is detected, then this is a sign of unacceptable wear of the PG, as a result of which a strong pressure of crankcase gases is created in the engine and oil is released.
It is also necessary to listen to the engine running at idle. If the engine does not run smoothly, the gear shift lever shakes, then this indicates the presence of different pressures in the engine cylinders, due to obvious wear of the CPG. Extraneous noises and knocks in the working engine indicate obvious malfunctions of the device; driving such a machine is strictly prohibited.
The crankcase ventilation system should be checked. To do this, you need to remove the gas outlet hose (breather) from the system and see how the exhaust vapors and gases come out of the hose. If they come out in time with the operation of the cylinders, then there is a presence of rings in the piston.
All of the above features are signs of worn-out engine PG, due to improper use, engine overheating or prolonged operation without proper lubrication.
Running in the engine after replacing the piston
Replacing a piston group is always accompanied by running in or checking the performance of the engine. This is done simply - the engine starts at idle. If within 5-10 minutes of operation there is no drop in speed or other signs of instability, a run-in is carried out for 2-3 thousand kilometers (diesel units are run in for at least 8-10 thousand km). It is advisable to carry it out at third speed. Before running in, it is recommended to check the condition of the battery - it should be 90-100% charged. And most importantly, it is recommended to cover the first 300 km in one race along a country road!
Advice on how to avoid problems during your first race. After replacing the piston, the car engine needs to be warmed up well, and for this it is better to do this. First let it idle to 80 degrees. Then stop the engine and let it cool to 40 degrees. Start it again at idle, allowing it to warm up to 80°. Repeat the procedure 8-10 times.
During the run-in it is prohibited:
- heavily load the car - for example, seating passengers or towing;
- accelerate sharply;
- go uphill;
- increase speed above 3000/min;
- engine braking;
- drive at lower speeds;
- drive on an engine that is not warm enough.
What does running in give you? It allows new engine parts to run in without unnecessary overload after replacing the piston. At a service station, running-in is often carried out using a stand. After replacing the piston, an electric motor is connected to the machine’s engine, which “grinds” it. At home, this is done directly on the machine, using the method described above.