Compressor module design
To begin with, briefly about the refrigeration compressor, as a module that forms part of the air conditioner. This equipment belongs to electromechanical devices, the distinctive feature of which is the complete sealing of the internal contents.
That is, in case of any mechanical (electrical) malfunctions, you cannot simply take and disassemble such a device, like many others, in order to get to the faulty unit. Everything is much more complicated here. In some cases, you will even have to dismantle the split system.
That is why, in case of serious malfunctions, it is easier to replace a split system refrigeration compressor with a new one rather than try to repair it.
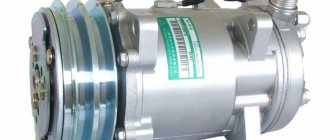
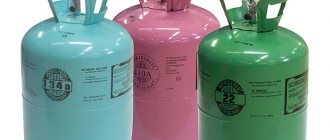
Examples of compressor units from the variety of options that are used on household split systems. The classic shape is usually cylindrical, but in terms of overall dimensions there is a wide variety of designs
Generally speaking, the mechanical design of a refrigeration compressor resembles that of a traditional air compressor.
The machine also contains a connecting rod and piston system, although often of a rotary type, bearing units, and a valve system. But all this is contained in a hermetically sealed metal case.
External and internal structure of the compressor: 1 – bearing balancing unit; 2 – channels for oil; 3 – drive motor; 4 – spiral design; 5 – discharge pipe; 6 – valve system; 7 – coupling; 8 – oil pan; 9 – support base
There, inside the housing, the electric drive is mounted. The drive system is made in such a way that the winding of wires, which does not have air cooling, receives cooling from the working refrigerant - freon
This fairly effective method of internal cooling ensures the longevity of compressor motors. In practice, malfunctions of electric motors are observed, but quite rarely.
Professional inspection
Despite the fact that it is not difficult to diagnose the unit yourself, the best option is to use the services of a specialized car service center. For such work, you need not only a qualified craftsman, but also special equipment. It’s unlikely that anyone would have something like this lying around in their garage.
The sequence will be like this:
- First, connect the climate control equipment to the installation.
- The engine starts.
- The air conditioner turns on.
- You need to monitor the pressure gauge readings. If the compressor is working properly, they should grow.
If the diagnostics showed that the device is in working order, but the interior cooling is incorrect or absent altogether, then the cause should be looked for elsewhere.
How to check the air conditioning compressor of a car without freon? There is one way, only it already relates to clutch diagnostics. To do this, you need to remove the plug of the unit, that is, disconnect it from the power source. Now use a piece of wire to connect the positive terminal of the battery and the contact in the connector. When the wire touches the plug, a click will be heard - confirmation of the functionality of the coupling. Otherwise there is a breakdown.
Continuity testing of air conditioning compressors
The most common type of compressor in air conditioners is single-phase compressors with a starting winding.
To gain access to the compressor contacts, it is necessary to disassemble the air conditioner so that there is access to the compressor. Usually the contacts are protected by a cover that is screwed in place; you can find it by the wires that go to the compressor. After removing the cover, you will see three contact pins on which terminals with wires are attached.
It is necessary to remove the wires and measure the resistance between the terminals with a multimeter. We set the device switch to the resistance measurement function (indicated by the letter Ω). If the multimeter shows an infinitely large resistance between terminal C and the others, then this means a break; in the case of built-in protection, you need to make sure that the compressor is not overheated and the protection has not tripped; otherwise, and if the external protection is faulty, the compressor is faulty. If the resistance approaches zero, this means a short circuit and the compressor is also faulty.
The exact value of the resistance depends on the power of the compressor, the accuracy of your device and can range from approximately 1-20 ohms.
As can be seen from the diagram, the resistance between terminals M and S must be equal to the sum of the resistances between terminals S and C and between M and C.
As a rule, the operating winding (MC) is more powerful, so its resistance is lower than that of the starting winding (SC).
Each compressor has thermal protection, but it can be built-in as in the diagram, or located under the cover, next to the compressor terminals.
If it is not built-in, the so-called “tablet”, then it can be ringed separately and replaced in case of malfunction (it must be closed in the normal state, opens when a certain temperature is reached 90-120 ° C).
I’ll immediately make a reservation that in this way we will not be able to determine short-circuited turns; there are other devices for this (but they also do not detect short-circuited turns stably enough).
Features of the air conditioner
The technical characteristics of any climate control equipment indicated in the passport correspond to the values obtained under certain test conditions. Therefore, the air conditioner will not produce laboratory power in any weather. So, when the temperature outside the window is +50 OC, and the coil of the street block produces +90 OC, then in this case the effect of the equipment will be 2 times less if it is used in mid-latitudes at +10 OC. The same thing happens when using the cooling mode.
Important! The lower the outside air temperature, the more difficult it is for heat to be transferred into the room. Manufacturers create air conditioners, the normal operation of which provides for the absence of sub-zero temperatures on the evaporator
For this reason, condensation occurs in the humid environment. However, the water does not turn into frost. This principle of operation of devices underlies the dehumidification option. Therefore, it is necessary to turn on the devices alternately either for heating or cooling the air in the room. During the operating cycle of the equipment, the air temperature does not change. At the same time, air humidity decreases. Ignorance of this nuance leads to the need for communication in an air conditioning repair organization
Manufacturers create air conditioners, the normal operation of which provides for the absence of sub-zero temperatures at the evaporator. For this reason, condensation occurs in the humid environment. However, the water does not turn into frost. This principle of operation of devices underlies the dehumidification option. Therefore, it is necessary to turn on the devices alternately either for heating or cooling the air in the room. During the operating cycle of the equipment, the air temperature does not change. At the same time, air humidity decreases. Ignorance of this nuance leads to the need for communication in an air conditioner repair organization.
Cooling system design
First, let's look at what this entire cooling complex consists of. The resonant term should be understood as a set of certain components that together provide the required level of cooling. It is worth considering that the entire system is completely sealed, filled with refrigerant (freon) and compressor oil. Lubrication reduces friction between rubbing parts, just like a motor consumable. As a result, internal elements wear out less, which extends their service life.
In addition, the oil removes some of the heat that occurs as a result of friction and also removes small particles. Thus, gas in combination with oil constantly circulates along the line, resulting in an optimal microclimate in the cabin. The air conditioning complex includes the following parts:
- compressor;
- condenser (radiator);
- evaporator;
- fan;
- safety valve;
- receiver-dryer;
- expansion valve;
- evaporative fan;
- pipelines.
Thanks to coordinated work and technical interaction, comfort in the cabin is ensured at a high level. And knowing what exactly the entire cooling complex in your own car consists of and its operating principle, you can independently perform diagnostics. And this is already savings. True, in case of difficult situations, including repairs, you cannot do without the help of a professional.
Important component
It is worth paying attention to how the compressor is designed. Of all the other parts, the stability and performance of the entire cooling system depends on this device. The car air conditioning compressor, without exaggeration, can be considered the heart of the entire air conditioning complex! This is the most complex unit, which ensures the pumping of refrigerant along the entire length of the pipeline. To do this, it creates the necessary level of pressure.
Today, two varieties are most often used:
- axial piston;
- rotary-blade.
In total, there are up to 40 types, but these two mechanisms are widely used. Some modern units are capable of dividing the entire pipeline into two circuits - high and low pressure. In the language of professionals, they have their own designations:
- Discharge - a high-pressure circuit or everything that is located before the evaporator.
- Suction - low pressure line that connects the evaporator to the compressor.
The power device is driven by the rotation of the crankshaft, and when the air conditioner is turned on, the main participants of the entire link are connected:
- pulley;
- drive belt;
- electromagnetic coupling;
- drive disk.
By pressing a button, power is supplied to the electromagnetic clutch, after which it is used to engage the compress shaft with the pulley. It is worth noting that this moving element rotates constantly, since the common engine drive belt passes through it. When turned off, the opposite happens - the clutch disengages, the pulley continues to rotate as if nothing had happened, only the cooling no longer functions. That is, the equipment is running idle.
How does the entire air conditioning system work?
This question is also interesting to study. There will be no harm from this, only benefit. As noted above, the operation of an air conditioner resembles the operation of a conventional refrigerator, which is found in every home or apartment. The principle of operation is based on a natural physical phenomenon, which everyone who has graduated from an educational institution with honors knows about. During the evaporation of a substance, thermal energy is absorbed, but during condensation, it is, on the contrary, released.
After compression, the hot refrigerant enters the condenser, where it is cooled by flows of cold air (counter-movement of the machine and from the engine cooling fan). The cooled refrigerant is condensed and then sent to the dryer for filtration. Purified freon bypasses a thermostatic valve (TRV), which controls and regulates the degree of heating of the steam.
Next, the cooling gas flows through the pipeline towards the evaporator. Steam is already released there with a temperature close to the boiling point of water. This is where the whole point of the device’s operation lies. Warm air from the cabin comes into contact with the tubes, which are already cold, and in a cooled state is directed back into the cabin - circulation also occurs.
From the evaporator, the freon is sent back to the compressor - this completes the cycle. The procedure is then repeated countless times.
Checking the starting-protective relays of the refrigerator
Start-protective relays look like this:
Electromagnetic relay
Relay with posistor
The round black “pill” with terminals is a thermal relay, which is closed at normal temperatures and opens only when very hot. It is checked with an ohmmeter - the resistance should tend to zero, or in the “testing” mode - there should be a sound signal when the probes are applied to the terminals.
The same applies to the posistor - in the normal state it is closed. It is usually located inside the relay, between terminals S and R of the compressor. (In the picture above these are terminals on a white base).
Technical requirements for installation of blocks
There are a number of rules for choosing a location for installing air conditioning units, but the nuances are not always indicated in the instructions and technical documentation of the equipment, although they are very important during operation. Existing calculations for air conditioning systems require mandatory compliance with a number of parameters during installation. So, for the indoor unit the following parameters must be observed:
So, for the indoor unit the following parameters must be observed:
- the distance from the top cover of the indoor unit of the air conditioner to the ceiling, to ensure normal air suction, must be at least 15 cm;
- the distance to the corner wall to which the air conditioner unit adjoins is at least 30 cm;
- the distance to a possible obstacle to the movement of air blown into the room is at least 1.5 meters.
Failure to comply with these technical parameters may lead to disruption of the normal functioning of the air conditioner and increased power consumption.
Also, a lack of air masses supplied for cooling can lead to unstable operation and breakdown of the indoor unit of the air conditioner.
Installing air conditioners in apartment buildings yourself is actually not permitted by law. Existing norms of federal laws, civil and housing codes oblige the moment of installation of air conditioners to be coordinated with the residents of the house, with the management company, with executive authorities
As for the household rules for installing the indoor unit of an air conditioner, when choosing a place where the flow of cold air will be directed, it is necessary to exclude the possibility of a person constantly being there.
Cold air should not enter the place for relaxation (sofa, bed) and place for work (computer or desk). Otherwise, you cannot avoid constant illnesses due to cold air blowing.
To install the external unit, the following parameters must be observed:
- the distance from the rear wall of the external unit to the wall of the building is at least 10 cm, otherwise it will be difficult to “capture” external air;
- maintain a sufficient distance from the ground (when installing air conditioners on the ground floors or in private houses) to prevent snow, dirt, and water from entering the unit;
- install at a distance of at least 1 meter from gas pipes;
- provide at least 1 meter of free space for blowing air with a fan.
The outdoor unit of the air conditioner must be installed on the external wall of the building adjacent to your apartment. You should also exclude the location of the block on the wall of a neighboring apartment. If necessary, provide the external unit with a special canopy - this is necessary to prevent icicles from falling onto the air conditioner unit in winter.
When locating the outdoor unit, it is important to take into account the possibility of free access to it for maintenance. The installation of an external air conditioner unit on the first floors must be carried out in compliance with the conditions for the unimpeded passage of pedestrians near the walls of the house. It is also worth enclosing it with a special grille to prevent vandals from affecting the block.
It is also worth enclosing it with a special grille to prevent vandals from affecting the block.
The installation of an external air conditioner unit on the first floors must be carried out in compliance with the conditions for the unimpeded passage of pedestrians near the walls of the house. It is also worth enclosing it with a special grille to prevent vandals from affecting the block.
It is worth noting that at the dawn of mass installation of air conditioners in apartment buildings, it was believed that the outdoor unit should be installed lower than the indoor unit. This myth was based on the fact that this is how constant oil lubrication of the outdoor unit compressor will be ensured (otherwise the oil supposedly collects in the indoor unit).
From the point of view of the location of the external and internal blocks, the determining parameter is the distance between them. The established limits are from 1 to 6 meters, but the manufacturer may indicate specific parameters that should be strictly observed.
If the maximum permissible distance is exceeded (more than 6 meters), additional freon will have to be pumped into the system, and if the distance is less than a meter, it is necessary to form a ring from the tube to ensure the required footage.
We discussed in more detail the issue of choosing the right optimal location for installing an air conditioner in our other article.
How to check the oil in a car air conditioner
The oil level in the air conditioning system is critically important, since it ensures not only its normal operation, but also the performance and long-term operation of its individual elements. While the air conditioner is on, oil constantly circulates through the system, lubricating the moving parts inside the compressor and other system elements. However, after turning off the air conditioner, some oil still remains in the compressor. It is this level that can be checked. You can do this as follows:
- let the air conditioner run for about 20 minutes in cooling mode;
- It is necessary to check the oil level in the compressor through the inspection window.
The oil level in the car air conditioner must be above the minimum mark (usually indicated by a dash and the inscription MIN), but above approximately one-eighth of the lower level of the inspection window. Accordingly, there should not be very much oil (no more than the maximum mark). If necessary, oil must be added to the system.
Pay attention to the condition of the oil. First of all, whether it foams. If there are bubbles on the surface, then there is a high probability that freon has entered it. Accordingly, it is necessary to look for the location of the refrigerant leak, and subsequently completely replace the oil with a new composition.
Checking the performance of a used air conditioner
Older models are sold in good condition if they have been cared for regularly.
But it happens that a defective model was purchased, which works below the declared power or with malfunctions that the technicians could not fix. To find out if the air conditioner is working, connect both units to each other. It is not necessary to hang them on the wall - just connect the copper pipes of the two units and connect the electrical wires. The operation of the device is assessed by the noise level, the cooling time of the room, and the operation of all functions. It is better to entrust the inspection procedure to a specialist who understands climate control technology and will give his opinion.
When purchasing an air conditioner, you should check the following parameters:
- electricity consumption;
- pressure in the system (by manifold);
- compressor temperature;
- current.
Tools for checking are available in the specialist’s arsenal. If you save on a purchase, it is advisable not to skimp on inspection.
Compressor diagnostics using disassembly
When unscrewing the compressor mounting bolts, oil can be seen on the bolt threads from the rear of the compressor
After unscrewing the bolts, you can remove the back cover and assess the condition of the valve mechanism. When removing the rear cover and subsequent assembly of the compressor, it is not necessary to replace the shaft seal, because the front cover was not removed and the mechanical seal was not manipulated. But for this it is important not to open the front cover and the group of cylinders.
After disassembling it became clear that such a compressor cannot be used
It must be disassembled and the condition of the piston group, shaft, and bearings checked. Carry out the necessary repairs by replacing damaged elements, rinse and reassemble.
Air conditioner indoor unit diagram
Terminal block
On the terminal block, in addition to inter-unit connections, there are also clamps for connecting power (power can be supplied vice versa - to the external unit)
L, N - electric line and neutral of single-phase power supply
Filter Board - filter board, reduces the level of noise in the power supply
Control Board - control board - controls all devices, receives data from all sensors, performs thermoregulation, displays information for the user, and performs self-diagnosis.
Main relay - the main relay is a power relay that supplies voltage to the compressor.
Display board is an indication module that can be a line of LEDs that indicate the presence of power, the selected mode, an error code, or a display that also displays the temperature.
Thermistor - thermistor, thermistor, temperature sensor
Room temp. - room temperature sensor
Pipe temp. — temperature sensor of the heat exchanger tube, evaporator
Temperature sensors may also be located in:
- control panel - to maintain the temperature at the point where the remote control is located (for example, “I Feel” mode).
- at the inlet, outlet and midpoint of the evaporator
Step motor - stepper motor,
Used to open louver grilles or curtains covering a fan
In one step, its shaft is deflected by a small angle, thus it is possible to very accurately control the position of the shaft.
Drain pump motor - drainage pump, built-in only for cassette air conditioners
Float switch - float sensor for condensate level, only for cassette air conditioners
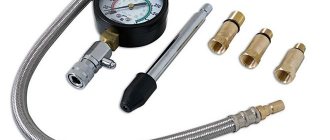
Pressure measurement
If all indicators are within normal limits, but the equipment continues to malfunction, you will need to use a pressure gauge to measure the level of wave vibration.
- Attach a hose of suitable size to the pressure shutter
- Activate the mechanism
- Record your blood pressure readings
Pressure measurement
Pressure measurement
The optimal parameters for a large two-chamber refrigerator are 6 atmospheres. For medium or small – 4-5 atmospheres. You will need to quickly disconnect the gauge to prevent it from breaking.
Car air conditioner diagnostics + common faults
When there is a liquid substance in the system, it is necessary to ensure complete tightness. Otherwise, freon will leak out and the air conditioner will become unusable. But during operation of this device, depressurization sometimes occurs. The culprit is the irresponsibility of mechanics, which leads to freon leakage. Every car mechanic will confirm that repairing or refilling the air conditioning system is not an easy job that can only be carried out by an experienced specialist. Therefore, diagnosing a car air conditioning compressor with your own hands can be done only after studying the theory and gaining practical skills.
The problem is not only due to a freon leak. For example, malfunction of the condenser can lead to breakdown. It is also called an air conditioner radiator, because according to the principle of operation it is similar to a motor radiator, only it has different functions.
When the condenser fails to do its job, an air flow enters inside the machine, the temperature of which is the same as outside. This can happen because dirt has accumulated in the radiator. As a result, cooling is poor and the climate system turns off on its own. Under no circumstances should you delay repair work. It is necessary to clean the contamination, otherwise the radiator will overheat and the pressure in the system will become extremely high.
The next most common breakdown is a malfunction of the evaporator. The reason is the appearance of corrosion if the device is dirty (or the tube through which moisture is removed is clogged). How to determine that the problem is in the evaporator? The air conditioner will not only work poorly, but water will appear in the car, and an unpleasant odor will begin to be felt in the cabin.
If the technician has charged the air conditioning system incorrectly, moisture will no longer be removed, as well as contaminants that penetrate the receiver (due to compressor wear).
When the technician refilled or diagnosed the car air conditioner and contaminants got into the freon, the filter would deteriorate and become unusable. As a result, the air conditioner hoses will freeze because water stagnates in them. As a result, the air conditioning system will turn off.
The thermostatic valve is also an important element that affects the functioning of the climate system. After all, thanks to the expansion valve, the volume of refrigerant supplied is controlled. To do this, it is necessary to take into account the temperature and pressure in the system.
During diagnostics of the car air conditioner using pressure gauges, it turned out that the thermostatic valve was broken? Be prepared for:
- the air conditioning system will begin to operate cyclically, and there will be interruptions in the supply of cooled air;
- the evaporator hoses will begin to freeze;
- the air conditioner will turn off.
Why might such a breakdown occur? The issue here may be the following: mechanical damage to the valve, incorrect choice of operating mode of the system, contamination of the car air conditioner from the inside, entry of air and moisture into the system.
When diagnosing a car air conditioner, it may be revealed that it periodically turns off and functions unstably. The reason is a malfunction of the pressure sensor. It is necessary so that the cooling system turns off if the pressure exceeds the permissible values. Sensor failure occurs due to contamination or improper operation of electronic components (contacts, relays, fuse).
The air conditioner condenser can be equipped with a fan to cool the refrigerant. When a fan breaks down, it begins to make strange noises or stops spinning altogether. This can happen because the bearing is worn out or the electrical connection is broken. The fan can also break as a result of mechanical damage.
The culprit is incorrect operating conditions of both the machine and the climate system. For example, overheating can occur as a result of:
- driving a car in the heat, when climate control is not only unable to cool the air, but itself has become extremely hot;
- driving at excessive speed (engine speed is increased). As a result, the engine compartment overheats, as does the interior;
- leaving the car in direct sunlight for a long time (it becomes too hot in the cabin).
Tips for repairing equipment
Internal defects of the split system compressor are corrected exclusively in professional workshops. At home, repairs of such complexity by the owner himself seem irrational, with an extremely low percentage of successful completion.
If the normal operation of the compressor is disrupted due to excess or lack of refrigerant, it is quite possible to solve the repair problem yourself.
In the first case (excess freon), it is enough to simply remove some of the gas from the system. In the second case, you need to do the opposite - fill the system with an additional volume of gas.
With an interturn short circuit, repairs at home seem to be a futile exercise. Such a malfunction is difficult to eliminate even in a professional workshop.
When the cause of the compressor inoperability is the starting capacitor, you should open the top cover of the external system unit, having first disconnected the machine from the power supply.
Remove the capacitor and check with a tester in resistance measurement mode (mOhm), alternately touching the working terminals with the probes. A non-working capacitor will not show the discharge effect. This is the reason for replacement.
Frequent problems
Split systems are becoming more popular every day. They allow you to stably maintain the optimal air temperature in the house, are affordable and can be used in any season. The system does not break down very often, but since such devices are still considered an innovation, in the event of a malfunction, the owners do not know what to do.
A small educational program related to the operation of the system will not be superfluous. The split system itself is represented by an external compressor-condensing unit, as well as an evaporation unit, which is considered an internal unit. The external parts of the split system include a compressor, condenser, fan, control board, as well as a four-way valve, filter and housing. The indoor unit includes a front panel, filters, display panels, an evaporator, a fan, a control board, and a condensate tray.
During operation, freon is in two states - liquid and gaseous, which is why copper tubes are available in several diameters.
Let's consider the most common problems in the operation of the presented mechanism.
- The split system does not turn on/start. Most likely, the problem is a defect in the electrical cable. If you are convinced that there is voltage in the network, then the breakdown should be found in the power socket, power plug or cable, or in the power connectors (which are located on the control board). Sometimes it happens that the voltage in the network is not enough for the device to operate. If the split system does not work, the intra-house network may be overloaded.
- Water is dripping. The problem is probably a clogged drain pipe. If the blockage is of a mechanical type, then it is due to dirt that has clogged up in the tubes. If the blockage is climatic, then this may happen in winter if individual parts of the pipeline freeze. Ice plugs are a dangerous and unlikely, but still possible cause of blockage.
- Unpleasant smell. This internal problem indicates a clogged filter. If the indoor unit fan emits a foul odor, this may be an indication that bacteria are growing in the unit. Sometimes washing the filter does not help, you need to order a comprehensive service.
- The compressor does not work. This breakdown has several possible occurrences. The compressor itself may fail, or the thermostat may break. If the compressor specifically breaks down, you won’t be able to fix it yourself. Only a jammed engine shaft can be repaired relatively easily.
- Turns off quickly or immediately. If the split system, during apparently normal operation, begins to quickly turn off, this means that one of the temperature sensors has failed. You can check the operation of the sensors with a multimeter. Repairing sensors is inexpensive, so this problem is usually solved quickly.
Sometimes the remote control breaks down - in this case you need to contact the service department. If the device is still under warranty, the remote control will be replaced. If the warranty period has expired, they will tell you where you can repair it or buy a new one.
If it seems that the split system has some problems, if you do not feel that it is working at full capacity, conduct an external inspection. If necessary, call specialists. You can remember if anything happened recently that could have damaged the equipment.
Service Issues
Maintenance of your car refrigerator should not be neglected either. At the same time, some owners noticed an unpleasant odor in the cabin, while others observed obvious overheating. There is nothing to be surprised about, because this is clear evidence that the inspection has not been carried out for a long time.
What exactly is the service? First of all, you need to regularly clean the condenser located in front of a traditional radiator. As a rule, after each summer season, poplar fluff, adhered insects and other contaminants are discovered. This causes the honeycomb to become clogged and the air conditioner will no longer work properly.
You can clean it with water pressure, but you should act carefully so as not to bend the honeycomb, otherwise you will have to buy a new condenser. It is also acceptable to use special radiator detergents. Then rinse everything well with water and blow with a fan.
Another unpleasant moment is the presence of fungus or dirt on the evaporator, which leads to the appearance of an unpleasant odor. There are several ways out here:
- Try to get to the evaporator and rinse it thoroughly. Unscrewing its element is strictly contraindicated!
- Use special detergents for the internal parts of the car air conditioner. It is not necessary to disassemble the front panel; it is enough to use an extension cord that is used to apply them to the evaporator. After some time, the product is washed off when the air conditioner starts working. This simplifies the cleaning process.
There are situations when at first glance it is clear that the entire system is working properly, but nevertheless it does not work correctly. And if the problem is the lack of refrigerant, then the problem can only be solved by contacting a specialized car service center. It is impossible to charge the device with freon without the necessary equipment.
Only specialists will be able to diagnose at a high level and, if necessary, carry out all the necessary operations.
Importance of verification
Checking such an important device should never be neglected, since negligence can lead to costly repairs. Yes, refilling equipment with freon is not that expensive - about 1000 rubles. Although for some this amount may seem considerable.
But replacing a faulty unit can cost about 1000 conventional units - already a significant amount! Inexperienced owners run the risk of having to undergo such repairs in the following situations:
- Continued operation with a malfunctioning unit. The result is failure of important parts, including the expansion valve.
- Purchasing a used car whose climate control system is not working correctly, which promises unreasonably high costs in the future.
Some sellers simply turn off the faulty cooler in order to deceive potential buyers. To do this, the drive belt is removed, freon is released from the circuit, or other methods are used.
For this reason, this important component must be checked in any case, not only when you are already the owner of the vehicle, but also before purchasing it.
Rules for proper use
No one will dispute the importance of climate control equipment in a car. This device is indispensable in hot weather. But in order for the installation to work properly for as long as possible, you should know some rules. Following them will extend the life of all parts of the cooling complex, including the compressor. Here is a small list of useful recommendations.
When it is scorching hot outside, it is advisable to open all the doors for ventilation before turning on the air conditioner. It is enough to wait 3 to 5 minutes, and then you can go on a trip by turning on the life-saving cooling unit.
When the equipment is turned on, do not lower the windows, including the sunroof (if equipped) and do not open the doors (while the vehicle is stationary). The flow of oncoming air entering the cabin reduces the efficiency of the entire system, forcing the compressor to work at full capacity. Thereby increasing the wear of parts and reducing their service life. In addition, when the windows are open, fuel consumption increases.
Leaving the air conditioner idle for a long time without use leads to disappointing consequences - metal elements will begin to corrode, elastic gaskets will begin to collapse. To avoid this, you should turn on the air conditioner once a week for at least 8-10 minutes. This time will be enough to fill all parts of the unit with oil and keep the system in working condition.
Also read:
The world's first car from Carl Benz - The beginning of the story of Carl Benz
4MATIC all-wheel drive system How does it work?
Car Air Conditioning Cleaner: Types of Uses Top 5 Best Cleaners
How does a car air conditioner work?
What does the Check Engine light mean and why might it be on?
Self-diagnosis
The owner of the car can also check its performance. To do this, turn on the cooling equipment and wait until the unit starts working. Now touch the return line with your hand (these are thick tubes). If the device is working, then after 10-15 seconds you can feel the cold.
Also touch the tube that leads from the compressor to the radiator. Just be careful - it will be either warm or hot, depending on the ambient temperature. If it is 20 ° C, then you can already get burned. At the same time, if it is too hot, this indicates a dirty system, a fan malfunction or oversaturation with freon.
Traces of fogging, oil stains, dirt on the tubes and their attachment points may be evidence of a freon leak. In other words, this way you can diagnose the entire complex, and not just check the air conditioner for performance.
Air conditioner indoor unit
- 1. Front panel
- is a plastic grille through which air enters the unit. The panel can be easily removed for servicing the air conditioner (cleaning filters, etc.) - 2. Coarse filter
- is a plastic mesh and is designed to retain large dust, animal hair, etc. For normal operation of the air conditioner, the filter must be cleaned at least twice a month. - 5. Evaporator
- a radiator in which cold freon is heated and evaporated. The air blown through the radiator is cooled accordingly. - 6. Horizontal blinds
- regulate the direction of air flow vertically. These blinds are electrically driven and their position can be adjusted using a remote control. In addition, the blinds can automatically perform oscillatory movements to evenly distribute air flow throughout the room. - 7. Indicator panel
- indicators (LEDs) are installed on the front panel of the air conditioner, showing the operating mode of the air conditioner and signaling possible malfunctions. - 3. Fine filter
- there are different types: carbon (removes unpleasant - odors), electrostatic (retains fine dust), etc. The presence or absence of fine filters does not have any effect on the operation of the air conditioner.
- 4. Fan
- has 3 - 4 rotation speeds. - 8. Vertical blinds
- used to adjust the horizontal direction of air flow. In domestic air conditioners, the position of these blinds can only be adjusted manually. The ability to adjust from the remote control is only available in some premium air conditioner models. - Condensate tray
(not shown in the figure) - located under the evaporator and serves to collect condensate (water formed on the surface of the cold evaporator). From the pan, water is discharged outside through a drainage hose. - Control board
- (not shown in the figure) - usually located on the right side of the indoor unit. This board contains an electronics unit with a central microprocessor.
- Union connections
- (not shown in the figure) -
- located at the lower rear of the indoor unit. Copper pipes connecting the outdoor and indoor units are connected to them.
Related Posts
- How to turn on the air conditioner correctly
- Precision air conditioner
- What role does the drain pipe play in the operation of the air conditioner?
- How to get cooling or heating for 2 rooms? using a split system with one outdoor and two indoor units
- Do-it-yourself air conditioner dismantling
- Why does the air conditioner gurgle when not working when there is wind?
- How to properly connect and use a winter air conditioner kit
- Why does your air conditioner make gurgling noises?
- How to choose the right air conditioner for an apartment or house
- Design principle, functionality and advantages of vrv air conditioning systems
- What to do if cold air enters the room from the air conditioner in winter
- Why may an air conditioner or split system fail to heat?
- The principle of installing an air conditioner on a ventilated facade
- Air conditioners for server rooms
- Why does the air conditioner not turn on or turn off from the remote control?
- How does an air conditioner work in cooling and heating modes?
- How to clean a split system at home
- Installing an air conditioner yourself
- Why doesn't the compressor turn on?
- Air conditioning system maintenance
- Split system with ultraviolet lamp for air purification
- How much electricity does a split system consume: the best ways to save
- Copper pipes and their use in air conditioners
- “auto” mode on the air conditioner: setting and operating principle
- GOST 31427-2010 residential and public buildings. composition of energy efficiency indicators
Read with this
- How to turn on the air conditioner correctly
- Precision air conditioner
- What role does the drain pipe play in the operation of the air conditioner?
- How to get cooling or heating for 2 rooms? using a split system with one outdoor and two indoor units
- Do-it-yourself air conditioner dismantling
- Why does the air conditioner gurgle when not working when there is wind?
- How to properly connect and use a winter air conditioner kit
- Why does your air conditioner make gurgling noises?
- How to choose the right air conditioner for an apartment or house
- Design principle, functionality and advantages of vrv air conditioning systems
Compressor connection features
Let us consider in detail how to connect a compressor from a bk 1500 air conditioner. The connection is made taking into account:
- features of the compressor itself;
- used by the voltage conditioning system;
- power of air conditioning systems.
The air conditioning compressor starts in a few seconds.
Scheme of work
Connecting the air conditioning compressor is a simple task. Any of the two compressor outputs are connected to the power supply. A terminal is connected from the third output. Wiring is connected to the second output. We complete the connection of the compressor and check its level of performance. To do this, the air conditioning system is turned on for several minutes and the degree of heating of the compressor is determined.
Attention! If the compressor heats up strongly and quickly, this indicates poor wiring. To correct problems, it is swapped at the compressor outlet
Automotive air conditioning systems differ from stationary ones. Therefore, when installing them, the connection diagram for the Panasonic air conditioner on the Lada Granta is used. Proper connection of air conditioning systems in a vehicle will guarantee its excellent performance.
Methods for flushing the air conditioner
A car wash does not always help get rid of contaminants from the climate system, which can cause various problems. If you notice that the air conditioner in your car is not cooling, most likely it is simply dirty. Therefore, it is recommended to periodically flush the air conditioner yourself. This procedure, although it will require partial disassembly of the system, will allow for much better cleaning.
To do this, you will need to remove the condenser from the mounts and unfold it a little to gain good access to both the inside of the condenser and the space between the radiators, where a lot of dirt also accumulates. To wash, you can use dishwashing detergent, which should generously moisten all radiator tubes and give the chemical time to absorb (10 - 15 minutes is enough). Then you should rinse the radiator with a stream of water, which must be directed strictly at a right angle. The pressure should be small - otherwise the risk of damage to the radiator honeycomb increases.
The degree of cleanliness can be determined visually; if all the dirt is not washed off, the procedure must be repeated. If you notice bent (crumpled) honeycombs, you need to carefully straighten them using a wooden (not metal!) stick, after which you can remove the remaining solid fragments (twigs, pebbles, insect remains).
Checking pressure and sealing
Before pumping freon, be sure to check the drainage. To do this, having removed the filter, pour clean water onto the evaporator of the indoor unit, as if simulating the formation of condensation.
If the drainage is done correctly, the water will flow freely through the tube and will not overflow over the edge of the inner pan.
It is also advisable to check the pressure in the system before opening the freon line ports. The manufacturer, as a rule, fills 5 meters of refrigerant along the route, and reports this on the nameplate of the outdoor unit.
However, there are also half-empty copies (they save freon).
Next, the tightness of all connections is checked. Superprofessionals do this with nitrogen at a pressure of 38 bar at a reasonable price. But are you ready to pay money for such quality?
In the standard version, after disconnecting the vacuum pump, simply release a certain amount of refrigerant into the line (5-7 bar) and remember the pressure value.
Wait 20 minutes and check if the readings have changed. If the result is positive, using hexagons, the service taps of the air conditioner are fully opened and all the freon is released into the line.
Next, apply voltage to the air conditioner and test it in all modes. When cooling, measure the surface temperature of the evaporator with a pyrometer, or preferably a contact thermometer.
After reaching the operating mode, it should be at least +6C. If the temperature is higher, additional freon charging may be required.
In this case, a complete refill of the system is used more, rather than just refilling it, due to the complexity of the process.
If all installation stages are completed without any comments, you can enjoy the coolness and assume that your air conditioner is installed correctly.
A little about the air conditioner
Over the past few years, it has been difficult for a person to imagine his life without such an item as an air conditioner. After using it for several years, a person may have the feeling that it is now working somehow differently, the air has become more polluted and less fresh. This fact is easy to explain; after six months, the air conditioner must be cleaned, lubricated, and all parts inspected. Therefore, when buying an air conditioner, you should not throw away the instructions; this process is described there in quite detail, and you can do everything yourself. If you can’t solve the problem yourself, then it’s better to turn to specialists.
How to repair a coil
The simplest and most correct thing is to replace the electromagnet with a new one, eliminating the cause of the malfunction. The cost of a magnet is not high, so it’s not worth saving on it. But if you need a more budget-friendly option, you can melt the protective layer of the winding, find a thermal fuse and change it or replace it with a wire (but then there will be no protection for the compressor from overheating). Then fill everything back with epoxy or heat-resistant glue. The method is complex, but, in principle, working. You can also rewind the coil winding, but we do not recommend doing this, because... It will not be possible to do this efficiently in non-factory conditions. A rewound reel will not last long. Moreover, the price of this event is almost equal to the price of a new reel.
Air conditioner electrical circuit
Terminal - terminal block for connecting an interconnect cable for connection to the indoor unit.
N - electrical neutral
2 - power supply to the compressor from the control board of the indoor unit
3 — power supply to the fan motor for operation at 1st speed
4 — power supply to the fan motor for operation at 2nd speed
5 - power supply to the four-way valve drive to switch to heating mode
Compressor
C - common - common output of the compressor windings
R - running - working winding of the compressor
S - starting - phase-shifting compressor motor winding, starting
Internal overload protector - internal overload protection
Compressor Capacitior - an electric capacitor, in this case a working one (there are also starting ones, but currently not used in air conditioners)
Fan motor - engine, fan motor
Thermal protector - protection against overheating, usually placed directly on the motor windings and breaks the circuit when the temperature is exceeded.
Fan motor Capacitior - working capacitor of the fan motor
SV - solenoid valve - an electromagnetic valve that drives the four-way valve mechanism.