This is what the load fork consists of:
- two terminals with wires connected to them;
- the required resistance in the form of a spiral or resistors;
- voltmeter.
There are products of different shapes:
- classic (in the form of a dinner fork);
- with two wires and two terminals;
- with one wire and one spike.
Anything will do, but it has its own specifics. If the option with a wire and a spike is used, then, accordingly, look for a terminal on the battery for the spike. Many people prefer to have two terminals. But there is no fundamental difference here. Even a homemade load fork is suitable for testing.
Load fork device
There is nothing complicated about the battery plug design.
Modern look of a battery plug
Regardless of the type and design, it includes the following elements:
- Voltmeter with a measuring range corresponding to the voltage of the battery being tested.
- A low-ohm resistor that, when connected, provides operating current for the device powered by the battery under test. It could also be a homemade resistor made of nichrome wire.
- Wires and clamps for connecting the load to the battery terminals.
- Most modern devices have a switch or button installed to connect the load to operation.
It is not entirely clear why this measuring device is given the name fork. Perhaps this name came from the fact that the first models, instead of clamps and wires, had protruding contacts in the form of “horns”. And the whole structure, in appearance, really resembled a plug that was “stuck” into the battery being tested.
One of the older types of load fork
Types of load battery plugs
Even such a simple device is available in various versions. And this applies not only to his appearance.
Plug with dial indicator and two wires
Load battery plugs differ in the following characteristics:
- Type of voltmeter. Nowadays they often use digital displays instead of pointer ones. They give better perception and allow you to more accurately estimate the change in voltage when testing under load.
- Range of measured voltage and accuracy of measurement scale.
- The resistance value of the connected load.
- Changeability of load resistance. For different types of batteries, the operating current can vary greatly. If the device contains several replaceable load resistors, then they can test the battery at different load currents. With modern load forks, changing the load resistance is carried out not by mechanical replacement, but by changing the load mode on the electronic display.
- Option for connecting the device to the battery terminals. There are different types of load forks with two wires and with one wire. In the second case, the role of the wire is played by a contact pin located on the body of the device.
Plug with digital display and one wire
Operating principle of the measuring device
Since a voltmeter must be installed in this device, any battery-powered load plug can be used to check the voltage at any point on the vehicle’s on-board network. But its main purpose is to test the battery, that is, to check its readiness to provide the operating current value.
The terminals of the plug are connected to the battery terminals, and then the load is “switched on” for a short time. Based on the voltage level that the battery produces after connecting the operating resistance, and its change, a conclusion is drawn about the degree of readiness of the battery and its serviceability.
Basically, such devices are used for car batteries designed for 12 V or 24 V. Therefore, the voltmeter measurement scale should be up to 15 V, less often - up to 30 V. The operating current that ensures the start of a car starter is 80 - 120 amperes. The connected resistance of the device must provide such a current at the appropriate battery voltage.
Before turning on the load, it is useful to check the battery charge level. To do this, you need to measure the potential difference at the battery terminals in no-load mode.
For 12-volt batteries, their charge is assessed using the following voltmeter data:
Battery charge assessment, checked in idle mode
How to find out the battery charge by the density of the working fluid and the “green window”
The battery mixture characterization method only works with serviced power supplies. It is good for owners of cars with this type of battery, since many of them have to deal with electrolyte. Usually in the arsenal of the owner of such a machine there is something to determine the density of the liquid. A hydrometer serves this purpose.
To obtain the value, the device is immersed in the working mixture through the opening of the jar. The sample is collected using a bulb. The density is determined using the scale on the flask. The corresponding mark is indicated by the upper electrolyte level. To check the discharge, you need to calculate how much the result obtained is less than the nominal value. Every 0.01 g/l corresponds to a loss of about five or six percent. For convenience, you can use the table.
| Density at 100% charge, g/cm3 | Discharge density, g/cm3 | |
| 25% | 50% | |
| 1,29 | 1,25 | 1,21 |
| 1,28 | 1,24 | 1,20 |
| 1,26 | 1,22 | 1,18 |
| 1,24 | 1,20 | 1,16 |
| 1,22 | 1,18 | 1,14 |
The different nominal densities are due to different ambient temperatures. The higher the second one, the lower the first one. Let's look at how to test a car battery using a hydrometer. First you need to know the characteristics of the working fluid. The most common value is 1.27 g/cm3. For example, the electrolyte level in the flask is set at 1.23. The difference is 0.04 g/l. 0.04/0.01=4. 4*5=20% About 20 percent - this is how much energy is lost.
The permissible degree of discharge does not exceed 50%. If the battery test shows a value less than that, then you just need to recharge it. But the density changes depending on the temperature during measurement. An appropriate adjustment must be made for this.
- At temperatures from -55 to -45, reduce by 0.05 g/l;
- From -40 °C to -25 °C - by 0.04 g/l;
- From -25 °C to 11 °C - by 0.03 g/l;
- From -10 °C to -4 °C - by 0.02 g/l;
- From 5 °C to 19 °C - by 0.01 g/l;
- From 20 °C to 30 °C does not change
- From 31 °C to 45 °C increase by 0.01 g/l;
- From 46 °C to 60 °C - by 0.02 g/l.
There is an alternative option to check a maintenance-free car power supply. It is also not universal. There are batteries equipped with a built-in indicator, which is called a “green window”. The latter is located on the side or in the center of the device.
This is the most convenient - no additional devices or actions are required. But not everyone will like the price of the issue. A battery without a built-in indicator is almost 30 percent cheaper. It may be more profitable to purchase an inexpensive voltmeter. If the car owner is of this type, then you can assess the condition of the battery by looking under the hood. The color signal means the following:
- green - full charge;
- white - low level of working fluid;
- black - requires recharging.
How to make a load plug for a battery with your own hands?
A load plug is a device necessary to determine the degree of charge and serviceability of a car battery. With its help, you can determine the battery voltage level at idle speed and under load. A load fork for a battery can also be made with your own hands - if you have certain skills and abilities.
Why check the battery with a fork?
It is especially important to do this for those who buy a car second-hand. But do not forget that the test should be at room temperature (20 to 25 degrees). The car must be warmed up; you cannot check the battery of a car that has just been standing in the cold for a long time.
However, even if we are talking about a completely new battery, it is worth checking it sometimes using a load fork. This will give you an idea of:
- battery charge level;
- the need for desulfation or lack thereof;
- overall condition of the battery.
What is a load fork?
Standard load plugs are often manufactured in the form of voltmeters with a handle with the ability to connect the load in parallel with the voltmeter itself. The load is carried out in the form of a spiral, which has the functions of connecting in various ways. There are plugs that can be connected to battery banks, and there are devices for testing 12-volt batteries - when the load is connected using a nut.
Modern plugs are equipped with a liquid crystal display and, as a rule, have several load modes. To test conventional batteries, a plug with a current load of 100 A will be sufficient.
Any load plug is one of the elements of a closed electrical circuit, which has a fairly high power rating. The simplest version of such a device consists of a voltmeter, a wire resistor and two clamps.
There are many options on how to make a load fork yourself. As the saying goes, “there would be enough junk in the garage.” Because it is often made from improvised means, based on the fact that it is used infrequently, and it is not at all necessary to buy it specifically. The main thing is that the electrical circuit is built correctly, in accordance with simple calculations.
The battery does not hold the load, what should I do?
When checking with a load fork, the voltage on the battery should “sag”, after which it begins to rise.
Read also: Tool steel what is it
If this does not happen, and the battery does not hold the load (the voltage continues to decrease), we can conclude that the device has failed and needs to be replaced.
The rechargeable battery (AB) provides power to the electrical systems and devices of the vehicle. If the battery is not maintained promptly, its life may be significantly reduced. The maintenance schedule includes periodically checking the condition of the battery with a load fork. The plug allows you to check the state of charge of the battery, i.e. completeness of charge or depth of discharge. Load forks have a variety of designs, but all of them allow you to check the performance and condition of the battery.
The easiest way to make a load fork
In order to make the simplest fork and immediately take the necessary readings, you will need the following available tools and actions:
- Any spiral. You can take a good-quality spiral from an old electric stove lying around in the garage.
- The spiral should be rolled into several layers (wire strands), achieving a resistance value of 0.1-0.15 Ohm .
- the battery itself (with a voltage of up to 15 V), a car light bulb (for example, remove it from the turn signals, with a power of 21 W). Such a homemade resistance can either be soldered or secured with a screw and nut. You will also need a multimeter with a current range of 10 amps.
- The entire circuit is assembled and connected in series .
- Then the clamps are brought out to the battery terminals.
- The multimeter provides readings of the current flowing through the circuit. The usual indicator in this case is ±1.78 A.
- Now we remove the multimeter and turn on the entire circuit .
- Using it, we take readings of the voltage on the spiral , which is twisted in several layers. Here the indicator will be in millivolts, about 197 mV.
- We calculate the required resistance according to Ohm's law - 0.197: 1.78 = 0.11 Ohm.
Thus, the resistance of our homemade resistor is 0.11 Ohms. Now you need to connect it to the battery for 5-10 seconds with a multimeter connected to it, which will measure voltage readings in the constant 20 volt range. We take readings and record them. A self-made load fork works well if the chain was assembled correctly.
The second method is just as simple
This will require “spare parts” from old cars.
If you have them in the garage, then you can make a homemade load fork like this:
- take a ground switch from an old car, for example, from a GAZelle;
- extract two additional resistors for the fan from the garage;
- add clamps and wires to the circuit.
The general technical characteristics of such a device will be as follows: resistor resistance from 0.23 Ohm (can be a little more or less), operating current (taking into account fan cooling) - 15 amperes , standard voltage - 12 volts . As for resistors of this particular type, their advantage is that they have built-in fuses that trip in case of overheating inside the circuit. If one resistor is used, the load indicator with it will be 50 amperes, and if two are in parallel, then, accordingly, 100 amperes.
Purpose of the device
- Determine the time that the battery retains its reserve of electricity. This depends on the battery capacity. If the battery has a capacity of 50 A/h, then it can hold a charge for approximately 141 days, if the device is not overcooled and kept at above-zero temperatures.
Moreover, if the battery is in the car and connected to the network, then the charge retention time is halved. The thing is that electricity is consumed even when not in use. If there is an alarm in the car, current leakage (in the region of 0.02 - 0.05 A/h) occurs even when the battery is at rest.
In winter, with such a loss of energy, the battery will be discharged in 10 days, but if the temperature is above zero, the discharge time will be about 20 days.
- Measure the degree of charge. If the voltage on the battery is 11.7 Volts, the battery is discharged; from 12.1 to 12.3 Volts - the battery is half charged; 12.7 Volts - fully charged.
- Find out how long the battery can still hold a charge. It is important to know when to charge the battery. Typically, the battery requires charging when the battery voltage drops below 12 Volts. Even with a charge of 11.9 Volts, the battery capacity remains only 40% full. In this case, it is better to charge the battery in a warm room, without waiting for frost.
- Check if there is a short circuit between the plates. A short circuit exists if, when tested with a plug: the voltage drops below 9 Volts; the electrolyte boils in a closed jar; When a voltage of 14.4 volts is applied, the electrolyte boils in a closed jar or in all jars besides the closed one.
- Set the generator output voltage value. The output voltage level must be stable. The car battery is sensitive to such changes. If the voltage level is below normal, the battery will not charge to the desired extent.
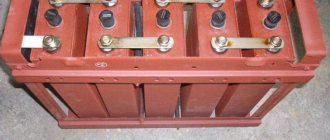
Non-standard solution to the issue
In this case, the load fork is made in an even more interesting way, using a sewer pipe carefully cut in the longitudinal direction.
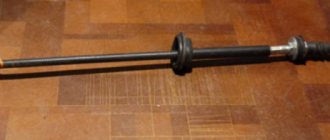
Here is a diagram of the plug design, designed to test the resistance indicators of 12-volt batteries with a capacity of several tens of ampere-hours:
- constant wire , 12 turns with an internal winding diameter of 38 mm;
- M8 studs are welded to the ends of the wire ;
- all this can fit perfectly into a sewer pipe if its diameter is 50 mm ;
- the gap is closed with a second piece of the same pipe;
- are installed on the sides , and the structure is ready.
Technical parameters: resistance value is about 0.1 Ohm , current at a voltage of 12 volts is from 110 to 120 amperes . The duration of the load in this case should be minimal, no more than 3-5 seconds (unfortunately, the device heats up very quickly). All battery indicators are measured in the same way, using a voltmeter of any type. When creating such a plug, it is recommended to use the table for calculating the resistance of wires of various lengths.
General recommendations for constructing homemade load forks
Before you start assembling the plug yourself, be sure to measure the voltage readings in each battery bank and check that the banks are accessible. It also doesn’t hurt to re-read the instructions that came with your battery: it contains the minimum and maximum current ratings possible for it under load, which is very important.
The clamps used for measurements must be strong so that they can withstand high current when the battery is loaded. It is better to connect the crocodile clips to the battery using strong wires.
All connecting parts of the electrical circuit must be tightly soldered. For this you will need a good welding machine.
For ease of use, it is recommended to place the entire chain on a pre-prepared frame. Frame materials should be made of fire-resistant metal.
And a few more important tips:
- calculate the power correctly to avoid overheating;
- do not connect a homemade device to the battery while it is charging;
- do not store a homemade plug near batteries;
- ventilate the room before and after working with your device;
- Do not hold the plug for longer than 3-5 seconds to avoid damaging the battery.
As you can see, making a load plug for a battery with your own hands is not difficult. It is important to remember from a school physics course how to correctly calculate resistance indicators and correctly assemble an electrical circuit from suitable available means. Also, when using a homemade load plug, do not overdo it with current and carefully monitor its indicators.
Selecting a measuring device
When choosing a load fork, important parameters are taken into account, including the type, characteristics of the battery, and design features necessary for the application. In particular, the device, which has two pointed contacts on the body, is suitable for evaluating a 6-volt battery and a 12-volt battery with externally connected cells.
In addition to technical characteristics, devices are divided into groups according to purpose, indication, measurement results, and functionality.
According to their purpose, they are of two types:
- for a battery with an external connection - represent the shape of a plug with contacts of a large cross-section of a rod or flat type;
- for a battery with internal connection of elements - they have a rod contact on the body and an external contact at the end of the wire.
Read also: How to calculate a capacitor for a 220 volt electric motor
To obtain the measurement result of the indication, two types of devices are used:
- switches;
- digital.
A digital load fork with a liquid crystal panel or LED indicator is a more accurate, technologically advanced and speedy device with an attractive ergonomic design. But in the price segment it is more expensive than standard ones and in domestic use does not have any special advantages over other product models.
A striking example is the digital model HB-04 with two spirals, suitable for measuring 24 V traction and car batteries. A timer on which the time is set allows accurate measurements. And simplified use is facilitated by easy switching of spirals. The heavy-duty device has a corrosion-resistant coating. It is used for professional purposes, including in auto repair shops and service stations.
Universal options include designs with a current load of 200 A. They, as a rule, have two types of load resistances (100 A and up to 200 A, if connected in parallel), and are designated 100/200 or 100+100 A. Also on the device market today There are more powerful devices with 3 resistances, expanding measurements with increasing accuracy of readings. When working with modern battery designs that have internal connections between the cans, a plug with one or two remote contacts in the form of pins is used.
According to expert advice, the resistance is calculated taking into account the required current strength. To prevent damage to the part, you should select the appropriate power, and not push through the oxides when measuring; it is advisable to sharpen the ends of the contacts. The operating time of the measuring device should not exceed that specified in the instructions to prevent its breakdown. How to make a load plug for a battery with your own hands, read here →
A battery is a special device that provides voltage to the devices and electrical systems of the machine.
If the power supply is not properly maintained, its lifespan may be reduced, resulting in additional costs.
The battery diagnostic regulations stipulate a test with a load fork.
What is this device? What parameters can be measured with it? What should you consider during the application process? These issues require detailed consideration.
Device
The load plug is a simple device that combines a multimeter, a resistance coil, an alligator clip with a wire, a housing, and a load switch. They differ from each other according to the following criteria:
- by type of voltmeter (digital or analogue);
- voltmeter accuracy;
- spiral resistance (0.1 ohm is equal to a load of 100 amperes);
- measured voltage;
- type of connection to the battery.
A digital voltmeter is good because it is easier for them to visually show that the voltage is increasing under load, because it grows, as a rule, imperceptibly to the human eye in comparison with an analog voltage meter.
Some experts are inclined to believe that it is not advisable to test batteries with a capacity of 55-75 A with a load of 200 A, but these are unfounded fears. In cold weather, when starting the engine, the load on the battery is much more significant.
Load fork. Purpose, types, rules of use, feasibility of acquisition
Experienced car enthusiasts remember that they always had a load fork in their garage. With its help, the condition of the battery cans and their capacity were monitored. During operation, the battery capacity decreases. This occurs due to the destruction of the plates and sulfation processes. Indeed, lead plates are constantly in an aggressive electrolyte. If such electrolyte gets on clothes, then after a while a hole appears on it. The plates are also destroyed when extreme currents flow during engine startup.
How to use: instruction manual
To check the battery, you need to make sure that the battery terminals have no signs of corrosion or oxidation. If, under load, the contact with the pole terminals is poor, the multimeter will produce incorrect (underestimated) data.
Next, we hook the crocodile to one of the battery terminals (usually the negative terminal). At this point, nothing will happen to the multimeter. Then you need to make sure that the load at the plug is disconnected. If you first measure the battery under load, and then without load, the voltage it will produce will show less than vice versa. We recommend assessing the battery charge level as follows:
- 12.70 V or more – excellent charge;
- 12.60 V -12.69 V – good charge;
- 12.50 V -12.59 V – satisfactory charge.
How to use the device
Checking battery voltage with a load plug without load
It is no secret that new drivers, and especially female drivers, are wary of any problems related to the internal structure and components of the car. However, we want to reassure you that working with this device is quite simple.
So how to use a battery load plug?
There are two options for testing the battery with a load fork. Let's take a brief look at each method of how to test a battery with a load fork.
Test without load
For this diagnosis, it is necessary to carry out preliminary work - disconnect the battery from charging and be sure to wait for at least 6 hours to pass. Then the “positive” terminal of the device should be connected to a similar terminal of the battery, and the “negative” pin is touched to a similar terminal. Take indicator readings. This plug method will show you the charge level of the battery:
- when the voltmeter value is in the range of 11.5–11.8, it indicates that the battery is completely discharged;
- readings varying in the range of 11.8–12.1 indicate that 25% of the charge remains;
- numbers 12.1–12.3 means the battery is half charged;
- indicators 12.3–12.6 – the battery has 75% charge;
- 12.6–12.9 – these numbers indicate a full (100%) battery charge.
Load test
Checking the battery voltage with a load fork under load
This is the next stage of battery diagnostics. It is no different from the first method, the only exception is that you connect the appropriate load to the load plug. The steps are similar for testing without load. Please note that diagnostics must be carried out within no more than 5 seconds. If the readings on the plug indicator show more than 10.2 volts, it means that the battery is charged, otherwise it should be charged . If the results of the first and second diagnostics are strikingly different, we can conclude that the battery is faulty.
Review and rating of load forks from different manufacturers
There are only a few manufacturers of load forks on the shelves of Russian auto stores; let’s study them and make our own rating. The rating methodology consists of studying the characteristics of devices and identifying pros and cons. So, let's begin.
Autoelectrics T-2001
The first tester we will consider in this review. It is well known to sellers of specialized stores. This tester used to be an ideal option, if not for one “but” - to switch to load mode it was necessary to recess the tip, which closed the contact on the spiral, it burned and the plug quickly failed.
Autoelectrics T-2001 mini
This tester replaced its older brother T-2001. The modern T-2001 mini took into account the disadvantages of the previous one and began to cost less by switching to a resistance of 100 A. This device is primitive, but at the same time reliable.
Only one minor drawback was identified - during assembly it is necessary to clean the handle seat from paint, because It is not conductive, which is why it may not work correctly.
Master 122-0001
It looks like a serious tester for current sources. It has a multi-colored scale with several dimensions, which visually gives it seriousness. Another plus is the “ear brackets” for crocodiles, which help avoid wires getting tangled. Everything is in its place. There is no shame in using this standard to measure Optima and test Varta. Produced in Taiwan.
Orion NV-01
The most primitive voltmeter with resistance in our test. A small crooked metal box with a handle. Particularly frivolous is the appearance, which at first glance is perceived as something assembled from a tin can in the garage. Such a unit cannot inspire confidence, especially since the smaller scale creates a large measurement error.
Orion NV-02
An improved model of the previous sample. It has a powerful crocodile, large-section wire, a thick tip and a factory-made housing. At the same time, the characteristics are similar to the previous model and it is possible that the filling remains the same (write in the comments if you took it apart and compared it).
Orion NV-03
Modified previous model. It already uses a digital voltmeter monitor and two connected 100 A spirals, which allows this device to be classified as professional. This device has one advantage that is insignificant in practice - it is able to remember measurements in its memory. It seems like a small thing, but it’s nice.
Orion NV-04
Model NV-03 slightly modified for truck services. The voltmeter has a large range. Otherwise, it is no different from the previous fork. If you don’t have a truck service, take the previous version of the tester, you won’t overpay.
Ermak (2 wires)
Even the manufacturer himself does not write about this device. Although, apparently, Ermak is not the manufacturer, but the logo and color scheme. Other instruments are also manufactured under these brands. Accordingly, this device is most likely from an imported manufacturer at the Aliexpress level. Therefore, when choosing before purchasing, twirl it in your hands and ask to see it in action. So far, the only plus of this toy is its appearance at a low price.
Ermak (1 wire)
Similarly, like the previous model of this brand, it is a copy of the original Orion NV-01 tester. Last place in our ranking.
Why do you need to check your battery?
As mentioned above, the battery is a device responsible for starting the engine of any vehicle, and its serviceability determines whether you drive a car today or walk. Unfortunately, buying a new battery does not guarantee that it will be in good working order, so for peace of mind, it is better to check the battery with a load fork when purchasing. How to carry out the check will be described below. If you haven’t gotten around to making a load fork, then there are several other ways to test a battery without a load fork. The main ones:
- external (visual) inspection of the battery;
- electrolyte level measurement;
- diagnostics of electrolyte density using a hydrometer;
- check using a voltmeter as well as a multimeter.
Article on the topic: Replacing the wheel bearing