Every car has a suspension. And one of the most important components of this suspension is the shock absorbers. Thanks to their work, the trip is easy, comfortable and without problems. We guess, needless to say, the function of these all-important elements is to absorb vibrations and provide good traction to the car's wheels while driving.
Shock absorbers are attached to both the vehicle's chassis and body using rubber pads that are designed to absorb vibrations while the vehicle is moving and reduce noise in the body.
How to replace support bearings
There are a couple of options here: you can remove the rack assembly together with the brake disc or dismantle the part separately by disconnecting the ball joint pin. The first option involves adjusting the wheel alignment after completion of the repair. In the second case, you won't have to do this. However, it is still more convenient to replace the support bearing on a separately dismantled unit: in addition, you will have the opportunity to check its other components. It is possible that a complete replacement of the shock absorber strut support will be required. Let's consider both options.
Replacing the support bearing with dismantling the rack unit
Place the car on a level surface, tighten the handbrake and place chocks under the rear wheels. Further:
- put the car on a jack and remove the wheel from the side where you will pull out the rack;
- remove the steering rod (its tip) by pulling out the pin and unscrewing the nut: it is better to use a puller;
- disconnect the hub;
- pull out the brake hose from the special clamp;
- in the engine compartment, unscrew the 3 nuts in the “glass”;
- pull out the assembly;
- compress the spring on both sides with a special device;
- use a special star wrench to hold the internal fastener, unscrew the nut from the rod and remove the support bearing;
- reassemble in reverse order;
- After installing the wheels and tightening the bolts on them, do not forget to adjust the wheel alignment.
Replacing a part without dismantling
The first steps are the same as in the previous version: put the car on the handbrake and remove the wheel from the desired side. Also remove the tie rod end. After:
- take a flat pry bar and spread the brake pads without pressing too hard into the fragile disc;
- unscrew the fasteners;
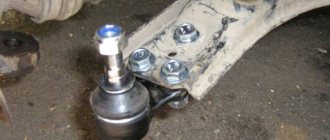
- disconnect the ball joint pin using a puller;
- compress the coils of the spring with a device: to prevent them from slipping, place sandpaper under the hooks;
- under the hood, unscrew the rod nut in the “glass” using a rack wrench: a pair of tubes inserted into each other;
- remove the old part and install a new one;
- reassemble the assembly in reverse order;
- During installation, before installing the wheel, sharply press the brake pedal several times so that the pads adhere well to the disc.
During the work, the question arises: should I change the front strut support bearing in pairs or can I install one new one and leave the second one, if it is functional? It’s difficult to answer unequivocally: usually they change both, playing it safe. It all depends on the general condition of the suspension. So, it is possible to determine exactly whether it is worth changing the second spare part, if it is in working order, only in a service station.
Replacing the front support bearings
To avoid serious damage to car systems, you should pay attention to the slightest knock or creaking noise under the hood. If you stubbornly ignore seemingly minor signs of malfunction, then serious problems cannot be avoided.
In particular, this is a knocking sound when turning the steering wheel. It may indicate a faulty front strut upper support bearing. Changing the support itself is quite simple, and this process will not be accompanied by serious costs. But if you do not pay attention to the breakdown in time, it will lead to more serious consequences.
The front strut support bearing is an important part of a car's suspension. Unfortunately, most drivers pay minimal attention to the health of their suspension systems. But in vain, given the state of domestic roads and, sometimes, the low quality of parts that are installed on modern cars. But it is the suspension that is responsible for car handling and road safety.
Its maintenance is complicated by the variety of parts, and they all perform their functions: brackets, springs, shock absorbers, and so on. In this article we will talk specifically about the support bearings of the front strut, since these parts are subject to increased wear and often fail.
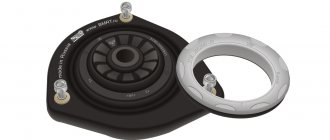
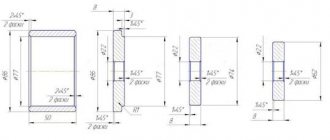
Design
The main components of the part are steel rollers or balls located in a cage and separated by a separator. That is, structurally, it is an ordinary rolling bearing placed in a housing, which can be solid or dismountable. This element of the front pillar is:
- with detachable or built-in inner ring;
- single-divided;
- with removable outer ring.
The first type has special holes for fastening (pressing flanges are not used). These journal bearings may have a built-in ring with spacers to ensure the highest possible rotational accuracy. Products of the latter type are considered the most reliable, where the outer ring is divided at a specific point: due to this, the structure is more rigid.
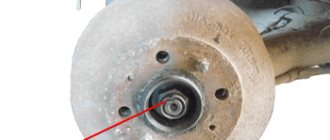
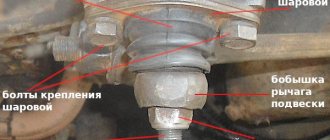
Where are the support bearings located?
Opening the hood, you will see “glasses” on the sides, to which the racks are attached and on which the car body number is sometimes stamped. The described spare parts are located under the plastic cover of the “cups” and are fastened with 3 nuts, which can be immediately seen.
Subtleties of the process of replacing the shock absorber support
The shock absorber support does not require a tie when replacing. The tooling base and fixtures are the same (standard, according to the size of the nuts and bolts). The replacement shock absorber support involves the following manipulations:
- unscrewing the support fastening;
- raising the vehicle until the shock-absorbing rod comes out of the support;
- it is allowed to drown the rod by hand and squeeze out the old shock-absorbing support;
- cleaning the support seat from dirt;
- recessing the shock-absorbing rod and supplying a new support;
- fastening the support without inserting the rod into the support;
- placing the car in place implies parallel monitoring of the correct installation of the shock-absorbing rod to its place in the support;
- After successful installation of the rod, the nuts are screwed in and tightened, and the jack is lowered.
TYPES OF SUPPORT BEARINGS
There are several most popular types of bearings used in modern cars. These include:
- bearing with built-in ring. This arrangement of the front strut support bearing is considered the most convenient to install. The built-in ring can be external or internal. The main feature of this type of bearings is the presence of special holes for installation. Its installation does not require the use of clamping flanges. The bearing ensures the rotation of parts using both the inner and outer rings;
- with outer detachable ring. The inner ring provides connection to the vehicle body;
- with detachable inner ring;
- single divided. This type of bearing is practically no different from all others, but its peculiarity is that it is made of more durable materials.
How to determine whether support bearings are faulty
The first characteristic sign is a knocking sound in the area of the front pillar of the car (left or right). Other suspension parts may also be the source of extraneous sounds, but the check should begin with the support. The knocking is especially noticeable when overcoming bumps and driving over rough terrain during sharp turns. Another symptom is a slight decrease in controllability: the steering wheel responds sluggishly to the driver’s actions - the car seems to “chatter” slightly on the road.
It is possible to determine that the front strut support bearing is faulty under stationary conditions. You will need an assistant. Point-by-point diagnostics:
- Park the car on a level surface and apply the handbrake.
- Open the hood and remove the left or right “glass” cover.
- Lightly touch the top of it and ask an assistant to press on the fender to make the strut work on the side on which the spare part is being checked. If it malfunctions, a slight vibration will be felt and a knock will be heard.
- Test the second rack in the same way.
- Ask an assistant to turn the steering wheel to the right or left so that the spring is clearly visible. Place your palm on it: when you turn the steering wheel from side to side, you will feel the impact and hear the sound of metal.
Replacing a bearing with a separate element
If the support itself is in order, and the fault concerns only the bearing, it can be replaced separately. To do this, remove the rack with the support (the process is described above) and deal with it separately.
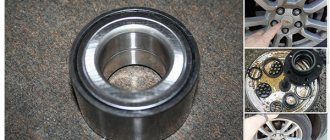
Having disassembled the support (the design is different for everyone, but the principle is approximately the same), we inspect the bearing. As a rule, the balls are worn unevenly, there are burrs on the holder, and the seals are damaged.
It is possible that the problem can be solved with little blood
Although journal bearings can usually be disassembled and individual components can be accessed, there is no point in repairing them.
It is hardly profitable to tinker with the component parts of the support bearing, trying to repair them
Firstly, the bearing itself separately from the support is not that expensive.
Secondly, this is a critical unit, so replacing balls or seals using a makeshift method will not lead to anything good. Therefore, it is a clear replacement.
It is safest to replace the entire bearing
Whether to change bearings in pairs or not - there is no consensus. Typically, paired replacements are made more due to reinsurance. Experienced service station workers determine this need based on the general condition of the car’s suspension. It also happens that it is not practical to change the second bearing - why throw away a well-functioning part?
How to carry out work on an Opel Astra (video)
Causes of support bearing defects
The main culprits of failure are moisture and dirt penetrating inside and lack of lubrication. Often the cause is a blow to the rack assembly: for example, due to an accident or collision with an obstacle. The causes of support bearing failure are worth considering in more detail:
- Natural wear and tear. As noted above, this happens no later than 100 thousand kilometers.
- Dirt getting inside the part. Here the design is “to blame”, in which there is no protection from external harmful factors.
- Driving style. The habit of “rushing” from a stop, ignoring the speed limit when driving on a bad road – all this “helps” parts to fail prematurely.
- Low quality product. It is most typical for Russian cars - the same VAZ, for example. If a “original” part installed at the factory lasts a long time, then a newly supplied one may not last even a couple of tens of thousands of km.
Risk of failing to replace the support bearing in a timely manner
Many people underestimate this seemingly unimportant detail. But in vain! The now popular MacPherson suspension has a good quality: a broken support bearing does not collapse instantly, but periodically signals the driver about its incipient “disease”. Ignoring the symptoms leads to part failure, as a result of which the strut pierces the hood. It’s good if this happens at low speed when the wheel hits a hole or hits a bump. At high speed the consequences can be much worse.
Also, untimely replacement of the described spare part is fraught with gradual failure of other suspension elements. Due to the looseness of the spare part, silent blocks, ball joints and other parts will experience greater loads, the service life of which will be reduced.
Algorithm for carrying out repair work
After the shock absorber has been removed from the vehicle, you can proceed to repair work. To restore the functionality of the node yourself, you must perform the following steps:
- Compress the spring using screw ties. To perform this action, you will need two ties, which are installed on opposite sides. To tighten the spring, rotate the pins alternately.
- Tightening must be continued until the spring begins to move a little. After this, you can unscrew the upper fastening element and remove the support bearing with the rubber bumper.
- Remove the spring from the strut.
- Next, you need to conduct a visual inspection of all elements of the part. If the malfunction manifests itself in the form of an extraneous knock, the cause may be a worn rubber bumper or a damaged support bearing.
- Unscrew the shock absorber from the housing. For this action, you can use a special key, or, if it is not available, a regular hammer and a steel rod.
- Again, it is necessary to examine all elements and replace damaged ones. It is extremely important to use original components, or parts that perfectly match the dimensions of the old ones.
- Insert the new cartridge into the rack, tighten it with a nut. The spring can only be released after the top nut is securely screwed on.
- After all necessary elements have been replaced, install the rack in the reverse order.
- Screw the wheels back on and remove the car from the trestles.
Also interesting: Changing the engine oil and filter Niva Chevrolet
In order for the restoration of shock absorber struts to be successful, you must follow several recommendations:
- follow safety regulations;
- do not rush, especially at the stage of compressing and decompressing the spring, as this is dangerous both for the integrity of the car and for your health;
- If you have already started repairing shock absorber struts, check the suspension, steering rods, racks, and brake hoses at the same time.
If everything is done correctly, repaired components can last up to 3-4 years. This is provided that the car is driven on good roads and not at too high speeds. Some other recommendations that will help extend the life of your refurbished shock absorbers:
- If, among the considered methods for diagnosing the condition of struts, you choose to check in motion, the road should be good and the speed should be low. Such actions will only aggravate the problem, because if there are faults, they will make themselves felt even under light loads.
- Lifting the suspension using a special attachment instantly disables the rod, so such an action is categorically not recommended.
- In winter, the oil needs to warm up, so the first 5 minutes of driving should be driven at the lowest possible speed. Remember that frost is one of the main reasons for failure of racks.
Some drivers claim that the main reason for the frequent need to repair shock absorber struts is the unsatisfactory quality of our roads. If the vehicle travels on good European roads and not on Russian potholes, then its struts are fine. But, as practice shows, regardless of geography, shock absorbers need to be restored at similar intervals; the only difference is in the nature of wear and malfunctions.
Thus, repairing shock absorbers with your own hands is gradually becoming a thing of the past, new cars are equipped with non-separable structures, but a significant portion of owners still prefer to restore the functionality of their car themselves. For an experienced motorist, the procedure will not be difficult if everything is done consistently and correctly.
But, if repaired shock absorber struts in monetary terms will cost almost the same as their complete replacement, you should give preference to the second option due to the length of further operation. It is worth recognizing that shock absorbers on our roads rarely withstand more than 50-60 thousand kilometers and are consumables. Solve the problem without making it worse, because you should not skimp on what your safety depends on.
And also interesting: We are installing an engine on a Niva from a foreign car. It's worth it "
Why is the shock absorber strut knocking?
Replacing shock absorbers Kia Rio 3
Review of gas and oil Torr shock absorber struts
Replacing shock absorbers for Ford Focus 2
Selection and replacement of Renault Logan shock absorber struts phase 2
Part selection features
The market offers a fairly wide range. However, it is clear that preference should be given to original products. But there are options: there are manufacturers that produce parts that are not inferior in quality to “conveyor” ones, while their price is slightly lower compared to the original. Below are the most popular companies offering this suspension component:
- SNR: a French company that produces its products in Europe and China;
- SKF: international company headquartered in Sweden;
- FAG: produces bearings for the engineering industry and concerns such as Mercedes-Benz;
- INA (Germany): the company bought FAG and today is in second place in terms of the volume of bearings produced;
- Koyo: A leading Japanese manufacturer that produces products of high quality, but at a high cost.
How to extend the service life of support bearings
The first rule is to avoid driving on broken roads, and if this cannot be avoided, reduce your speed to the minimum possible. Also, do not “break away” by turning the steering wheel. If characteristic signs of a support bearing malfunction appear, replace it immediately without waiting for the part to be completely destroyed. And the last point: buy quality products from reputable manufacturers.
In the last article, I talked about choosing front suspension components for my Kalina. And here I will try to describe in more detail the entire procedure for replacing these parts, starting from struts and springs, and ending with supports and their bearings. All this can be done in three hours, if there are no special problems with rusted nuts. To perform this repair you will need the following tools:
- Balloon wrench
- Hammer and pry bar
- Jack
- Open-end wrench size 9 and socket wrench size 22 (for unscrewing the top nut of the strut and holding the rod)
- Socket wrenches 17, 19 or similar heads with a crank
- Pliers
- 13mm socket head with ratchet or wrench
- Penetrating lubricant
- Spring ties
DIY shock absorber repair
Having determined the type of breakdown, you can proceed directly to troubleshooting. If you choose the option of replacing racks, it is important to remember that it is carried out on a pair basis. If you decide to restore the functionality of a failed unit, you can use the services of a car service or repair the shock absorbers yourself.
Before carrying out repair work, it is necessary to study in detail the features of the part and safety regulations. Opening with an angle grinder and welding the monolithic body is strictly prohibited.
Also interesting: Interchangeability of all spark plugs and analogues
The first stage of repair work is disassembling the shock absorber. Before dismantling the rack, you must prepare all the required tools and equipment. The repair kit does not provide any special equipment; all the tools can be found in almost any garage:
- support trestles for lifting the car (the use of a jack is prohibited by safety regulations);
- standard kit for automotive repair;
- rack key;
- screeds.
Over the past few years, the process of repairing rear and front shock absorbers has become much easier. Previously, individual components of the unit were replaced, such as working fluid, seals, valves. Now, to repair the shock absorber, it is enough to dismantle and replace its internal cartridge.
Removing the Kalina front strut assembly with support and spring
If you are going to change at least one of the front suspension elements described above, then in any case you must completely remove the entire module. So, the first thing you need to do is open the hood and slightly loosen the top nut securing the support to the strut. To do this, first put a 22mm wrench on the nut, and holding the 9mm wrench to prevent the rod from turning, loosen the fastening (just make a couple of turns):
Then lift the front of the car with a jack and remove the wheel:
Immediately after, move the brake hose to the side, after first removing it from its engagement on the stand, as shown in the photo below:
Next, you need to apply penetrating lubricant to all connections that will have to be unscrewed, first of all to the fastening of the strut to the steering knuckle:
Then you need to unscrew the nut securing the steering tip to the steering arm of the front strut and knock the tip out from there (using a pry bar and a hammer), or press it out using a puller. The result is the following picture:
Now you can proceed directly to fastening the rack at the bottom, where you should unscrew the two nuts using wrenches 17 and 19 (ideally, heads with a knob):
Certain difficulties may arise here. Personally, everything was fine with the nuts, but I couldn’t knock out the bolts for a very long time. I had to knock through a wooden spacer, then hit the bolt with a punch (carefully, without damaging the thread), and only after turning the bolt from the back side with a huge lever of two knobs, I was able to deal with it:
Disassembling the Kalina front suspension module
Here, first of all, we will need spring ties, which can be bought at almost any auto store. Personally, I have them like this, in the photo below:
We put them on the coils of the spring on both sides and, using these devices, compress them (doing this evenly on both sides in turn so that there are no distortions):
When you see that the springs are sufficiently tightened and do not rest against the strut support, you can unscrew the top nut:
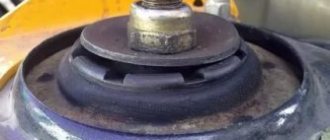
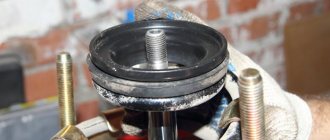
Now you can remove the support along with the bearing, cup and rubber band. I didn’t stand on ceremony and rushed a little - in the end, I had to reassemble the old bearing later. But I repeat - it’s better to remove this entire structure assembled, and not like in my photo below:
Then you can remove the spring:
All that remains is to remove the boot from the shock absorber rod from the bump stop, simply by pulling it up with a little force:
The disassembly procedure is completely completed and now you can begin assembling the new Kalina front suspension module.
Instructions for installing new springs, struts, support bearings and the supports themselves
First of all, we put the bump stop and boot on the new rack:
Then we tighten the new springs to the required moment and put them on the rack. It is important that the lowestmost coil falls exactly into the recess on the rack, so to speak, in its home place:
When the spring is sufficiently compressed, we proceed to the supports and bearings. We take the new support, turn it over and insert the support bearing. Typically, the bearing is marked “TOP”, meaning that this side should be inserted into the support:
We put a cup on top of the support bearing, as shown in the picture:
And on top of this pancake we put an elastic band:
Now we carefully place this entire structure onto the stand rod and tighten the nut, keeping the rod from turning. It is important that the upper turn, upon final installation, lies exactly along the circle of the elastic so that there are no distortions. As a result, the entire SS20 front suspension module looks like this:
Then we remove the coupler, also checking that the spring is evenly seated at the bottom and top, and you can start replacing. If you are installing spacers, then on them, as well as on the supports, there is an arrow that should be directed in the direction of travel of the car. We put it on the support studs and install the module on the car:
We also insert the stand back to the top of the glass and immediately tighten the nuts. Well, then you will have to sweat a little to get the steering knuckle into the place where the rack is attached. To do this, I pressed the brake disc with my foot with great force, pointing it down, and tried to combine the whole thing with my hand. It didn’t work out right away, but after 10 minutes of effort everything worked out and the rack was installed on the car.
With the second side we perform the same operations and with it everything turns out much faster, since our hands are already full!
So far, no word about impressions of the new suspension, I will write a more detailed article about this tomorrow.
Support bearing mechanism design
In fact, the weight of the front of the car (including the engine) rests on this unit. When the front wheels turn, the bearing experiences lateral loads, which accelerates its wear.
Important! Operation of faulty supports can lead to damage to shock absorber struts and steering.
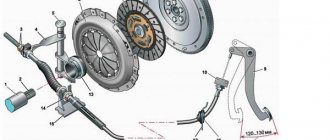
A typical arrangement of support bearings can be seen in the diagram:
Diagram of support elements
Even a minor malfunction or critical wear of a bearing immediately affects the operation of the suspension and steering.
Design Features
The support bearing is located between the upper shock absorber cup mount and the upper strut mount. The main purpose is to provide a movable connection between the upper support of the shock absorber strut and the car body.
The unit is a regular ball bearing. In some designs, the bearing may be attached to a plate that rests on the upper spring seat. This is exactly the design used on the Opel Astra F, but this does not make a fundamental difference in the replacement process.
Tool
- spanners, sockets and hexagons of the required size;
- slotted and Phillips screwdrivers;
- spring ties;
- a wire brush for cleaning bolts before unscrewing, penetrating lubricant (WD-40 or its equivalent).
The steering tip can be removed with a special puller or using a hammer. Also, a hammer and an adapter of the required diameter may be required if the outer CV joint is stuck on the splines to the hub (methods for replacing bearings without removing the axle shaft are mentioned in the video, but in most cases it is actually easier to unscrew the hub nut).
Keep in mind that small sets of universal sockets will likely not cover all your needs. For example, when unscrewing the top nut of the shock absorber rod, the rod itself must be held with a hexagon. To prevent the stabilizer link pin from turning, there may be, for example, a recess in it for a Torx, so you won’t be able to unscrew and tighten the stabilizer with a regular head - you need a spanner. Also, in some cars, the CV joint nut may not be the usual hexagon type, but a special multifaceted shape. Be sure to check these points before repair, so that during disassembly the tool is not found to be missing.