Rubber mats are used in almost every car, regardless of the manufacturer. However, over time they can wear out. It all depends on the initial thickness of the mat and how often the car is used. Naturally, the more often the car is used, the faster the first signs of wear will appear on the floor mats. Experience shows that in the vast majority of cases, the first carpet that breaks is located under the driver’s feet. This is especially true for girls who use high-heeled shoes while driving.
On the website https://stingray-market.com.ua/ you can find rubber mats for absolutely any car. The widest range of brands is presented. Indeed, if you assume that it is possible to sell the car in the near future, it is better to replace the mat with a new one rather than repair it.
When to repair rugs
If you notice damaged or worn areas in time, it will be much easier to solve the problem. This will preserve not only the carpet, but also the car’s upholstery and its bottom. Torn options are practically useless. Carry out repairs in the following cases:
- The surface is severely abraded or a part is damaged. This happens especially often among girls who constantly wear shoes with thin heels. It digs into the surface and damages it in a small area.
- Natural wear and tear due to long use. Over time, both rubber and fabric wear out and in places where the foot constantly stands, deflections or even holes form if repairs are not carried out in time.
- Cuts, damage from sharp or heavy objects. Sometimes this option also happens; in this case, you need to seal the hole as quickly as possible so that it does not get bigger.
The driver's mat wears out most often, since it bears the heaviest loads.
If damaged areas are not repaired, this will not only lead to their increase and damage to the product. Holey rugs provoke a number of other problems, which will be much more difficult to eliminate:
- Sand and debris penetrate the floor covering. You will have to constantly vacuum; over time, the surface deteriorates and looks untidy.
- Water gets under the rug. This is especially dangerous when using rubber coverings, since they do not allow evaporation to pass through and moisture accumulates from below. This causes the upholstery to become wet, causing an unpleasant odor and mold to appear. Moisture also affects the bottom; with constant dampness, the metal begins to rust, then through holes appear.
Assess the condition of the surface; if the wear is severe, then there is no point in repairing; it’s easier to replace. Some people use two sets - fabric options for the summer, and rubber ones for the winter, so that the melting snow collects and does not spread over the floor covering.
Install buttons (clips)
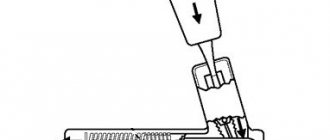
Clips or pistons, as well as puckles and andaps (they are also called that) are small automotive spare parts made of metal, plastic or rubber. With their help, parts are attached to each other.
The upper part of this device is fixed to the mat, and the lower part is screwed to the car showroom floor using self-tapping screws. That's all. All that remains is to snap both parts together.
Another interesting idea: the rugs are fastened together with special buttons. They are easy to find in any sewing studio. How all this should look can be clearly seen in the picture. If the car needs to be washed, the covers are very easy to separate.
Repair of rubber mats
To prevent severe damage, inspect the surfaces of all elements at least once a month. Take it out of the car and assess the condition on both sides. A cut or a through hole can be easily identified by moisture on the reverse side; it always accumulates there, since it does not evaporate when it gets on the reverse side.
Preparation
To repair a driver's or other carpet, you need to prepare everything necessary and ensure normal working conditions. A lot depends on the nature of the damage, so it’s worth assessing the condition in advance and understanding what work needs to be done. Remember the following:
- Take out the interior mat, shake it off any dirt and wash it well. This can be done with a hose or by pouring water and scrubbing off dirt with a brush. Clean both the outside and the inside, hang outdoors to dry.
- Inspect the damaged areas, measure their sizes, then select a patch. It should be a little larger to cover the problem area.
- When the hole is through, you will need twice as much materials for repairs. If you patch it on only one side, the patch will not hold up as well or even break after a short time.
- For small damaged areas, buy ready-made patches. They are sold in markets and automotive stores. The elements are already ready for use, which is very convenient. Most often they sell sets of several pieces; you need to choose the right one for your location.
- For large cuts, you won’t be able to find a repair kit. The easiest way is to find an old inner tube from a bicycle or car and cut a patch of the desired size and shape from it. Use thin rubber, otherwise the repair site will stick out strongly above the surface and will quickly be torn off by the sole of the shoe.
- Buy special glue for rubber if it is not included in the kit. It is best to choose an option that has everything you need, then you can be sure that the patch will be securely fixed to the car mat. Do not use cheap compounds; they do not adhere well and may peel off over time due to exposure to water.
- Carry out work in a well-ventilated area or under a canopy outdoors. Rubber glue has a strong odor, so it is not advisable to work in a residential area.
It is better to choose not a universal glue for rubber surfaces, but an option for repairing cameras.
Carefully study the instructions for using the adhesive. They vary in use, some need to be applied, left on for 5-10 minutes and only then pressed on the patch. If you don’t understand this aspect, the rubber simply won’t stick or won’t stick well.
Repairing damage
It is most convenient to do the work on a table or workbench, provide good lighting, this will help to accurately position the patch and efficiently process the repair area. It is advisable that the air humidity is low and the temperature is above 20 degrees; in a damp, cold room the glue sets much worse. Operating instructions:
- Dry the pre-cleaned and washed rubber well. It is advisable to heat it with a hairdryer, at least a household one, to remove all moisture from the structure of the material.
- Clean the repair area with sandpaper with P400 grit or finer. It is necessary to treat the surface over the entire gluing area, remove irregularities, burrs and minor damage. This will allow the glue to absorb better and hold the patch more firmly.
- Remove dust with a rag or brush. Degrease the surface with a solvent or special compound. Wipe with a lint-free cloth and wait until it is completely dry.
- Try on the repair element, make sure that it covers the damage with a margin and fits on the strong edges around it. If necessary, trim and give the desired shape; you should not use too large pieces.
- Apply glue. Maintain it according to the instructions; usually you need to wait until the composition has set a little and only then press the surfaces to be glued. It is important to position the patch evenly and press it.
- To glue the rubber even more firmly, it is advisable to press the patch with a heavy object, simply place it on the floor or table and place a weight on top. You can also use a vice or a clamp if the size of the patch allows you to press it completely.
- When the damage is through, repeat all work on the reverse side. You can start them only after the glue has completely dried, usually this is done no earlier than a day later.
- When the patch protrudes strongly, it needs to be processed with a sanding machine to remove excess from the surface. Do this carefully, do not remove too much.
Select the repair material to match the color of the rubber. Most often, the carpets in the car are black, so after finishing the work the patch is almost invisible, especially since it is located under your feet and is not noticeable.
If the surface is perforated, you need to align it to the size of the patch. To do this, first carefully cut off the protrusions with a construction knife, and then sand the rubber with a machine or by hand.
How to install
Let's look at what to glue the car door seal to and how to do the work correctly
It is important to choose the right type and thickness of the part; if you need to increase the tightness, the thickness is increased. Moreover, the thicker the rubber, the more difficult it will be to open and close the doors.
Old parts are removed. Find the ends of the tapes and pull them until they jump off the door or body. If there is no end, cut the elastic band anywhere with a knife, and the resulting end is pulled in the direction opposite to the body.
The seal must be installed carefully. Its shape is adjusted to the configuration of the doorway, other designs are unacceptable
The rubber is soft and prevents the seal from acquiring the correct shape. First, the elastic is applied to the opening, it is advisable to enlist the help of a partner, then the approximate part is carefully put on. When the part begins to fall into place, you can lay out the seal completely on the opening. Haste is inappropriate. If the ends of the product do not match, the installation must be done again.
Glue
The easiest way to glue a part is with special glue. They use BF-88, Moment, other construction adhesives, and less often liquid nails. The surface is first prepared - cleaned and degreased. After applying the glue, you need to press the gum for 20 minutes and wait until the surfaces set.
How to restore a fabric rug
You can repair car mats yourself even when they are made of pile material. But this option will differ from the first; in this case, you cannot glue the surface, since the composition will not adhere to the pile as it should. Do the work like this:
- Remove the damaged product and remove dirt. Then wash using a high-pressure unit or a brush and soapy water to remove stubborn dirt. Dry for a day or more until the moisture is completely gone from the material.
- Determine the size and shape of the patch. The easiest way is to cover not a small area, but the entire surface that is subject to heavy wear. In the case of the driver's mat, this is the strip under the pedals on which the feet rest.
- The easiest way to select carpet or other material is in carpet stores. Moreover, it is advisable to make a pattern from cardboard or paper. Then they will cut you a piece of the required size and overlock the edges, this will improve the appearance and protect the ends from wear. Select the color of the finishing according to the color of the main rug, use the same shade so that the repair area is not noticeable.
- It is best to sew on a patch using a special sewing machine that pierces a thick surface. There are these in every shoe workshop and they charge little for services. In extreme cases, you can use an awl, a large needle and do the work by hand. The main thing is to do everything carefully so that there are no crooked stitches.
- Check the integrity, pour a little water and leave the mat for a day. After this, look at the underside; if it is dry, then everything was done correctly.
- When the base is damaged, it must be repaired as described in the section on rubber mats. Use thin patches, make them of such a size that there is a margin of several centimeters around. After gluing, be sure to press down with a weight.
Most often, only the part where the shoes stand wears out. If it is repaired, its service life will increase by 3-4 years, as the thickness will become greater and the abrasion resistance will increase. Replacing the patch is easy, you just need to cut the threads and sew on a new one.
Glue Velcro
There is one more trick, also very simple.
You will need a textile fastener, in other words, Velcro, and scissors. You need to cut a piece of the desired size and glue it to the back of the rug.
Here it is worth considering what quality the flooring is. If it is smooth, another cut will be needed. We fix it on the floor and connect the sticky parts. Such fasteners will not allow the material to fidget.
How to care for products
To reduce wear and prolong service life, simple maintenance rules should be followed. This will help maintain the surface in good condition and restore the structure of the material. Depending on the type of rugs, the process may differ; you need to remember simple recommendations:
- Wash rubber options once a month. To do this, take them out of the car, hang them up or lay them down and brush them with a brush and a cleaning solution. Then rinse off the remaining product with clean water and let the liquid drain. Before placing it in the car, remove any remaining moisture with a cloth; do not place mats with wet spots.
- It is advisable to vacuum products with pile once every 2 weeks. If possible, take them out and process them separately in order to clean the floor covering in the car at the same time. Once every few months, the rugs should be washed; it is most convenient to do this with a high-pressure cleaner, but you can clean it with a brush and detergent.
- After washing, be sure to dry the material completely. Do not place wet items in the machine or step on wet material. It is best to hang it on a rope or place it under a canopy outdoors.
- Do not remove dust from the surface with a carpet beater. If you do this constantly, the structure of the material is disrupted.
- Remove stains with a suitable composition; products for cleaning car upholstery are well suited. If you need to use a solvent or other chemical composition, apply it to a small area in an inconspicuous place, make sure that it does not damage the surface or change its color.
Do not twist or squeeze the product under any circumstances. After washing, hang them so that the water drains naturally.
Caring for the mats is easy; it is enough to maintain basic cleanliness in the car and wash them from time to time to remove stubborn dirt. Rubber options are the easiest to use, as they do not absorb moisture and are easy to clean. Fabric ones require more attention, but look much better.
Sealing a rug or sewing a patch is not difficult if you understand the work and prepare the products well before repairing. It is important to use high-quality glue for rubber, and when you need to repair a version with a pile, then make a patch over the entire width or the area where the legs are located, then you will not have to repeat the work again.
Source
Lada 2110 PhiX › Logbook › Rubber mat repair
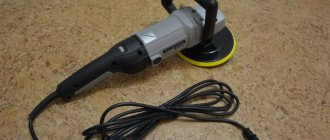
Hi all! Less than six months later, another rug died, and, as always, the hole under the gas pedal wore out. In addition to the frayed hole, the rug was a little torn.
The seller sold me these carpets and swore that they would last forever. The rest of the rugs are still in good condition, so the idea came to me not to replace all the rugs yet, but to somehow patch up the old rug. The first thing that came to mind was the aluminum trim.
It would go well with the pedals.
But as it turned out, the price tag for these things is high, from 1500 to 5000 rubles, depending on the model and the greed of the seller. I thought about cutting a similar thing myself, but have not yet found a suitable piece of aluminum or stainless steel. Temporarily I decided to patch up the rug using scrap materials. The mudguard with the Mercedes emblem came into play.
I cut out a piece of the desired shape from it. Then I degreased the surfaces to be glued and glued them with construction silicone sealant.
The hole on the back side was also sealed with a piece of mudguard.
During operation, it turned out that the volumetric Mercedes badge clings to the sole causing some discomfort.
I solved the problem simply by removing the relief with a grinder.
The Mercedes icon remained, it just became flat.
I know that it’s a collective farm, but the voice of reason insistently insists that replacing all the carpets because of one hole is not the case, especially when this happens once every six months. It's better to have a Mercedes badge under your feet than a hole and dirt under the carpet.
Price: 200 ₽ Mileage: 183,000 km
What to look for when choosing
Of course, taking something even the cheapest is the lot of those car owners who don’t care about the condition of their four-wheeled friend. What factors should you consider when going to a car dealership? Of course, size matters. Nobody argues with this. But the aesthetic function of the car accessory, the material used to make the mats, and its environmental characteristics are also important.
Individual preferences also become important.
In addition, the product that is located under the driver’s feet must be as ergonomic as possible: do not fidget while driving, have an anti-slip coating, and take into account the anatomical features of a particular car model so as not to ride up in the pedal area, since this directly affects traffic safety and can become the cause of the emergency.
So fitting and testing the driver's side mat is a mandatory requirement for the purchasing process.
Repair of rubber mats - logbook Toyota Carina MY ROAD MY LOVE 1986 1986 on DRIVE2
Yesterday I finally got to the car wash and washed Karina of the multi-layered dirt that had accumulated over the long winter months. I noticed the rubber mats. They are still original Toyota ones, branded. All the rugs are not very worn, of course. Only the front passenger side remained completely intact. The rest turned out to be torn in some places. The reader will ask whether it would be easier to buy a set of new universal rubber mats and use them for good measure. I agree, it could have been done that way, but I wanted to keep the original mats. So, let's go. First, I went to the construction market and bought one of the best adhesives for rubber, the so-called 88th Moment. On the way back I stopped at a vulcanization and begged for an unnecessary camera. I offered money - they gave it for that, thank you). I came home and immediately got to work.
Why is repair necessary?
Carpets in the interior perform a number of important functions:
- protection of the original upholstery from snow, dirt, water, salt deposits;
- creating additional convenience for the driver;
- addition to the factory interior.
If there are holes in the product, water can easily accumulate on the floor. In the future, this will lead to unpleasant odors, dampness and metal corrosion. Removing rust is problematic and expensive. For non-through holes, dirt will become lodged in the material, destroying the carpet from the inside. To avoid these problems, we recommend restoring the integrity of the carpet using available methods.
You can buy a new carpet or special metal pads. Moreover, their cost is disproportionately high compared to the investments required for repairs.
Why do you need floor mats and trunk mats?
Factory flooring is, in most cases, a soft material such as felt or thin rubberized fabric, which is susceptible to the effects of dirt, water, sand, snow and other pollutants transmitted from the sole of shoes through sexual contact. If you do not protect it, then within a week (especially in the off-season and winter) the flooring will turn into something dirty and worn out, and after six months holes will probably appear in it, and the coating will have to be changed. Therefore, immediately after purchasing a car, you purchase a set of mats that are designed to protect the floor covering.
They are not that expensive, install quickly, and are easy to clean. This is an ideal protective agent that has some kind of, but still noticeable, aesthetic component. So if you hate frequent dry cleaning of upholstery, you can’t do without rugs.
see also
Comments 15
Well done! beautiful and most importantly, everything is done with your own hands!
I'm in exactly the same situation now. The driver's is worn out, but the rest are alive. I'm still looking for where I can buy it separately.
The penultimate photo is absolutely bomb))
Yeah, the BMW haters weren’t enough for me, now the Mersovods will also join in))
They cost some DIASHINA. 6 years . it's just me. still like new)))
Cool, I'll keep that in mind.
The Norma rugs lasted the longest for me - almost two years. Only recently the driver's license started to tear. All others ended much faster
The crisis has put a lot of pressure on everyone, we have already seen that we are repairing the rugs...
It’s not so much a crisis as it is common sense; replacing 4 carpets every six months with only one torn one is wasteful)
I agree, it’s the same thing, and I couldn’t find it on sale separately.
It’s not so much a crisis as it is common sense; replacing 4 carpets every six months with only one torn one is wasteful)
it’s just that now on vases up to 2000-2500 rubles all the rubbish is made from waste, either torn or worn out, I encountered this when I was driving a viburnum, I worked for 2 years, I wound up 10-12 thousand a month, at the beginning the mats were not yet a consumable I took it once for 2300 rubles and forgot, but now due to the dollar))) it’s most likely more expensive))) but I don’t know how it concerns us when producing goods from our own raw materials and in our own country)
My first rugs, the most ordinary ones, factory ones, lasted more than 10 years. Still, the grass was greener before, but... parts are more reliable now that you don’t buy all the crap. Especially with regard to rubber products, for example, the caliper guide boots crumbled during the installation process. )
It’s not so much a crisis as it is common sense; replacing 4 carpets every six months with only one torn one is wasteful)
My wife’s relative also died in the Passat B5, I also think it would be more expedient to glue it.
The crisis has put a lot of pressure on everyone, we have already seen that we are repairing the rugs...
I also think that it was not the crisis that led to repairs, but progress to the point of degradation, almost a marathon to the store. The author may have done it a little collectively, of course, plus a blow to the pride of the Bavarians, but in general I don’t see anything shameful in such a repair]
Repair of fabric rugs
Repair of pile (and fabric) products follows a similar method, but with the exception of the use of glue. Experts and advanced drivers recommend applying a special pattern using a sewing machine. This is a more reliable and aesthetic way.
After completing the entire procedure, be sure to take it for a test drive. In dry weather, pour a special amount of water into the carpets. If after driving for 24 hours the product retains liquid, then the repair was carried out professionally. In case of leaks, it is necessary to remove the patch and then do the procedure all over again. It is better to detect defects immediately than during heavy rains and snowfalls.
Now you know how to repair rubber and fabric mats for any model and make of car with your own hands. Investments are minimal: purchase of glue and patches, and if the rugs are fabric, then plus a patch. Most car enthusiasts usually already have all the materials in the garage.
- Author of the material
- Other materials
Author Christian
A professional auto mechanic with more than 7 years of experience at one of the largest service stations in Moscow. I am well versed in cars such as VAZ, Kia, Peugeot, Bmw, Audi, Mercedes and many others. If you want to receive a professional answer, leave your feedback in the comments to this material.
Rating of the best manufacturers of car mats
Most motorists choose rubber or polyurethane floor mats, all because the choice is most often driven by practical considerations. Not everyone likes to bother with cleaning products, and few people bother organizing an elegant interior of the salon
As for manufacturers that have proven themselves in this field, it is worth paying attention to the rating of car interior mats:
- Euromat (extra class 3D mats, Latvia);
- 3D Boratex (textile 3D car mats from a domestic manufacturer);
- NovLine (polyurethane, 3D, textile floor mats from a domestic manufacturer. The company is an OEM partner in Russia for the production of floor mats for Nissan, Mazda, Lexus, Infiniti, Toyota and other well-known brands);
- Seintex (Russian manufacturer of high-quality car mats made of various materials);
- Satori (inexpensive textile car mats from Taiwan);
- Gumarny Zubri (Czech company that supplies factory-fitted floor mats for Skoda cars);
- Weathertech (high-quality car mats made in the USA);
- RezawPlast (Polish polyurethane car mats).
The best car mats, first of all, are a means of protection against moisture, while they must meet safety requirements, and of course, please the owner. Products should be selected taking into account the local climate and operating conditions, as well as in accordance with the purpose of the purchase. For connoisseurs of aesthetics, textile or combined rugs are suitable; for those who are not ready to spend their time on care, rubber and polyurethane products are suitable. The popularity of modern 3D models is gaining momentum and practical motorists are increasingly choosing this type of car mats.
Each car enthusiast has his own preferences and priorities, so the choice will be individual, but remember that the invariable condition for the right choice is safety, because who needs a mat that interferes with the normal control of the car and can thereby cause harm of various sizes.
Pasting method
The classic way is to seal a hole or cut with a patch. You can use different products depending on the size of the cut:
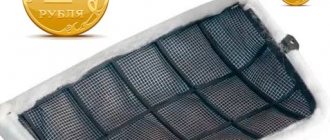
- Standard patches for wheel air chambers. Can be purchased at any car store or market. Bicycles and cars are allowed.
- You can use material from another unwanted rug as a source for the patch.
- Cut from a mudguard or tire.
Wheel patches have clear dimensions, so their scope of application is limited. If the hole or cut is of a non-standard size, it is recommended that you cut it out yourself. Please note that the layer of rubber is not too thick compared to the carpet being repaired.
First prepare acetone or solvent, sandpaper (minimal grit), and specialized glue for rubber.
You can use rubber glue models U425-3, 4NB-UV, 4508. The compositions do not have any strong odors, retain their properties in the range from –40 to +60 degrees Celsius, and are not susceptible to the destructive effects of chemically active compounds. The last characteristic will be relevant in winter, when the roads are actively sprinkled with chemicals.
Having selected the material, you can begin repairing rubber carpets:
- Take out the carpet and thoroughly wash it under running water (you can do it with your own hands or with various brushes). Try to remove absolutely all contaminants.
- Clean the problem area, removing burrs and other irregularities.
- Degrease the surface. Next, thoroughly dry the area with a hairdryer. The presence of moisture will significantly increase the “setting” time of the adhesive.
- Apply glue around the edges and attach the patch. Wait until completely dry. It is allowed to place a heavy object on top so that the patch is firmly fixed.
- Repeat the previous steps for the second side if the hole was through.
If the patch on the rugs sticks out too much and you feel discomfort, be sure to solve this problem, otherwise it will be very annoying later.
The relief can be removed with a grinder or grinder.
Shoe polish
A rather unexpected but effective way to restore rugs. Although shoe polish was originally developed for the care of leather and its substitutes, if used correctly it is also suitable for treating rubber.
All you need to do for this is to pre-wash and dry the rugs. After this, you can take any sponge, apply a little cream on it and rub it into the surface of the rubber with careful circular movements.
To ensure that the color is rich and lasts as long as possible, it is recommended to purchase the highest quality shoe polish. Then, depending on the frequency of use, the products may look like new for several months. By the way, you can even use colorless cream. It will still saturate the rubber and make it darker.
Preliminary degreasing and gluing of patches
After degreasing the surface, make sure that the rubber is completely dry. Otherwise, the polymerization time of the glue will increase significantly.
The patches installed in the above manner remain almost invisible during operation. In addition, due to the use of special glue, we can confidently say that even through a sealed hole, water
(snow from shoes in winter) is guaranteed not to seep below the mat.
In the video, a car enthusiast demonstrated the result of using camera patches on floor mats:
Repair of rubber mats
To prevent severe damage, inspect the surfaces of all elements at least once a month. Take it out of the car and assess the condition on both sides. A cut or a through hole can be easily identified by moisture on the reverse side; it always accumulates there, since it does not evaporate when it gets on the reverse side.
To repair a driver's or other carpet, you need to prepare everything necessary and ensure normal working conditions. A lot depends on the nature of the damage, so it’s worth assessing the condition in advance and understanding what work needs to be done. Remember the following:
- Take out the interior mat, shake it off any dirt and wash it well. This can be done with a hose or by pouring water and scrubbing off dirt with a brush. Clean both the outside and the inside, hang outdoors to dry.
- Inspect the damaged areas, measure their sizes, then select a patch. It should be a little larger to cover the problem area.
- When the hole is through, you will need twice as much materials for repairs. If you patch it on only one side, the patch will not hold up as well or even break after a short time.
- For small damaged areas, buy ready-made patches. They are sold in markets and automotive stores. The elements are already ready for use, which is very convenient. Most often they sell sets of several pieces; you need to choose the right one for your location.
- For large cuts, you won’t be able to find a repair kit. The easiest way is to find an old inner tube from a bicycle or car and cut a patch of the desired size and shape from it. Use thin rubber, otherwise the repair site will stick out strongly above the surface and will quickly be torn off by the sole of the shoe.
- Buy special glue for rubber if it is not included in the kit. It is best to choose an option that has everything you need, then you can be sure that the patch will be securely fixed to the car mat. Do not use cheap compounds; they do not adhere well and may peel off over time due to exposure to water.
- Carry out work in a well-ventilated area or under a canopy outdoors. Rubber glue has a strong odor, so it is not advisable to work in a residential area.
For your information!
It is better to choose not a universal glue for rubber surfaces, but an option for repairing cameras.
Carefully study the instructions for using the adhesive. They vary in use, some need to be applied, left on for 5-10 minutes and only then pressed on the patch. If you don’t understand this aspect, the rubber simply won’t stick or won’t stick well.
It is most convenient to do the work on a table or workbench, provide good lighting, this will help to accurately position the patch and efficiently process the repair area. It is advisable that the air humidity is low and the temperature is above 20 degrees; in a damp, cold room the glue sets much worse. Operating instructions:
- Dry the pre-cleaned and washed rubber well. It is advisable to heat it with a hairdryer, at least a household one, to remove all moisture from the structure of the material.
- Clean the repair area with sandpaper with P400 grit or finer. It is necessary to treat the surface over the entire gluing area, remove irregularities, burrs and minor damage. This will allow the glue to absorb better and hold the patch more firmly.
- Remove dust with a rag or brush. Degrease the surface with a solvent or special compound. Wipe with a lint-free cloth and wait until it is completely dry.
- Try on the repair element, make sure that it covers the damage with a margin and fits on the strong edges around it. If necessary, trim and give the desired shape; you should not use too large pieces.
- Apply glue. Maintain it according to the instructions; usually you need to wait until the composition has set a little and only then press the surfaces to be glued. It is important to position the patch evenly and press it.
- To glue the rubber even more firmly, it is advisable to press the patch with a heavy object, simply place it on the floor or table and place a weight on top. You can also use a vice or a clamp if the size of the patch allows you to press it completely.
- When the damage is through, repeat all work on the reverse side. You can start them only after the glue has completely dried, usually this is done no earlier than a day later.
- When the patch protrudes strongly, it needs to be processed with a sanding machine to remove excess from the surface. Do this carefully, do not remove too much.
Production of EVA car mats
The production of EVA car mats initially appeared in China and Taiwan. It was there that a high-strength material for general purposes was first obtained and received the international classification EVA. The Koreans (not to be confused with the Chinese) began to produce almost everything from EVA material. The material, thanks to its environmentally friendly and high-strength characteristics, literally immediately conquered the market. Leading shoe manufacturers began to make soles out of it, and shoes became lighter. This means it is more convenient for the consumer to travel and less transportation costs for the manufacturer.
Rice. 3. Production of car EVA mats |
EVA material has conquered the tourism market. All travel foams are made from EVA. The material does not conduct heat and is environmentally friendly. Floor coverings for kindergartens are also made from EVA. If a child falls, he will not hurt his knees, thanks to the elasticity of the material.
Currently, the production of EVA car mats in Korea and Taiwan has reached such volumes that every taxi has EVA mats. In Russia, EVA mats appeared much later, in the first decade of the 21st century. More and more Russian car enthusiasts are learning about them, telling their friends and recommending them to their acquaintances. There is no targeted advertising and marketing program for this product yet; the appearance of EVA mats in a cell is too unusual.
However, behind cellular mats made of sevilene there are many advantages that arise from the qualities of the material itself:
- Save money. EVA MAT mats last twice as long as regular mats. Rugs do NOT require additional costs for the purchase of cleaning and care products.
- Install the mats and forget about changing them for 3 years. The rugs are made of durable polymer material. EVA mats are all-season, adapted for Russian winters, resistant to road chemicals.
- Taking care of your health. EVA MAT mats have a ROSTEST certificate of compliance with all requirements of the Customs Union. The rugs do not emit harmful substances, are odorless, hypoallergenic, and non-toxic.
- Choose the individual color of the mats.EVA MAT mats are made in various color combinations of material and edging strap. Choose floor mats to match the interior and exterior color of your car.
Rice. 4. EVA MAT mats in Tesla Model S |