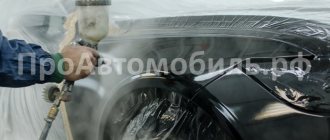
Polishing a car body these days won’t surprise anyone. If the owner wants to preserve the car and cares about its appearance, he often resorts to this method of protection. However, the desire to polish a freshly painted car often causes confusion: why? In fact, a car with a fresh paint coating (full or partial) needs protection no less and even more, since polishing the car after painting is necessary to eliminate minor defects in the paintwork and give it a bright shine.
About paint defects
Often, in order to save money, the owner undertakes to paint the car with his own hands or turns to a master who does not have sufficient qualifications. And the room in which work is carried out on the car body cannot boast of ideal cleanliness; it is still a workshop, not an operating room. As a result, particles of dirt and dust stick to the coating, and various defects appear.
For example, if the owner takes on a job without qualifications, then through his actions (incorrect spraying of paint, too thick a consistency) he creates an orange peel effect - shagreen. In rooms with high humidity, due to poor-quality thinner or high pressure in the spray gun, it happens that the paintwork becomes matte. After the paint dries, a pricking effect may also appear, in other words, bursting bubbles. This happens if you do not intermediately dry a thick layer of paint or choose a quick-drying thinner.
All of the above flaws can be neutralized if the car body is polished correctly. This work can be done not only by a professional with special equipment, but also by an amateur using his own resources and available tools. To work with your own hands, a home craftsman needs to choose the time, decide on the type of polishing and arm yourself with a few tips.
At the beginning of glorious deeds...
Considering the location of the damage, we will need to perform two transitions: one along the base, the second along the varnish.
First of all, you should determine where the border of the varnish transition will be located. Firstly, it should always be further than the transition along the base (this is understandable). Secondly, to go over the varnish, it is best to choose those areas of the part that are least noticeable. For example:
- the narrowest sections of the part (narrowing of the wing on the strut, above the wheel arch, etc.);
- relief and textured elements (molding line, various recesses, borders and bends).
If it is not possible to make a transition over the varnish in an inconspicuous place, it is better to varnish the entire part, since making a transition in a “visible place” and its further polishing is a more labor-intensive and expensive process than varnishing the entire element.
In addition, there are no guarantees that during further use, for example, after several mechanical washes, a visible boundary, a “step” between the old and new varnish will not appear. Over time, this may well happen.
This is due to the fact that any paintwork has maximum strength in its upper part, while in depth the strength of the layer becomes lower. It is because of this circumstance that each subsequent “deep” polishing of the paintwork becomes less and less durable. Likewise, when polishing a transition area, when we file away the toughest “top,” there is an increased risk that further mechanical stress on the remaining finish will reveal a visible repair margin.
However, in certain cases, varnishing the entire part makes absolutely no sense. For example, when fixing a small scratch on a bumper. Or, as in our case with the wing, which does not have a distinct border with the pillar and roof. Varnishing the two rear wings, pillars and roof is an unaffordable luxury even for such a luxurious car as our “German”, so in this case the transition to varnish cannot be carried out, but it is necessary: the risk pays off with big savings. And the ideal place for the transition in this case is the narrowing on the counter.
Thus, we have three sections:
- repair area (1);
- the area in which the varnish transition will be located (3);
- everything else is paintwork that is between them (2).
It is important to identify these areas as they will be prepared for painting slightly differently.
Types of polishing
There are several types of polishing that are performed after painting:
They resort to abrasive paint when quite serious defects have formed during the painting process: deep scratches and even chips on the surface of the car. Using special sanding paper, imperfections are removed and the surface is thoroughly polished with a paste. In such cases, it is better to work with each section or part separately.
The name of the polishing – protective – speaks for itself; special products based on Teflon and wax are used, and the protective layer will last from 3 to 10 washes. If you treat a small area, you can apply the product without a grinder, literally with your hands.
To work on a larger surface, some car owners use an electric drill on which special attachments can be attached.
Nanopolishing is an ultra-modern method, and a special multi-component nano-varnish, which has unique features, was invented in Japan. Its advantages are quick application to the car, a more durable coating and a bright shine.
How to properly polish a car
You can start polishing your car at home. But here we are faced with a choice: to work only with our hands or to make our work easier with a polishing machine? It all depends on the complexity of the work.
Using an abrasive polish, polishing a car manually without a machine is extremely problematic. It will take a lot of time and take a lot of effort, so for deep polishing it is better to acquire special tools. But if you do not have the opportunity to purchase a polishing machine, you can polish the car with a drill using round attachments of different densities.
First, polish the car with a medium-abrasive mixture. Special wheels must be moistened with water and gradually polished the surface. Suitable speed is 2000 rpm. Upon completion of this stage, dry the car coating and clean off any remaining abrasive particles.
Moving on to the second stage, we reduce the speed to 1000 per minute, using only the ugly mixture.
Polishing the car after painting is completed at a speed of 3000-4000 rpm using a soft sponge. When finished, pour water over the car to remove particles of the polishing mixture.
Advice. If you do not have experience and you only know theoretically how to properly polish a car, practice on an inconspicuous or unnecessary part.
Polishing the car by hand can be completed at this stage. If you want to consolidate the result, you should polish the car with protective agents, for example, Teflon-based polish, which will withstand more than 10 washes.
If necessary, go over the car body with Teflon compound - it will help maintain shine longer.
When applying only a protective polish, feel free to skip the first step, since the use of abrasive mixtures is required here in this case.
Where to start?
Determine the timing of the work, since the car can only be polished 3-4 weeks after painting. During these days the paintwork will dry completely. The work room should have good ventilation, well lit, but without direct sunlight. Before starting work, thoroughly clean the surface of the car from dust and dirt.
Plastic and rubber parts of the car must be sealed, and the working surface must be thoroughly degreased. To polish the body after painting until it shines with your own hands, prepare the following tools:
- sandpaper;
- polish with different abrasiveness;
- spray;
- lint-free wipes;
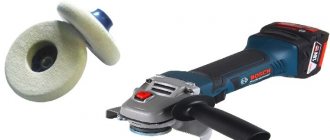
- polishing wheels (felt and soft foam);
- a grinder or drill with a special attachment.
The role of paint and varnish material in painting
Modern paints must be of high quality, only then will it be possible to adhere to the required high painting technology.
Today's paint and varnish materials are truly reliable and at the same time relatively low in cost. What is car paint characterized by? First of all, it must contain pigment substances, binding elements and a solvent, each with its own functions. The coloring itself is a complex technological process that requires constant monitoring.
For example, paint and varnish material loses its elasticity when the solvent evaporates and becomes very thick.
Everyone is familiar with the metallic color, which requires special enamel with the addition of aluminum powder. Thanks to its particles, light rays are reflected, creating that very shiny surface of the car.
But here, too, to achieve the desired effect, you must strictly adhere to the required painting technology, because paint can both decorate and protect a car if applied properly, or, conversely, ruin the appearance and promote corrosion.
Polishing stages
The polishing process after painting can be divided into two main stages:
- grinding - processing the body with sandpaper;
- polishing – rough, intermediate, finishing.
At the first stage, the car is treated with sandpaper, the grain size of which depends on the method: wet or dry. In the first case, it is necessary to properly polish the surface with constant wetting with water, then the paper will not become clogged with dust and will not harm the paintwork. With this option, the work is done by hand.
For the wet method, you need waterproof paper with a grain size from 2000 to 4000, for the dry method - from 1000 to 4000 (in this case, you can use a sander).
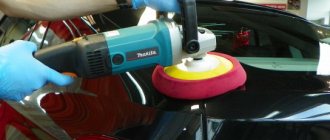
Then they move on to the second stage - the actual polishing. Before purchasing an abrasive paste, it is advisable to consult with specialists, since its type depends on the thickness of the paint coating. To rough polish, take a harder wheel and apply a coarse abrasive paste to a small surface area. Then they rub it in in a circular motion, if they work with their hands, and if they use a polishing machine, then in a cross-shaped motion.
Intermediate polishing is performed with a medium abrasive compound. At this stage, change the circle to a less rigid one. At the final polishing stage, they work with a non-abrasive paste, having previously removed the previous type of polish with a napkin. At all stages, be attentive to the polishing wheels you use, change them along with the paste in order to achieve an excellent result with your efforts.
How to polish a car - preparation and execution
Before you start polishing your car after painting, prepare all the necessary equipment for the job. You will need:
- sandpaper with different grain sizes;
- pastes with different abrasiveness;
- a polishing machine and a couple of circles for it;
- scraper made of rubber and napkin;
- degreaser;
- personal protective equipment.
First of all, completely remove all dirt and dust on the car body. The body must be absolutely clean. Then cover with masking tape those parts of the car that will not be polished. For example, cover the radiator grille under a special plug, hide the rear-view mirrors and windows under old newspapers. Blow hard-to-reach areas of the body to completely remove any remaining dust.
Both preparation and polishing should be carried out in a well-ventilated area. You can begin processing the body only after it has completely dried. Directly for work, use sandpaper with a grit of 1000 to 1500, gradually replacing it with products with a grit of 3500. You can not pay attention to minor errors, since further use of the paste will correct them.
The abrasiveness of the selected paste directly depends on the thickness of the paint layer applied to the body. In order not to make a mistake when choosing, be sure to consult an expert. Polishing can be wet or dry. The first option is to periodically spray the body with water. As a result, dust practically does not fall on the sandpaper, and the paintwork of the machine does not deteriorate.
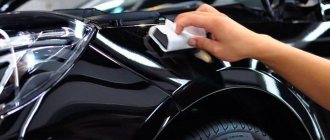
Protective polishing
Do-it-yourself treatment of the car body is completed by applying protective polishing. With its help, a thin layer is created on the paintwork, the service life of which directly depends on the polish and its properties. You need to polish with a Teflon or wax-based paste, apply it yourself or using a machine.
It is not recommended to work outdoors, since the polish dries quickly in the sun and it will be difficult to spread it over the surface in a thin layer, especially if you work with your hands.
If stains remain on the surface after protective polishing, they must be removed with removers. At this point the work can be considered complete, because the car shines like new!
Common mistakes when polishing
- Use of technical devices.
Beginners think that using a polishing machine will speed up the polishing process. However, experience of the work done is required here. Incorrect angle when working, strong pressure when processing the surface, uneven movements, overheating of the abrasive material can lead to damage to the factory paintwork, after which you will have to contact the experts.
- Choice of material.
For manual polishing, a special varnish is required, which differs from machine polishes, which use thin consistencies and fine-grained abrasives.
- Carrying out work outdoors or in direct sunlight.
Heating the body under the sun causes the polish to stick to the car's coating, which becomes a problem, since it is difficult to remove and remove excess. No need to work in a hot room.
A cool, dark, clean place with good lighting is ideal for work.
Why can't you polish your car outdoors? Due to the dust that sticks to the tools, the body will cause new scratches on the paintwork during polishing.
- Wax selection.
It is the wax that seals imperfections and serves as the final stage in polishing. There is no need to skimp on its quality.
- Selection of napkins, rags.
The rag should not leave lint or scratches. Otherwise, you will have to start all over again.
It is better to use microfiber, which quickly removes excess water and wax without streaks.
- Carefully.
You should not take on one part of the car, then another, without finishing the first. Work must be carried out carefully, processing parts sequentially. This is the only way to get a brilliant result.
Polishing a car after painting: why is it necessary?
The procedure is useful even if the body is painted impeccably. In this case we are talking about protective treatment. It is necessary that the paint layer be coated with a special composition that will prevent abrasive, chemical and other aggressive influences from the external environment.
It is important to select high-quality, certified polishing pastes, suspensions and other compositions. In this case, the coating created with their help will effectively protect the paint layer for a year or more. You can use nanomaterials - they retain their functional and other properties for three years.
To find out whether your car needs to be polished after painting, pay attention to the quality of the paintwork applied. The process is definitely necessary if there are adhered dust particles, a matte effect, burst microbubbles, small bumps, or other similar defects on the body. Firstly, they spoil the appearance, and secondly, each such defect is a potential source of destruction of the paint layer and the formation of corrosion.
This is interesting: How to properly bleed a gas-oil shock absorber before installation
Reducing shagreen with polishing
How to set up a spray gun for painting a car
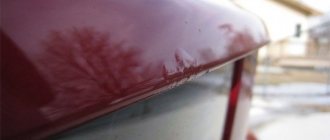
Shagreen is a paint texture that resembles an orange peel. It is formed due to the viscosity of the varnish, which is applied in small droplets sprayed with a spray bottle. These droplets create a bumpy texture on the surface of the body, but gradually, spreading, it smoothes out.
Car varnish or paint hardens quickly. At the same time, their viscosity increases every minute. The drops do not have time to completely spread, turning the surface into an ideal “water” surface. Often they freeze without reaching an equilibrium state.
Too noticeable shagreen is a disadvantage. You need to get rid of it, otherwise the car will not look perfect, especially upon closer inspection. And there is only one way to do this - abrasive polishing.
During the polishing process, the abrasive removes the tubercles that form shagreen. There is no need to be afraid to do this, because the thickness of the varnish is determined by the lowest point of the layer, and not the highest. Essentially, shagreen is removed by grinding, and only then the leveled and matted surface is polished.
When sanding, shagreens are guided by the pattern. If the surface being treated remains spotty (matte spots interspersed with glossy ones), then sanding should be continued. As soon as the spotting goes away, you can proceed directly to polishing with pastes.
The choice of polishing paste manufacturer depends on the personal preferences of the car painter. In other words, who is used to what! Some prefer 3M, others prefer Farecla, others prefer lesser-known products. The main thing is that the result is satisfactory.
After polishing the painted car, the shagreen should disappear. To check the “orange” without leaving the garage, you need to look at the reflection of the lamps. Their boundaries should not be torn.
How is this process carried out?
If you want to properly polish your car, contact a specialized technical center (after sufficient time has passed since painting). Attempts on your own may give negative results and lead to serious damage to the paintwork. The work should be carried out by professionals who are fluent in the methods and technologies for performing such operations, the appropriate tools, and also know how to polish a car after painting. The following procedures must be performed sequentially:
- washing the body using low pressure water and a soft rag;
- gluing plastic, rubber and other components with tape or other protective material;
- surface treatment with sandpaper or sandpaper;
- blowing the body and degreasing it;
- applying the first and second layers of polishing composition. In this case, it is necessary to periodically wet the metal using a spray bottle.
High-quality sanding is the key to a car’s shine
Tools and materials for polishing
The first stage of polishing a car body after painting includes getting rid of large scratches and varnish deposits by grinding. Sanding can be “wet” or “dry”. Both the first and second methods have their advantages and disadvantages.
With the “wet” method, the sanded surface is periodically wetted with water. This method is well suited for preparing a car body for polishing, as it avoids clogging the sanding paper with dust, which can lead to damage to the paintwork. The disadvantages of “wet” grinding include the inability to use an orbital sander. “Wet” sanding is carried out using special waterproof sanding paper. You should start with a grain size of p2000, gradually reducing it to p2500 - p4000.
Many professionals prefer to use “dry” sanding to prepare for polishing a car after painting. The advantage of this method is the ability to use an orbital sander, which greatly facilitates the work when sanding large and flat surfaces. In this case, at the beginning, simple sanding paper with abrasive p 1000 is used. At the end, for more delicate sanding, you can choose paper with a grain from p3000 to p4000.
Sanding can be completed after all visible coating defects have been removed. At the end of the work, you should thoroughly blow off the car body from the dust formed during the grinding process and then you can proceed to the polishing stage.
How long should I wait after painting the body before polishing it?
To find out when you can polish your car after applying a new coat of paint, it is advisable to contact a paint specialist. It is best to consult where the paint was purchased (especially if it was made to order).
In most cases, it is recommended to wait approximately 3-4 weeks - as a rule, this time is enough for the applied paint layer to dry completely.
If you don’t know exactly how long before you can polish your car (for example, you don’t know how much time has passed since painting), it’s better to wait for a certain additional period. Premature processing can lead to serious damage to the paint layer. There are cases when, after such situations, it was necessary to completely repaint the body.
Transition over 2K acrylic paint
Let's imagine for a moment that we are not repairing a Mercedes CLS, but... some Ford Escort painted with acrylic enamel! Is it possible to transfer over acrylic? It is quite possible - such a transition is practically no different from a transition over varnish. Acrylic enamel is, in fact, the same varnish, only colored.
So the process of preparing the surface and performing the transition itself are almost the same for these materials.
The paint is prepared in standard proportions and applied in two layers: the first - on the primed area, the second - a little further, but without going beyond the boundaries of the matted surface. After which the repair boundary is blurred with a mixture of paint and transition solvent and/or, if necessary, with pure solvent.
There is another possible way to create a smooth transition on acrylic enamel: using a transparent varnish in the transition zone.
This method is indispensable when repairing some specific colors, such as dark blue. On such colors, when polishing the transition zone, the lower layers of the coating may appear - in this case, they will be lighter (this occurs due to the settling of white, the heaviest pigment), and the transition zone in this case may look lightened.
If, after applying standard layers of enamel, we perform the transition with a “wash-out” varnish, further polishing it will not lead to lightening of the transition zone.
This is how our renovation turned out to be ideal: high-quality, modern, technologically advanced. And if it’s not free yet, that’s great!
PS From the last article you remember that there are three types of transition painting. As a bonus, keep visual step-by-step descriptions of each of them.
Ford Taunus Diesel Locomotive › Logbook › Do-it-yourself polishing!
I’ll make a reservation right away in order to avoid unnecessary criticism from people who make a living from what will be discussed further, I’m not a professional, I’m just sharing my experience, maybe it will be useful to someone...
We'll talk further about polishing the body after painting! in my case, polishing was a necessity since I painted the car myself, and due to inexperience, the varnish did not go on as smoothly as I wanted; in other words, the varnish was a bit dry. the result of this was the appearance of a strong shigreen (orange peel effect), the car sparkled in the sun, the varnish made itself felt, but alas, the shigreen greatly spoiled the quality of the reflection, as a result of which all the effectiveness of the paint simply disappeared. on many forums of car painters they claim that it is useless to polish such a stain, only a complete repainting, but you can always repaint it at any time, but why not try polishing, you can safely try a very decent layer of varnish (I left repainting for myself as a backup option).
So, enough of the foreplay, technology:
Grinding in our case is 99% of the success of further polishing. The main thing here is to create the correct plane of the paintwork, without craters, smudges, specks of dust, debris and other nasty things that may appear during the painting process.
for sanding, many sources insist that you need to use sandpaper with a grit of 2000. in my case, sanding started with 1000, then 1500, and then sanded with 2000 sandpaper for the finish; further reducing the grain makes no sense, since the pastes that will be used in further have sufficient abrasiveness to remove the risks that remain after sandpaper.
the choice of abrasive is yours since you know better how thick the paint coating is and how hard the surface needs to be sanded.
It is better to sand wet, that is, with water, then the sandpaper lasts for a long time, I prefer to do this work using blocks (I use polyurethane foam, it is not very hard, but dense enough to sand the surface well) the size of the block is chosen so that a sheet of sandpaper was cut into four pieces.
I recommend doing sanding intermittently, thoroughly washing the surface so that you can see if there are any unsanded areas left (if such places remain, they are immediately visible on a dry surface; glossy spots and craters remain)
if you use several sizes of abrasives, then change them in increasing order, the further you go, the finer they are... that is, the numbers on the sandpaper should only increase.
special attention should be paid to all kinds of protrusions and ribs, it is easiest to wipe the paint there, and then touch-ups cannot be avoided. be vigilant.
Then, if the surface is already uniformly matte, you can start polishing. here you will need a polishing machine with adjustable speed, polishing pastes and polishing wheels.
Polishing wheel: available in different hardnesses, I used black (the softest) made by Farecla
Polishing pastes (this is not an advertisement) I used two types produced by 3M: coarse-grained and fine-grained, here are links to those same pastes (in our city it is not necessary to purchase whole packages of these pastes, you can buy by weight, I used about 250 grams of each for my car paste) avtomaliar.ua/index.php?m…Path=1_22&products_id=187 (small-finish) avtomaliar.ua/index.php?m…Path=1_22&products_id=177 (large-start) so as not to write a lot in what order apply the paste and how to polish correctly here is a short video tutorial:
But in general, all this is just a theory, until you try it yourself, you won’t learn. Only experience is the best assistant in these matters. as they say: “it’s not the gods who make the pots”
All this pleasure resulted in me taking into account the fact that I took the polishing machine to use from a friend (in another city (transportation costs are about 50 UAH) + polishing wheel + sandpaper + polishing pastes = about 300 UAH. and of course a little patience and free time …draw your own conclusions
The main difficulties of painting a car with a transition
So, this is what painting a car with a transition using modern methods consists of: if the car is partially painted, then its closest parts will differ from the painted area, and primarily at the joints.
And the difference in tones is especially depressingly visible on nitro enamels. That is why, in order to achieve an impeccable result, it is necessary to paint the car with the transition to the nearest part. The main problem in car dealerships where professional painting is carried out using the transition method is the coordination of the work of the colorist and painter. The first one, using a special computer program, selects a tone that would ideally match the existing paint of the car, and the second one carries out the repair itself. But the problem is that the paint color, even if it was chosen according to the exact code in the documents, can vary depending on the technique used to apply the paint tone.
Important! Pressure, scope, tools - all play a decisive role in whether the transition will be visible or not.
That is why the colorist always gives instructions to the painter regarding the pressure and spray force. But the latter does not always listen or simply cannot, due to inexperience, follow all the colorist’s recommendations.
As a result, the transition is noticeable, the tones do not match, but the colorist is still blamed - if the paint was chosen correctly, then, in the painter’s opinion, the technique of applying it cannot change the color. That’s why the ideal option is to entrust transition painting to a master who will select the paint and apply it himself.
Unfortunately, there are not very many such specialists. Therefore, it is best to consider in advance, if possible, how the car transition painting is carried out by the master himself - videos of the work process are available on the websites of car repair shops.
The most difficult transition to make is acrylic, but it is doable. The main difficulty here is proper preparation of the surface for painting, because the transition will be done on the final coating itself, which will be the top layer. That's why experts recommend matting the part completely , and then carefully marking it.
In general, working on acrylic as a single-layer coating is similar to working with a transition over varnish in two-layer and three-layer ones: the new paint is applied in drops, which is difficult to make unnoticeable, and the possibilities of high-quality watering on single-layer coatings are much more limited. For example, when removing a defect, it is easy to cut off the entire layer of paint, especially if you have to work on edges and bends. And two-layer coatings dry much faster, which cannot be said about acrylic.
Also, for example, low-opaque paints, which are light and silver tones, always form a dark, noticeable halo when sprayed in several layers. In this case, an inexperienced master will cover the repair area and fight this halo, spraying paint further and further until he reaches the edge of the part. This is where his mistake will be - each individual layer needs to be applied only with a smooth transition.
Why do you need to polish a car after painting?
This question is not of interest to those motorists who have painted their cars with matte paint, but for the rest, you need to know not only about polishing the car after painting, but also about sanding. And the main reason for the need to polish the body after painting is the “unsterility” of the room. After all, we are talking about painting the body in the garage, that is. about conditions “close to combat”
Paintwork defects that occur when painting with your own hands
Orange peel (shagreen). The cause of such a defect may be the use of too thick paint or varnish. To prevent defects from occurring, before painting you need to carefully study the recommendations for the use of paint and varnish. Another reason is the incorrect selection of nozzle for the “gun” and low air pressure. This defect can also be eliminated by grinding and polishing the car body after painting.
Matte coating . The reasons for this defect, which, by the way, you will see only in the morning of the next day: high air humidity in the garage, increased air pressure when applying paint or varnish, or a quick thinner was used, leading to rapid cooling and condensation of moisture on the freshly painted surface of the body. To eliminate this defect, deep polishing of the body after painting will be required.
Bubble burst .
Injection effect. Appears some time after drying. This defect is associated with: the wrong brand of thinner (fast for the existing temperature), application of too thick layers after a short intermediate drying, too high a drying temperature. Eliminated by grinding and subsequent polishing.
When is transition during coloring irreplaceable?
Car transition painting is a set of techniques with the help of which, during repairs, an almost invisible combination of the old, factory paint coating with a completely new one is created.
Moreover, on any body there are always two old coatings - paint and varnish, and therefore there are also two transition boundaries - “by paint” or “by varnish”. And they should not coincide with each other - this is important. Both transitions - paint and varnish - can be done separately or in combination.
Almost any part of the body can be painted using this method. The transition is also made with varnish, which is then polished especially carefully, and therefore is practically invisible - the transition polishing zone can be seen only when its localization is precisely indicated. The transition painting technique itself is usually used in cases where:
- the car's original paintwork is worn out in places and or severely faded;
- there is a defect on one of the large parts;
- It is difficult to choose a paint tone for painting doors or a large area of the body such as a hood or roof.
The most common transition points are the bend on the car door and fender, the edge of the hood or body. The doors themselves are traditionally painted up to the molding, and then the transition is done. In the grooves, the varnish pitch can be either with sharp boundaries or sprayed.
By the way, on light colors the paint transition is more noticeable, but on dark colors the varnish transition is more noticeable. But you can also look for non-factory paint by looking at the appearance of the new varnish - it will not have the dullness that is inevitable in used cars.
This painting method is also indispensable for using paints that tend to change their shade depending on the thickness of the layer and spray pressure. This technology also eliminates discoloration after previous unsuccessful repairs. And the costs of the material itself are significantly reduced - very little paint is needed.
But preparing the car for such painting is somewhat more difficult. Also, if the transition needs to be done on adjacent parts (for example, a door), then the material consumption will also increase. But thanks to the color transition, it became possible to avoid different colors as much as possible and significantly save energy and time on color selection.
Stages of polishing a car body after painting
The phrase “after painting” does not mean at all that you should polish the body the next day. After painting the car with your own hands, it should take about 3-4 weeks, i.e. month.
This is interesting: How to remove the window handle on a VAZ
Grinding . It is carried out wet or dry. For the wet method, you need waterproof sandpaper, starting grain size from 2000 to 4000. For dry grinding with a grinder with an abrasive from 1000 to 4000.
Abrasive polishing using abrasive pastes. This is done either manually or using a polishing machine. The area to be treated at the same time is approximately 40x40 cm. Apply the paste and process it in a circular motion if by hand, and in a cross motion if using a polishing machine.
Pastes are used in the following order: coarse - abrasive, fine - abrasive, non-abrasive. After passing 4-5 sections, we wash the circle in water to remove any remaining paste and continue polishing the body.
Protective polishing of the body . Produced with pastes for protection and shine of paintwork. As a rule, these are car polishes with Teflon or wax. The method of applying and polishing the body after painting is outlined in the instructions for each type of polish. Polishing after applying the polish is best done with a machine with a gradual increase in speed.
It is not recommended to polish a car body in the sun, as the polish dries quickly and is difficult to polish, especially if you polish it manually. You also need to choose a place where there is no dust, as it will serve as an abrasive and the effect will not be achieved.
All. We step aside, wipe away the sweat from our foreheads with a tired movement of our hands and rejoice at the result – a brightly shiny car.
Good luck, car lovers.
Body polishing process
For work we will need the following materials and equipment:
- polishing pastes of various types: abrasive, medium-abrasive and non-abrasive;
- sandpaper P1500 and P2500;
- polishing machine;
- polishing wheels;
- soft rubber scraper;
- microfiber cloths or soft cotton rags that do not leave lint on the surface;
- water sprinkler.
Mechanical polishing of a car body is carried out in several stages using pastes of various compositions. To remove deep and medium scratches, first use P1500 sandpaper. It should be cut into pieces that are comfortable to hold in the hand and soaked briefly in water. It will become soft and will not leave rough marks. We make forward movements and periodically remove water and cleaned material with a scraper.
Then we sand it in a circular motion with P2500 sandpaper, removing the smallest shells. After this, spray water on the workpiece and take a white circle (the roughest). We apply abrasive paste to it and, without turning on the machine, manually distribute it evenly over the part. If you don’t know what abrasiveness to use, purchase paste from Farecla G3 - this is a universal paste that is recommended by professionals at service stations, and liquid wax from the same company to consolidate the result. The grinding machine should be selected so that its speed can be easily adjusted. Polishing the car body begins at the lowest speed of 900 rpm.
Do not press too hard on the machine, as you can very easily damage the paintwork.
Work calmly, smoothly, without staying in one place for a long time. Be especially careful when polishing the corners and edges of the surface. When the polishing process is completed, the car needs to be washed with car shampoo. After drying, you will see the results of your work: the dry surface will shine no worse than a wet one or a completely new one. Then apply a protective layer. This can be a non-abrasive polishing compound or the liquid wax we mentioned above. The wax can simply be dripped onto the surface and lightly smeared without rubbing. After it dries, wipe the surface with a flannel or cotton rag to remove excess wax. It washes off without difficulty. And you will see the shining shine of the car, from which you cannot take your eyes off. High-quality work, and even done with your own hands, always brings great satisfaction.
After polishing the part, wipe it with a napkin, evaluate the result and move on to the next one. So gradually, without going to the previous row, polish the entire body. The machine moves easily over the surface until it is heated and there is water and paste on it. If overheating occurs, you need to let the part cool down or spray water again.
Professional car polishing is not inferior to the factory coating in terms of service life. However, to prolong the effect, experts recommend applying protective compounds after it. In any case, whether it is professional care or done at home with your own hands, your faithful car friend will last much longer and will evoke admiring glances.
Preparatory stage
Work should begin with preparatory work. To do this you need:
- Carry out a thorough car wash;
- dismantle or cover with available material parts that will not be polished;
- blow compressed air onto the polished panels;
- perform degreasing.
The last two points are best done in a pre-prepared garage or other suitable room. When all this is completed, you can begin performing further procedures.
How to prepare a surface for polishing?
Before polishing, the surface of the car must be prepared. Preparation includes the following steps:
- Thoroughly wash the car from dirt and dust.
- Applying masking tape to car parts that will not be polished.
- Blowing the car body from dust residues. In this case, special attention should be paid to hard-to-reach places.
- Body degreasing
The last two procedures must be carried out in a specially prepared room, where polishing will be carried out in the future. After completing the above procedures, polishing should begin as soon as possible to reduce the likelihood of re-contamination.
This is interesting: How to choose an inexpensive and good radio for your car
About sanding body panels
After complete drying, when the surface of the car is hard enough, you can begin the grinding procedure. It cannot be accomplished without the necessary tools and consumables. You will need:
- a grinding machine with adjustable disk rotation speed;
- block of rubber or hard wood;
- dishes with water;
- polishing wheels, they should be of different hardness, soft and dense;
- clean, soft, lint-free cloth.
- sheets of abrasive paper, with a grain size ranging from 1500–3000 units;
- polishing pastes with or without abrasive, as well as for final polishing.
Now we can talk about how to polish the varnish on a car after painting.
Preparing for painting
Many problems when painting a car arise due to improper preliminary preparation of body panels. This is a very important stage that must be taken very seriously. Basic points include matting, washing, drying, and degreasing.
It is important that the surface to be painted is dry and without the slightest hint of condensation. It is necessary that the temperature in the room where the car is painted is from +10 to +25 degrees Celsius. You need to use the right proportions of paint components and set up the spray gun correctly. You can read more about preparing your car for painting in another article.
About the technology of work
Polishing of varnish is carried out either using a special tool or by hand. In the second case, bars made of rubber, wood, or felt are used, which are wrapped with sanding paper of selected grain size.
Polishing the body after varnishing with sanding pads is just the initial stage when minor defects are eliminated after painting the body. It is best to carry out the work using the “wet” method, that is, instead of sanding, the varnish is poured with water. The sanding paper should also be periodically moistened with liquid to remove adhering particles.
About polishing
Let's look at how to polish car varnish. This procedure may consist of two stages:
- polishing with abrasives;
- applying a protective layer.
The first type of work is designed to perform very precise sanding to achieve perfect smoothness. How to polish the varnish on a car depends on what paint is used to paint the vehicle body. Dark-colored bodies should be subjected to the most careful and high-quality processing.
The layer of varnish that can be applied to the body can be approximately 35–40 microns thick. With this thickness of varnish, 6 to 8 polishing operations can be performed. Polishing thin varnish on a car is done with pastes, which can be based on wax, silicone, or other polymer composition. There are many such formulations available in retail chains. The greatest durability belongs to compositions based on epoxy resins.
Car polishes made using “liquid glass” are also gaining popularity. The unique composition of this polish allows you to visit a contactless car wash more than 50 times. It has a number of other advantages. For example, it repels water and dirt from the varnish well, and the color and shine of the paintwork is preserved for a long time. There is no need to use a polishing machine for polishing. Among the shortcomings, one, but very significant, can be noted, this is the high cost of polish.
How to polish ceramic varnish
Lately, varnishes that are commonly called ceramic have begun to gain popularity among car owners. In fact, they never contained ceramics. Manufacturers carefully hide the composition of this product, but something is known about them. Manufacturers managed to invent a varnish composition that began to interfere with the abrasion process; it quickly restores the lost shine of the paint coating after minor damage.
This became possible due to the presence of solid particles in the top layer of the coating varnish. They are designed to provide obstacles when attempting to scratch. There is still talk among drivers that this is due to ceramic particles. This conclusion is incorrect, since the high performance of the material was obtained after a strong crystal lattice was obtained. With its production, it became possible to form a strong elastic film.
It will not be possible to polish car bodies coated with such varnish with ordinary polishes, so manufacturers have developed a number of products for polishing such coatings. One of them is the Polar Shine polishing system, which was developed and manufactured by Mirka.
There are two types of such products on sale: C20 and A12. The first is a coarse polishing paste, it is designed to work with two-stage polishing systems such as Polarshine. The A12 product is used for one-stage paint treatment when there are small or minor scratches on the surface of the car body. It can well restore lost qualities; you just need to change the polishing disc in a timely manner.
In addition to these products, you can successfully use the Farecla system paste; it is available in several types and is used for polishing both completely new coatings and car bodies with many years of use. You can also find polishing complexes from Festool, and some other materials.
What is shagreen
Often car owners, when painting a car or part of its body with their own hands, violate the technology and, as a result, have a pronounced cosmetic defect in the form of shagreen. Possible causes of the defect and factors that contribute to it:
- The paint was not sticky enough to complete the job. This means that when mixing the coloring composition, the technology for its preparation was violated. It was necessary to use only special containers for measuring the dose of components and avoid adding them “by eye”. You also need to strictly follow the proportions indicated on the paint container.
- The paint was stored in a cool place. The optimal storage conditions for the paint composition are 15-20C, in this case the paint will spread perfectly over the surface.
- The paintwork was applied too thinly. Shagreen after painting can be removed by additional polishing and re-painting.
- Insufficiently dried paint. Shagreen may appear if each layer is not given time to dry completely.
- The room was too cold or hot. How to paint without shagreen? It is imperative to adhere to the temperature regime, in this case the paint will dry evenly. Also, at high temperatures, the solvent evaporates too quickly, which is very undesirable when painting.
- The spray gun was not adjusted correctly, causing the defect to appear. The nozzle of the device must be of the optimal size, it must be at the recommended distance so that the paint does not splash. The air stream also needs to be adjusted during the application of the coloring composition.
How to paint without shagreen?
Such a defect can appear at any stage of applying the paint and varnish coating and even during varnishing. Also, various mistakes that were made during the work process can affect the final result.
shagreen is visible in good lighting
Why does shagreen appear when painting? This is a question that car owners ask when they encounter such a problem for the first time. It is necessary to select the right materials for the job and ensure that they are compatible with each other.
It is imperative to follow the paint application technology and accurately adjust the spray gun before starting work. If the surface of the car body is damaged by shagreen, you need to know how to get rid of this defect.
How to remove shagreen after painting?
Small defects can be removed from the surface of the body using regular polishing. For work you need to use sandpaper of different abrasives and carry out the final work very carefully, using a special polishing paste.
To get a perfectly smooth surface, you can use two or three abrasive pastes; before using them, you must mat the surface. To save time and effort, you can use a special polishing machine in which you can independently regulate the speed.
All movements must be uniform, this way you can avoid defects in the form of stripes. In exactly the same way, you can get rid of this type of defect after the varnish has dried, if the car owner has a question about how to remove shagreen on the varnish.
In some cases, the defect may be deep and cannot be eliminated by polishing. How to remove shagreen? It will be necessary to repaint the surface after first removing the old paintwork from it.
The surface of the body is sanded again using sandpaper, degreased, and only then can a new coat of paint be applied.
Whether to get rid of shagreen or not is decided by the car owner himself, depending on how large the area and depth of the flaw is. You need to understand that this is a very labor-intensive process, and it is more expensive than following the technology when applying paintwork to the body.
Elimination of defects
As practice shows, shagreen is often obtained after painting a car. This is due to the fact that it is not possible to follow all the rules when performing the operation. To correct the situation, you have to resort to some methods:
- Polishing.
- Repainting.
Then the shagreen will need to be removed using sandpaper. To work, you need water and the abrasive itself with a grit size of P1200 and P1500. When the main defect has been removed, you need to finish the polishing stage with P2000 and P2500 paper. After cleaning, you need to go over the parts with polishing paste to smooth the surface and give it shine.
It is worth noting that when repainting, you need to remove all fresh paint and use sandpaper to smooth out and remove defects. After this, you can begin repainting.
Effective ways to remove shagreen
When painting a car or part of its body, sometimes a cosmetic defect occurs in the form of a small uneven surface (shagreen), which looks like an orange peel. The appearance of such a defect is possible at any stage of applying paint and varnish mixtures, and even during varnishing, if they are carried out in violation of the technological sequence or without following the recommendations contained in the instructions for the paint.
Irregularities can be either small in size (fractions of a millimeter) or very significant in size (0.5-0.7 centimeters). In addition, the visual visibility of defects is affected by the color of the coating. White shagreen is noticeable on a car much more than similar flaws on a dark-colored body. Therefore, owners of light-colored vehicles are often concerned about how to remove shagreen.
What to do to prevent a defect from appearing
It is possible to paint a car without the appearance of defects, but to do this you will need to follow some rules and adhere to painting technologies.
Many masters highlight the basic requirements that help prevent the appearance of shagreen:
- At the moment when the paint and varnish composition is mixed, the proportions should be strictly adhered to. In order for the proportion to be maintained with greater accuracy, it is necessary to use measuring containers for work.
- A solvent should be used to paint the car and mix the paint. It must match the paint; as a rule, the manufacturer writes on the can which solvent should be used. You also need to know that the solvent is used not only according to the manufacturer’s recommendation, but also depending on the climate, room ventilation and volume of work.
- Also, before painting, you should properly set up the spray gun. It should have a passport with data on pressure and other characteristics. Tool adjustments must be made after any use.
- The temperature in the room must correspond to certain indicators, namely about 20 degrees. A temperature discrepancy of 1 degree is allowed, both up and down.
- Storage of paint and varnish compositions should not be in a humid place, and the temperature should correspond to the data in the paragraph above
It should be noted that shagreen is not so easy to remove from a car. In this regard, you need to be well prepared, since you will need to spend a little money and time.
How to get into shagreen
Newbie 06/19/2017 Painting
5291
If we look closely at the painted surface, we will see that it is not completely smooth. There is always a more or less clearly expressed “shagreen” on it - barely noticeable bumps and depressions, reminiscent of the skin of an orange.
Shagreen is characteristic of absolutely any spray-painted surface. Even on those coatings that are applied at the factory, shagreen is always present - this is due to physical processes during the drying of the varnish. When sprayed, the paint falls on the surface to be painted in the form of drops, and before they harden, they do not have time to completely spread and form an absolutely smooth surface without texture.
Therefore, when repainting it is impossible (and not necessary) to avoid shagreen.
It is important to “get into shagreen.” That is, the painted part should have approximately the same shagreen color as the original one, and deviations in one direction or another are not welcome
Shagreen is influenced by many factors. Like the recipe for preparing paintwork materials, using faster or slower thinners (the slower the thinner, the more time it takes to spread and the smoother the shagreen, and vice versa), so are the settings of the paint gun and the application technique. The type of gun also affects shagreen. HVLP guns produce larger shagreen grains than LVLP guns, since the low pressure at the outlet of such guns is not able to break varnish or paint (especially materials with a low solvent content) into small droplets.
Most often, the ways to “adjust” shagreen are as follows:
- increased or decreased atomizing air pressure;
- changing the application distance;
- changing the speed of passage.
For example, if we take a varnish of standard viscosity and apply it at standard pressure (2 atm) and at a standard speed, we will get, relatively speaking, “average” shagreen. If, with a varnish of the same viscosity, we slightly reduce the pressure and reduce the speed of passage, we will get a smoother and more wavy shagreen. By slightly increasing the pressure and speed of passage, the shagreen will be finer, more frequent and sharper.
In this way, by varying the above parameters and using your precious experience, you can imitate the factory shagreen of absolutely all famous cars: from a large wave of Mercedes SUVs to small, almost imperceptible ripples of sports Toyotas; from a very smooth wave of American Cadillacs, to a more pronounced shagreen, characteristic of Russian cars.
If the shagreen is very large, it can always be reduced by polishing. It should be borne in mind that cutting off shagreen with harsh abrasive treatment will lead to the formation of an unnaturally “bald” mirror surface of the varnish. Only a gentle impact will eliminate shagreen, while maintaining the surface structure identical to the undamaged areas.
Reasons for appearance
Shagreen on a car can result from improper painting. And it arises for the following reasons:
- The paint and varnish product was prepared according to the wrong recipe. As a result, the consistency turned out to be of low viscosity, which was not enough for uniform application on the surface of the car.
- The paint manufacturer's instructions were not followed correctly. The wrong solvent may have been used.
- The spray gun has not been adjusted correctly, so the air pressure does not meet the required parameters.
- The spray gun used a very large nozzle. here is the Hydra mirror
- The conditions in the box where the car was painted were unfavorable. The air temperature is either higher or lower than normal, which is why shagreen appears when painting and other defects.
- The car paint product was stored incorrectly (at low temperatures). When using such paint, it lies unevenly on the surface of the car.
- The painted parts were not dried correctly and the drying times of the layers were not maintained.
Shagreen on a car can appear even if the car is painted in specialized services. In order to avoid its occurrence, it is necessary to take measures that prevent such a defect.
Alternative methods of applying paint to a car body
Powder painting of cars will help to avoid the possibility of unevenness and cosmetic defects as much as possible. This technology makes it possible to obtain high-quality polymer coatings with minimal material consumption and good performance properties. And special additives that regulate spreading and have good corrosion resistance provide reliable protection to the body metal.
The powder paint method has a number of undeniable advantages, which has led to the popularity of its use in the modern automotive industry.
Forget about fines from cameras! An absolutely legal new product - NANOFILM, which hides your license plates from IR cameras (which are installed in all cities). Read more about this at the link.
- Absolutely legal (Article 12.2.4).
- Hides from photo and video recording.
- Installs independently in 2 minutes.
- Invisible to the human eye, does not deteriorate due to weather.
- 2 year warranty
Why might shagreen appear on your car?
Lumps of paint material on a car can be seen during unprofessional painting. Incorrect distance of the gun from the metal or incorrect hand movements will result in poor paint application to the surface. But this is not the only reason for such trouble. The performer’s limited experience should always be taken into account, not allowing a beginner to carry out responsible work on expensive areas. Shagreen can appear on car body parts for the following reasons:
- low quality paint - in this case it will be very difficult to remove this defect by any means;
- poor compressor performance during painting work, low or too high pressure;
- a clogged spray gun that has not been washed properly for a long time, poor atomization;
- poor-quality metal preparation before painting, textured putty surface;
- poor quality of the primer used to expose the part before applying the paint and varnish material.
The choice of method to remove the effect depends on the cause of the appearance of shagreen. There are two options for car processing to eliminate such consequences. This is a treatment that involves removing a layer of paint, and also without repainting the car. If shagreen appears on the entire surface of the car after painting, you will have to take a more serious approach to eliminating the problem. Most likely, the preparation was performed poorly.