We remove the unit to replace the failed damper drive rods and backlight bulbs.
Disconnect the negative terminal of the battery.
By pulling, remove the air temperature control knob.
We also remove the handles for the air flow distribution regulator and the fan operating mode switch.
Use a screwdriver to pry up the plastic handle
Remove the air recirculation control lever handle
Use a screwdriver to pry up the block lining
Remove the cladding and use a Phillips screwdriver to unscrew the two self-tapping screws securing the block
We remove the unit from the instrument panel and disconnect the wire block from the fan operating mode switch
Disconnect the wiring block from the backlight lamp socket
Using a screwdriver, pry it off and remove the bracket securing the shell of the recirculation flap drive rod.
Use a screwdriver to pry the rod from the recirculation drive lever
Disconnect the recirculation flap drive rod.
We also disconnect the rods from the temperature regulator and air flow distribution.
To replace the backlight lamp, use pliers to turn the lamp socket counterclockwise to the lamp and remove the lamp socket from the block
Remove the lamp from the socket
Install the lamp and unit in reverse order.
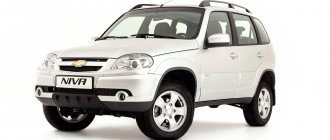
The stove is the central element of the interior heating system of any car. Any malfunction, especially in the cold season, leads to very unpleasant sensations. A well-functioning stove is the key to a comfortable climate inside the car.
The device of the stove of the Niva Chevrolet car
The Chevrolet Niva is equipped with a liquid-type heater. It supplies warm air to the cabin and cools the engine, overheating of which can lead to disastrous consequences and costly repairs.
Without air conditioning
The Chevrolet Niva heating system consists of the following elements:
- ventilation duct;
- windshield heating duct;
- intermediate body;
- air intake filter;
- fan;
- interior heating duct;
- foot heating duct;
- heater radiator.
The intensity of the hot air supply is regulated using dampers. The air duct system distributes the heat flow to various areas of the cabin: windshield, side windows, legs, doors, etc. In addition, there is a four-speed air supply switch.
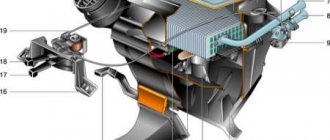
Heating system for the interior of a Chevrolet Niva car, where 1 is the side deflector air duct; 2 — windshield air duct; 3 - intermediate body; 4 - intermediate air duct; 5 — outside air filter housing; 6 — fan housing of the heating and ventilation system; 7 — central deflector; 8 — air duct for blowing the front passenger’s feet; 9 — facing of control units; 10 — front air duct for blowing the legs of rear seat passengers; 11 — rear air duct for blowing the legs of rear seat passengers; 12 — heater assembly; 13 — air duct for blowing the driver’s feet; 14 - side deflector
With air conditioning
The air conditioning system allows you to regulate the temperature and humidity in the cabin. Before turning on the air conditioner, the heater fan is turned on, and the temperature control knob is set to minimum. Almost the entire air conditioning system is located in the engine compartment. Only the evaporator is brought into the cabin between the heater and the electric motor, providing heat exchange between the incoming air and the refrigerant.
Heater and air conditioner diagram, where 1 - heater housing; 2 — inlet pipe of the heater radiator; 3 — heater radiator outlet pipe; 4 — air conditioner evaporator housing; 5 — evaporator outlet pipe; 6 — evaporator inlet pipe; 7 — fan housing; 8 — control cable for the external air supply damper
As the refrigerant moves through the evaporator tubes, it absorbs heat and turns into a gaseous state. The evaporator fins are cooled, and the fan directs cold air into the cabin and reduces the temperature. Gaseous refrigerant from the compressor under pressure enters the condenser, cools and turns into a liquid state. After this, the liquid is supplied to the receiver, and from it to the evaporator reducer, where it again turns into a gaseous state. A new cycle begins.
How to remove the heater regulator on a Niva Chevrolet
articles:
- Photo
- How to remove the heating and ventilation control unit VAZ
Communities › Chevrolet Niva › Blog › Disassembling the stove control panel. Help. Druid78 last online more than 1 month ago. That's all! I can’t remove the part further. I found an article on the Internet: GONKI1.RU -otopitelya-niva-shevrole, but I can’t do it. I couldn’t remove the panel marked with a red tick! What's the catch?!.
We also remove the handles for the air flow distribution regulator and the fan operating mode switch. Use a screwdriver to pry up the plastic handle. Remove the air recirculation control lever handle. Use a screwdriver to pry the rod from the recirculation drive lever. Disconnect the recirculation flap drive rod.
We also disconnect the rods from the temperature regulator and air flow distribution. To replace the backlight lamp, use pliers to turn the lamp socket counterclockwise to the lamp and remove the lamp socket with the lamp from the block. Remove the lamp from the socket. Install the lamp and unit in reverse order.
Control dimensions of the VAZ car body How to remove the VAZ instrument panel from the city.
! The most popular Chevrolet model is rightfully the Camaro. The history of Camaro begins in 1966. The name is taken from the word “Komrad” - comrade. The powerful car quickly conquered the market in this segment. The car turned out to be not only powerful, but also aesthetically attractive. It’s not for nothing that the Camaro is constantly seen in various films.
Removing the interior heater of a Niva Chevrolet car is carried out to repair it in the event of a breakdown, as well as when carrying out other work in which the presence of the heater will interfere.
Prepare a standard set of tools and perform the following sequence of actions: First of all, you need to turn off the power to the car; to do this, disconnect the minus terminal from the battery.
Now on the stove control panel you need to remove the heating control handle and the air recirculation control handle. Then, using a small flat screwdriver or grasping it firmly with your hands, remove the decorative panel of the heater control levers.
The best prices and conditions for the purchase of new Hyundai Creta cars. Now on the stove control panel you need to remove the heating control handle and the air recirculation control handle. I thought to see if there was a clear switching of positions, but I couldn’t think of anything to do. I removed the side panel at the driver's feet, the cables became visible, I decided to insert the temperature control knob, began to turn it slowly and saw that the damper simply did not move, my mistake was that the cable had come off and that's what the service center said, i.e.
Repair of hot cold air regulator. — logbook Chevrolet Niva on DRIVE2
Therefore, knowledge of the algorithm for diagnosing faults, repairing and replacing the interior heater, as well as modifying the heating system is relevant for any car owner, especially in the cold season.
This design, the main function of which is to heat the interior, allows, if necessary, to increase the intensity of engine cooling.
Most of the heating system elements are located inside the car. Exceptions are the heater valve built into the partition of the engine compartment, and the pipes connecting the heater to the engine cooling radiator.
The radiator and heater dampers are combined into a block hidden by a common plastic casing. If necessary, this unit can be replaced entirely. The coolant, heated by the engine, flows from the radiator of the cooling system into the heater radiator through pipes and a tap.
The air forced by the heater fan enters the heating system through the air intake located under the windshield. Depending on the position of the damper, the air flow goes either through the heater radiator or directly into the air ducts.
The distribution damper is responsible for distributing the flow between the air ducts. The selection of the stove operating mode, temperature and air flow direction is made using the stove control unit located on the center console. The principle of operation of a car heater with air conditioning is similar to that described above. However, its design is significantly different. Instead of an intermediate heater housing, an air conditioner evaporator is installed, hidden by a plastic casing.
Main stove malfunctions
Stove malfunctions can be very different. The most common reason for its failure is:
- heater valve malfunction;
- damage to radiator pipes;
- failure of the additional resistor;
- radiator damage;
- control unit problems.
As a result of any of the above situations, the stove stops working normally.
Warm air does not enter the lower part of the cabin
Before repairing the stove, you should check the temperature of the coolant (coolant). Perhaps the problem is not in the interior heater, but in the cooling system. If the engine warms up to operating temperature (90˚C), then the cause of the malfunction should be sought in the stove.
With the help of damper position regulators, warm air is directed to different parts of the cabin
The dampers should be adjusted first. To supply hot air to your feet, follow these steps:
- The engine warms up until the warm air can be felt with your hand.
- The heater fan speed switch is set to position 4.
- The airflow direction knob turns to the 12 o'clock position and immediately returns to 10 o'clock. Air should begin to flow into the lower part of the cabin.
- If the result is not achieved, the procedure is repeated.
Reassembly
Reassembling the dashboard proceeds in the reverse order. Good luck with the repair and bright soft light of the tidy!
We remove the unit to replace the failed damper drive rods and backlight bulbs.
Disconnect the negative terminal of the battery.
By pulling, remove the air temperature control knob.
We also remove the handles for the air flow distribution regulator and the fan operating mode switch.
Use a screwdriver to pry up the plastic handle
Remove the air recirculation control lever handle
Use a screwdriver to pry up the block lining
Remove the cladding and use a Phillips screwdriver to unscrew the two self-tapping screws securing the block
We remove the unit from the instrument panel and disconnect the wire block from the fan operating mode switch
Disconnect the wiring block from the backlight lamp socket
Using a screwdriver, pry it off and remove the bracket securing the shell of the recirculation flap drive rod.
Use a screwdriver to pry the rod from the recirculation drive lever
Disconnect the recirculation flap drive rod.
We also disconnect the rods from the temperature regulator and air flow distribution.
To replace the backlight lamp, use pliers to turn the lamp socket counterclockwise to the lamp and remove the lamp socket from the block
Remove the lamp from the socket
Install the lamp and unit in reverse order.
Niva Chevrolet, replacing the heater and backlight regulator in 5 minutes
replacing light bulbs on a Chevrolet Niva dashboard
Interior heater repair
The stove in the Chevrolet Niva is considered one of the most reliable components of the car. However, it can sometimes fail.
Replacing the heater cable
Sometimes it is not possible to change the position of the heater damper. The reason for this is a broken cable. To replace it, you will need a standard set of tools and a headlamp. Replacing the cable is carried out as follows.
- The driver's seat moves back.
- The handles are removed from the damper control panel and the screws are unscrewed.
- The panel is dismantled on the left side at the location of the driver's feet.
To access the cable you will need to remove the heater control mechanism
Using a cable, the position of the air supply flap is changed
Replacing the interior heating control unit
A faulty control unit can also cause the interior heating system to not operate correctly. Its dismantling, necessary for repair or replacement, requires the following procedure.
- The negative terminal is disconnected from the battery.
- All handles are removed from the heater control mechanism. To do this, you need to carefully pull them towards you.
All handles are removed from the heater control mechanism
Use a flat screwdriver to remove the air circulation lever
Use a screwdriver to pry up and then remove the block lining
Two self-tapping screws are unscrewed under the cladding
The connector with wires is removed from the control unit
After dismantling, the control unit is repaired or replaced with a new one.
Replacing stove pipes
If a coolant leak is detected, the pipes along with the clamps should be replaced. The work is performed in the following sequence:
- The coolant is drained from the system.
- The screws securing the glove compartment are unscrewed and it is removed.
- Use a Phillips screwdriver to unscrew the clamp of the lower pipe. The hose is removed carefully - the antifreeze should not get on exposed skin. If difficulties arise, the pipe should be rotated around its axis.
- The second pipe is removed in the same way.
- New hoses are installed and tightened with clamps.
If antifreeze leaks, the stove pipes are replaced with new ones.
Video: dismantling the stove pipes on a Chevrolet Niva
Replacing the stove fan
If the fan does not turn on or if strange noises appear when it is turned on, then the electric motor is most likely faulty.
Before removing the heater motor, you need to make sure it is faulty.
The most common reasons for its failure are:
- Lack of voltage on the electric motor due to poor contact.
- Visible damage to the motor wires due to chafing.
- The 25 A fan fuse located in the fuse box number F18 has failed.
- Failure of one of the resistors, manifested in the absence of one of the speed modes.
- No ignition.
- Deterioration of the armature and brushes of an electric motor as a result of long-term continuous operation.
If the electric motor malfunctions, it will need to be dismantled.
In any of the above situations, the electric motor will need to be removed.
How to replace the heater radiator on a Chevrolet Niva without air conditioning
Many motorists are often interested in the question of how to replace the radiator of a Chevrolet Niva stove without air conditioning. To carry out all the actions, you will initially need to unscrew the bolts located on the cylinder block. To avoid damaging the outer shell of the expansion tank cap, it must be carefully removed.
In addition to this option, experts are considering another method, more practical. For example, you need to use a new hose to remove liquid that gradually accumulates in the container.
What tools will you need?
To carry out the procedure you will need the following equipment:
- screwdriver;
- pliers;
- wire cutters;
- socket heads - you can choose the appropriate size (8, 10, 14).
Preparation
There are two options for draining the coolant:
- Open the hood lid. Use the front part of the cylinder to eliminate fluid.
- Remove the expansion tank cap and use a new hose.
Important! When replacing a part, the airbags may deploy. To prevent this from happening, you need to turn the key in the ignition switch to the “Lock” position. Experts also recommend disconnecting the ground on the battery. After completing all the steps, you need to wait a few minutes. This is done to discharge the backup capacitor.
If you have an air conditioner, the process of replacing the heater becomes much more complicated. Therefore, experts are considering the following options to help with operations:
- without removing the instrument panel, the air conditioning system is depressurized;
- If the dashboard is disassembled and the steering wheel is removed, then the operation of the air conditioner is significantly improved.
How to remove a stove radiator
Removing the heater radiator begins with removing the glove compartment. The self-tapping screws for fastening the trim are removed from both sides at the passenger's feet. After performing these steps, it is necessary to remove the terminal of the lighting fixture.
When the rubber hose clamps become loose, they can be easily removed. As soon as the hose is removed, the heat exchanger fasteners are unscrewed.
To securely fix the radiator, it is necessary to glue the edges using foam rubber due to the leaky connection. This will prevent air from getting inside.
The frame of the new heat exchanger is secured with plastic. Only after this is it placed on the seat.
Several replacement methods
In practice, two options are being considered for replacing the Chevrolet Niva 2006 heater.
First way
It is important to note that the heating system retains voltage for up to 2 minutes.
Initially, remove the cap from the expansion tank and unscrew the drain bolt located at the bottom of the engine. You can also disconnect the throttle body cooling tube. As an alternative, you can use a hose with which the coolant can be transferred to a special container.
Next, the radiator is replaced. It is not necessary to remove the instrument panel at all. Initially, you need to remove the heater radiator and disconnect the air duct. Loosen the clamps to make it possible to remove the rubber tube.
Second way
You will need to use a small container. To avoid the formation of puddles in the interior, fabric or film is recommended.
Step-by-step instructions for the entire process
Using a flat-head screwdriver, pry the plug off the panel. Next, press the latches, which are located at the bottom of the structure, and then lift the pillow up. Use a wrench of the appropriate size to unscrew the airbag mounting bolts.
Installation of the ventilation grille plugs is carried out by unscrewing the screws, as well as removing the grille itself. Next, you need to remove the tape and remove the air duct using the appropriate tool.
To carefully remove the air duct on the passenger side, you will need to dismantle the ventilation grille. Then remove the tape.
The pipe in the passenger's feet is dismantled. Initially, unscrew the hose fasteners. To remove the air conditioner evaporator, remove the fuse box along with the control unit.
Important! When removing the fan, remove the air filter. Then unscrew 4 self-tapping screws, with which the electric motor is attached.
To place the structure, select the right side. Next, remove the latches (there are only 6 of them). They are pryed off with a screwdriver. Once the steps are completed, the structure can be separated and carefully removed. To disconnect the fan components, you need to remove the latches.
The next step is to remove the air conditioning system tube. Since there is a possibility of freon escaping, it is advisable to use special safety glasses during the procedure.
The nut is unscrewed. The fastening bolts must be carefully removed so as not to damage the nuts. You also need to remove the self-tapping screw, which is located in the same place as the radiator pipe itself.
In the cabin, unscrew the evaporator mounting bolts, as well as the self-tapping screw. The evaporator nozzle should be on the right side until it comes free.
Installing a new heater
Before replacing the old heater with a new one, the axis of the structure is lubricated with a special lubricant. Reassemble the parts in reverse order. When installing the impeller, it is moved in different directions. Then you should make sure whether or not a complete landing has been made on the motor shaft.
Dismantling the stove
The stove is dismantled as follows.
- The negative terminal is removed from the battery.
- Remove the dashboard, performing the same steps as when replacing the control unit.
- The screws securing the heater to the cross member of the instrument panel are unscrewed.
- The stove is pulled out from its installation location.
Removing the stove from a Niva Chevrolet car is quite simple
Replacing the backlight of the stove Lada 2123 (VAZ 2123)
Removing the interior heater of a Niva Chevrolet car is carried out to repair it in the event of a breakdown, as well as when carrying out other work in which the presence of the heater will interfere. Prepare a standard set of tools and perform the following sequence of actions:
- First of all, you need to de-energize the car; to do this, disconnect the minus terminal from the battery.
- Remove the instrument panel.
- Now on the stove control panel you need to remove the heating control handle and the air recirculation control handle.
- Then, using a small flat screwdriver or grasping it firmly with your hands, remove the decorative panel of the heater control levers.
- And use a Phillips screwdriver to unscrew the screw securing the arm bracket.
- Now you can remove the control panel illumination lamps.
- Next, disconnect the wiring harness block.
- We disconnect the drive rods of the damper levers; to do this, unscrew the screw securing the bracket.
- Next, unscrew the screw securing the bracket and disconnect the recirculation flap drive rod.
- We remove the lever bracket from the panel and disconnect the block with the supply wires from the power supply wire harness for the heating fan drive electric motor.
- Then we disconnect the remaining rods by unscrewing the screw securing the bracket.
- Remove the fan motor switch.
- And remove the heater by unscrewing the screws securing it to the cross member of the instrument panel.
At this point, the repair work to remove the interior heater of the Niva Chevrolet car has been completed. Carry out the necessary repairs, after which we carry out the installation in the reverse order.
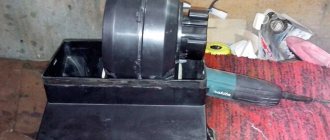
I recently received diodes from China, which means I need to use them somewhere. So we have red and green ribbon and a piece of blue ribbon.
Ready backlight
Ready backlight turned on in the dark
Ready backlight turned on in the light
The finished backlight is turned on approximately as it should be
Initially, I did it without stabilizer and at full brightness. It turned out beautifully, but it was very bright, stood out strongly against the general background and was a little distracting, so it was decided to add a stabilizer and a resistor. After which, the brightness became almost at the level of the rest of the backlight.
Ready backlight turned on in the car with flash
Ready-made backlight turned on in the car without flash
Ready-made backlight with stabilizer included in the car
It took: Green tape 18 LEDs (less than a meter) ~11rub Red tape 3 LEDs ~2rub Blue tape 3 LEDs =0rub KR142EN8A stabilizer = 15rub Diode 1N4001 2 pcs, 2rub each = 4rub Resistor 50 Ohm 0.5 Vata = 1.5rub Wires and consumables were = 0rub
https://www.drive2.ru/l/6366210/
It is difficult to scare a person who owns a Chevrolet Niva with anything. He is not afraid of vibrations, ominous sounds from the distributor, or the darkness. Although, the darkness is sometimes annoying, especially in those moments when the lamps on the instrument panel do not light up. There is nothing special about the lamps themselves, W1.2W is exactly 1.2 W. These lamps are installed to illuminate the instrument panel, to illuminate the buttons on the panel, and as control lamps.
They are often replaced with LEDs, but this is a separate topic.
First, let's find out how to change the light bulbs on the instrument panel of a Niva Chevrolet.
Removing the dashboard of Niva Chevrolet
There is no way without removing the instrument panel and, by the way, replacing lamps is the only repair that the instrument panel is subject to.
If inaccuracies and malfunctions are found in the operation of at least one device, the shield along with the board is replaced. Regardless of whether repair or replacement is needed, the shield will have to be removed. This is done using a Phillips screwdriver and a flathead screwdriver.
Algorithm
The process goes like this:
- First of all, remove the negative terminal from the battery so as not to inadvertently short-circuit the electrical wiring.
- There are two screws installed on top under the tidy visor. They are not covered by anything and are clearly visible; we turn them out using a Phillips screwdriver.
- There is a plug installed near the control lamp block. Using a thin screwdriver, remove it; underneath it is a third self-tapping screw.
- The fourth screw is hidden under the plug to the right of the emergency light button. Remove the plug and unscrew the screw.
- Now you need to remove the control lamp unit. To do this, use a thin slotted screwdriver.
- As soon as the control lamp unit is in your hands, you can disconnect the contact block and remove it completely.
- You can try removing the dashboard. To do this, pull it towards you, but the panel fastening latch will get in the way. You need to press it slightly with your finger.
- Theoretically, the tidy is free, but it is held in place by wiring harnesses. Carefully disconnect the contact blocks and remove the instrument panel assembly.
- To get to the board, you need to unscrew two more screws on the right and left.
- All that remains is to move the instrument cluster in your direction, disconnect the contact blocks from it, after which the shield will remain in our hands.
Replacing lamps on the instrument panel
When we have the dashboard in our hands, we turn it face down and find the plastic sockets for the backlight and warning lamps.
To remove them, simply turn the cartridge body counterclockwise. We take out the socket, take out the old lamp from it, and install the new one in its place. We insert the cartridge into the board and turn it clockwise to secure it.
Refinement of the heating system of the Chevrolet Niva
When the intensity of supply of air heated by the heater into the cabin decreases, it becomes necessary to modify the heating system. This is due to errors in the assembly of the system. The main problem is the lack of tightness in the air ducts and dampers. This leads to incorrect distribution of warm air throughout the cabin. The modification is carried out as follows.
- The steering column casing and driver's side console are removed.
- On the heater side, a plate is removed that sets the direction of air supply.
The die located on the heater side needs improvement
To give the desired trajectory of movement of the damper, you can glue a plastic card to the die
The last stage of modification of the stove is the rigid fixation of the lower damper
As a result, warm air will be distributed throughout the cabin strictly in accordance with the position of the flow direction regulator.
Thus, even an inexperienced car enthusiast can ensure a comfortable microclimate in the interior of a Chevrolet Niva car. To do this, you just need to strictly follow the instructions and recommendations of professionals.
Identified problems and ways to eliminate them
If controlling the stove on your Chevrolet Niva has suddenly become impossible for you, do not put aside the question of finding the cause. It may happen that you really need to redirect the flow of warm air in a certain direction, and you cannot count on a positive result.
We would like to point out that the problem may be a failure of the switches themselves, as well as a simple break in the cable that allows the valves to turn.
Algorithm for troubleshooting
Do not try to succumb to the “tempting” ideas of some “masters” who suggest doing nothing but changing the position of the damper manually. Indeed, this can be considered as one of the options for solving the problem, but only short-term. If even the slightest amount of time arises, we recommend not to be lazy, but to arm yourself with the necessary information and successfully carry out repair work aimed at restoring the functionality of the switches.
In order to get a positive result, we recommend that you prepare pliers, a screwdriver, high-quality glue, and three pieces of steel wire, the length of which is at least ten centimeters.
Under the driver's steering wheel there is a panel secured with four self-tapping screws. Unscrew them and remove the panel. Under it there will be cables that go to the switch. If you notice a clear break in such a cable, you can rush to the auto store and purchase the appropriate analogue. You can do it differently and use the material that you have prepared in advance.
The cable itself can be safely glued together. You can also disconnect the broken latch, then remove the broken cable. Make a double clamp from the prepared wire and secure it to the plastic part, tightening it with pliers, twisting it into a tight braid. This completes your repair work related to a broken cable.
If you still need to replace the switch itself, then after you remove the panel located under the steering wheel, you will have access to these round switches. All that remains is to simply remove them, then visit a car store and purchase an appropriate replacement. Just do not forget to show the removed regulator to the store salesperson so that he can study the markings and successfully select the right part for you. It will be easy to put the new switch in place, acting in the same way as before, but only in the opposite direction.
Sometimes drivers complain that it is difficult for them to still get to the broken cable, then we suggest you expand the space, and this will make access easier. Of course, in this case you will need to remove the control unit of your stove. There is nothing complicated in these steps, you just have to unscrew a few extra bolts and be extra careful.
Initially, after removing the panel cover, unscrew and carefully remove the plastic frame, then unscrew the two bolts and remove the cup holder. Now unscrew the bolts again and remove the glove box and tape recorder. All that remains is to unscrew two more bolts and carefully pull the climate panel towards you by about five centimeters. Now you will be much more comfortable checking the integrity of cables and fasteners, and if necessary, replacing or repairing them.
We recommend: How to change rubber bands on windshield wipers - a DIY job
So, if you want to personally solve all the problems that may arise during the everyday operation of your favorite vehicle, it is enough for you to familiarize yourself with the recommendations provided, and then carry out all the proposed manipulations in practice. Your beloved “iron horse” will definitely thank you for showing such concern for him; he will be very pleased to please you with his excellent work.
DIY heater replacement
So, your heater radiator is leaking, to make sure of this and not engage in “monkey work”, touch the radiator pipes on the front passenger side, if they are dry, then look for a puddle under the driver’s carpet. If the puddle is from antifreeze, it will taste greasy and sweet. So, if all the signs match, then most likely the radiator is leaking.
We go to the store and buy a radiator. I bought a regular aluminum one for 500 rubles and some clamps just in case. You will also need 10 liters of antifreeze. Also stock up on boxes for self-tapping screws, because there will really be a lot of them!
Drain the antifreeze. To get as much as possible, blow into the expansion tank.
I’ll say right away that you need to remove the dashboard if you don’t want to end up at a gas station, although judging by my guesses, even in that case you’ll have to remove the dashboard.
First of all, we remove the glove compartment, it is easy to remove, there should be no problems.
Unscrew the center console along with the radio. There is nothing complicated here either.
Next, unscrew the decorative panel of the center console, which is on the side. We loosen the lining of the checkpoint tunnel. To do this, it is enough to unscrew one (seemingly) extreme screw. On the driver's side closer to the pedals, the passenger moans similarly.
Next, we begin to disassemble the decorative cladding
dashboard, simultaneously throwing off the dashboard and the steering column housing with switches. We take out the air duct, which is located behind the dashboard. Here you will have to suffer with the cables. Why can't you remove the entire dashboard? - you ask. This bolt won't give you anything.
Symptoms of a problem
The simplest situation is when the electric motor does not spin at all. In this case, there may be several reasons :
- Fuse failure №18 face value 25 A. It only protects the heater motor circuit.
Check fuse F18.
- Break, short circuit, damage to the motor winding.
- Lack of contacts on the motor power supply block, damage to the wiring.
- Damage, freezing or wear of the electric motor brushes.
- There is no voltage at the output contacts of the speed switch, the switch is broken.
In these situations, everything is simple - change the fuse, clean the contacts and check the wiring. In the case of damaged or worn brushes, you will have to completely remove the stove fan.
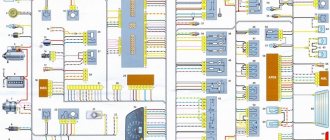
Connection diagram for the electric motor of the heater fan and the rear window heating element: 1 – ignition switch; 2 – mounting block; 3 – heater motor switch; 4 – additional resistor; 5 – heater electric motor; 6 – rear window heating element; 7 – switch for heated rear window with control lamp; A – to power supplies; K6 – additional relay; K7 – relay for turning on the heated rear window.
Stove fan repair
It is more difficult when the engine spins, but does not develop sufficient speed . This is dangerous because when the rotation of the electric motor shaft is difficult, it consumes much more current, so the fuse may burn out and the winding may fail. Diagnosing a fault in this case requires some experience and the breakdown may not be immediately detected, but a blown fuse will make it clear that there are problems with the motor.
The engine armature may not gain speed due to a dirty, oxidized or worn commutator or worn brushes.
In addition, insufficient motor speed can be caused by an interturn short circuit in the armature winding or wear or clogging of bushings or bearings . It is also possible that the cabin filter is clogged. In the case of bearings or bushings, the engine will make noise during operation, and the noise will increase over time. This can be treated either by replacing the motor, or by lubricating or replacing bushings or bearings.
The cause of increased noise from the stove may be clogged bearings and bushings that need to be lubricated.
The bushings or bearings are lubricated only with a regular spindle and machine oil. Engine oil or grease is not used in this case. A new engine costs about 600 rubles, depending on the manufacturer .
Furnace Fan Failure Determination
The stove in Niva Chevrolet is switched on from the passenger compartment. The regulator is located on the dashboard. It has four positions . Three of them are designed to switch the heater in different power modes. The fourth is used to turn on the electric motor.
The heater fan turns on the fourth position.
When you put the control in position “1”, then the engine sounds. In addition, its operation must be verified in all other provisions. If this doesn't work, it will need to be replaced.
The main causes of the problem are:
- No battery power.
- The fan power cable is damaged.
- Fuse failure.
- The pre-resistance is faulty. In this case, the fan will not work
only in certain positions. - The ignition does not turn on.
- The fan has reached the end of its service life. This requires a complete replacement.
Due to problems with the connection and winding of the furnace fan.
Chevrolet Niva engine tuning
There are a huge number of options for modifying the Niva Chevrolet engine, which will significantly increase its technical characteristics:
- Replacing the crankshaft and piston rings gives an increase in volume of 0.1 liters
- Replacing injectors
- Replacing the control unit
- Correction of engine geometry by increasing the diameter of the valves and the pushrod well for the intake and exhaust ports. New pushers with a diameter of at least 1 mm are required
- Sealing valves increases power by 10%
- Replacing the catalyst with a flame arrester. This is a tuning of the Chevrolet Niva exhaust system, but it helps improve the technical performance of the engine
All these operations require direct intervention in the technical device of the car. The optimal way to chip tune a Chevrolet Niva engine is to work with the brains of the engine – the injector. Software knowledge is required here. With its help, the technical parameters of the machine are changed. This method is the least expensive.
Video of chip tuning of a Chevrolet Niva with your own hands.
Also interesting: Air conditioning system in Chevrolet Niva - coolness and comfort in the cabin
Niva Chevrolet, replacing the heater and backlight regulator in 5 minutes
Link to stove
set of 3 pieces 197 rubles.
Disconnect the negative terminal.
To make the operation more convenient, first remove the dashboard from the inside . Next, you need to disconnect the input connections on the stove. Then follow the hand to check.
If you are not able or willing to remove the dashboard, you can try to climb up from below to the slab. In this case, you will definitely need to remove the glove compartment.
We remove the glove box, unscrewing everything that will get in our way.
Then you need to disconnect the connector on the engine. If the motor does not work in only one position, simply replace the board.
Disconnect the fan power and rubber hoses.
Removal process:
- Tighten the fasteners using a screwdriver.
Using a screwdriver, remove the three screws. Fan motor mounting.
Read
By turning the fan a little and pushing the box towards you, we remove the electric motor along with the impeller.
You should also check the air ducts for damage. They may contain foreign elements. Clean air ducts . Then you should check the operation of the engine itself. To do this, you can connect it directly to the battery.
How to replace a radiator without removing the instrument panel
The device is replaced in stages:
- Remove the glove box and disconnect the air duct.
- To simplify the process of removing the rubber tube to drain the remaining liquid, loosen the bolts.
- The structure is attached using two screws.
- Using a side cutter, remove a piece of plastic that interferes with the dismantling of the structure.
- Then a new radiator is prepared. To prevent air from passing through the cracks, glue is applied around the perimeter.
This is interesting:
Replacing the Fan Heater
The connecting plate must be screwed onto the new device . Then insert the motor into place and turn it to the left.
Install the fan with the motor by turning it as shown in the figure.
When it is in the socket, it should be stopped, preventing it from turning during operation.
Connect the wires and fittings from the plate to the panel. Check engine operation with the ignition on. This work can be considered complete.
We fix the fan, connect the wires, rubber hose and check its functionality.
Chevrolet Niva heater damper repair
Niva Chevrolet, replacing the heater and backlight regulator in 5 minutes
Chevrolet Niva, speed and heater blower position controls, just like on a Mazda!
Niva Chevrolet heater blows cold air
Niva Chevrolet Shaitan Cyclone in the legs, revision!
Replacing the heater resistor on a Niva Chevrolet. Replacement of the heater resistor
How to change the stove on a Chevrolet Niva without swearing? with air conditioning.
stove Niva Chevrolet
DIY heater cable replacement
HEATER RELAY REPAIR, OVEN DOES NOT TURN ON
How to remove the heater control unit in a Chevrolet Niva - Automaster
Modern people prefer to have at their disposal vehicles that allow them to move in any direction at a time when it is most convenient for them. Unfortunately, cars bring their owners not only joyful moments, but also unpleasant surprises.
Sooner or later, some mechanisms fail, so the Chevrolet Niva, like others, actively needs the participation of its owner. Some repair work cannot be carried out without the necessary technical knowledge, so you have to resort to the services of car mechanics.
Symptoms of a malfunctioning stove fan
The main signs of a stove fan failure are as follows:
- the electric motor does not work;
- the rotation speed of the electric motor decreases;
- The fan starts to creak.
Depending on the symptoms that appear, the procedure for eliminating the problem is determined.
The electric motor does not work
If the electric motor stops working, the noise in the cabin disappears when the heater is turned on.
Often the reason for this is the failure of fuse F18 with a rating of 25A in the corresponding block, through which voltage is supplied to the stove motor.
Another reason may be damage to the fan motor winding - if the wire insulation is damaged, an interturn short circuit may occur. In this case, the electric motor must be replaced.
When there is an interturn short circuit, the electric motor stops working.
The rotation speed of the electric motor decreases
When the rotation speed of the motor shaft decreases, it is somewhat more difficult to determine the source of the problem. The noise level becomes noticeably lower as the motor power decreases. This may be due to severe wear on the armature or brushes. In addition, the fan begins to consume much more current, and this can lead to the failure of fuse F18.
If the armature is heavily worn, the electric motor will rotate much more slowly.
The fan starts to creak
The fan begins to creak when the motor bearings wear out. The more wear, the stronger the squeak. If you do not take any action, the heater fuse will burn out and the motor itself will jam. In this case, the electric motor should be replaced with a new one.
If the bearings are worn too much, the engine seizes up.
Replacing the heater fan fuse
Almost any malfunction of the stove motor leads to the replacement of fuse F18. On a Chevrolet Niva car, the fuse box is located in the passenger compartment under the instrument panel and is closed with a cover secured with two self-tapping screws. When replacing F18, it is recommended to check and, if necessary, replace other fuses.
The heater fuse is located in the fuse box under the instrument panel
If fuse F18 has to be changed quite often, then the problem should be looked for elsewhere. There may be a short circuit somewhere in the motor power supply circuit. Sometimes the fuse blows as a result of severe contamination of the cabin filter. In this case, the electric motor does not have enough power for normal air ventilation, and the fuse fails.
Often the cause of the heater motor stopping is a blown fuse.
The suspicious fuse is removed from its seat in the block using special tweezers. If it burns out, a new one is installed in its place. When checking, it is better to use a multimeter, since it can be difficult to visually determine the integrity of the fuse.
The heater fuse on the Chevrolet Niva (F18) is rated at 25 A
Replacing the backlight of the Chevrolet Niva control console
The green lighting of the console on the Chevrolet Niva did not really suit me; I wanted something different. I saw a blue-red backlight on one foreign car, it looks cool, so I’ll do the same on my car, especially since the vacation has begun, I need to spend my time usefully. I didn’t start with something complicated right away; first I installed blue LEDs in the dashboard, and installed two white LEDs to control the stove.
Then I installed fog lights and daytime running lights (I had also been planning this for a long time), they also had buttons in the interior. I installed a blue backlight on the PTF button and a white backlight on the DRL. I could have stopped there, but I still didn’t want to stop there, especially since I completed the work in just a couple of days, and there are still several weeks of idleness ahead.
I pulled out the buttons for the headlight adjustment and the brightness of the backlight. To dismantle them, I had to temporarily remove the cover of the fuse box and then press on the corresponding latches. I took the board and worked a little with a soldering iron. If there is no resistor or any other resistance to the LED in the button circuit, then you will have to install it; select a resistance with a nominal value of 1 kOhm. We follow approximately the same scenario with the seat heating buttons.
There are relays inside the buttons, you need to disconnect them, solder the LEDs there and put everything in place.
Let's go further and next in line we have the ESP buttons. Then we begin to work with the toggle switch for adjusting the speed of the interior heater. I took a red LED strip, removed two diodes from it and soldered blue ones instead. In total, you will need to remake two tapes. so buy enough right away so that you don’t have to run to the store later, for example, I had to.
I glued the tape inside. One is glued with self-adhesive, which is already on the tape, I also glue the right one with the same, but near the air conditioner button, I also soldered it with a soldering iron as an additional fastening. Reinstall the instrument panel.
Now I haven’t finished the work yet, I still need to work with the backlight of the radio, but that will come later, at the end of the vacation.
chevroletov.ru
Illumination of the instrument panel and heater block Chevrolet Niva, VAZ 2113-15
This kit is designed and can be installed without problems only on panels manufactured by VDO! (manufacturer is indicated between the tachometer and speedometer scales)
The kit is designed for those who:
- does not tolerate the collective farm, and wants to get a decent result in one evening - will receive excellent quality with minimal cost and labor. Color options for dials, hands and displays - white, blue, red.
The kit is attached to 2-sided tape and is equipped with a smooth ignition and extinguishing circuit.
The smooth ignition and extinguishing scheme allows you to:
- Turn on the instrument panel illumination when the ignition is turned on.
- Precisely adjust the brightness level of dials and hands, which is very important, as LEDs are used from different batches and with different brightness.
- Adjust and remember the brightness level of the backlight for day and night mode when the lights are turned on.
- Configure various options for smooth ignition and extinguishing of arrow and dial channels.
- The technical characteristics and configuration of this device are described HERE.
Installation of the kit.
We disassemble the panel and clean the dials from the layer of blue-green paint. The process is the same on all panels, so there is no point in focusing on it. The paint is removed with a scalpel, or wiped off with solvent, alcohol or nail polish remover. Don't try to use acetone if you don't want to ruin the pad!
We disconnect the display case from the main structure, biting off the excess elements on the sides (in 1 photo). We remove the display and clean the blue paint from the diffuser under it. We fix the display backlight boards with super glue, and then put the structure back together.
We attach the backlight boards to the plastic base, and, observing the polarity, solder the wires from the display backlight to them. We make wells for arrows. Any suitable plastic tube, or one rolled independently from several layers of paper, will do. Markers, pens, spools of thread (in 2nd photo) are great for wells... The main thing is that our wells do not show through, for this you can paint them with a black marker, wrap them with electrical tape, or tighten them with black heat shrink. The internal diameter must be at least 10 mm.
Use a step drill to drill out the transparent plastic so that the wells for the arrows fit into it.
We attach the wells to the board with super glue.
Electrical connection.
First, solder the wires to the contacts on the board according to the photo.
And after that we connect them to the corresponding points on the backlight board:
+12 - constant 12V, GAB - dimensions, IGN - ignition, GND - ground
In the version without smooth ignition, we use the GAB and GND contacts on the backlight board, and connect them, observing the polarity, with the closest contacts from the standard backlight lamp on the main board.
The updated version of the PCB looks a little different, but the pin assignments remain the same. The photo will be replaced with a new one soon.
The setting buttons are essentially needed only once to set a comfortable brightness level for day and night mode, as well as to select the desired options for igniting and extinguishing the backlight.
Watch a video demonstrating the operation of smooth ignition and extinguishing using an example of a kit for panels produced by AP.
Illumination of the Chevrolet Niva stove block.
Everything is simple here - the backlight board is screwed with 4 screws on top of a transparent diffuser, and connected to a standard socket instead of a light bulb. No polarity required.
For a more uniform glow of the temperature controller, it is necessary to level the ribbed surface of the diffuser.
With this all modifications to this unit are completed, you can install it on the car. The photo shows the very first version of the backlight board, so we don’t pay attention to the uneven illumination of the temperature controller - in the new version the number of LEDs has been increased, and the problem has been fixed.
ufo-ts.ru