Paintless Dent Repair (PDR) is a technology for repairing body dents while preserving the car's original paintwork. Paintless repair specialists use various PDR tools to attack the dent on the back side of the body panel, or pull it out from the front side with an adhesive system, or combine both methods. In addition, special punches and hammers are used to tap and lower the heights of the metal.
In this article, we will look at what tools are used for paintless car dent repair, their characteristics and methods of application.
The content of the article:
|
PDR Tools
The first teams of PDR specialists began to form in the quality control departments of auto giants. They needed to create the necessary tools to successfully straighten out the small dents that were sometimes created during the manufacturing and assembly of automobiles. Initially these instruments were homemade. They were converted from existing tools of “tinsmiths”, and also invented new unique devices and improved them over time. You can read in more detail about the emergence of paintless dent repair technology in the article “history of the emergence of PDR technology.”
Homemade paintless dent repair tools were used many years ago by the early PDR technicians.
PDR technology has improved significantly over the past 15 years. Nowadays, qualified PDR technicians can straighten quite complex dents without painting. This is possible thanks to the range of modern tools, as well as the elasticity of modern paint coatings.
There are now many manufacturers that provide a wide range of paintless dent repair tools and accessories.
PDR tools can be classified by design and by application (intended purpose).
By design, instruments can differ in bend (single, double, triple bend, or more complex shapes), tip shape, length, tool diameter, shape and configuration of the handle.
By application, tools can be classified depending on which body panels they are used on or what action they perform. For example, classic hooks (or rods, from the English rod) are designed to work in open, fairly accessible places, such as fenders, roofs, trunks, hoods. They work by applying pressure to the back of the dent. Another example is the whale tail tool. This tool, in contrast to classic hooks, is used in hard-to-reach narrow places and works due to the twisting action. Additionally, PDR technicians use special reflective panels to accurately “read” dents, LED lights, and an adhesive system to pull out dents. Correcting different dents may require the use of multiple tools. The more tools you have at your disposal, the more freedom and flexibility you will have to repair a specific dent.
Next, we will look in order at the various tools that are used for paintless dent repair, as well as the necessary accessories.
Price-quality ratio
Particular attention should be paid to the price at which it is proposed to buy a pdr tool. There is always an opportunity to save money and buy cheaper, because the market is overflowing with offers. But at the same time, there are high risks of purchasing a low-quality product, which will not only entail significant losses. In this case, the price speaks volumes about quality, and this is the main thing in car repair (including removing dents), be it a VAZ or a Mercedes.
Trust reputable manufacturers. Despite this, this type of self-repair using pdr technology remains one of the most affordable. This is important, taking into account the fact of a significant increase in prices for services in the field of maintenance. Although you should not neglect the services of a qualified master who has undergone special training.
It is enough for any car owner to once make a financial investment in a quality tool in order to be able to independently, without involving outside help or the need to undergo training, eliminate body defects, the occurrence of which is inevitable. The PDR tool is sold in different configurations and sets.
PDR hooks (PDR rods)
PDR hooks are the staple tools that fill a craftsman's toolbox. Various in shape and size, they are used on every panel of the car. Most craftsmen use a rigid hook (or rod) 120 cm long for all open, fairly accessible places, such as roofs, hoods, trunk lids, fenders. Shorter versions of the same hooks are used for doors. Hooks can provide consistent and very controlled pressure to lift metal.
Hooks differ in length (from 40 cm to 2 m), bends, diameter and tip shape. It is better to have a set of different hooks, from which over time you can choose the ones that are most preferable for the job.
Some PDR tool companies create ratchet handle pdr tools. This is a great addition because the technician can use one tool for different positions and apply different amounts of force on the lever. Hooks are available with interchangeable tips, making one tool more versatile and saving space in your toolbox or bag.
Door hooks PDR (PDR door hooks)
Door hooks are used to work with door damage through the gap between the door glass and the panel, allowing you to straighten dents without having to remove the trim. Door hooks have different bending angles (from 90 to 180 degrees) and different lengths, with a narrow tip for better maneuverability. For ease of operation and increased functionality, door hooks can have a rotary handle.
These hooks are mainly used on the top of doors.
Brace tool (eng. brace - bracket, spacer)
Tools for use under panel reinforcements. There are versions for left and right hands. Designed to maximize reach and minimize ridges from tool use. This tool is often used to repair hail dents.
Dent Reaper
This type of hook is quite new. Dent Reapers provide strong pressure, do not bend, and have sharp tips for finishing.
Sickle/scythe hooks work well in doors and can also be used on other panels. They are “powerful” and precise in application. Increases work efficiency. Excellent for working with aluminum panels.
Knife-shaped/knife “shaved” hooks ( SHAVED TOOLS )
Knife/knife-shaped or “shaved” (from English shaved) hooks are designed to work in areas of difficult access, in narrow cavities, under amplifiers.
This tool is a hook with the barrel cut at an angle from the base to the working part. Shaved hooks come in different sizes. What they all have in common is slim design and flexibility. In terms of capabilities, these hooks are close to the “whale tail” tool, but they have a different principle of influencing the dent. Used to repair hail dents, especially under hood, roof and trunk reinforcements. Well suited for work in the rear fenders, where two metals are pressed closely together. Also good as an auxiliary tool, helping with finishing work in the final stages.
Due to the thin barrel, “shaved” hooks are not used on hard places, curves, or dense metal.
Whale tail
Whale tail instruments are named after the shape of their tip. They provide leverage at the edges of the tip. Whale tails come in different lengths from 10 cm to 150 cm with tips of different widths (from 1 cm to 10 cm - ultra-thin, thin, standard, wide and extra wide). The tips are completely rounded at the top.
They are used to work under panel reinforcements. Whale tail tools are not the easiest to learn. They work by twisting rather than pushing/pressing like regular hooks.
Equipment
Levers and bump stops
This paintless dent repair tool is used for mechanical alignment from the inside. You can use an oblong pin or a flat bar as a lever. The technology under consideration is based on differential pressure. The principle of work is to squeeze out the dented area from the back side with a lever placed in the technological hole. When the material returns to its original place, a click occurs. You need to apply pressure carefully and smoothly, controlling the appearance of edges and peaks. To straighten them, a fluoroplastic bumper is used.
However, since this method is associated with penetration into the car, the scope of its application is limited, since not all areas of the body can be reached with a lever through technological openings.
Pops-a-Dent
This is a specialized set of tools for fixing dents without painting, including an applicator, glue and a mini lifter. This specialized kit is used for external straightening of dents. Its basis is a device in the form of a bracket with two rubber tips. In addition, the kit includes glue, a gun, and a set of attachments.
The previously damaged area of the car is degreased. Then heated glue is applied using a gun to one of the nozzles (also degreased) and installed in a clockwise circular motion in the center of the dent. In this case, excess glue comes out through the holes in the nozzle. The hardening time is 2 - 3 minutes. After it dries, the dent is pulled out with a mini-lifter - a bracket is installed on the nozzle and screwed on until the defect is completely straightened. Upon completion of work, leave the device on the work surface for 5 minutes. At the end of the work, the surface is cleaned of glue.
There is other equipment for removing dents without painting using this method. For example, a piston is used in a similar way. It is also glued to the damaged area and the dent is straightened by pulling. It is also possible to use a non-professional tool, such as a set of suction cups. The technology for their use is the same. The adhesive method has a much wider scope of application, since almost all dents can be straightened from the outside. At the same time, the work is very simple to do with your own hands.
Vacuum suction cups
The technology for using vacuum suction cups differs from the above-mentioned suction cups attached to glue, since this equipment is installed on the working surface using the vacuum method.
The previously damaged area of the car is cleaned. Then install a suction cup and create a vacuum in it with a pump. Finally, the pump hose is disconnected and the dent is pulled out. Upon completion of the work, the vacuum is released by opening the valve and removing the suction cup. This technology differs favorably from the adhesive method in that there is no need to clean the body after repairs.
Set of levers
Such equipment is used when straightening dents using PDR technology. The set includes many hooks that differ in shape, length and curvature of the working part. In addition to them, you will need a hair dryer, a plastic spacer called a drift, and a mallet. It may be necessary to dismantle the interior trim and adjacent parts of the vehicle before starting work. On a pre-cleaned working surface, the metal tension in the bending areas is relieved. Then the damaged area is heated to 40 - 50°C. The edges of the bend are lightly tapped using a punch to avoid damage to the paintwork. Leveling is carried out by pressing on the damaged surface from the back. To do this, select a lever depending on the conditions for the location of the defect, insert it into the technological hole and, turning the handle, act on the surface. Professional sets are equipped with polymer wedges that are placed under the hooks to prevent damage to parts. The technology under consideration is the most difficult for do-it-yourself repairs, as it includes various repair methods. It is usually used to correct complex and extensive defects.
Magnet
This tool is used to straighten dents using the pulling method. Place a rag under it so as not to damage the paintwork. The magnet is moved from the edges to the center of the dent, slightly pulling.
Hairdryer and can of compressed air
The use of such a kit involves a thermal method for straightening dents. It is based on the tendency of the metal to return to its original shape under the influence of temperature. First, the damaged area of the car is heated with a construction hair dryer, and then air from a spray can is directed onto it. In this case, the metal is leveled. When straightening large dents, this operation will have to be carried out at several points. Moreover, their location is not chosen randomly, but depending on the shape of the defect. So, for round dents, the points are placed along the radius, and for oval ones, along the narrow side. If there are rigid elements in the defect area, alignment begins with them. This method does not always allow you to completely straighten the damage, so for complete straightening, use a mallet with a rubberized backing material to protect the paintwork.
Also, among other things, you will need a set of protective equipment in the form of gloves and a mask, since this work involves high temperatures (300 - 650 ° C).
There is also the option of performing repairs using this method using household materials. So, a gas burner is suitable as a heating tool, and water can be used for cooling.
Set of rubber mallets and anvil
This equipment is used to tap out dents from the back, and the anvil is placed on the outside to prevent the metal from bending in the opposite direction. Tapping begins from the center of the dent, moving to the edges in a circular motion. The force of the blows should be controlled, as exceeding it can lead to thinning of the metal. If there is no access to the damaged area, a set of hooks is used.
Tools with replaceable tips
Interchangeable tips allow you to use one tool in different situations, replacing several tools, which increases its flexibility of use and saves space in the master's bag or drawer.
Replacement attachments are designed for use with hooks, punches and hammers that are threaded for them. Nozzles or tips come in different shapes and sizes, and are also made of different materials, which gives them differences in properties (in particular, different hardness). The most common ones include coated, plastic, uncoated steel, pointed, rounded, and mushroom-shaped tips. Each tip plays a different role. Generally, the larger the dent, the larger the tip of the tool. However, you need to consider each dent, take into account its structure and choose the most suitable tips and methods of exposure. Typically, straightening starts with large tips to reduce the overall size of the dent, and then gradually reduces the tip size as the dents become smaller.
Let's look at the types of replacement tips installed on hooks and when they are used.
- Tips are made of different materials (steel, plastic, rubber and others). Some have a coating (PVC or rubber) that acts as a damper to soften pressure on the panel. When using uncoated metal tips, you need to be careful and know what you are doing, as bare metal can damage the paintwork if pressed hard. Coated or plastic tips are safer in this regard.
- Large mushroom tip with PVC coating. This tip is great for removing large, “soft” dents. It is suitable for quickly lifting large areas of metal. The mushroom shape is useful in cases where a lot of pressure is required on the dent. This tip provides very strong leverage. This type of tip comes in different sizes. The larger size acts the same as the small one, but with an even greater range.
- A large round rubber tip is used to start pressing out large dents.
- A plastic conical (pointed) tip works well on body lines (stiffeners, edges). The pointed plastic tip, if pressed too hard, can crush the metal and create a raised area, but will not damage the paint, unlike metal. That is, the likelihood of straightening the “edge” of the body increases before you damage the paint. Plastic can vary in rigidity and have different effects on metal. Stiffer plastics can be used on both aluminum and steel panels. Softer plastic will not be able to dent an aluminum panel with sufficient force, since this requires a stronger force than steel. With strong pressure, a sharp tip made of soft plastic may lose its shape and the pressure will not be clear; a harder material retains its shape and provides a clear, strong pressure.
- Sharp metal tip. Its location is easier to determine from the back of the panel, as it gives a clear point effect. When using a sharp metal tip, you need to clearly know what you are doing. This type of tip cannot be pressed randomly onto the metal, as this will create many sharp peaks. The sharp tips can become dull over time, so you can adjust their shape yourself, if necessary.
- Slightly tapered tip. It is best suited for small dents. Its shape will give you precision but little leverage.
- The tip is cone-shaped with a rounded center. This tip provides sufficient force and is quite accurate.
- Roller Rod Tips allow you to apply more pressure to the panel without leaving a raised area, thereby increasing the visibility of the tip from the back of the panel. Wider rollers allow you to straighten larger and deeper dents with less tendency to tear the paint or stretch the dent. A roller tip with a thinner profile is used for finishing the panel. These tips can have different hardness, as they are made of hard or soft plastic.
Master's secrets: pothole repair
December 27, 2013
Why does the first pancake often turn out lumpy? Because no instructions can replace experience. Correcting dents without damaging the paint is somewhat more difficult than baking pancakes, as we recently discovered. The market is full of devices, having bought which someone immediately feels like a car repairman. We also acquired a modest set of hooks and other things. The purpose of the hooks is to press on the dents from the inside out, where there is no direct access.
This is only a minimal set of tools: a lamp with a suction cup for fastening, hooks, a core, a plastic drift, an elastic attachment... This is only a minimal set of tools: a lamp with a suction cup for fastening, hooks, a core, a plastic drift, an elastic attachment...
What should you practice on? There were several small dents on the trunk lid of the editorial Citroen, so we decided to deal with them.
First of all, those that are covered from below with lid reinforcements - they cannot be overcome without hooks. And the educational and advertising film convinced us that we could easily do this.
In full accordance with it, we polished the car, illuminated the dents with an oblique light from a lamp in order to better show them...
First pancake
Dent number one is on the cover, right above the amplifier. You'll have to drill a hole in it.
When working in such places, a drilling depth stop is very useful.
It’s difficult for someone who is not used to working blindly. And it’s easy to make a mistake by exceeding the effort!
We check the result in the light of a lamp. Remove this squiggle again, and the job will be completed!
In short, we spent almost the entire day just on the first “hole.” It's time to learn from the professionals!
The opportunity presented itself quite soon - when our driver discovered an impressive dent on the rear wing of the Volkswagen Caddy, next to the lamp.
The dent on the “Caddy” hurts the eye, but it’s located well. The dent on the “Caddy” hurts the eye, but it’s located well.
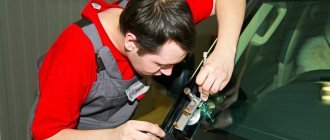
I contacted one of the Moscow services. Naturally, each specialist determines the strategy for editing a specific area himself, based on his experience, knowledge, etc. The sequence of actions in our case is shown in the pictures. Having removed the rear light, the master had good access to the dent from the back side - naturally, for working with hooks.
The lantern has been removed. Access to the reverse side of the damage is open. The dent is highlighted by a lamp. The lamp is removed. Access to the reverse side of the damage is open. The dent is highlighted by a lamp.
We, of course, already knew that it was possible, for example, to first “pull out” a dent using devices like glued mushrooms, suction cups, etc. These days these are quite popular technologies. But not required. Our master did not waste time on them, but started with something else.
Turning on the backlight, he thoroughly (and for quite a long time) tapped the entire perimeter of the dent with a plastic core... inward! Someone will say: where is the logic here? And here's what she's talking about. The metal in these places, gradually straightening out, seemed to pull the middle of the dent outward, which should have made subsequent actions easier with hooks.
As we can see, what the master did was not easy even from the point of view of strength of materials, and even more so in practice!
After the initial editing, the master proceeds to finishing the surface with hooks. After the initial editing, the master proceeds to finishing the surface with hooks.
Having finished this matter, the tinsmith began to “massage” the dent from the inside. Crochet movements are soft, calculated, without fuss. The process is long - several hours with breaks for short rest for the eyes: they get very tired from the tension and blinding light of the lamp.
It is curious that at first the master did not particularly care about the ideal shape of what he got - pits, tubercles... Some of the spectators even began to show concern, but after some time the irregularities began to miraculously disappear, and the Caddy's wing was all more like new.
Such is high art! The result is shown in the last picture.
The dent was gone. And the master’s eyes need a long rest. The dents are gone. And the master’s eyes need a long rest.
The described operations cost our accounting department 5,000 rubles. But everyone knows that repairing a wing using traditional methods would cost many times more.
The most important thing is that our car, if you check its paintwork with instruments, will remain in the undamaged category! So why is putty still held in high esteem? It's simple.
The instantly hardening polyester mass allows you to frankly hack things: you can fashion out of it even something that has long since rotted, then paint the car and get a lot of money from the owner. Of course, the owner of an ancient car can put up with layers of putty while “it” is still driving.
But we advise the owner of a new car not to rush to the unfortunate masters under any circumstances. Traditional repair methods create a lot of problems - from corrosion of the dented area to troubles when selling: after all, putty cannot be hidden from modern devices.
So, not all technologies are worth mastering, ignoring specialists. Let us recall the joke: “It’s not at all difficult to walk along a rope stretched across a gorge, just keep your balance!” Would you like to try?
Hammers, smoothers and supports (counter supports) for repairing dents
Hammers, trowels and supports have been used in auto body repair to straighten dents for a long time. They are also used for paintless dent repair, but they differ from conventional tools for body repair. Supports and smoothers for paintless dent repair have a perfectly smooth, polished surface or contain a softening coating so as not to leave any marks or damage on the paintwork when exposed to the panel.
- Paintless repair hammers are used to lower high spots. They can have replaceable attachments to change the characteristics of the striker.
- Supports (or counter supports) are auxiliary tools used to support the metal on the back of a panel when straightening with a hammer or float. There are many different shapes and sizes of counter supports. Selecting the correct shaped support is critical to the outcome of the repair. It is selected taking into account the bend of the panel being repaired. The counter support provides support for the panel and prevents undamaged areas from being crushed. An example of using support would be leveling (tapping) hills around dents from large hail. Such dents can be about 10 cm in diameter. To eliminate the bulk of the damage, it is necessary to remove the high spots around these dents. This is where supports and special hammers come into play.
Smooth with a soft pad to soften the impact.
- A smoothing iron is a hand tool with a smooth spring steel surface that is great for smoothing corrugated metal. The trowel controls more impact surface than any hammer. At the same time, it is easy to use. The float is used with support when lifting metal and can be used without support to lower elevated areas. The smoother may have a leather pad on the front side to soften the impact.
Making a minilift
A homemade minilifter is a great help for a car owner who has slightly dented the fender or bumper of his car. If you don’t have money for a ready-made pdr tool, then you need to make it yourself.
The main task of a minilifter is to pull out a dent without damaging the car’s paintwork. A homemade repair tool using PDR technology is made as follows:
- preparation of materials: a small diameter metal tube, 3 metal pins (1 20 cm long, 2 others - 12 cm each), a spring, 2 8 cm pins, 2 nuts, rubber pads, brake pads and a welding machine;
- the first stage is the manufacture of a mini-lifter body from a pipe in which a groove is cut (height - 3 cm, width - 1 cm);
- A metal pin is welded below the cut groove - the lower part of the handle;
- 2 more pins are welded at the bottom of the body;
- The bed of a homemade minilifter is made from used brake pads. It is on the frame that the housing will be mounted. The bottom of the frame is covered with rubber pads;
- the largest metal pin is a place for welding a piece of tube with a nut, after which a slot is made on the nut. On the reverse side, a spring is put on the pin;
- a groove is cut in the pin at the height at which it is located on the body of the homemade mini-lifter;
- the designed device is inserted into the middle of the body and secured with a nut;
- a 12 cm pin is welded to the lower handle - the upper part of the handle;
- all parts are assembled into a single mechanism.
Read also: Audi pb18 e tron
If you have even minimal experience in performing welding work, it is not difficult to make a homemade mini-lifter. The craftsmen solder the “sticks” themselves, based on the required bend.
Not all body damage can be eliminated by PDR technology. For example, dents on the sills, hood, roof pillars and other sharp creases cannot be removed using a hook and a mini-lifter. It is better to entrust complex damage to the car body to professionals.
Forget about fines from cameras! An absolutely legal new product - Traffic Police Camera Jammer, hides your license plates from the cameras that are installed in all cities. More details at the link.
- Absolutely legal (Article 12.2);
- Hides from photo and video recording;
- Suitable for all cars;
- Works through the cigarette lighter connector;
- Does not cause interference to radios and cell phones.
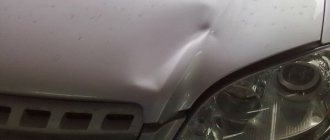
The percentage of car owners calling services with the problem of removing car dents is very high. Any qualified specialist knows that in such a case, painting is not the only way to eliminate the various origins of dents on different parts of the car. There is a technology for straightening and repairing dents that excludes painting and uses a pdr tool.
This is an abbreviation for the English name Paintless Dent Repair (PDR). It is a complete set in the form of levers, hooks, clubs, differing in shape and size. Such a tool will allow you to eliminate defects even with your own hands, although before doing this you will have to undergo special training. This will save you from having to leave the car at a service station for several days if there is minor damage.
Punchers (cores, cue balls)
A punch (also called a core or cue ball, English knockdown tool) is an essential PDR tool. You will use it regularly. Most high-quality craftsmen can boast that they limit the use of a punch, but there is not a single craftsman who could do without it.
With paintless repair, dents are not just sharply straightened out from the impact on them, they are slowly and methodically squeezed out with hundreds of tiny pressures. Sometimes the pressure on the metal is past where it should be. This can be accidental, and sometimes even on purpose. This creates hills that need to be removed with a punch. The tip of the punch is located directly at the high point and lowers it down by hitting the PDR punch with a hammer or other light object.
On some dents, it is necessary to tap the raised areas around their perimeter to relieve stress and soften the metal before straightening the metal begins.
Punchers can be made of different materials and also differ in the shape of the tip. They can be blunt, sharp, rounded, or mushroom-shaped. The sharpness of the tip depends on the size and shape of the hills. Tapping with a heavier punch (such as steel) with a soft, rounded tip will take much less time to move the same amount of metal than tapping with a lighter nylon punch. A lighter punch requires much more hammering or striking force to create the same impact as a heavier punch.
The type and material of the hammer used to strike the punch does not matter much; what is important is its weight, which will affect the force of the blow. In addition to the hammer, you can use other objects if it is more convenient for the master.
It is recommended to purchase one punch with replaceable tips.
In general, to tap high spots during dent repair, either a punch or a special hammer without using a punch can be used. So-called blending hammers are best used for larger, softer high points. Punchers are generally best suited for sharper elevations.
General Workflow Recommendations
Much of the effectiveness of using a non-destructive tool for dent restoration is determined by the skill of the master himself. Experienced installers do not recommend using excessive force even when working with deep and large defects. The power of impact, as a rule, is sufficient to correct the defect. The main attention should be paid to the accuracy with which dents are removed without painting. The tool should be convenient and comfortable - this will make it possible to perform manipulations more accurately. For comfort, it is also recommended to use attachments, extensions and adapters that allow you to optimize physical effort, calibrating it more precisely.
Adhesive system
The PDR adhesive system is designed for pulling out dents from the face of a panel and includes a glue gun with special glue sticks, special pull-out clips, pull-out devices and a tool for removing glue from panels and clips.
- Glue guns come in electric (corded or battery-powered) or gas. Glue sticks, as a rule, differ from the usual ones sold in hardware stores, have better adhesion, and are more durable. The rods come in different colors, which marks their characteristics. They mainly differ in the temperature at which the repair will be carried out, as well as the strength of the bond.
- PDR Pull Clips come in different sizes, shapes, designs and colors. They can also vary in strength. As a rule, the shape of the clip is selected to match the structure of the damage. Now there are special reinforced long strips that replace several clips and make it easier to pull out complex dents.
- Pulling devices. Once you have the clip glued to the dent, you will need a puller to pull one or more of the clips. For pulling, a sliding hammer, a mini-lift, a large lifting device, or a lever-type device is used. Different devices must be selected depending on the damage. Don't expect a blowback hammer or mini lift to pull out a dent in a panel and return the metal to factory condition with minimal effort. It is more correct to perceive these devices as one of many tools that you may need to achieve results. You may need to do several repeated stretches. You may also need to tap the high spots around the dent with a special punch and use PDR hand tools to finish the bumps.
- Glue remover. Sometimes the adhesive is not easy to remove from the panel or clip, in which case you will need a tool to make the adhesive easier to remove. There are special formulations, and you can also use alcohol.
For professional use, harder types of clips are most often used, while softer clips provide less precise control over tension.
“Glue Pull Repair” (GPR), used without or in combination with PDR tools, has become a very powerful system thanks to its wide range of different types of glue, clips (or pull bars) and many pull devices. A modern adhesive system with all accessories and additional tools allows you to replace the use of a spotter and many other straightening tools.
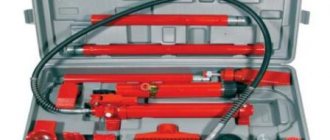
Dent Repair Kit
A master who seriously engages in body repair must have a whole set of pdr tools. The starting price of a full set of devices is from 150 thousand rubles. and higher. Not everyone can afford such a “pleasure,” so many choose another option – a homemade pdr tool.
The design of the tool is simple - the hook is made of steel, which can be stainless or ordinary. The angle of each stick is directly related to the area where the dent will be repaired. Different repair areas require different hooks with the right curve. In addition to the “sticks”, you will need an accompanying tool – a mini-lifter. The operating principle of a minilift is the opposite of a hook; the device can be equipped with hinges or not have them. The importance of using a minilifter is to preserve the paint layer on the body during repair work.
The professional set includes a shock-resistant lamp that illuminates the repair area. Any car owner can use a simple lamp to illuminate the restoration area.
Pneumatic suction cup puller
The pneumatic suction cup is sold in a set with several suction cups of different sizes (usually three). Depending on the size, it can create different pulling forces.
It is attached to the rods of a sliding reverse action hammer. The suction cup is made of rubber and plastic. The suction cup can work with both metal panels and plastic bumpers.
This tool can remove large dents very quickly. Used at the initial stage of repair, to eliminate the bulk of dents.
Auxiliary accessories
Accessories for working with doors through a window opening (window protector PDR and wedge)
To repair door dents, PDR tools are typically positioned between the door panel and the door glass. To prevent damage to the glass, a window protector with a special wedge is used. All you need to do is lower the glass down, insert the wedge and protective protector, creating space for the tool to work. Also, instead of a wedge, an air cushion is used, which easily increases the gap between the glass and the panel, providing better access for the tool.
There are different types of protectors on the market, but the most common is a plastic or metal sheet with a right angle at the edge.
Before you start working with doors, you need to consider the type of glass installed in them. Typically, side windows are made of stalinite (tempered glass), but some modern cars may now have laminated side windows. For this type of glass, the pressure that can be applied to them during repairs (even through a plastic protector) is critical.
Before repairing, it is better to always check the glass of the door on which the dent will be repaired. Laminated glass can be recognized by its 2-layer structure, which can be seen at the top of the glass. If the glass looks like 2 layers glued together, this is a sign of laminated glass. In contrast, the layering will not be visible along the edge of a piece of tempered glass. It will look like a completely smooth, solid piece. Also in the corner of the glass there may be the designation “laminated” or “tempered”.
If the glass is laminated, it is better to follow the following recommendations to minimize the likelihood of damage to the glass.
- Remove the molding at the top edge of the doorway.
- Lower the glass so that it protrudes about 7–8 cm from the opening.
- Use an air cushion to create space between the glass and the panel. Do not use a wedge for this as the pressure on laminated glass is dangerous.
- Always use a metal glass protector for laminated glass.
Removing the molding from the top of the door allows more clearance to insert the tool between the glass and the door panel. This will provide enough space for the tool. By leaving 7-8 cm of glass raised, you can apply more even pressure to the center of the glass with the air cushion, rather than concentrating all the pressure on the top edge. The metal protector also helps dissipate the pressure you will apply to the glass with the tool.
Since laminated glass is easier to damage than tempered glass during PDR door dent repair, sometimes if the car is expensive, the safest way is to remove the door inner trim and glass.
Hood stand _ _
The bench is typically used to repair dents on the hood when they cannot be repaired on the car. The stand simplifies the work. The panel is firmly fixed on the stand and the master can easily access the back side at any point.
Modern stands have adjustments, which allows them to be used for hoods of different sizes, as well as for trunk lids. The stand folds easily for compact storage.
Stops, clamps, hangers
To repair dents on a car body, in addition to special tools, stops and clamps are required. It is important to fix the movable panel being repaired (hood, trunk lid or door) in a convenient position. For this purpose, special stops and clamps are used.
The hangers are designed to provide support and proper leverage for the hooks when repairing dents. Usually attached to the technological holes of the body. They come in different shapes and sizes. Carbines are also used for these purposes. They hold larger instruments while removing extensive damage.
Knives for cutting sealant
Knives for cutting sealant are necessary when repairing dents under reinforcements. The knife allows you to carefully cut off the sealant without scratching the paintwork. These knives are sharp and flexible. They can have different lengths and different handles.
Pops-a-Dent Car Dent Removal Devices
No matter how careful and prudent the driver is, he still will not be able to insure against unpleasant situations on the road, including minor damage to the car. Of course, if the hood or fender of the car is soft-boiled, there are no options here - you will have to send the car for repairs.
But if the damage does not look major, you can try to straighten your car yourself without wasting time and money on service services. For this purpose, there is a unique development of a device for removing dents on a car, Pops-A-Dent, about which a few words are worth saying.
Video
Benefits of the tool
The Pops-A-Dent kit, which you can purchase at a reasonable cost, is a kit that can remove small dents. Using Popsa Dent, you can not only smooth out defects, but also give the surface of the car its previous appearance.
Despite the apparent difficulties, not only men, but even women can handle the device. The only condition required when using the repair kit is special care and slowness.
The obvious advantages of the Pops-A-Dent dent removal tool include:
- no scratches during use of the kit;
- the ability to use Pops-A-Dent for any brand of car;
- ease of use;
- the compactness of the device, which allows it to be used in any conditions;
- significant savings in money and time.
Using a unique device for removing dents on a car, you can fix the problems yourself, without damaging the paintwork and without resorting to the help of specialists.
The Pops Dent set is very reliable to use, and its effectiveness has been proven by numerous tests and customer reviews.
How to use the kit
Working with the tool is no different. The gun is filled with glue, then the damaged area is covered with the composition, where the suction cups are mounted.
A bracket with a screw is put on the suction cups - and you begin to carefully pull out the dent, giving the surface its original evenness.
Without any haste, any motorist will correct the irregularities quickly enough.
Stages of work:
- Clean and degrease the dent area on the car.
- Depending on the size of the damage, choose one of three attachments.
- Glue the selected nozzle with glue using a hot glue gun.
- Wait 5-10 minutes for the glue to harden.
- Place the bridge-bracket on the nozzle.
- While screwing the nut, tighten the dent until it is level.
- Remove the remaining glue from the surface of the car with a special rod.
PDR lighting
Lighting and reflection is one of the most important components of a PDR repair. PDR lamps are used indoors and allow a specialist to see dents on car body panels in more detail. There are two types of lighting currently in use: fluorescent and LED. With the introduction of LED lighting, things have definitely changed. LEDs allow you to have more compact, lightweight and very durable lamps. LED panels can change the light intensity, and even color. This is necessary for cars of different colors. For example, light-colored panels may be difficult to repair without painting using a standard white light PDR lamp.
Lamps for PDR repair may contain a special light diffuser. Usually these are parallel lines or the so-called fog board. The color and design used on the face of the lamp is the personal preference of the artist. Such diffusers or screens can be purchased separately and placed on the lamp or replaced with an existing diffuser. They help achieve high detail defects.
Reflective screens (reflective screens/panels) are a panel with a specific pattern (usually parallel lines). They, unlike a special lamp with lines, do not produce their own light, but reflect existing light (for example, sunlight) and cast lines onto the panel being repaired, helping to better see the damage.
So the purpose of the PDR light (or reflective screen) is to allow the technician to see the damage pattern that is happening inside the dent. By reading shadows and distorted reflections, a specialist can determine where the metal is high and where it is low. The craftsman also uses reflection to guide the tip of the tool exactly where it should be. Further, the reflection helps to monitor the repair process, allows you to develop precise force and stop pressing in time. After manipulating with the PDR tools, once the distorted lines become parallel in the panel reflection, the dent will be successfully corrected.
PDR lamps come in different sizes and variations. In general, they can be divided into stationary lamps for workshops and portable ones.
- Stationary lamps are mounted on collapsible tripods, allowing you to work with large volumes of damage. They can rotate and can be installed at any angle. These lamps are useful for repairing hail damage and can illuminate the entire roof or other panels.
- Portable PDR lamps usually range from 25 cm to 50 cm in length. They are easy to move and are usually mounted on the car using a suction cup. Mobile lamps are designed to work both in stationary conditions and on the road. They allow you to work with minor damage and damage of medium complexity.
When choosing a PDR lamp, consider the following factors:
- Size
- Ease of installation and setup
- Personalization (can you change the light intensity, color)
- Battery life (in the case of a portable lamp)
- Durability
What do new technologies offer?
One of the most advanced solutions in this group of instruments is a magnetic-inductive device. It affects the problem area through eddy currents. Contact with metal surfaces provokes inductive excitation, which makes it possible to heat the area and precisely correct its geometry.
Self-inductive dent removal without painting is also possible. It is advisable to use a DIY tool in a garage or other room where fire protection measures are provided. Such devices do not harm the environment, but in the wrong hands they can be dangerous due to the risks of electric shock and fire.
PDR Tool Kits
Tools for paintless dent repair can be purchased individually or in kits. Kit sizes range from simple starter kits to complex professional kits. Before purchasing, it is better to study different tools so that you have an idea of what is offered to you.
It is better to buy tools not in sets, but separately. The kit may not include hooks, but may not include the tools you need. In any case, you need to study the assortment before purchasing.
Which tool should I choose to repair a specific dent?
Tools come in different lengths, shapes and sizes. Each tool is uniquely designed for a specific purpose, and a PDR technician has a variety of tools to access even the most difficult to reach areas of the vehicle.
How do you know which tool to use for a certain dent? There are two main things to consider, one is “reach” and the other is “leverage”. That is, whether you can reach the back of the dent and whether you can influence it. This will help narrow down your choices among the available tools.
It really doesn't matter what tool you use, the main thing is to get the result. There may be more than one way to repair the same damage. In addition to the classic PDR hand tools, do not forget about the capabilities of the adhesive system. With its improvement, the possibilities of paintless dent repair have expanded significantly.
Where and how did the technology originate?
The German company Nuessle has developed a pdr tool for removing dents. This is one of the leading companies in Germany, specializing in straightening all kinds of dents without the need for painting, dents resulting from bad parking, from hail, from flying objects and many others.
The technology was first introduced at car shows, where it was necessary to remove dents that appeared during the inspection of cars by visitors. This method of auto body repair, which can now be done with your own hands, appeared thanks to the discovery of paint and varnish coatings based on polymer compounds. The durable and flexible structure of the paint layer withstood even severe body damage.
By the way, this technique for eliminating defects is by no means the latest development. The history of its existence goes back more than 20 years; it turns out that it was simply kept secret by the developers. In fact, since 1996, education and training of qualified specialists using pdr has been organized.
Brands of PDR tools
Now there are many different companies producing PDR tools and accessories. It is better not to buy cheap analogues from unknown companies or even kits without a name. Tools from well-known, proven brands are thoroughly tested and tested by experienced paintless repair specialists. Specialists from PDR tool manufacturing companies maintain feedback with craftsmen and also take into account requests for the necessary modification of some tools.
The highest quality and most proven instruments are from American companies, such as Dentcraft Tools, A‑1 Tools , PDR Finesse Tools, Ultra Dent Tools and others. Also worth mentioning are KECO and Blackplague PDR, which sell innovative tools and adhesive system materials for pulling out complex deformations.