When and why should this be done?
On the Gazelle car, this system is hydraulically driven. This means that a special fluid exerts pressure on the working cylinders. It has special properties and does not boil when compressed. However, the main disadvantage of brake fluid is its hygroscopicity. When the system depressurizes, air and water get inside. Because of this, the liquid loses its properties.
What signs indicate that you need to bleed the system? The behavior of the car itself will tell you this. If the brake pedal on the Gazelle has become soft, its travel has increased, the car sluggishly slows down, all this indicates problems with the system. But this is not always caused by air or water. It happens that the vacuum brake booster on the Gazelle fails. In such a situation, the brake pedal becomes very hard. This can be determined as follows. Before starting the internal combustion engine, the pedal must be pressed several times so that its travel becomes minimal (remove all vacuum from the system). Next, start the engine and control the pedal: it should fall a little. If this does not happen, the Gazelle will need to be repaired, namely replacing the vacuum booster. Let us also note one more point. The handbrake on the Gazelle has nothing to do with hydraulics. It is mechanical, cable driven, and operates separately from the working system.
Brakes are also bled after any repair work related to this system. This may include replacing the clutch master cylinder, any hoses, or other measures.
How often to pump?
There are no specific regulations here. The system needs to be pumped only after characteristic signs appear. Air is also removed when repairing any parts of the brake system. However, if you replace the pads, it is not necessary to bleed the system. It is enough to check the fluid level and add it, since when the working piston is squeezed, it can pour out through the top.
Note that the liquid itself has a certain resource. It needs to be changed every two years or every 80 thousand kilometers. And you can control the current state of the liquid thanks to special testers, as in the photo below.
Scheme of work, tools and materials
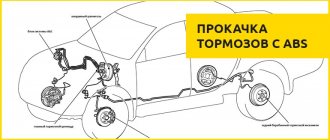
Before you bleed the brakes on a Gazelle, you need to know the bleeding pattern. The operation is performed from the farthest wheel to the nearest one. Thus, work begins on the right rear wheel, then moves on to the left rear. After this, the air is removed on the right front, and then on the left. In simple words, you need to pump in a Z-shaped pattern.
What tools and materials will we need? First you need to prepare the liquid. The Gazelle is filled with the fourth class RosDot product. You will also need a 10 mm wrench to unscrew the fitting. A clean rag will also come in handy, since fluid can flow onto unnecessary areas (discs, pads). In addition, you should prepare a rubber (possibly transparent) hose that will be put on the fitting, as well as a plastic bottle with a volume of about a liter.
Bleeding the ABS brake hydraulic unit of GAZelle Next.
Bleeding the ABS brake hydraulic unit of GAZelle Next.
Other posts on brake systems and ABS brakes GAZelle Next:
Bleeding ABS9 can be done using diagnostic equipment.
To carry out ABS9 diagnostics, it is recommended to use a diagnostic scanner tester ASKAN-10 (manufactured by ABIT LLC, St. Petersburg), with a diagnostic cable Adapter PrM230 (ABIT.471080.310), as well as with an installed ABS9 GAZ diagnostic module (version v1. eleven).
Using the subsection “ Vacuum and filling ”, the procedure for filling the brake system and hydraulic unit with brake fluid is carried out by creating a vacuum.
The test is performed on a stationary vehicle with a special vacuum pumping unit connected.
Attention.
It is not recommended to use this program without additional equipment to create a vacuum and fill the hydraulic unit. After replacing and installing a new unfilled hydraulic unit, it is recommended to use the “ Bleeding Hydraulic Unit ” program.
Using the subsection “ Bleeding the hydraulic unit ,” air is removed and the internal circuits of the hydraulic unit are filled with brake fluid.
Attention.
Bleeding the hydraulic unit is only necessary after installing a new hydraulic unit.
Manufacturer of hydraulic unit, f. Bosch notes the need to use a bleeding device that creates an excess pressure of at least 2 Bar (
2 kgf cm2) in the brake fluid reservoir.
Before bleeding the hydraulic unit, it is necessary to bleed the brake system in the usual way. Pumping of the hydraulic unit is carried out in 4 stages with the following mandatory sequence:
- bleeding the left rear wheel;
- bleeding the left front wheel;
- bleeding the right front wheel;
- bleeding the right rear wheel.
Anti-lock brake system (ABS) device
When braking, ABS regulates fluid pressure in the working cylinders, preventing the wheels from completely locking. Thanks to this, the braking distance is reduced and the driver continues to control the vehicle’s trajectory even during intense braking on snow, sand or wet asphalt.
The principle of operation of the abs system. Video:
The anti-lock braking system includes the following parts:
- Control block. Electronics that change pressure by opening and closing bypass valves. It analyzes information about wheel rotation. When the wheel stops, the valve partially relieves pressure and the pad presses less.
- Sensors that control rotation speed. The devices are mounted on wheel hubs and operate due to the Hall effect. They transmit information to the ECU.
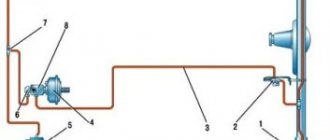
- Hydraulic block. It consists of hydraulic accumulators, solenoid valves for inlet and outlet, an electrically driven pump and damping chambers.
In their normal position, the exhaust valves are closed and prevent fluid from leaving the cylinder. Accordingly, the intakes are open and do not prevent pressure from increasing when the pedal is pressed. When the car brakes, fluid enters the cylinder, increasing the pressure in it. If the wheel starts to slow down too sharply, the ECU closes the intake valve, preventing blocking. If necessary, a signal is sent to open the release valve, which reduces the pressure to a value at which the wheel is unlocked.
The principle of braking GAZ 53
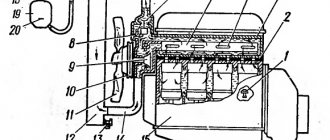
The gas brake system 53 includes actuators and mechanisms that activate the actuators. That is, the mechanism itself is located on the wheel of the car and is engaged in slowing down the rotation of the wheel at the right moment, when the driver desires it. The drive runs throughout the machine and is a way to control the mechanism. First we will discuss how exactly it works. Drive includes:
- Brake pedal.
- Master brake cylinder.
- Hydraulic vacuum booster.
- Circuits and connecting pipes.
The pedal is located inside the car between the accelerator and clutch pedals; it is the pedal that the driver presses when he wants to slow down the car. When the driver presses on it, a force is created that is perceived by the brake master cylinder. The cylinder has the same shape and contains a small piston with a valve. When you press the pedal, the valve in the cylinder closes and the fluid in the circuit cannot leave it, since the circuits of the brake mechanism are completely sealed. The piston with the valve closed begins to move down and builds up fluid pressure in the system. The circuits from the main brake go to each wheel of each axle, so there are two brake circuits. This was done more for security reasons than for technical reasons. Technically, it would have been easier to do one, but if the entire circuit was depressurized, it would be impossible to stop the “lawn.” But if only one fails, then pressing the pedal will still somehow change the situation, but it will be possible. A hydraulic vacuum booster is also installed here, which creates additional pressure on the main brake piston, in order to increase the pressure in the system to a greater extent than can be achieved by pressing the pedal with one foot. The gain is created due to the vacuum that appears in the engine intake manifold. The vacuum booster redirects part of it to the brake cylinder, which creates additional pressure. The condition of the hydraulic vacuum booster must be constantly monitored, because if it depressurizes, air will leak into the intake manifold and this, at a minimum, will cause the car to stall. At most, this can lead to engine failure.
The mechanism itself has a fairly simple design in the form of the use of brake drums on all wheels of the car. There are actually drums on both the front and rear axles, with the only difference being that they are smaller in size at the front. The rear ones have protective screens that prevent failure of the brake mechanism. The moving part here is the drum body itself, which is tightly screwed to the wheel and rotates with it. Inside there are two pads with springs and working cylinders. Springs are necessary to restrain the pads from spontaneous pressing and return them to their original position when the driver releases the pedal. When you press the pedal, the pressure in the circuits presses on the working cylinders, and they press the pads against the horizontal surface of the drum body. The pads are equipped with special friction linings that prevent them from quickly rubbing off on the drum. On trucks, drum brakes have shown pretty good results so far, so if they are kept in good enough condition they can last quite a long time.
Types and types of ABS anti-lock systems
Based on the number of control circuits, there are three types of anti-lock braking systems:
- single-channel - when one wheel is blocked, all four are released;
- two-channel - triggering occurs based on data from the best (high-threshold) or worst (low-threshold) wheel;
- four-channel - each wheel is adjusted separately, which ensures maximum braking efficiency.
Important! Modern cars are equipped with four-channel systems.
Depending on the location of components and maintenance features, there are three types of ABS:
- with components (hydraulic module, valves, accumulator and pump) located in a single unit;
- with components spaced in the form of different units;
- with optional SBC and ESP systems.
Despite the complicated design, it is quite possible to replace ABS brake fluid yourself.
Let's get started
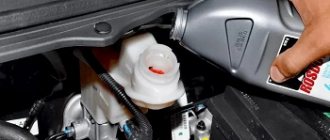
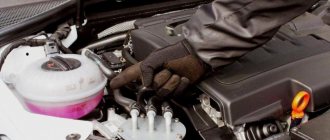
So, we need to get to the back of the “spark” and find the air outlet fitting. We don’t unscrew it yet, but just put on a hose, the other end of which will be lowered into the bottle. If there is dirt on the fitting, it must first be removed by cleaning the area with a wire brush. Also add liquid to the tank to the maximum level.
We recommend: Replacing antifreeze Daewoo Nexia: instructions, draining, flushing, filling
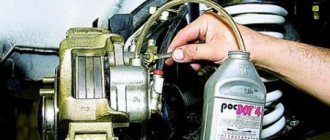
After this, we will need an assistant who, on command, will press the brake pedal and hold it. This is necessary so that increased pressure forms in the system. Otherwise, the liquid will not leave the system. The assistant should press the pedal about five times at intervals of one second. Then you need to hold the pedal. And at this time we carefully unscrew the fitting half a turn. If the hose is transparent, we will see liquid with air bubbles coming out of the system.
After the liquid has stopped flowing, the fitting is tightened. We need to repressurize the system. The assistant presses the pedal five times and holds it. Then the fitting is unscrewed. If the operation is performed several times in a row, you need to add brake fluid. It should not fall below the minimum level. When clean liquid comes out of the circuit, without bubbles, you can tighten the fitting and remove the hose.
After this, they move on to the adjacent rear wheel. How to bleed the brakes on a Gazelle? They operate in the same way. First, clean the fitting from dirt, then install the hose. Add liquid to the tank if necessary. The assistant creates pressure in the system. Then we unscrew the fitting and monitor the condition of the liquid. If the hose is black and you cannot check for bubbles, this can be noticed by ear. When unscrewing, there will be a characteristic noise - air with liquid under pressure comes out. If no noise occurs during subsequent unscrewing, it means that air has already been removed from this circuit.
How to bleed the brakes on a Gazelle at the front? Here the work is done in a similar way. In order not to lie under the car, you can unscrew the wheel by jacking up the Gazelle by the spring (the jack is placed closer to the beam). The sequence of work is the same. First, clean the fitting, put on a hose, add fluid, and create pressure. Then carefully unscrew the fitting and watch how the air comes out.
Proper bleeding of the brake system
Then it turned out that not all people know how to correctly do this generally simple procedure.
And since this unit is one of the most important in the car, the life and moral health of all citizens in the car directly depend on it, I think it makes sense to take it from the comments. I also think it makes sense to add this to the FAQ.
The procedure for bleeding the brake system, according to the Workshop Manual
. 1. The procedure is done together. Before pumping, in any case, we strictly cut off the ABS, if there is one, otherwise pumping can damage it. The ABS is disabled by removing the corresponding 40-amp fuse link in the engine compartment relay/fuse box.
2. Put the car on the parking brake and start the engine. Under no circumstances should you pump it with the engine not running, because then it will be bad for the vacuum booster.
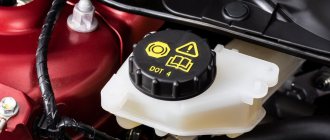
3. Remove the cap from the cylinder filler neck. Top up to full level. We make sure that during pumping the liquid is always at least 1/2 level.
Bleeding the master cylinder:
4. Disconnect from it the tube (near one) going to the rear wheels. Check the fluid level. 5. We give the command to smoothly depress the brake pedal and leave it depressed. 6. We pinch the hole in the cylinder with our finger and give the command to smoothly release the pedal. 7. Release your finger when the pedal returns to its original position. 8. We repeat what is indicated in paragraphs 4-7 until liquid begins to pour out of the hole, while constantly making sure that the liquid level does not drop by more than 1/2.
9. Connect the removed tube to the cylinder and tighten the nut.
10. We give the command to smoothly depress the pedal and hold it.
11. Loosen the nut on the tube. Then press it back. We give the command to smoothly release the pedal.
13. Repeat steps 10-11 until air stops escaping.
14. Similar to the above, then repeat steps 4 to 13 for the tube going to the front wheels.
Bleeding calipers.
15. For right-hand drive cars, the order of bleeding the calipers is: left rear, right rear, left front, right front. For left-hand drive: right rear, left rear, right front, left front.
16. We put a tube on the nipple, which we lower into a jar partially filled with brake fluid. Place the head on the screw. 17. We give the command to pump the pedal three times
at intervals of 1 pump per second
and then hold it.
18. We loosen the screw, watch how the liquid flows out of the tube, then, when it stops flowing, we tighten it. 19. We give the command to smoothly release the pedal. 20. Repeat steps 17-19 until the bubbles stop coming. Usually you have to do this up to 15 times for the rear wheels, and up to 10 times for the front wheels. If air does not flow, then the main cylinder remains air-filled; we carry out the cylinder bleeding described above. 21. After successfully pumping one, we move on to the next wheel. 22. After completing the entire process, we check the result: depress the pedal. If we feel that the pedal is “soft,” we repeat the entire procedure from the very beginning.
23. During the process, we continue to monitor the level. After each wheel, add fluid to the maximum level.
24. After successfully completing the procedure, we close everything with a lid, and if the rubber membrane is jammed, we correct it.
How to properly and quickly bleed ABS brakes with your own hands
The procedure for bleeding the brakes is influenced by the design of the system, the location of components and the presence of additional electronic modules. The correct sequence is important. You need to start by relieving the pressure in the hydraulic accumulator. To do this, you need to turn off the ignition (it is not necessary to start the engine) and pump the pedal.
A simple secret to quickly pumping brakes. Video:
Read how to bleed ABS brakes and stock up on the following materials, parts, accessories and tools:
- spanner;
- a rubber (possibly plastic) hose with a diameter corresponding to the thickness of the fitting tip;
- brake fluid;
- container (necessarily transparent). This is where you will drain the old brake fluid.
You cannot do without an assistant who must press the pedal on command. You will perform manipulations with the fittings that ensure the removal of liquid.
Bleeding ABS brakes, where the components are located in one unit, differs little from the standard procedure. The only thing you need to do is turn off the system by pulling the fuse. This method works on domestic Ladas.
You can take advantage of the built-in pump. Then you will have to pump with the ignition on or even with the engine running. The sequence and order of bleeding the brakes starts with the right front cylinder and looks like this:
- disconnect the terminal of the level control sensor fixed on the expansion tank cover;
- remove the cover;
- open the brake reservoir;
- fill the reservoir to the brim with brake fluid;
- put the hose on the tip of the fitting;
- lower the end of the hose into a container to collect liquid;
- open the fitting by turning it a quarter or half a turn;
- to activate electronic systems, turn on the ignition;
- release the brake;
- wait until the pump expels the airy mixture;
- release the brake pedal;
- Tighten the fitting with a wrench.
The brake bleeding scheme is no different on any car, be it Patriot, Lacetti, Ford, Passat, Gazelle. First, air is removed from the “far” circuit (for “left-hand drive” cars it is on the right), then from the “near” circuit.
Important: When bleeding, keep an eye on the brake fluid level. If it falls below the minimum, the system will fill with air. Then the work has to be done again.
To bleed a system with components located in different places, a diagnostic tester is needed. It connects to the car and allows you to control electronic components using a smartphone or computer. In this case, you will also have to unscrew the fittings and drain the airy liquid. However, no manipulation of the pedal is required. Instead, the valves and electric pump must be activated using the appropriate menu items. This way you can bleed the systems on the VW Passat B6 and other modern cars.
Bleeding the brakes using the Priora as an example
Before you bleed the ABS brakes, you will have to drive the car into a pit. This will help you gain convenient access to the fittings on the rear cylinders and will allow you to avoid removing the discs during operation. On the Priora, the procedure for pumping brakes with ABS does not differ from that adopted on simpler models. The only difference is that the work must be performed by first turning on the ignition. In this case, the solenoid valves will be in the open position.
We recommend: Advantages of rubber mats for car interiors over pile mats
How to properly bleed the brakes on a Priora with abs with your own hands, video:
The work starts from the right rear and is done like this:
- disconnect the wires from the tank lid;
- unscrew the lid;
- Fill the reservoir with brake fluid to the brim;
- remove the protective cap;
- loosen the fitting using a spanner wrench;
- connect a tube to the tip of the fitting;
- lower the tube into the container;
- pump the brake pedal;
- press and hold it in this state (you need an assistant for this);
- open the fitting by turning it with a key;
- wait until the fluid flows out (the brake pedal goes down);
- tighten the fitting;
- pump up the pedal and release the “brake” until liquid that does not contain air bubbles comes out of the tube;
- tightly tighten the drain fitting;
- remove the tube with the spanner;
- put on the cap.
After this, it is necessary to repeat the work on the remaining three cylinders. To access the fittings on the front cylinders, you will have to jack up the car and remove the wheel rim.
Pumping the brakes using the example of “Grants” and “Kalina”
The technology for pumping brakes with ABS on the Kalina and Granta models is no different from that described in the section for Priora. Therefore, you can safely use it1, it is suitable for the entire model range of the VAZ brand.
Advice: after bleeding the brakes, do not rush to leave the garage immediately. It is necessary to check their system functionality. Make sure there are no pedal dips or leaks.
How to properly bleed your car's brakes yourself
The vehicle's braking system must be in good condition and respond to pressure on the brake pedal in accordance with the driver's expectations. The slightest problems with the brakes can lead to a traffic accident, so when the first symptoms of malfunctions appear, they must be eliminated.
Most often, drivers take care of their brakes by promptly changing pads and brake discs. However, system maintenance should not end there. It is equally important to replace the brake fluid in your car on time, and at the same time correctly perform the brake bleeding procedure.
When is it necessary to bleed the brakes?
Each car manufacturer sets its own mileage standards before replacing brake fluid. They usually range from 50 to 70 thousand kilometers. When you completely replace the brake fluid, air enters the system, and you cannot do without bleeding the brakes.
In this case, other situations may arise when it is necessary to bleed the brakes and remove excess air from the system:
- After repair work related to brakes: replacing pads, brake discs, cylinders and other system changes;
- If you experience symptoms of excess air in the brake system. The most striking of these is the “softness” of the pedal. That is, the driver presses the pedal with the usual force, but the brakes do not respond or respond partially. Because of this, the speed of emergency braking slows down, and it is prohibited to operate a car with such a problem.
You can properly bleed the brakes at a service center, where to perform such a service, the technicians have special devices that allow them to complete the job quickly and efficiently. But if you want to bleed the brakes yourself, then there is nothing difficult about it either.
What you need to bleed your brakes yourself
The procedure for bleeding the brakes is quite simple, but it is better to have a partner to carry out the work. This is due to the fact that during the work process one person will need to press the brake pedal from time to time inside the car. If you can’t find a partner, you can replace it with a gas stop, but doing the work will be much less convenient.
In addition to an assistant, to bleed brakes in a garage you will need:
- A standard set of tools is several wrenches to dismantle parts;
- A short-length rubber hose, the diameter of which will be suitable for pulling onto the fitting;
- New brake fluid. Important: You must use the brake fluid recommended by the manufacturer;
- A small plastic container, a brake fluid bottle will do.
Please note: In automobile stores you can find special tools for bleeding brakes. Essentially, they are a combination of plastic containers and rubber hoses. It is not advisable to buy them if you have the opportunity to assemble such a simple structure yourself.
Before you begin bleeding the brakes, you should refer to the service manual for your specific vehicle model. It needs to clarify according to what scheme the brakes should be pumped. In most cases, car manufacturers indicate this information, but if it is not there, then the “brake master cylinder rule” applies. Its meaning is that you need to start pumping the brakes from the wheel that is located as far as possible from the main brake cylinder.
Assume that the brake master cylinder is closest to the front left wheel. In this case, pumping the brakes will proceed according to the following algorithm:
- Rear right;
- Rear left;
- Front right;
- Front left.
By choosing the correct sequence for pumping the brakes, it is possible to remove as much air as possible from the car’s braking system.
How to properly bleed the brakes
Having prepared everything you need, you can start bleeding the brakes. Correctly follow the following algorithm:
- Brake fluid is poured into the brake master cylinder reservoir so that it reaches the top of the reservoir;
- On all wheels, the air release valve is cleaned of dirt and dust to prevent debris from entering the system;
- Next, a little brake fluid is poured into the prepared container, and the hose is pulled onto the wheel air release valve, from which pumping begins. Don't forget to remove the cap from the valve first (don't lose it). The second end of the hose is immersed in brake fluid poured into a container;
- After this, you need to give a command to the person in the car so that he presses the brake pedal. It is necessary to make from 3 to 5 clicks, leaving an interval of about 2 seconds between them. On the final press, the pedal must be locked in the depressed position;
- When the pedal is depressed, you need to unscrew the air valve half a turn. At this point, it is important that the hose remains submerged in the brake fluid. When unscrewing, some of the excess air will pass through it, which will be marked by the appearance of bubbles on the surface of the brake fluid;
- After all the bubbles have come out, you need to screw the air valve back on and give the command to release the brake;
- Next, instructions points 4 to 6 must be repeated several times (usually about 5). This is necessary so that all the air is gone;
- Having completely bled the brakes of one wheel, you need to remove the hose, put the protective cap on the fitting and move on to the next wheels.
Special device for bleeding brakes
There is a brake bleeding device on sale that allows you to independently replace the fluid on cars with ABS and easily get rid of air in the system. You don't even need an assistant for this.
Device for bleeding brakes. Video:
The device is a transparent sealed tank with two tubes. One is connected to the vacuum pump, the second to the fitting. The procedure for pumping the device looks like this:
- connect the device hose to the fitting;
- use a vacuum pump to pump out the brake fluid into the reservoir;
- tighten the fitting.
Thanks to the transparent body of the tank, the presence of air in the liquid can be easily determined visually.
Brake system of a GAZ 53 car
GAZ 53 is an old worker who has been plying our roads for a very long time. Although they have not been producing it for a good 25 years, there are still enough of these cars. They are especially relevant in villages where there are no roads as such, and in the spring such impassability begins that not a single cool jeep can drive through them. The truck is quite roomy, but it requires constant care over its 30-plus years, the consumption of this car is approaching 20 liters per 100 kilometers of road, and the double-squeeze gearbox and the lack of power steering require a certain skill to drive the car. Often drivers who have never driven such cars fail to control the car and have problems later. In addition, engaging gears without double squeezing is fraught with extremely rapid breakdown of the gearbox. But with proper care, the car is extremely reliable and can withstand heavy loads.
Vacuum booster diagnostics
Often, a sign of depressurization is unstable engine operation (tribbing). This happens due to air entering the intake manifold. It sharply depletes the air-fuel mixture entering the cylinders. If the pedal does not press when the car is running, first of all you should check the reliability of the connections.
In addition, when the system depressurizes while the engine is running, a characteristic hissing sound is heard from the vacuum booster.
To pinpoint the problem, turn off the engine and wait a few minutes without pressing the pedal. If after this time the pedal remains hard, the most likely cause is a broken check valve.
It is very easy to diagnose the correct operation of the vacuum booster. To do this, without starting the car, you should “pump” the pedal, then, continuing to hold it, start the engine. If the vacuum seal is working properly, the pedal will go down.
Methods for checking a vacuum booster
There are several ways to check the vacuum booster. First you need to start the engine. A vacuum will be created in the system. Next they press the brakes. If the brake pedal is hard, then there is a fault in the hose or booster. You need to turn off the engine and wait 5 minutes, but do not apply the brakes.
To specify the malfunction, you need to press the pedal. If it continues to be hard, then in most cases there is a problem with the vacuum booster valve.
There is another way. The engine must be turned off. To relieve the vacuum in the brake system, press the brake pedal several times. Then the engine is started, but the brake pedal is not released. If the pedal goes down, then there is no problem with the amplifier.
The second problem is the soft brake pedal. This may indicate several malfunctions at once. More precisely, there are several reasons why the brake pedal can become soft. Soft brakes mean the brake pedal sinks.
GAZ 3110, ZMZ 402, 1999 brakes are completely stock. I mean, there are no brakes. — if you start to slow down in advance and press the brake pedal softly, it falls through, there are practically no brakes. grabs it immediately, but very weakly. you have to press the pedal further and further. when the pedal is already pressed to the floor, the car begins to brake a little harder, but still weakly. Sometimes you have to release the pedal and brake again. — if you press the pedal sharply and quite hard, it will stick up about 1/3 of the way, and the wheels will also stick up. then the braking distance from a speed of 60 km/h is approximately 5 - 5.5 meters - there is also this “nonsense” - after pressing the brake pedal in about 40% of cases it does not return. The brakes continue to slow down weakly. = GTZ is new, the vacuum seal has been changed (installed as a known working one), the valve and vacuum hose are new, the pads are practically new (no more than a quarter of wear), the calipers and brake cylinders are not sticking, the drums are within normal limits (turned), the brake discs have recently been changed, the return spring There are pedals, the brake system is bled. what to watch? where to dig? how to get the brakes back?
We recommend: Idle speed fluctuates after cleaning the throttle body
PS, don’t offer vacuum cleaners and gas turbine engines from monks or gazelles. Previously there were normal brakes, the other 2 cars have normal brakes. I just want to figure out what is the reason here?
Today we will look into the reason why the brake pedal has become hard or, on the contrary, very soft. Automobile manufacturers provide such behavior of the pedal when pressing it does not cause any dips or vibrations, and to activate the brake system it is not necessary to apply much force to the pedal.
However, there are times when her behavior when pressed causes concern. Either the brake pedal sinks to the floor, or, conversely, becomes excessively tight. Both of these options are unacceptable and indicate technical problems with the brake system.
Before repairing, you need to understand what exactly needs repair or replacement. Below we will look at the most likely causes of malfunctions and possible options for eliminating them.
Test 1
The car must be started and allowed to idle for about 5-7 minutes. Next, the engine is turned off, and the driver needs to fully depress the brake pedal to create a vacuum in the brake booster. The pedal is then released and pressed down again.
If there is a problem with the vacuum brake booster, the second time you press the brake pedal, the pedal travel will be significantly less than the first time because vacuum can no longer be created. In a situation where the second press does not differ from the first along the pedal stroke, we can conclude that the system is working properly or, if there is no certainty, move on to the next test.
Test 3
The third way to check the vacuum brake booster allows you to determine whether there are air leaks. To carry out diagnostics, you need to start the car engine. Next, the pedal is pressed all the way and the engine is turned off.
Has the brake pedal become hard?
The vacuum booster is responsible for creating the necessary pressure in the brake system; accordingly, if it is not working properly, the driver simply cannot press the pedal:
- The vacuum booster air filter is clogged. The solution is to change the filter element;
- The valve body is stuck in the vacuum chamber. You will have to change the vacuum booster assembly;
- Damage to the amplifier diaphragm, nothing can be done here, you will have to change it;
- Tip failure. Again a replacement;
- The check valve is not working properly. Solved by replacing it;
- Violation of system tightness. Depressurization can occur due to damage to the hose connecting the intake manifold and the “vacuum tank” or loosening of the clamps. In the worst case, it is solved by replacing the hose, in the best - by tightening the clamps;
- Swelling of the sealing rings in one or more working cylinders. This happens due to the use of low-quality brake fluid, or contact with fuel and lubricants on the rings. Hardly anyone now burdens themselves with rebuilding the working cylinders; it’s easier to simply replace them along with the brake fluid.
Brake system repair
Repair of the GAZ 53 brake system must begin with a pressure diagnosis. If everything is in order with it, as well as with the pads (no more than natural wear), then you need to study the operation of each circuit. It's not a problem if only one of them doesn't work. At the same time, the car retains the ability to operate, but during sharp braking there may be a skid. Most likely, this is either a damaged brake drum, or oil getting into the area of the brake pads and disc, or a faulty power steering.
When the brake circuit of the rear GAZ 53 is faulty, the troubleshooting should begin with the shut-off valve. You need to understand that one side functions both due to hydraulics and due to rarefied air, but it cannot get beyond the limits of that same valve and acts in exactly the same way as brake fluid - it transmits force.
Problems with hydraulic boosters can only be corrected by replacement, and immediately after installing it, the pressure must be adjusted and, in fact, the brakes must be bled. This is done until the rod can move normally when the pedal is pressed without excessive force.
If the rear GAS brake drum is damaged, you will have to change all the bent bushings, as well as the pads themselves.
This must be done very carefully, as metal fragments and sawdust may remain there; all of them must be removed, otherwise overheating will occur during braking. And this, by the way, is the main drawback of the GAZ brake - an open system in which any debris can get under the block.
Brake pads for Gas 53
Bleeding the brakes is done to remove air from the pipes and the cylinders themselves. If everything is done correctly, the signal button will go out after turning on the engine and 10-20 pedal presses. Otherwise, you need to look for a hole through which brake fluid is leaking.
The brake pedal falls
There are several possible reasons for increased pedal softness, and the most common is air penetration into the brake system. Air may get in due to insufficient brake fluid level. To remove air, the brakes must be properly bled.
The softness of the pedal can also be caused by malfunctions of the main or working brake cylinders, for example, due to boiling of the brake fluid or jamming of the pistons.
Regardless of whether the brake pedal has become hard or soft, this should immediately alarm any driver; continuing to drive such a car means endangering not only yourself, but also those around you. And if it is not possible to fix the breakdown on the spot, it would be right to contact the nearest car service center.
Brake device
The brake system of the GAZ 53 is also a representative of the previous generations of the automotive industry and cannot boast of a minimum braking distance or extremely effective braking. As a rule, it is generally impossible to stop this car abruptly, but, equivalent to this fact, it does not accelerate to too high speeds. But those who still operate this car still have to somehow monitor its technical condition of the braking system. This is what we will talk about today.
What should you pay attention to?
Before bleeding the brakes on the Gazelle Business, you need to find out what the fluid level is in the tank at the moment. You need to control the level every time you move from one wheel to another. The liquid must not drop below the minimum, otherwise a new portion of air will enter the system.
Sources
- https://avtorazbor61.ru/drugoe/kak-prokachat-tormoza-na-gazeli-3.html
- https://remontautomobilya.ru/kak-prokachat-tormoza-s-abs-abs-poshagovaya-instrukciya.html
- https://autolot.su/tugaja-pedal-tormoza-gazel/
- https://kraniauto.ru/raznoe/kak-uluchshit-tormoza-na-gazeli.html
- https://inkam-auto.ru/raznoe/kak-uluchshit-tormoza-na-gazeli.html