05/25/2021 5,691 Sensors
Author: Victor
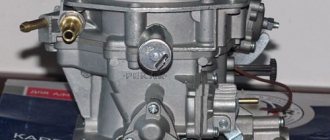
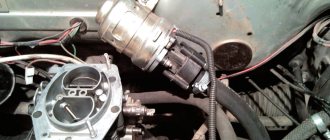
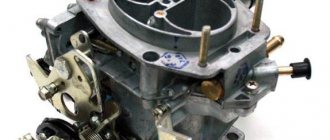
VAZ 2109 and 21099 cars are equipped with a variety of sensors and regulators designed to ensure proper operation of the power unit as a whole. One of such devices is the sensor for turning on the VAZ 2109 carburetor fan, as well as the DTOZH - antifreeze temperature controller. Find out more about the devices in this article.
[Hide]
Revision instructions
Remove the air intake box (popularly called “boot”):
- In the interior, unscrew 4 nuts using a 10mm wrench;
- In the engine compartment, an assistant holds the bolts with the same key;
- Remove the air intake.
Remake the “boot” and install a fan in it:
- Cut off part of the plastic a little from the side so that the fan housing does not interfere with the hood lock;
- We cut off all the protruding parts of the fan mount and place it inside the “boot”;
- Secure the fan, securing its housing with sealant.
- We close the space around the fan nozzle with suitable material to prevent air outflow;
- We install the casing with the fan in place, laying the wires;
- We check that the hood closes without problems.
The result should be a design as shown in the video:
The damper can be left in place, but if it is removed, there will be no additional obstruction to the air flow into the cabin.
Sensor
Don't rush to change the fan right away. Often the problem was a sensor, relay, fuses, or simply broken wiring. First of all, we will check the sensor and also tell you about the features of replacing it.
Signs of a faulty sensor may include failure to turn on when the coolant temperature is high or turning on when the engine is cold.
The fan switch sensor is located at the bottom of the radiator. A couple of wires come off it.
Searched device
Accurate check
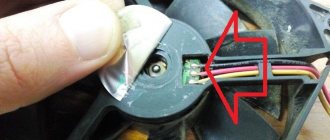
In order not to rush to conclusions, experts first advise checking the sensor for functionality.
- If the fan does not want to turn on according to the standard circuit, try shorting the wires that go to the sensor. If the fan is running and the sensor is hot, the problem lies there. If the radiator is hot during testing, the sensor housing may be warm. This suggests that you should check the condition of the thermostat and the coolant level in the tank. You may need to change and top up accordingly.
- If, after closing the wires, the fan does not turn on, the sound of the relay being activated is not observed, check the condition of the relay and fuse. It is number 4 in the mounting block.
- By shorting the wires, the fan did not start, but the relay worked. Here you should check fuse number 8.
- If the fan starts randomly on a cold engine, it does not turn off for a long time, try disconnecting one wire from the sensor. If the fan stops, the sensor contacts are stuck. If the fan continues to turn, sticking has occurred on the contacts of the control relay.
Having discovered that the regulator has failed, there is nothing left to do but change the radiator fan activation sensor.
Replacing the sensor
Changing the sensor is quite simple:
- Turn off the ignition;
- Drain the coolant from the expansion tank;
- Disconnect a pair of wires from the sensor terminal block;
- Using a 30 mm wrench, unscrew the regulator from its seat. You shouldn’t apply a lot of force; you risk breaking the seat;
- Following the reverse sequence, install the new sensor.
Disabling the sensor
You can change the sensor without draining the coolant. To do this, you need to quickly unscrew the old regulator and screw in a new one in its place. A small part of the coolant will spill out, but you won’t have to drain it for a long time and then pour it back in.
Reasons for fan failure
There are a number of reasons why the fan sensor can eventually fail other than the sensor itself. Therefore, they should first be excluded to make sure that the sensor is to blame.
Reasons for fan failure include:
- The fan has failed. It can wear out, lose integrity, and receive mechanical damage. It will be more expensive to replace it compared to the sensor, but there is no choice.
- The chain has broken. When testing a sensor, the method of closing two of its contacts is usually used. But if the wiring circuit is damaged, this will not be possible, and due to inexperience, all the blame will be placed on the regulator.
If checking the contacts does not produce results, the fan does not respond, try connecting its contacts directly to the battery.
Operating principle of the stove
- The liquid is heated to a certain temperature and enters the radiator of the VAZ 2108 stove.
- To ensure constant circulation, rubber tubes are installed between it and the liquid cooling system, fixed for better fastening with clamps.
- Warm air enters the car interior through several openings. The heater motor with its own fan is designed to distribute air evenly.
- The air flows directly to the feet of the driver and passengers, and also exits to the panel. The heat flow is then delayed by the dampers, and therefore the air is cooled. Thus, cool air is supplied to the windshield.
If the operation of the furnace is not satisfactory, it can be modernized. This is done by installing fiberglass.
The action goes like this:
- It is necessary to disassemble the stove, wash all parts and begin assembly. This action can also be used to visually inspect parts for damage. For example, the casing ear often breaks.
- After this, you need to glue all the flaps and fill the seams with sealant. Glue the casing and wait a while until the sealant is stable.
- Assemble the “insides” of the heating system and cover it with fiberglass. Thanks to this, the temperature will increase to 10 degrees.
Checking and replacing DTOZH
There are several options for diagnosing the device - the first one:
- The negative probe from the voltmeter must be connected to the engine and turn on the ignition.
- Using a tester, it is necessary to determine what voltage parameter is generated during movement.
- If the DTOZH is working, then the voltage should be at least 12 volts when the battery is fully charged. If the obtained indicators are lower, it is necessary to replace or repair the device.
Temperature and Resistance Correspondence Table
Second diagnostic method:
- You will need to set the multimeter to voltmeter mode - measurements are carried out in the range from 100 Ohms to 10 kOhms. Also prepare a thermometer that can measure temperatures greater than one hundred degrees. The regulator should be removed and placed in a container with antifreeze.
- You need to warm up the coolant. As a result of an increase in temperature indicators, you need to monitor the readings given by the thermometer.
- Using a multimeter, you should measure the resistance of the DTOZH at different temperature conditions. The obtained parameters should be compared with those indicated in the table above.
Causes of fan malfunction
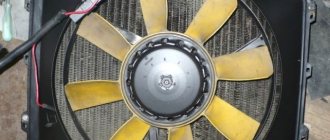
In a VAZ 2109 car, the cooling system fan may make extraneous sounds during operation. There can be many reasons for this behavior:
- It is possible that the bolt that secures the fan to the engine has simply become loose. Because it doesn't hold up well, it wobbles while riding. Actually, this leads to the formation of incomprehensible sounds.
- The radiator is not installed correctly. That is, he is not in his place. Perhaps it lies on the cross member of the suspension, which is also not very good.
- The fan may have broken on one side, causing an imbalance.
The cushions are not clamped well, so they do not hold the motor well. The cushions may be compressed (this happens after long-term use). As a result, the motor vibrates.
- If the fan makes a loud noise, it means it lacks lubrication (you need to urgently lubricate the engine with oil).
- The bearing broke. This problem occurs because the impeller has been damaged for a long time, so there is an imbalance in the system.
Parameters of the VAZ 2109 injector cooling system
The cooling system of the VAZ 2109 injector is practically no different from other VAZ cooling systems. The proud prefix “injector” may indicate that the system has a thermostat of a different configuration, but this is not a fact. It can also be a regular number eight. We won’t start spewing letters about how a cooling system is necessary and you can’t go anywhere without it; even a child can understand this. We present only some book parameters for precise control of system performance. Parameters are temperature conditions that the system must maintain and adjust, depending on the condition of the engine.
- The volume of the cooling system of the nine is 7.8 liters. They pour whatever they like into the system, but we would not recommend following the lead of genetic memory and pouring Antifreeze into the expansion tank. Real Antifreeze A40 has not been produced for twenty years, and what is sold under this brand is rare rubbish, not recommended for use. The Nine will happily swallow any coolant. recommended by AvtoVAZ or similar in composition.
- 99 degrees is the closing temperature of the fan motor relay. 93 degrees is the contact opening temperature, then the fan turns off. Knowing this, you can find out the approximate coolant temperature without a suspicious thermometer on the panel. The normal operating temperature of antifreeze is 85-95 degrees.
- The thermostat of the cooling system divides it into two circuits - large and small. This is convenient in the cold season, when, in order to quickly warm up the engine, the thermostat valve closes a large circle and the antifreeze circulates in a small circle. When it warms up to operating temperature or so, the valve opens and the antifreeze enters the large complete cooling circuit.
- The nine pump is of a centrifugal type and is driven by a timing belt. It must create a pressure in the cooling system of about 1 atmosphere. The impeller is made of metal-ceramic, the pump shaft rotates on plain bearings, which must be lubricated from the factory with Litol 24 grease. It is not maintained during operation, and in case of failure, in theory, cannot be restored.
How to replace a fan
If replacing the impeller does not help, then you will have to take extreme measures - replace the cooling fan itself.
To do this you need to do the following:
- Open the hood.
- Take off .
Protrude the impeller. Any convenient tool will do for this.
- Using a 13mm socket, unscrew the nut that secures the impeller.
- Under no circumstances should you lose the key that is inserted into the motor shaft. Otherwise, you will have to make something similar to it yourself, and this is not so easy.
- Replace impeller blades.
Insert it into place (if necessary, you can use a new impeller). The nut needs to be tightened as tightly as possible, because if the impeller dangles, it will soon break again.
- Before you put the fan in place, you need to install two rubber washers. This will ensure that the vibration coming from the fan will be less noticeable.
- To easily put the mount back on the stud, you can make a small slot in the lower mount of the frame.
Insert the fan. Tighten all the nuts that secure it.
Double fan
In the summer, the “nines” especially overheat. Therefore, in order to ensure the maximum, you can install two instead of one fan. To do this:
- First of all, you need to make another mount for the fan.
- In addition, you also need to make a small hole in the fan itself so that it can be easily installed in place.
- Disassemble the motor and remove the magnets (it is better to use a screwdriver to prevent them from breaking).
- Use a grinder to cut off the previous cylinder fasteners and weld new ones in their place.
- Reassemble the motor in reverse order.
- Screw the frame to the motor.
- Install the blades.
- Connect two fans to the blades.
The cost of repairing a cooling fan at a car dealership is not too high. However, if you do this work yourself, you will have to pay even less. We must not forget that before this it is worth reviewing various photos and videos on this topic. Perhaps the instructions we offered will also be useful.
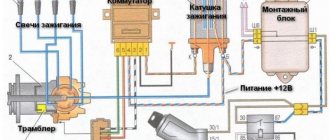
Scheme for switching on a VAZ 2109 fan using a relay
It is not difficult to force the VAZ 2109 fan to turn on; you just need to think a little and understand the principle of operation of the entire system. The need to cool the radiator arises when you are driving through traffic jams (and it doesn’t matter at all whether this happens in winter or summer). In hot weather, of course, overheating occurs more strongly.
But when driving for a long time in the starting mode and instantly stopping, the antifreeze in the cooling system simply boils. Today we will look at the reasons why the VAZ 2109 fan does not turn on in automatic mode, replace the temperature sensor, and also draw up a small diagram for forcing the fan to start. The latter turns out to be useful, since the quality of thermal switches leaves much to be desired.
Replacement with draining antifreeze
If you discover that the device is not functioning correctly or is completely inoperable, you need to replace it with a new one. To perform dismantling, you must follow the instructions:
- If the engine is hot, it must be allowed to cool;
- De-energize the vehicle ground by disconnecting the negative terminal of the battery;
- Remove the expansion tank cap;
- Remove the radiator cap;
- To prevent contamination, it is necessary to place a container under the drain hole;
- Drain the antifreeze from the radiator. There is no need to drain antifreeze from the cylinder block. To unscrew the drain plug, just a hand is enough, so no tools are needed;
- When the liquid stops flowing out, you should return the plug to its place to avoid its loss;
- Remove the terminal with wires;
- Use a wrench to carefully unscrew the sensor.
To install a new sensor you must:
- Check the condition of the copper sealing washer. In most cases, it will require replacement with a new one. Using an old gasket is fraught with antifreeze leaks;
- Screw in the new sensor, making sure that the sealing washer fits evenly;
- Connect the terminals with wires;
- Pour antifreeze into the expansion tank. If the drained antifreeze is of good quality, you can return it. Otherwise, fresh fluid must be used;
- To eliminate air pockets in the cooling system, it is necessary to purge it;
- Replace the radiator cap;
- Close the expansion tank;
- Connect the negative terminal of the battery;
- Warm up the engine until the sensor responds.
If after these steps the fan does not turn on when the required temperature is reached, it is necessary to continue troubleshooting in other possible places. Before continuing to search for a breakdown, it is advisable to read the error log from the ECU using a diagnostic scanner.
What is a stove fan
A car heater, which is popularly called a stove, is designed to perform a simple and at the same time important function - heating the interior. In addition, the device helps eliminate fogging of windows in cold and damp weather.
During normal operation of the heating system, the temperature in the interior of the “nine” should be maintained at +20 ˚С with the same indicators outside, but only with a minus sign. In the legs, with maximum heating mode, the value should be maintained at +25 ˚С. One of the important components of the stove, in addition to the radiator, is the fan. The purpose of this device, its malfunctions and repairs should be considered in more detail.
Purpose of the device
The purpose of the motor is to increase the efficiency of the heating system and air circulation in the car. Its operation is based on air intake from outside and its subsequent supply into the cabin through the radiator. As a result of the air flow passing through the heat exchanger, the air enters the cabin already warmed up.
Heater operation diagram: a - VAZ 2108; b - VAZ -2108–01: 1- fan impeller; 2 — air duct for heating the windshield; 3 — windshield heating flap; 4 — damper for heating the driver’s feet; 5 — central nozzle flap; 6 - central nozzle; 7- radiator; 8 — heater control damper; 9 — driver’s foot heating window; 10 - internal ventilation duct
Where is the motor located on the VAZ 2108/09
The heater motor on the VAZ 2108/09 is installed in a niche in the engine compartment in front of the windshield, which is radically different from the design of the heater of classic Zhiguli cars, which have a fan installed in the cabin. The unit is an electric motor with an impeller mounted on it, through which air is pumped into the cabin.
The heater motor on the VAZ 2108/09 is installed in a niche in the engine compartment in front of the windshield
Connection diagram
To make it easier to find possible faults with the fan, an installation diagram may sometimes be required, the main components of which are:
- fuse mounting block;
- egnition lock;
- additional resistor;
- fan motor;
- operating mode switch.
The heater motor connection diagram consists of a fuse mounting block, an ignition switch, an additional resistor, a fan motor, and an operating mode switch
Typical faults
As with any mechanism, problems can occur in the heating system (video author: Andrey Kuzemsky).
If the VAZ 2108 heater motor is broken, you can understand this by comparing some symptoms:
- If the motor does not work when switching operating modes, the cause of the breakdown may be hidden in the resistor. When repairing, you need to replace the resistor with a new one, because it cannot be repaired.
- If the fuse is blown, you need to check the insulation of the armature located on ground. There may be a short circuit.
- If, when switching modes, the VAZ 2108 heater fan rotates at the same speed, this may be a consequence of contamination or oxidation of the collector. In case of repair, it is worth cleaning the collector and, if nothing has changed and the fan continues to act up, you can replace the bearings.
If the VAZ 2108 stove motor does not even show signs of life, then the reason is not in its design, but in a broken circuit. To find out if this is true, you can use a voltmeter.
How to balance an impeller
There are two balancing options:
- The first is to twist a thin wire onto the fan blade. See on which side the imbalance is more pronounced. Try to align the impeller with a smooth movement until the extraneous sounds disappear.
- The second is to insert an axis into the hole, the diameter of which is similar to the diameter of the hole. Install the impeller on two supports located in a horizontal position. If there is an imbalance, you can get rid of it by grinding a heavier blade, or by gluing a small weight to a blade with less mass.
You can replace the four-blade impeller (this is a standard part) with an eight-blade one.
On sale you can find both individual impellers and complete with a motor. The latter, naturally, are much more expensive. Therefore, you should not choose the second option if the motor is working properly (usually it just needs to be lubricated so that it works better). You should not buy the cheapest impellers. They usually have minor defects.
Replacing the VAZ 2109 stove fan
Many owners of domestic cars are faced with a problem when, when they turn on the heater, creaking and other extraneous sounds begin to be heard from the dampers. “Nines” are no exception in this regard. The only solution in this case is to replace the VAZ 2109 heater fan
.
or even better, replacing the heating system motor assembly
. Note that as a temporary solution, if for some reason you are not ready to immediately change the parts, you can lubricate all the rotating parts, but such repairs will not last long and very soon the extraneous sounds will return.
As part of this publication, we will tell you how to replace the VAZ 2109 heater motor assembly, but if you decide that it is worth replacing only the fan, you can use the same principle as for the motor, with one exception - at the final stage You will not replace the entire structure, but only the fan.
Let us remind you that in the previous article, Replacing the heater (heater radiator) of a VAZ 2109, we told you what and how to do when you encounter the most common problem with the VAZ 2109 heater - a radiator leak.
What is required to replace the VAZ 2109 heater motor?
The procedure for replacing a stove motor is quite simple and you will need a minimum of tools: 1. Phillips screwdriver.2. Ratchet with a head with a diameter of 10 millimeters.3. Flat-head screwdriver (needed in rare cases to pick up baked-on parts).
Algorithm for replacing the VAZ 2109 heater motor assembly
As mentioned above, the procedure for replacing the fan and motor is quite simple. At the same time, you need to clearly understand what exactly you are doing and in what sequence the manipulations need to be performed. In this regard, we decided to describe the work on replacing these elements of the heating system in the form of step-by-step instructions.
Step 1:
The first thing you should do is remove the plastic trim of the heating system. It is located under the hood of the car and is secured with five bolts.
Step 2:
Now you need to move the protective cover of the heater motor. To do this, you must remove the rubber band that serves as the hood seal.
Step 3:
Unscrew the two mounting bolts that secure the fan and motor.
Step 4: Next, you must move into the car interior. Here you should sit in the driver's seat and feel the positive wire plug under the steering wheel, and then disconnect it
It is important to note that this inconvenience is due to a design mistake by VAZ engineers, who for some unknown reason decided that soldering the wires directly to the motor was a good idea
Step 5:
After you finish disconnecting the positive wire, you need to move on to the negative one. Here you will face even more inconveniences than with the positive wire. The whole point is that you will also have to act by touch, but here you will also have to unscrew the nut that secures this very negative wire. This nut is unscrewed using a ratchet and a 10mm socket.
Step 6:
Let's go under the hood again. This time we need to pull out the motor. This is done in the direction the car is moving.
Step 7:
Now the stove motor is directly replaced, after which you need to assemble the structure in the reverse order.
Be very careful when restoring the electrical circuit, since an incorrect connection can, at a minimum, force you to disassemble everything all over again, and at maximum, ruin the new motor. As we said, the procedure is not complicated, but quite inconvenient and requires concentration, but if try, then everyone can cope with it. It remains only to add a few words about the prices of new spare parts. So, a motor will cost you about 500 rubles, but a motor assembled with a fan will cost at least 1000 rubles.
Replacing a heater fan on a Lada Niva Replacing a heater fan on a Lada Niva is a very common type of repair. The thing is that the heater fan motor is the most vulnerable point in the heating system of this car. The vulnerability lies in the bushings, which are
Replacing the VAZ 2114 heater fan If you hear extraneous sounds during operation of the car’s heating system, then in the vast majority of cases the heater fan is to blame and it needs to be replaced.
What should the temperature be?
The temperature arrow tends to the red zone - soon overheating
According to the international automobile convention of December 1, 1992, where 92 representatives of the auto industry gathered, it was decided to establish a single standard for engine operating temperature.
This indicator is 90 degrees Celsius with a maximum permissible deviation of no more than 3 degrees Celsius.
With the development of the automotive industry and a sharp leap in technology in the 2000s, in 2004 it was decided to revise this indicator. So, having considered all the facts and analyzed the design features of many cars, it was decided to establish a floating indicator with marginally acceptable standards, which, today, is 85-105 degrees Celsius.
Operating range on the VAZ-2114
If we consider cars produced at the AvtoVAZ plant, including the VAZ-2114, then the operating temperature range for engines is considered to be 87-103 degrees Celsius. If we consider this issue from the point of view of functionality, then this is the optimal indicator.
If the temperature drops below the limit level, then the Samara-2 engine loses dynamics and power, and if it is higher, it can simply boil and cause great damage. Therefore, if malfunctions associated with the cooling system occur, they must be eliminated as soon as possible.
Cooling system design
Before considering cooling system malfunctions, as well as methods for eliminating them, novice motorists should study the cooling system.
So, let's look at what elements it consists of:
Cooling system design
1 – element in the form of a plug for the expansion tank; 2 – expansion tank; 3 – hose for draining liquid from the pipe; 4 – hose passing between the radiator and the expansion tank; 5 – hose leading from the radiator; 6 – tank to the left of the radiator; 7 – aluminum tube; 8 – plug systems; 9 – tank to the right of the radiator; 10 – drain plug; 11 – middle of the radiator; 12 – casing for electric fan; 13 – plastic wings of the electric fan; 14 – electric motor; 15 – toothed pump pulley; 16 – pump impeller; 17 – camshaft drive belt; 18 – engine block; 19 – pump pipe; 20 – radiator hose with supply function; 21 – heater radiator hose with drain function; 22 – hose supplying coolant to the throttle pipe; 23 – exhaust pipe; 24 – hose for refilling; 25 – heater radiator hose with supply function; 26 – thermostat; 27 – coolant temperature sensor; 28 – coolant level indicator sensor.
Main malfunctions and ways to solve them
The operating temperature of the engine is directly affected by the health of the cooling system.
Almost every node can affect changes in this indicator in both directions, so it is necessary to monitor its serviceability and prevent changes. It is temperature fluctuations that can lead to breakdowns of other engine systems. So, let's look at the components of the cooling system, their malfunctions and solutions.
Cooling radiator
Dirty engine radiator
The radiator is considered one of the most reliable parts. There are not many reasons that can lead to product failure, but they can be prevented. A clogged part can lead to an increase in engine operating temperature, but regular cleaning of the internal and external surfaces will bring it back to normal.
The formation of cracks can cause the radiator to leak, but this problem can be dealt with. There are two methods to solve the problem: soldering the surface or replacing the product completely. Thus, repair and restoration work normalizes the operation of the part, as well as the operating temperature in the system.
Pipes
Dirt and rupture of the SOD pipe can lead to a change in the operating temperature of the motor
The cooling system pipes can directly affect the temperature increase in the system. This is due to the fact that if cracks or delaminations form in them, it may happen that the coolant begins to leak out. In turn, the lack of “cooling” will lead to an increase in temperature, which can affect both the operation of the main power unit and increased wear.
Water pump
Leaks on the cylinder block from the timing side indicate that the pump has failed
The water pump or water pump should drive coolant through the system , but if this unit breaks down, low pressure can lead to slow cooling, which in turn will increase the operating temperature of the engine. Often, the water pump will simply leak and driving the car will no longer be possible.
The fault can be easily treated by replacing the part.
Thermostat
Thermostat operation diagram at different temperatures
DIY repair
To carry out repairs yourself, you need to use the following tools:
- a Phillips head screwdriver;
- 10mm wrench.
When dismantling, you need to remove the plastic trim, which is located on the outside of the windshield. To remove it, you need to open the hood and remove the 5 bolts that secure the trim to the body. Remove the rubber seal from the engine compartment and pry the casing with a screwdriver to get to the motor and oven fan. Now you can remove the motor. It is attached to the body of the VAZ 2108 with two bolts.
When the clamps are disconnected, you can turn off the power and disconnect the positive wire of the furnace under the dashboard. The negative one is attached over a special thread and pressed down with a special nut. You need to unscrew the nut by touch and fold back the negative wire. By disconnecting the wires, you can remove the motor and install a new fan. The entire structure is assembled in reverse order.
It is important to note that breakdowns associated with the stove also depend on which panel is installed on the VAZ - low or high. Both have their downsides
For example, on a high one the central flap does not open completely. It is she who is responsible for supplying cold and hot air to the car interior. To solve this, you need to adjust the damper. And to get to it you need to disassemble the dashboard.
If we talk about the low panel, this is where the thermostat often breaks. Of course, if it wears out, the oven will not work. It is recommended to change it every two or three years. And if replacement does not solve the problems, it is worth replacing the hoses that connect the stove and radiator.
Work completion time
Installation time – around 1 hour
.
Cost of work
For replacement or installation, check with the car service technician.
At your own risk, you must do the following: drain the antifreeze from the radiator, disconnect the sensor power wires, and then unscrew the sensor from the radiator housing. Then install the new sensor and perform all steps in reverse order. Before installing a new sensor, it must be checked for functionality using an ohmmeter - lower the sensor into water and heat it until the sensor responds. If the sensor is working properly, then after completing the steps described above, the sensor replacement can be considered complete.
Don't play with fire, make an appointment with us and rest assured about the performance of your car! Call us now.
We replace sensors on all cars listed below:
| Volkswagen | Audi | BMW |
| TRANSPORTER | A3 | 1 series |
| TOURAN | A4 | 3 series |
| TOUAREG | A5 | 5 series |
| TIGUAN | A6 | 7 series |
| SHARAN | A7 | X1 |
| POLO | A8 | X3 |
| PASSAT CC | Q3 | X5 |
| PASSAT | Q5 | X6 |
| GOLF | Q7 | Z4 |
The design of modern cars involves the use of an electric drive for the engine cooling fan. An electric drive can provide more comfortable conditions for engine operation: the use of an electric fan allows not only to reduce fuel consumption, but also to completely eliminate forced cooling of the engine at high speeds.
Heater fan VAZ 2108 in Moscow
An “Online consultant” is available on the seller’s website. To go to the site, click “Go to store”
“Order in one click” is available on the seller’s website. To go to the site, click “Go to store”
An “Online consultant” is available on the seller’s website. To go to the site, click “Go to store”
“Order in one click” is available on the seller’s website. To go to the site, click “Go to store”
A toll-free number 8-800 is available on the seller’s website. To go to the website, click “Go to store”
“Order in one click” is available on the seller’s website. To go to the site, click “Go to store”
An “Online consultant” is available on the seller’s website. To go to the site, click “Go to store”
“Order in one click” is available on the seller’s website. To go to the site, click “Go to store”
An “Online consultant” is available on the seller’s website. To go to the site, click “Go to store”
“Order in one click” is available on the seller’s website. To go to the site, click “Go to store”
An “Online consultant” is available on the seller’s website. To go to the site, click “Go to store”
“Order in one click” is available on the seller’s website. To go to the site, click “Go to store”
An “Online consultant” is available on the seller’s website. To go to the site, click “Go to store”
“Order in one click” is available on the seller’s website. To go to the site, click “Go to store”
An “Online consultant” is available on the seller’s website. To go to the site, click “Go to store”
“Order in one click” is available on the seller’s website. To go to the site, click “Go to store”
An “Online consultant” is available on the seller’s website. To go to the site, click “Go to store”
“Order in one click” is available on the seller’s website. To go to the site, click “Go to store”
An “Online consultant” is available on the seller’s website. To go to the site, click “Go to store”
“Order in one click” is available on the seller’s website. To go to the site, click “Go to store”
An “Online consultant” is available on the seller’s website. To go to the site, click “Go to store”
“Order in one click” is available on the seller’s website. To go to the site, click “Go to store”
An “Online consultant” is available on the seller’s website. To go to the site, click “Go to store”
“Order in one click” is available on the seller’s website. To go to the site, click “Go to store”
An “Online consultant” is available on the seller’s website. To go to the site, click “Go to store”
An “Online consultant” is available on the seller’s website. To go to the site, click “Go to store”
“Order in one click” is available on the seller’s website. To go to the site, click “Go to store”
An “Online consultant” is available on the seller’s website. To go to the site, click “Go to store”
“Order in one click” is available on the seller’s website. To go to the site, click “Go to store”
An “Online consultant” is available on the seller’s website. To go to the site, click “Go to store”
An “Online consultant” is available on the seller’s website. To go to the site, click “Go to store”
“Order in one click” is available on the seller’s website. To go to the site, click “Go to store”
An “Online consultant” is available on the seller’s website. To go to the site, click “Go to store”
“Order in one click” is available on the seller’s website. To go to the site, click “Go to store”
An “Online consultant” is available on the seller’s website. To go to the site, click “Go to store”
A toll-free number 8-800 is available on the seller’s website. To go to the website, click “Go to store”
The procedure for removing and installing the heater motor on a VAZ 2109-2108
First of all, you need to open the car hood and unscrew the 5 bolts securing the plastic trim, as shown in the photo:
And remove it so that it doesn’t get in the way in the future:
Now you need to remove the hood seal:
To then easily pull off the protective cover, under which the heater motor on the VAZ 2109-2108 is located:
After which access to the fan is open:
As you can see from the picture above, you need to unscrew the two mounting bolts that are located on the sides of the motor:
Well, then you will have to suffer a little. The fact is that on the VAZ 2109-2108 the power wires are soldered directly to the motor, and the terminals are connected to the electrical wiring inside the car. To put it mildly, the decision is simply idiotic. Now, in the cabin, by putting your hand under the panel on the driver’s side, we find the positive wire plug and disconnect it:
In the same area there is a negative wire, and there are even more problems with it, since it is secured with a nut, and in order to unscrew it, you must first feel it with your hand, and then use a socket and a ratchet to do this work. Immediately from the passenger compartment, you can insert these wires through the rubber seal in the hole in the body - it is visible in the top photo - from there two wires enter the passenger compartment.
And now, from the outside, turning the heater motor at different angles, we find the most convenient position, and remove it through the right side (in the direction of travel of the car):
And finally remove it from the engine compartment, as shown in the photo below:
If the part needs to be replaced, you need to buy a new stove fan, the price of which for a VAZ 2109-2108 is about 500 rubles for one motor. And if you buy it complete with the case, the price will be about 1000 rubles. We carry out the installation in reverse order.
Removal and installation of the heater fan VAZ 2108, VAZ 2109, VAZ 21099, Lada Samara
Cold weather is coming, in some places it has already arrived, and now more than ever it is important to have a working heater in your car. But not everyone prepares their sleighs in the summer; some don’t even realize that the stove is faulty, since in the summer there is no need to turn it on. So in our case, it became necessary to remove the heater motor from the VAZ-2109 for troubleshooting and possibly even replacement. So we will describe how to remove and install the heater motor on a VAZ-2109, VAZ-2108 and VAZ-21099. So, let's go. The heater fan motor is located in the compartment in front of the windshield under the hood.
Under the instrument panel, disconnect the block with wires from the heater motor from the wiring harness.
Disconnect the ground wire of the electric motor by unscrewing the left front heater mounting nut. We push the electric motor wires into the engine compartment.
We climb under the hood and unscrew two screws securing the fan casing on both sides. We take out the casing
Unscrew the screws securing the heater motor.
Unscrew the five screws that secure the air intake grille and remove it
Lift and disengage the front fan support by pulling the fan itself out towards you.
Rotate it 90 degrees and remove it from the compartment.
That's all, as we see, nothing complicated. We learned how to independently remove the heater motor on VAZ-2109, 2108 and 21099. If something doesn’t work out for you, you can ask questions on the forum of our club VAZ-2109 and similar models, they will definitely help you!
When should you think about replacing?
The schedule approved by the manufacturer indicates that the replacement of antifreeze on a VAZ 2109 should be carried out:
- Once every three years, regardless of mileage;
- every 60 thousand km. mileage regardless of operating time.
The expediency of carrying out the operation is relevant when carrying out repair and restoration work with elements of the “cooling” circuit, preparation for which involves draining the coolant. Such work may include replacement:
- heater radiator or cooling system heat exchanger;
- thermostat;
- expansion tank;
- centrifugal pump;
- antifreeze temperature sensor.
Experienced mechanics do not recommend delaying the process of changing antifreeze for a long time. The loss of anti-corrosion and detergent properties, a decrease in the density of the liquid can lead to serious consequences, requiring significantly larger investments than the operation of replacing the coolant.
Fan control
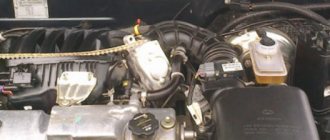
If a VAZ 2109 car has an engine with distributed injection and an injector, then it does not have the switch sensor familiar to owners of a carburetor model at all. The fan is turned on and off by the controller of the electronic motor control unit. This controller receives information from the coolant temperature sensor (DTOZH), which is installed in the outlet pipe between the thermostat and the cylinder head. The sensor is used to control not only the operation of the fan, but also the engine. This includes:
- optimization of the degree of enrichment of the air-fuel mixture: in a cold engine the mixture is over-enriched, as it warms up it becomes leaner;
- increasing the crankshaft rotation speed when starting the engine so that the engine does not stall immediately after starting;
- setting the ignition timing to ensure fuel economy;
- holding the recirculation valve in the closed position until the motor enters operating mode.
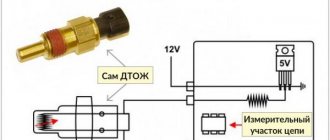
To determine the temperature of the DTOZH VAZ 2109, the injector uses a thermistor - a resistor whose resistance depends on the temperature. The VAZ 2109 uses a thermistor with a negative temperature coefficient. This means that as the temperature increases, its resistance decreases.
Voltage is supplied to the thermistor; by its change, the sensor determines the temperature of the coolant and transmits it to the ECU. And this unit turns the radiator fan on and off.
Return to contents