Replacing the gas cable of a VAZ 2109 carburetor
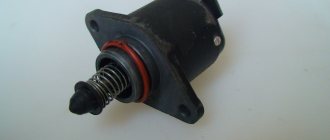
The throttle valve is a structural element of the intake system on gasoline internal combustion engines with fuel injection.
Its purpose is to regulate the amount of air that enters the engine for the fuel-air mixture. It is located in the space from the air filter to the intake manifold. In general, the throttle valve can be called an air valve. When it is open, the pressure in the intake system is equal to atmospheric pressure. Its closed position reduces the pressure to a vacuum state. This property of the damper is used to boost brakes (vacuum), as well as to bleed the adsorber in the gasoline vapor recovery system.
The throttle valve is opened and closed by a cable. Since the damper itself usually lasts as long as the car itself, the main problem is the cable, which sometimes requires replacement.
When does it need to be changed? If you cannot adjust the damper drive so that when you press the accelerator pedal it does not open completely, and when you release it does not close completely, then this is the reason for replacement. The price for it starts from 200 rubles. For a Nexia car it costs from 180 rubles. The price for a LANOS throttle cable is from 250 to 600 rubles.
We repaired a VAZ 2110 car; on other models, the removal and adjustment procedure is similar and not complicated, but when setting up, the help of a second person is required to press the gas pedal.
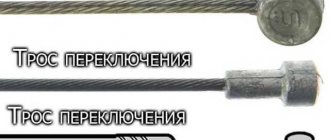
Cables and shirts
Sometimes simple cleaning of cables and jackets, as well as subsequent lubrication with liquid oil, gives an amazing result. After such a simple operation, it becomes much easier to change gears on a bicycle. Cables and jackets vary in strength and price, but even cheap parts will last a long time if you devote half an hour of your time to them once a month. Keeping all parts of your bike clean and lubricated is all you need to do.
The jacket on the cable, as you can understand, is needed to protect against dirt and wash off lubricant. In the world of mountain bikes, it has long been a rule to hide the cables in tubes as much as possible. But you can’t hide the longest cable of the rear derailleur over its entire length, because it will be very difficult to move in an excessively long shirt, especially in the places of kinks. On some expensive mountain bikes, the cables are partially routed inside the frame.
If you find a torn cable with unraveled wires, then the only correct repair is to replace it with a new one. The same applies to cable casings - all broken casings with stretched steel must be replaced.
If the rear derailleur setting suddenly goes wrong, the reason may be:
- tearing out the cable from the fixing bolt on the transfer device;
- pushing through the plug at one end of the shirt.
Replacing the throttle cable:
- First, use a screwdriver to move the tip of the cable from the interior so that it comes out from the pin of the pedal lever, and remove it.
Further under the hood, next to the throttle valve, there is a drive sector on which the cable is clamped. Turn this sector all the way and unfasten the drive cable itself from it.
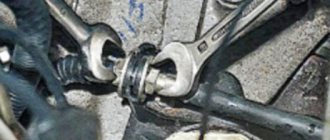
The next step is to remove the protective cap at the end of the cord (1). Hold the nut securing the cable sheath (3) so that it does not turn, and unscrew the nut (2). Next, remove the cable from the bracket slot.
We pull the cable in the direction of the engine compartment, it will come out of the hole that goes into the passenger compartment.
This completes the dismantling. In order to install a new cable, you need to perform the same steps in reverse order.
After installing a new accelerator cable, it needs to be adjusted. Let us consider further the order of execution point by point.
izocimov › Blog › Automatic transmission cable or how to adjust the cable on an automatic transmission
Hello friends. I already wrote about adjusting the cable in a used Toyota, but here I wanted to describe the general principle of operation and adjustment of the automatic transmission cable using the example of a simple hydromechanical automatic transmission.
So, let's begin. Here is an example of what an automatic transmission cable usually looks like connected to the throttle valve; in our case, the engine is an injection one.
Now about the pressure that is opposed to the “throttle” pressure. The pressure from the centrifugal regulator depends proportionally on the vehicle speed. It increases as the speed increases and tries to “push” the valves in the control plate, which are supported by springs of different hardness (they are responsible for shifting gears). If the pressure from the centrifugal regulator becomes greater than the force of decompression of the flow of one of the valves in the control plate (remember that pressure from the throttle regulator acts along with the flow, which also tries to distribute the flow), then the valve collapses and opens the passage of dextron pressure to the clutches, so the automatic transmission shifts to the next gear.
Throttle valve adjustment:
1. We loosen clamps at the connections of the intake pipe (1) and the throttle body, as well as at the junction of the large crankcase ventilation hose and the fitting (2), which is located on the cylinder head cover.
2. With the gas pedal fully depressed, the throttle should be in the fully open position. (For this action you will need the help of a partner).
3. When the gas pedal is fully released, the throttle valve should be in the fully closed position.
4. If steps 2 and 3 are not followed, the throttle cable needs adjustment.
5. If, when checking the adjustment, it is revealed that the damper does not open completely, then you should loosen the nut on the bracket, the second one from the end of the cable, and tighten the first nut until the desired effect is achieved.
6. If the throttle valve does not close completely, then do the opposite, namely, loosen the first nut from the end of the cable and tighten the second nut.
When you achieve full opening and closing of the partition when pressing and releasing the accelerator pedal, you have adjusted the throttle cable.
Symptoms when adjustment is necessary
Adjusting the automatic transmission cable will be necessary in the following cases:
- excessive weakening;
- thoughtfulness when changing gears from third to fourth speed;
- jerks and kicks. Checking for wear of clutches, oil quality and its level in the machine showed a standard result;
- sudden starts from a standstill.
Adjustment is necessary if, while eliminating problems with relaxation of the device, on the contrary, symptoms of a tightened cable arise. This is also harmful to the vehicle's automatic transmission.
Attention! For those who like driving with sudden starts, a tight cable tension is allowed. The main thing here is not to overdo it.
And the symptoms themselves can appear, for example, only when changing gears. Therefore, the car owner can ignore the shocks and jerks for a long time. This happens to those who have cars with a French-made Al4 gearbox. Or in Russia this device is called DP0.
Initially, the manufacturer tells car owners that the first generation has an untreated childhood illness in the form of rarely appearing kicks or hesitation when switching. The driver does not pay attention to these symptoms, the cause of which gradually leads to automatic transmission failure.
Other boxes are more advanced and do not have such serious features.
Instructions manual for VAZ 2109 replacing the throttle cable:
Advice for motorists about VAZ
© DIY car repair watch video
The latest repair publications and instructions for repairing cars of different brands. Repairing a car with your own hands is becoming more interesting and easier. Our blog will show videos on car repair in an accessible way and tell you how to quickly repair a car. We wish you pleasant viewing!
After replacing the gas cable on a VAZ 2109, it should be adjusted to the accelerator pedal
Press the gas pedal all the way down. In this case, the throttle valve of the first chamber should open completely. This can be determined by the position of the throttle control sector, which should move to the extreme position
Release the gas pedal, and the VAZ 2109 throttle valve of the first chamber should close completely. The throttle valve control sector should move all the way in the opposite direction. If this does not happen, adjust the drive
To adjust the gas drive of the VAZ 2109, loosen one of the adjusting nuts. By tightening another nut, achieve a position so that the throttle valve opens and closes completely. Then tighten the nut that was loose.
When tightening nut 1, the damper opens, and when tightening nut 2, the damper closes.
How to Install a New Automatic Clutch Cable
Installing a new automatic cable can be quite difficult. In stores it is sold in the “cocked position” and, when performing some work related to the clutch, it should also be brought to this state.
Most drivers have noticed that black or white clamps, made of plastic and with a slot, hang on the cable located under the hood. At the same time, in the place where the cable “jacket” thickens, there are “ears” that fit perfectly into the slots of the clamp. However, there is a small problem: when the tension mechanism is in the loose state, the elements are located quite far from each other.
The method for adjusting the clutch cable when disconnected from the gearbox is not very complicated. You need to perform several movements. Grab the end of it with one hand, and hold the base of the “shirt” with the other. This is where the self-tensioning mechanism is located. You need to insert the cable to a depth of about 5 cm into the “shirt”, then pull it towards you. At the moment it is fully extended, the mechanism will begin the folding process.
In this situation, you will need the help of a friend or your skill. It is necessary to fix the device in the “cocked” position, placing the clamp on the “ears”.
If you just need to disconnect the cable and the box, then first you should press the pedal three or four times. Next, press the drive lever in the place where the cable fastening element is located. Press down towards the ground. That's it, the mechanism has worked out. Hold the lever with one hand and tighten the clamp with the other.
: If the lever does not want to go down, then the tensioner is faulty. The cable needs to be replaced.
Remember! You can remove the fixing clamp from the “ears” only when the new cable is completely installed.
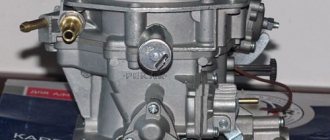
Replacing the Gas Cable on a VAZ 2109 Carburetor
Welcome! From this article you can now learn how to correctly change the throttle actuator parts on cars with Samara injection seeds.
Summary:
What are the details about the throttle valve? There are quite a few things with the drive, the main ones being:
- The cable is designed to adjust the throttle position. In short, it is also simply called an “air damper.”
- The main drive parts also include the accelerator pedal and other things such as fasteners, springs, sectors and more.
When should I replace throttle actuator parts? Here everything depends on the wear and tear of one more thing, say:
- The throttle cable should be replaced if it becomes stuck frequently. In other words, for example, if you were driving a car, you put your foot on the gas for a full program, say, to overtake, and after overtaking, your foot was released from the gas and the car accelerated as if it were an acceleration. Has anyone had this? The situation described above clearly indicates that the cable is jammed. Once this situation is discovered, you must either replace the cable or find that it is connected to the accelerator pedal.
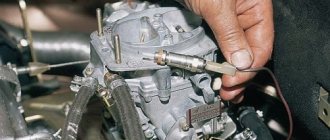
1) First, put the silicone protective cap on the throttle cable by hand or with a screwdriver.
3.2) Then use 2 wrenches to loosen the two nuts that secure the cable sheath to the bracket.
3) If the nuts are loose, disconnect the cable from the socket in the bracket.
4) When you reach the throttle valve itself, disconnect the cable end from its sector by hand.
5) Then go inside the car and disconnect the cable end from the thumb of the lever using a screwdriver.
Replacing the gas cable
6) At the end of the operation, when the last tip is disconnected, disconnect the cable from the front panel, thereby disconnecting it from the machine.
The note! To get the feel of installing a new throttle body, perform the entire operation in reverse order. And when the operation is completed, adjust the cable through the 2 tension nuts! (How to adjust the cable is not difficult to find the text of the article: “Adjusting the throttle”)
1) To remove the accelerator pedal, use a flathead screwdriver or Phillips screwdriver to remove the return spring lever.
3.5) Take the fixing clip with you without removing the screwdriver.
3) And then put it away.
4) Then remove the bushing from the bent end of the accelerator pedal using a screwdriver, following the lever principle.
5) Then lightly press the accelerator pedal to the side, remove the return spring.
6) Finally, carefully remove the accelerator pedal from its installation location.
The note! The new pedal is upside down. And our client has deformed parts: the drive sleeve, fixing clamp and return spring must be replaced with new ones!
Site navigation
Cable sheath stop Under the hood We complete the installation under the engine hood. All that remains is to connect the end of the plastic clamp and secure the adjusting spring iron clamp.
Before flattening the nut Before flattening Ready for installation The nut for ten must be flattened with a hammer by placing it on the iron until it clamps the replaceable Logon throttle cable with its internal thread in moderate measure so as not to bite the iron threads.
This concludes the repair, and we proceed to replacing the Logon throttle cable.
Replacing the throttle cable
If solder protrudes beyond the plane of the boss, the cable will be useless. Now let's learn how to deal with the T-shaped tip.
How to adjust and repair the throttle cable in Renault Logan
In principle, the same technology is used: We drill out the cable fastening; We fasten and solder the new cable. All actions are explained in the photo.
Preparing T-tips Steel can be soldered well. You just need to use active flux.
Soldering iron power - Watt. Any repaired cable is a temporary solution.
At the first opportunity, it is advisable to buy what is indicated in the chapter on articles. Adjusting the throttle cable The cable is adjusted as follows: Use pliers here. The steel bracket must be completely removed from the corrugation. For this, pliers are used.
The corrugation is moved forward or backward - there are no other options. There is no tension when the gas pedal is released.
The damper is completely closed; The cable should not sag.
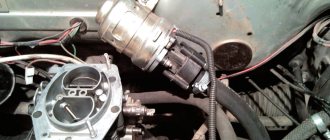
Replacing the throttle valve drive on VAZ 2108, VAZ 2109, VAZ 21099
Welcome! Today, from this article, you will learn for yourself how to correctly change parts that relate to the throttle valve drive on fuel-injected cars of the Samara family.
Summary:
What parts are related to the throttle valve actuator? There are a lot of things associated with the drive, the main ones are:
- A cable that is designed to adjust the position of the throttle valve. In short, it is also simply called “throttle cable”.
- The main parts of the drive also include the gas pedal and other things, such as brackets, springs, sectors, etc.
When should throttle valve actuator parts be replaced? Here everything depends on the wear and tear of this or that thing, for example:
- The throttle cable needs to be replaced if it gets stuck frequently. That is, for example, you are driving a car, you squeezed the gas all the way, let’s say, to overtake, and after overtaking, you took your foot off the gas, and the car just accelerated and continues to accelerate. Has anyone had this happen? The situation described above clearly shows that the cable is stuck. After detecting such a situation, the cable must either be changed or look for what it gets caught on when you press the gas pedal.
Features of adjusting the automatic clutch cable
In a machine with a mechanical drive, the free play of the pedal increases due to the fact that the cable is tensioned. This process occurs quite often. To prevent clutch drag, adjust the clutch cable when the pedal travel is very long. A certain number of manufacturers do not advise doing this manually and therefore install automatic regulators.
The device uses a simple cable. It stretches from the clutch to where it connects to the pedal. Here it is connected to a ratchet, which, by its movement, forces the clutch to work using a “pawl” attached to the edge of the pedal.
If during operation a sag occurs, causing the ratchet to move two or more teeth, then the spring turns it slightly and forces the pawl to jump over the tooth. Such actions allow you to remove the slack in the cable. In this case, the free play of the pedal is set to the amount required.
However, such cables also need to be tightened at certain intervals. Let's look at adjusting the clutch cable using the example of a car manufactured by AvtoVAZ, the Lada Priora.
In the direction of movement, you need to pull out the cable, holding the tip. A certain amount of force must be applied to overcome the resistance of the pedal spring. Next, you need to perform the following steps, holding it in this position:
- Measure the distance between the clutch fork lever and the end of the plastic guide. The length should be 27 mm. You know there's not a lot of space under the hood. In this regard, you need to stock up on wire or a stick of the appropriate size in advance.
- If the lengths do not match, you need to make an adjustment by rotating the leash.
- After the clutch cable is released, the fit of the leash to the fork lever should be tight, without gaps.
- Next, you should press the clutch pedal three times to start the mechanism, which will automatically adjust the length of the cable.
- Measure the full pedal travel. The distance should be no more than 146 mm.
Owners of Lada family cars say that when you press the pedal, the auto-regulation device can crackle and click. Many people get rid of this problem by changing the recommended length of 27 mm to decrease or increase. The selection method helps to find the best option.
How to replace the throttle cable and some drive parts on a VAZ 2108-VAZ 21099?
Replacing the throttle cable:
1) At the beginning of the operation, by hand or with a screwdriver, slide the silicone protective cap along the throttle cable.
2) Next, using two wrenches, loosen both nuts that secure the cable sheath to the bracket.
3) After the nuts are loosened, remove the cable from the slot located in the bracket.
4) Next, moving to the throttle valve itself, disconnect the tip of the cable from its sector by hand.
5) Then move to the inside of the car, and use a screwdriver to disconnect the tip of the cable from the lever pin.
6) And at the end of the operation, when the last tip is disconnected, remove the cable from the front panel, thereby removing it from the car.
Note! To install a new throttle cable, perform the entire operation in reverse order. And when the operation is completed, adjust the cable using the two tension nuts! (You can find how to adjust the cable in the article: “Adjusting the throttle”)
Replacing the gas pedal:
1) To remove the accelerator pedal, use a flathead or Phillips screwdriver to unfasten the lever return spring.
2) Next, without removing the screwdriver from your hands, use it to pick up the locking bracket.
3) And then remove it from the drive.
4) Then remove the bushing from the bent tip of the gas pedal using a lever-type screwdriver.
5) Next, slightly moving the gas pedal to the side, remove the return spring.
6) Finally, carefully remove the gas pedal from its mounting position.
Note! The new pedal is installed in the reverse order. And all deformed parts: drive bushing, locking bracket and return spring must be replaced with new ones!
6.1.2 Removing, installing and adjusting the throttle cable
Removing, installing and adjusting the throttle cable
Assembly of the throttle cable to the throttle body (models with manual transmission)
Assembly of the throttle cable to the throttle body (models with AT)
1. In the engine compartment, disconnect the throttle cable core from the throttle body, pull the cable out of the rubber bushing of the bracket and remove the spring retainer (see illustrations: Throttle cable fastening unit to the throttle body (models with manual transmission) and Throttle cable fastening unit to the throttle body (models with AT) ). 2. Moving backward along the cable, release it from the intermediate guide clamps and straps. Try to remember the cable route. 3. Release the clips and remove the section of lower felt trim under the instrument panel on the driver's side of the vehicle. 4. Inside the car, release the fuse mounting block cover latch by turning it a quarter turn counterclockwise. Remove the mounting block cover from the instrument panel. 5. Release the clamp and disconnect the cable core from the top of the gas pedal. 6. Release the cable sheath from the holder on the pedal bracket. Tie a piece of string to the end of the cable. 7. Return to the engine compartment and release the rubber cable guide bushing from the rear bulkhead. Then, pulling the cable towards you, pull it into the engine compartment. Untie the string from the tip and leave it threaded through the bulkhead. 8. Carefully inspect the cable, checking for signs of wear or mechanical damage. Also check the condition of the rubber bushing. Replace defective components.
1. Tie the cable to the string and pull it through the bulkhead into the car interior. Untie the string from the tip and snap the cable sheath into the bracket holder. Connect the core to the end of the pedal. 2. Check the reliability of the cable fastening and the fit of the rubber bushing in the bulkhead. Reinstall the felt instrument panel trim panel and fuse box cover. 3. Returning to the engine compartment, make sure that the cable sheath is seated correctly in the bushing, then, moving along the cable and ensuring that the route is correct, secure it in all intermediate clamps and straps. 4. Place a flat washer on the cable end and install the spring clip. 5. Thread the cable sheath into the bushing of the bracket on the throttle body. Connect the cable core to the throttle valve drive cam. Adjust the cable (see below).
1. In the engine compartment, remove the spring clip from the throttle cable sheath. Make sure that the damper drive cam is pressed against the stop. Smoothly pull the cable out of the bushing, taking up all the slack in the core. 2. Having fixed the cable in this position, install the spring clamp in the last of the open grooves in front of the rubber bushing. After installing the clamp and releasing the sheath, there should be very little slack in the cable core. 3. Ask an assistant to depress the gas pedal and make sure that the drive cam moves to the extreme position corresponding to the full opening of the throttle. When the pedal is released, the cam should smoothly return to its original position, pressing against the stop. 4. On models with AT, after finishing with the throttle cable, check the adjustment of the kick-down mode drive cable (see Automatic transmission ).
How to change the throttle cable on a VAZ 2109
the throttle cable change?
for VAZ-2110 injector
In principle, every little thing is included in the design of a car, even such as a gas cable. The functionality of the entire vehicle mechanism depends on its high-quality work. Below the company will consider aspects of the throttle cable
for the VAZ-2110 injector.
what kind of gas cable
By gas cable, car owners understand the throttle valve, which plays an important role in the proper operation of the car. The throttle valve is a structural part of the inlet fuel metering system of a gasoline engine. Its main function is to regulate the amount of air supplied to the engine to match air and fuel. This valve is located between the air filter and the intake manifold. If the throttle valve is open, the inlet pressure is compared with atmospheric pressure. In this case, it is in the closed position, then the pressure drops to a vacuum. This throttle action is necessary to improve braking efficiency. automotive systems and purge the adsorber in the gas vapor recovery system.
A special cable is used to open and close the throttle valve. Here it is, it has significant wear during damper operation.
when the gas cable needs to be replaced
How to find the moment when the VAZ-2110 throttle cable needs to be replaced? Experts advise taking into account the following points in the operation of this part of the car:
- it is impossible to adjust the throttle valve drive;
- when you press the gas pedal, the damper does not have the right to open and close in all senses;
- the iron part of the cable began to “sway” (you should pay attention to this when checking the car’s interior);
- During operation, the throttles are constantly jammed by the gas cable.
Step-by-step instruction
1. Open the hood and remove the air duct marked below. Removable by hand.
2. Remove the cable from the fork and then remove it through the cut.
3. Next, the cable is secured to the body with a clip just under the engine support. It is impossible to see this clip from under the hood, but you can stick your hand under it and open it. You can see this clip in the photo below.
The clip opens easily; you just need to pull the edge of the clip down. In the photo below, I think everything is clear.
Engine support 4. Next from the passenger compartment. You need to lift the clutch pedal up and remove the cable barrel from its engagement on the pedal. We grab the cable and move it towards us. Now we lift it up and pull it out. Everything is clear in the photo below. The photos were taken specifically with the pedal assembly removed.
5. The cable also snaps into the body. We squeeze the two clamps and squeeze the cable into the engine compartment.
Photo from the interior of a disassembled car. The arrows indicate the clamps that need to be compressed. 6. Go under the hood and remove the cable.
Before removing the cable, you need to pay attention to how it is routed. It runs between the gearbox and the gearbox support
7. We assemble in the reverse order:
- We put the cable in place and snap it onto the body
- We engage the barrel of the cable with the pedal
- Snap the clip
- We wind the cable by both forks
- Installing an air duct
If anyone doesn’t understand anything, watch the video lesson and write questions in the comments.
To understand whether your cable is good or bad, after removing it, move it back and forth with your hand. The cable should move easily and the white braid of the cable that peeks out from the edge should remain in place. It often happens that the braid comes off.