Appearance and Features
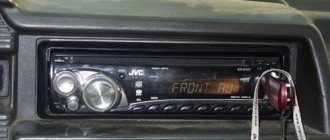
For example, let's take the Pioneer DEH-5000UB car radio. On the front panel there is a large display with alphanumeric indication and control buttons. It consists of 16 characters. You can change the display backlight using color combinations of 10 colors. The main part of the display displays information:
- in “tuner” mode – the range and frequency are displayed;
- in RDS mode - program name, PTY information and text information are displayed;
- built-in CD player and USB audio player - text information and elapsed time are displayed.
The rear panel contains USB and auxiliary (AUX) inputs. External audio sources are connected to them.
To control the device there is a control dial that works like a joystick. The joystick itself - the MULTI-CONTROL lever - can be rotated, moved to the right, left, up or down. By pressing the SRC button several times, select one of the signals: TUNER, COMPACT DISC, USB, AUX. The tuner has three fixed bands, each of which is tuned to 6 radio stations and provides stable reception of the FM and AM bands.
When switching playback mode from one source to another, there may be changes in sound volume.
To equalize the volume, a continuous sampling function is provided. There are many options for controlling the built-in CD player: folder selection, track selection, fast forward, etc.
An additional line output via an RCA connector allows you to connect the radio to an external amplifier or active subwoofer for better bass sound.
Specifications
The sound of an audio device is determined primarily by the power amplifier. Our car radio is equipped with a built-in 4-channel amplifier MOSFET 50Wx4. This ensures: matching with 2 Ohm acoustics, Hi-Fi class in terms of signal-to-noise ratio, low output noise. This ensures clear and rich sound when playing music of different genres.
- Are common.
- Power Supply: 14.4 VDC: (allowable range 10.8 V to 15.1 V);
- maximum current consumption: 10.0 A;
- dimensions (W × H × D): chassis - 178 mm × 50 mm × 162 mm, front panel - 188 mm × 58 mm × 22 mm;
- weight: 1.3 kg.
- Audio.
- Maximum output power: 50 W × 4, 50 W × 2/4 ohm + 70 W × 1/2 ohm (for subwoofer);
- rated output power: 22 W × 4 (50 to 15,000 Hz, 5% THD, 4 ohm load, both channels driven);
- equalizer: low frequencies: 40/80/100/160 Hz, mid frequencies 200/500/1k/2k Hz, high frequencies 3.15k/8k/10k/12.5k Hz;
- subwoofer (mono): frequency 50/63/80/100/125 Hz.
- CD player: number of channels - 2 (stereo).
- USB: USB 2.0 full speed.
- FM tuner.
- frequency range: 87.5 MHz to 108.0 MHz;
- signal-to-noise ratio: 75 dB (IEC-A network).
Manual
The kit includes instructions for using the Pioneer MOSFET 50Wx4 radio. The guide contains 5 main points:
Each item describes in detail the purpose of the device controls, setting sound quality, working with the tuner and external devices.
Settings
When setting up the Pioneer radio, all actions are performed using a special MULTI-CONTROL joystick. The manual contains detailed instructions for adjusting various parameters.
The equalizer is used to adjust sound correction. Moreover, the device already has 5 presets: powerful, natural, smooth, superbass. There is also a CUSTOM setting - this is an adjustable curve that we create ourselves. If you adjust the equalizer curve, it will be saved in memory in CUSTOM.
Loudness compensation compensates for insufficient sound pressure in the lower and upper audio frequency ranges at low volumes. Using MULTI-CONTROL select LOUDNESS.
How to turn off
To turn off the Pioneer radio, you need to press and hold the OFF button until the device turns off.
Setting up the subwoofer mode
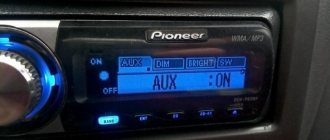
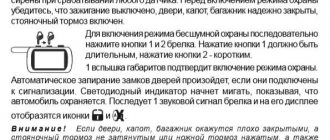
To configure the mode, we will have to work with the preliminary settings, which Pioneer, fortunately, has available. Finding yourself in the menu for these settings is easy. To do this, you need to turn off the radio and then press the power button (top left) and hold it in that position until the display lights up. Fired up? That's all, now you are in the preliminary settings menu. As a digression, let's say that almost all the options discussed below have always been on such radios, with the difference that these settings were entered differently. This is either holding the joystick in a recessed position, or holding the “function” button. But at the same time, the radio must be turned off - otherwise you cannot enter the preliminary menu. Let's move on. So, here is a list of preliminary settings. Turn the knob to find out what options are available. There you can see the language settings, search for radio stations, enable additional inputs, etc. But you need to find the name SW Control. To find this name, turn the knob. Found it? Very good. Next, press the joystick and look at the screen. The inscription REAR SP FUL should pop up on it, which will inform you that all the sound is going to the rear speakers, and we need the system to enter subwoofer mode. Turn the knob further until FUL changes to SW. Leave it like that. The preliminary settings are all done. Now turn on the radio by pressing the power button. As soon as the sound appears, you will immediately notice that the rear speakers cannot be heard at all. Don't be alarmed because this is completely normal. After all, using the preliminary settings, you just entered the rear speakers into the desired mode, and now you still have to configure them. Go to “Audio” again, since now you already know how to do this. In this menu, rotate the joystick to find SW SETTING1. After this, press the joystick briefly, and as a result you will see the SW item on the left side of the display, and as many as three items may appear on the right side: NORMAL, REV and OFF. Well, with OFF everything is clear - this is turning off the mode. You will not need this function for settings. But the NORMAL command means that the speakers operate in normal mode with the diffuser working upward. The inscription REV means that the speakers operate in reverse mode with the diffuser working downward. Rotate the handle to stop at any of these modes. By the way, experienced car enthusiasts know that the reverse mode is best suited for sedan-type cars. After you have launched the selected mode, turn the joystick to the left and exit the settings. Now turn the joystick to find the SW SETTING2 menu. You will find it by turning the handle to the right. This will be the next menu that you have to work with. Press down the joystick and thus light up SW 80 HZ 0 on the display. Let’s give the explanation: 80 – frequency filter. That is, this is the frequency that goes to the speakers. If you have an oval shape, then the frequency range can be limited to 50 hertz. With this cut, you get a nice rich bass in sub mode. But if something doesn’t suit you, then here you can experiment with different options. By turning the knob to the right, you will find the mode power level indicators from -6 to +6. Using the verification method, select the indicator at which there will be no distortion on the speakers. That's all. Setting up the subwoofer mode is complete. Exit the menu using the same BAND button. After this, monitor the rear at different volume levels and adjust the sound power if necessary.
How to install and remove
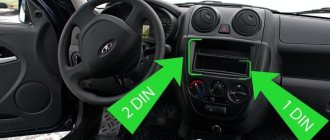
The Pioneer radio is installed using a rectangular hole made in the instrument panel or center console. To hold the body, a metal shaft is used, which is installed in the window and secured with folding tendrils of a triangular configuration. The head unit is inserted into the shaft all the way and is held in place by latches located on the sides of the housing.
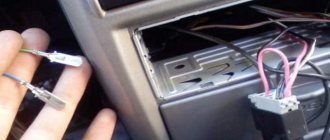
To dismantle the car radio, you must remove the decorative frame located around the perimeter of the case. The clamps are disconnected using keys included in the device set or purchased separately. After removing the case from the shaft, you should disconnect the pads that connected the radio to the on-board network and car audio.
How to remove the panel
To dismantle the front panel, you need to press a separate button and then remove the assembly from the mounting socket. To store and carry the tape recorder panel, a plastic case with foam inserts is used to protect the unit from scratches.
Are you a car driver?! Then you can take this simple test and find out. Go to test »
How to connect correctly
To correctly connect the Pioneer car radio, you need to familiarize yourself with the diagram attached to the documentation. The cables are routed under decorative plastic body panels that protect the insulation from physical damage. For correct operation, it is necessary to ensure a continuous supply of positive power that supports the device’s memory. For switching, a yellow cable is used, which is led directly to the vehicle battery.
Wire marking
The Pioneer radio is connected using 2 ISO standard plugs, in which wires of different colors are mounted:
- red - to supply positive power after turning on the ignition;
- blue - supplying positive voltage to the amplifier and motor drive of the antenna;
- yellow - positive signal to support the memory block (does not depend on the position of the key in the lock);
- black - connection with the car body (negative signal);
- purple and purple with a black stripe - for connecting the speaker installed in the rear right door;
- gray and gray with a black stripe - for the loudspeaker located on the front right;
- white and white with black - for switching the loudspeaker in the left front door;
- green and green with black - to send a signal to the rear speaker on the left side.
On some of the radios there are additional cables designed to connect the steering wheel control panel or additional components of the multimedia system. When using component car speakers or amplifiers, the speaker cords are connected to the additional equipment.
Connection diagram
The connection diagram for the Pioneer car radio is given in the operating instructions. The cables are connected in accordance with the color of the insulation; cables coming from the battery and the ignition switch are used to connect power. If you connect the red wire directly to the battery, the head unit will discharge the power supply. To ensure reliable contact between the cords, soldering with tin-lead solders or crimping the joint with a metal tube is used, followed by wrapping with insulating tape.
Additional outputs for the subwoofer or steering wheel controls are connected in the same way. The pinout of the connector complies with ISO standards; a positive signal cable and a negative cord are used to connect the speakers. It is prohibited to twist the negative terminals into a single busbar that is connected to the car body. Acoustic cables from the loudspeakers are laid inside the passenger compartment and doors along the standard electrical wiring harnesses.
How to turn it on and off
To turn on the head unit, you must first provide voltage by turning the key in the ignition. The user then activates the device by pressing the SRS/OFF button. When turned on, the display shows the frequency of the radio station being received or the parameters of the track being played by the player. It is not recommended to leave the head unit on with the engine off, as there is a risk of draining the car battery.
When the ignition is turned off, the equipment stops working automatically.
With the engine running, you can turn off the Pioneer radio by removing the front panel. You can turn off the device by long pressing the SRS/OFF button; you must first go to the adjustment menu and disable the energy saving options. Tape recorders equipped with infrared control are turned off by pressing a button located on the remote control (implemented only on some models).
How to reboot
If the settings are incorrect or the operating algorithm of the microprocessor fails, it is recommended to return the player parameters to the factory values. To restart the head unit, you need to press the hidden RESET button located on the front panel with a thin object. Products with a removable panel are equipped with a button on the front of the case (next to the connection block). The button is held down for 4-5 seconds; for further operation you need to configure the tape recorder parameters.
How to control the radio
The radio is controlled by a rotary control and buttons located on the front panel. The purpose of the keys specified in the operating instructions depends on the modification of the multimedia device. Some head units support standard control buttons located on the steering wheel.
The remote control is connected through a special signal converter to the connector located on the rear wall of the case. Some products have an infrared remote control; the panel has a signal receiver covered with tinted glass.
How to setup
The Pioneer radio settings affect the quality of radio reception and music broadcasts. Changing the operating parameters is done through the menu; the settings are described in the instructions. The list of adjustable parameters depends on the modification of the player and the firmware version written into the control unit.
Disable demo
The microprocessor of the head unit supports a demonstration mode, which consists of broadcasting an information message to the display. To disable the parameter, press the volume control and go to the radio settings, then turn the knob to find the System section. Rotate the potentiometer crown to select the Demo Off parameter, then press the knob to confirm the selection. The user needs to turn the knob briefly again, select the Yes option and press the knob to make the change into memory.
Sound settings
In order for the radio to play juicily and reproduce low frequencies well, you need to adjust the equalizer curve and adjust the cutoff of low or high frequencies. The equipment supports adjusting the sound balance between speakers; there is a separate function for dynamic bass boost (BASS BOOST).
The sound quality is affected by the bitrate of audio recordings stored on laser discs or removable storage devices. If the recording quality is low, it is impossible to correct the sound picture using the settings.
Equalizer
Equalizer curves with standard parameters are stored in memory; to select the required value, use the menu (EQ Settings subsection). Radio tape recorders support creating your own sound picture by recording parameters in a separate memory cell.
High and low pass filter subwoofer
Setting up the slice is done through the menu, where you need to find the Crossover parameter. The function is supported only by some equipment; the setting algorithm depends on the modification of the acoustic device. Some models allow you to set individual characteristics for each speaker. The cutting height is selected from the list of suggested values.
Loudness compensation
I would like to end here, but we forgot about something - loudness compensation. This is such a regime. It is easy to find it in the audio settings menu by rotating the joystick. Find the inscription LOUDNESS. Press down the joystick, and the same LOUDNESS will light up on the left, and three levels will be displayed on the right: low, medium and high. This setting adjusts the high and low frequencies at low volume. That is, the quieter the sound, the more clearly the effect of this setting is felt. However, if you turn the sound up to full power, this mode will not be felt at all. Therefore, you can fix the high level, which is indicated by the inscription HIGH. Now go to the audio settings in the EQ SETTING1 menu. Press down the joystick until the display shows EQ SETTING1 and three options in columns, adjusting bass, mid and treble. You can move through the columns by tilting the joystick to the right, and the adjustment itself is done by rotating the joystick handle. Using these options, adjust the frequencies to your liking. However, we do not recommend exceeding the low frequency parameter by more than one. From 0 to 1 will be quite enough - take pity on your acoustics. Although, if your speakers are powerful enough, then you can experiment. Now, that’s probably all. This time your “Pioneer” will sound at a professional level. I must say that there are still a few settings left in this radio, but only real music lovers with an ear for music will need them - and that’s a completely different story. We wish you a fun and safe journey! Video about setting up radio stations on Pioneer radios:
TagsTips for motoristsAn article on how to properly set up a Pioneer car radio. Features of setup, step-by-step algorithm. At the end of the article there is an interesting video about setting up radio stations on Pioneer radios.3 -> Sources used:
- https://autotuning.expert/magnitola/pioner-mosfet-50wx4-instruktsiya.html
- https://1avtozvuk.ru/sovety/magnitola-pioneer-mosfet-50wx4
- https://fastmb.ru/soveti_auto/1621-nastraivaem-avtomobilnuyu-magnitolu-pioneer.html
Possible problems and their solutions
The first problems may arise during the installation of equipment. If the radio does not fit completely into the landing shaft, then you should check the possibility of placing the housing in the instrument panel. Some cars require trimming of the internal structural elements into which the plugs or the rear wall of the device rest. The defect occurs due to jamming of the side latches (deformation or dirt ingress).
When using the device, there may be loss of sound from the speakers due to poor contact in the connecting cables. To restore functionality, you need to disconnect the plugs, inspect the connection points and reconnect the Pioneer radio. The defect occurs when the channels of an external amplifier break down; it is recommended to connect the speaker directly to the player. The damaged amplifier is repaired in a specialized service.
Doesn't turn on
If the head unit does not turn on when you press the keys, then you need to turn off the ignition and check the correct operation of the power circuits and the reliability of the cable connections, as well as the connection diagram of the Pioneer car radio. If you use an infrared remote control to start, the transmitter may not work due to dead batteries. Additionally, it is worth checking the functionality of the buttons; if dirt or moisture gets on the contacts, the transmission of signals that control the operation of the audio player is disrupted.
Doesn't turn off
Some Pioneer radios have an original operating algorithm that does not allow turning off the power when the demo mode is active. An attempt to turn off the equipment puts the player into demo mode, which is turned off by removing the front panel. After disabling the function through the menu, pressing the button turns off the power to the head audio unit (except for memory support).
After purchasing a car or a separate radio, every motorist is faced with the need to configure the audio system in the car for high-quality sound from audio files and radio. If your car has the latest Pioneer radio models, for example Mosfet 50wx4, 150UB or 170ub, or some of the AVH line devices, then you can configure it using simple steps, during which you will set the sound quality acceptable to you.
How to use the radio
Turning off Demo mode
Immediately after purchasing and connecting the radio, you should figure out how to disable the demo mode, intended for displaying the device in the store. It is possible to use the radio in this mode, but it is inconvenient, since when you turn it off, the backlight does not go out, and inscriptions with various information run across the display.
Disabling demo mode is very simple:
- We go to the hidden menu by turning off the radio and holding down the SRC button.
- In the menu, turn the wheel to reach the DEMO item.
- Switch demo mode from ON to OFF.
- Exit the menu using the BAND button.
You can also set the date and time in the hidden menu by going to the System section. The time display is switched here (12/24 hour mode). Then open the “Clock Settings” item and turn the wheel to set the time. In the System section there is also a language setting (English/Russian).
If your settings are reset when you turn off the ignition, the article “how to connect a radio” has the answer to this question