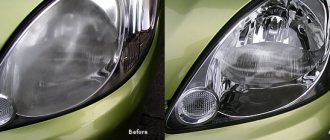
The bumper of a modern car can be considered a rudimentary organ; it has little in common with those massive iron structures that were installed on the GAZ-21, Moskvich or Zhiguli of the first years of production. Made of refractory polymer or fiberglass, it largely plays the role of a decorative or aerodynamic lining on the body. However, its very location determines that the bumper, as before, receives a large number of small impacts, which it parries with varying degrees of effectiveness, as a result of which scratches and cracks appear on it.
Such damage does not affect driving performance, but may well poison the life of a car enthusiast who believes that everything should be perfect for his “swallow”. Therefore, the question of how to repair a crack in a bumper and whether it is possible to do it yourself is very relevant and common.
Preparation for the main work
You can solder the bumper yourself at home. To do this, you will need to prepare a workplace and appropriate soldering equipment. To make it easier to restore the body kit in a car, you will need to remove the part.
Soldering of the body kit should only be done if the body part is severely damaged. Small cracks can be sealed.
Work cannot be carried out in a completely enclosed room or outdoors. Soldering the bumper is accompanied by an unpleasant smell of burnt plastic, but if the operation to restore the body kit is performed outdoors, the result may be spoiled by environmental influences. The optimal place for repairs is the garage. It will protect the treated surface from wind and rain, and the motorist can open the gates at any time and ventilate the room.
What is needed for repair
Repairing a bumper at home will not be a huge task, especially if this is not the first time you have had to work with your own hands to repair a car.
To do this, you must first prepare the working tools and purchase the required materials. ATTENTION! A completely simple way to reduce fuel consumption has been found! Don't believe me? An auto mechanic with 15 years of experience also didn’t believe it until he tried it. And now he saves 35,000 rubles a year on gasoline! Read more"
You will need the following tools for work:
- A construction hair dryer to be able to warm up and straighten dents or bumps.
- A grinder or grinder is necessary for the final leveling stage.
- Compressor.
- Spray bottle for painting seams or completely painting the bumper.
And the following materials to make your own bumper repair:
- Special putty with fiberglass and regular automotive putty.
- Fiberglass bumper repair kit containing epoxy resin and fiberglass material.
- Special solvent for acrylic paint.
- Small brushes 25-30 mm each.
- Sandpaper, different hardness.
- Primer.
- Varnish.
- Metal spatulas, it is better to buy a set.
- Dye on tap, about 300 grams.
- Mesh for placing over the seam to prevent cracks from appearing (fine-mesh, soft metal).
- Rubber gloves and tape.
Sequence of work
Repairing bumpers includes several stages. The following is the sequence of their execution:
- First of all, you need to remove the damaged bumper from the car.
- Next, the preparatory work begins. They consist of cleaning the part by washing, degreasing, and removing paint and varnish material from the damaged area using a grinding machine with a P240 wheel.
- If the bumper has split into several fragments, they are combined into the original integral shape by joining the edges.
- After that I start soldering. The seams are tightened with staples, placing them at intervals of 1 - 2 cm at a depth of no more than half the thickness of the bumper.
- Then the plastic layer is fused with a soldering iron tip to prevent the formation of corrosion.
- After cooling, the seams are cleaned with a grinding machine with a P240 wheel and blown with compressed air. To remove lint and hair, use a tool such as a hair dryer.
- Then putty is applied to the surface of the bumper with a rubber spatula. In hard-to-reach places, apply with your finger or any suitable object. After the material has hardened, the surface is ground with a machine using a P120 wheel.
- Next, the entire part is covered with primer in two layers with an interval of 15 minutes between them.
- A light-colored developing layer is applied on top using a dark base underneath. After drying, the surface is ground with a P800 wheel. The remaining stains are removed with nitro putty. Then wet grout the bumper surface with a P1000 wheel using grinding equipment.
- After drying, the surface is wiped with napkins and degreased. Paint is applied over the primer in 2-3 layers.
- Finally, the surface of the bumper is also varnished in 2 - 3 layers.
Repair with fiberglass
The technology is used to eliminate damage to body kits made of fiberglass, since the previous method will not work in this case. What you will need for work:
- fiberglass for bumper repairs;
- polyester (epoxy) resin complete with hardener;
- soft brush;
- stationery knife or scissors;
- latex gloves.
Advice. If a bulge or depression has formed at the site of the impact, then immediately after cleaning, level it using a hair dryer to heat it.
Since fiberglass patches will have to be applied on both sides of the damaged area, it is better to remove the bumper from the car. After completing all the preparatory work, including stripping paint and degreasing, proceed in the following sequence:
- Using a grinder with coarse sandpaper (P80-P120), make a recess in the body of the bumper from the front side, covering a radius of 3-5 cm from the crack. This is necessary so that the fiberglass overlay does not ultimately protrude beyond the plane of the part.
- On the back side, sand with coarse sandpaper, but without deepening. Degrease the area and let it dry.
- Cut out patches from fiberglass. On the front part you need to make a neat patch that follows the shape of the recess, and on the back you can glue a rectangular overlay.
- Mix the resin and hardener in the proportions indicated on the package. Apply the composition with a brush to the surface, apply a patch (several layers are possible) and saturate it with resin.
- Carefully observe the time specified for curing the epoxy composition (written on the resin container), and then thoroughly clean the repair area with fine sandpaper. The task is to level the surface by removing protrusions.
Note. Initially, coarse sandpaper is used to create a roughness on the surface of the plastic that promotes better adhesion of the polyester adhesive.
At this point, the work on repairing the plastic itself is completed; then cleaning, priming and painting are carried out using standard technology. The last operation is polishing the bumper; it is necessary to give the element a uniform shine.
Photo of fiberglass body kit repair
Video about sealing defects with fiberglass
Tools and materials
To solder the bumper with your own hands, you will need to stock up on the appropriate tools and materials:
- Electric soldering iron. The device must have high power (above 50 W). Using “household” soldering irons will not bring the desired result.
- Metal brass mesh.
- Hairdryer for soldering bumpers.
- Scissors.
- Plastic solder (made independently from an old bumper), metal staples from a construction gun.
It is recommended to use a soldering iron with a wooden handle. The plastic handle will melt after the first repair of the car body kit. Also, in order for the device to last longer, when restoring, it is necessary to take short breaks.
After restoring the integrity of the plastic bumper, it will need to be given its original appearance. To do this you will need:
- Rubber spatula.
- Blade.
- Spray.
- Sanding machine and sandpaper.
- Primer.
- Dye.
Do-it-yourself fiberglass bumper repair: step-by-step instructions
Fiberglass bumper repair»>
You will need the following tools for work:
- A construction hair dryer to be able to warm up and straighten dents or bumps.
- A grinder or grinder is necessary for the final leveling stage.
- Compressor.
- Spray bottle for painting seams or completely painting the bumper.
And the following materials to make your own bumper repair:
- Special putty with fiberglass and regular automotive putty.
- Fiberglass bumper repair kit containing epoxy resin and fiberglass material.
- Special solvent for acrylic paint.
- Small brushes 25-30 mm each.
- Sandpaper, different hardness.
- Primer.
- Varnish.
- Metal spatulas, it is better to buy a set.
- Dye on tap, about 300 grams.
- Mesh for placing over the seam to prevent cracks from appearing (fine-mesh, soft metal).
- Rubber gloves and tape.
Types of soldering irons for soldering plastic bumpers
Several types of soldering irons can be used for repairs. After all, this is a universal tool that is capable of performing connecting operations in many situations and working with various materials. If its parameters allow it to melt plastic, then it can also be used to repair bumpers.
The craftsmen use the following soldering irons to repair bumpers:
- Standard model. It should be a powerful tool with a straight or curved tip, which depends on the design features. It is best suited for heat bonding of broken bumper parts. With its help, you can create reliable joint seams so that the product can work for a long time after repair.
- Thermal gun. Serves for soldering parts and correcting their deformation. Thanks to the presence of a smooth temperature control system, the tool can finely adjust to any parameters of the bumpers and provide the desired effect, for complete melting to connect parts, or partial melting to level a curved surface. As a rule, such models come with several attachments that make soldering easier and more convenient.
- Hot air soldering station. This is a universal soldering iron for plastic, which combines several tools at once. This is a unique combination of a standard soldering iron and a heat gun. The kit may also contain a large number of attachments, but the main advantage is the ability to use two tools at once.
Using a hot air gun
When repairing severe damage, use a hair dryer. With its help, the edges of cracks are melted, as a result, a strong and reliable weld appears in place of the burst part of the body kit. To make the structure more durable, use plastic strips 1cm thick. They can be purchased separately, or cut from an old donor body kit.
When soldering, use the same type of plastic from which the bumper is made. Otherwise, the seam will turn out to be non-monolithic, which will lead to rapid destruction of the structure.
The method is effective in the absence of some parts of the body kit, serious cracks and holes.
Types of bumpers and materials from which they are made
Modern car bumpers can be made of metal and plastic
In turn, plastic ones can be made from 2 types of material:
- thermoactive;
- thermoset.
What is the difference between thermosetting plastic for car bumpers and thermosetting plastic?
The main difference between a thermoactive material is that it can be subjected to secondary heat treatment. Under the influence of high temperature, the material easily melts, becomes elastic, soft and can take any shape.
Thermosetting plastic, on the contrary, is very durable, resistant to high temperatures and mechanical damage.
Car bumpers made of thermosetting plastics, as a rule, are rarely subject to cracks due to the strength and reliability of the material.
The following types of thermoactive materials are distinguished:
- Polyethylene - used in the production of food containers, bags, etc.;
- Polystyrene - various insulation materials are made from them in construction, etc.;
- Polypropylene - used in the production of auto parts, including car bumpers, food industry, etc.;
- Polyvinyl chloride - production of insulating coatings for cables, window technologies, etc.
Thermosetting materials are divided into:
- Polyurethane - most plastic auto parts, both small and large, are made from this type;
- Epoxy resins - used for joining and gluing different parts;
- Fiberglass - used in the production of heavy-duty auto parts, including bumpers;
- Phenol resins - needed in the manufacture of small auto parts, computers. boards, etc.
Tools and Supplies
- Soldering iron. Any device is suitable for soldering plastic; you can take a regular electric soldering iron (using a tool with a power above 50 W will make soldering much easier) or less popular types of soldering irons - gas, hot-air and infrared. All devices have their advantages and disadvantages. You should choose based on your own experience and preferences, or from what is available.
- Scissors. Simple household scissors or a stationery knife will do.
- Metal mesh - mesh with 1 mm cells. The mesh will help hold the plastic fragments together. You can purchase this mesh at a hardware store, but if this is not possible, use an old air filter.
- Priming. The most common automotive primer will do.
- Putty. It is better to use a special putty for plastic to level the surface of the sealed area.
- Sandpaper. For rough grinding - 40 and 80 numbers, and for finishing - 800.
- Rags - it is used to remove dirt from the work surface.
- Plastic solder (use part of an old bumper). It is used in cases where the bumper is severely damaged, has split into small parts, and the crack does not heal. A piece of plastic from an old bumper is used as a patch.
- Hot air gun. Needed to eliminate bumper deformation. The heated plastic bends easily, so you can return the bumper to its original appearance.
To avoid unnecessary expenses, it is better to buy a repair kit. Typically, such kits include rough and finishing sandpaper, retouching, primer, and fillers. Such a kit will cost you much less than purchasing materials separately, since they usually use small packaging.
General repair rules
Before starting work, it is necessary to fix the edges of the crack, giving the part a shape that at least approximately corresponds to the original one. For this purpose, small clamps or coarse packing tape are suitable, which are glued to the side that will be repaired last. This is usually done outside.
If the plastic is viscous - it is planed without much effort, long, soft chips are formed, then the ends of the cracks do not need to be drilled. This is usually done with polyethylene parts. Rigid polycarbonate and ABS plastic are prone to further cracking, so try to determine as accurately as possible where the crack ends and drill a hole there with a diameter of no more than 1 mm.
All parts must be at least washed and dried, and if you are going to use glue, they must be degreased. Do not use gasoline as a solvent and cleaner; it is now not of the quality to be trusted recklessly. An aerosol can with foam cleaner is ideal. It consists of 90 percent acetone and is easy to apply - no jars or brushes are needed.
To remove or not to remove the bumper is, of course, up to you. But, if you want to achieve a good result, it is better to do it. Moreover, on the inside you can find markings and find out exactly the material from which the part is made.
What is needed for soldering a bumper
Basic materials needed to solder a car bumper:
- Soldering iron. This is a universal device that every man should have in his home. Remember that to repair a car with your own hands, you need to use only a powerful soldering iron - if you take a device with a power of 50 W, the work will not bring the expected result. Regarding the type of soldering irons, experts leave you freedom of action - you can take an electric, gas, hot-air, or infrared device. Here you make a choice depending on your own preferences and personal experience.
- Net. It is with its help that you will solder the bumper.
Tools and materials
- Scissors. The most ordinary scissors will suit you. Of course, you should not take scissors that are too old or dull - in this case, the work will not bring any results.
- Flathead screwdriver. This is what you often use to tighten screws and screws with your own hands.
- Hot air gun. You will only need this device if the bumper has not only cracks, but also deformations. Using a heat gun, you will straighten the bumper and return it to its original appearance. Remember that for soldering you need to install a round nozzle on the device.
How to repair a crack on a bumper with your own hands: how to solder it, what to seal it with, video methods
Having broken a plastic bumper on a VAZ car, the owner can relatively inexpensively purchase and install a new one, painted in a suitable color. Owners of foreign cars are not so lucky; plastic body kits for their cars are much more expensive. The solution is to repair the damaged part by repairing the crack with your own hands in order to save money. It is also useful for owners of Russian cars to know about methods for restoring broken plastic, so as not to buy a new element due to small cracks.
Methods for sealing cracks
Depending on the amount of damage and the type of plastic, the following methods for cracked bumpers are practiced:
- cosmetic bonding using acetone and donor plastic;
- sealing with modern chemical compounds;
- fastening with epoxy resin using fiberglass reinforcing mesh;
- sealing the crack with a soldering iron reinforced with metal mesh;
- welding using a hot air gun and a plastic rod.
Reference. There is one simple method used by car enthusiasts who are not too concerned about the appearance of the car. This is connecting the edges of a crack with wire or staples. This is a simple matter, which means there is no point in considering this technology, everything is already clear.
Tying a crack around the edges with wire doesn't look very attractive
The use of acetone, which can dissolve many types of plastics, for gluing is a temporary measure used for small cracks that appear in the middle of the body kit. Its essence is this:
- Pieces of plastic similar in composition to the bumper material are selected and dissolved in acetone to a thick consistency.
- On the back side of the bumper, the crack is degreased and also treated with acetone to soften the surface.
- Liquefied plastic is applied to the damage from the reverse side, after which it hardens for several hours. The outside of the defect can be touched up with a corrector tube.
Crack covered with plastic dissolved in acetone
Using thick two-component compounds, sold in two tubes, any single cracks in most types of plastic are sealed. The exception is fiberglass body kits; they are glued together with epoxy resin, and in case of serious damage, fiberglass mesh reinforcement is used.
A single crack can be sealed or soldered
With numerous large cracks, breaks and holes in the bumper, gluing methods become ineffective. In such cases, soldering or welding with a hot air gun using donor polymer material is practiced. After such repairs, the defect area is thoroughly cleaned and painted in the color of the car. At the end, it is necessary to completely polish the bumper so that the painted area does not stand out against the background of the old coating.
Advice. If you get into an accident or collide with a stationary obstacle and break the body kit, try to collect all the flying pieces, except for the smallest ones. This will allow you to use “original” plastic for repairs and not look for something similar.
Recommendations for preparation
The preparatory process differs little for different methods of gluing and welding polymer parts, so it is worth considering separately. The first question is whether it is necessary to remove the bumper to make repairs. In most cases, dismantling is not possible, since the plastic must be sealed on both sides. The exception is broken body kits, cracked in many places. They must first be fastened together and then removed. Otherwise, after repair, the part may lose its shape, causing the attachment points to not meet, and the gaps with adjacent elements will increase.
The body kit cannot be removed in this state, it must first be secured
Reference. Often the bumper body comes off at the attachment points and small pieces of plastic remain on the screws. Before dismantling, such a part is securely welded to the torn fastener and only then removed.
To prepare a damaged body kit for repair, you need the following tools and materials:
- a set of keys and screwdrivers for removing the element;
- electric grinder;
- sandpaper of different grain sizes - from P180 to P320;
- degreasing liquid - organic solvent or white spirit;
- rags.
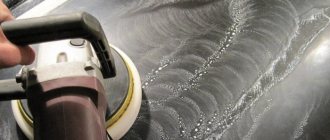
Sanding with a grinder speeds up the work significantly.
Note. Using a grinding machine, you can perform cleaning better and much faster than by hand. This and other power tools that will be needed for painting and polishing can be rented for 2-3 days.
Regardless of whether the work is carried out directly on the car or with the bumper removed, it must be thoroughly washed and dried. Then, using coarse sandpaper, you need to peel off the paint at a distance of 3-5 cm from the crack in each direction and sand the area with fine sandpaper. Whatever repair method you choose, the paint must be removed to the base, otherwise it will interfere with the adhesion of the glue or the fusion of polymers during welding. Finally, the area should be degreased.
The surface must be degreased after each cleaning.
Advice. The quality of body kit repair depends on the conditions in which it is performed. It is more convenient to repair damage in a garage equipped with an inspection ditch for easy removal of the part and soldering of the fallen fasteners in place.
Two-component bonding
To implement this method, you need to purchase the following bumper repair kit from the 3M brand:
- 2 FPRM components for preparing liquid polymer in 150 ml tubes (price - about 2500 rubles);
- special hard tape;
- self-adhesive reinforcing mesh made of fiberglass (otherwise known as fiberglass) 48 mm wide;
- adhesion initiator in an aerosol can;
- 2 spatulas - wide and narrow;
- stationery knife;
- gloves, safety glasses.
What to do if there is a crack on the bumper - methods for repairing it
If a crack has formed on the car bumper as a result of damage, then simply cleaning and polishing this place will no longer work; in any case, it will be visible.
To repair a crack, you need to resort to more effective methods. There are several ways to repair cracks in plastic bumpers:
- repairing damage with liquid polymer;
- welding using a rod;
- welding the crack with a hot air gun;
- repairs using fiberglass;
- gluing plastic with a two-component composition.
Let's look at each of them in detail.
To make it easier to work with damaged areas, the car bumper must be removed and secured on a stand. Before starting the repair, you need to thoroughly clean the damaged area from dirt and dust, and if the bumper has already been repaired, then remove the remnants of the repair kit from the last time.
Experts advise treating damaged surfaces with any degreasing chemical before starting repairs. means.
Seal the crack using liquid polymer
For this method you will need: a soldering iron, fine-grained sandpaper, a knife, wire cutters, steel wire, a hot air gun, a piece of protection for the car fender liner.
Sealing process:
- We clean the edges of the crack with sandpaper.
- If the crack is long, then it must be sewn together in several places along the edges with scraps of steel wire. The edges of the wire are bent and cut off with wire cutters.
- Next, the edges of the crack are brought together and carefully soldered with a soldering iron.
- The fender liner protection is made of polymer plastic, which melts easily and is suitable for creating patches. Small strips are cut from the protection fabric (about 2-3 cm wide, 15-20 cm long and 2 mm thick), which will be patches for soldering.
- The place where the patch will be applied and the patch itself is cleaned with a sharp knife.
- We heat the damaged area with a hairdryer in the place where the patch is applied. Next, we heat the patch strip to a semi-liquid state, gradually applying it to the damaged area. This is repeated several times (with new strips) until the crack on the bumper is completely sealed.
- The resulting seam is cleaned with an emery wheel and prepared for painting.
Video instructions for repair using this method are given below.
- Pros: low cost, simplicity, minimal set of materials and tools.
- Cons: likelihood of plastic deformation when heated.
Repairing the bumper with fiberglass. (“We mold” the missing fragments.)
We restore a plastic bumper with our own hands using fiberglass.
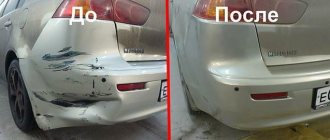
From this article you will learn how to restore a bumper that is missing a large piece of plastic. As you can see, the bumper looks hopeless, but it is possible to restore this, and fiberglass will help us with this. When repairing a bumper with similar damage, the master requires ingenuity, because you will have to build various structures to create a “matrix” of the missing part, and of course, be patient, because I will say that this is a long process. Personally, this turnkey job took me about a week.
We walked around, had a look, now get to work.
Before removing the bumper from the car, it is necessary to secure the upper and lower parts. This needs to be done on the spot, since if you first remove the bumper and then just fasten these parts, it may turn out that the bumper “spreads” to the sides and initially the “matrix” will be crooked.
To connect the bumper parts we use a regular drywall profile.
By the way, I advise you to go to a hardware store and buy a profile, hangers and screws. For such repairs, all this will be very useful and I would even say that you can’t live without it :)
Now we remove the bumper and think about how to “cover” this big hole. After a long walk around the pit and its surroundings, I came across a Sparco mudguard, which 7 years ago were very fashionable and were on almost every “tuned” car. Now this mudguard will serve as a patch for us.
We screw it to the front side of the bumper.
The mudguard fits tightly and follows the shape of the bumper surface as much as possible.
Which is exactly what I needed, so I used it.
In order to restore the missing fragment of the bumper, we need to create a base (“Matrix”) on which we will apply fiberglass. We will do this using polyurethane foam. We take the container, shake it well, then using a water spray, we wet the surface on which we will apply the foam. If you miss this moment, then be prepared for the fact that the foam will simply fall off the bumper and the procedure will have to be repeated, which is an extra waste of materials and wasted time.
Ready.
Now we wait for the foam to dry completely.
Alignment of the "matrix".
The creation of the “matrix” of a bumper fragment must be treated as painstakingly as possible, because the final result of our work depends on it. Polyurethane foam is very easy to process with sandpaper, so it is often used to create various car parts and body kits.
We pick up a block of sandpaper, grit P 40, and try to make the surface as smooth as possible.
Do not pay attention to craters not filled with foam, we will eliminate this later.
There are two options for filling these cavities, although you may come up with something else.
And so, option 1: you can foam the cavities again, and then sand them with sandpaper. The disadvantages of this option are that you will have to wait again for the foam to dry, which is a waste of time.
2nd option , faster, more convenient and simpler. We fill the cavities with plasticine or putty for window frames (this was previously used for insulating windows). Lightly heat the plasticine with a hairdryer and easily level the surface using a metal spatula. This method has no downsides.
Preparing to apply fiberglass.
At this stage, we have the matrix of the future product ready, now all that’s left to do is to glue and glue part of the fiberglass bumper. In this article I will not repeat what materials and components are needed and how they need to be diluted. There is a separate article about this “fiberglass”.
I would like to warn you that the foam may “melt” from the resin, since when mixing the components, the reaction is accompanied by heating. Therefore, you need to protect yourself from “matrix subsidence.” For example, cover the surface of the “matrix” with masking tape; in addition, it will be more convenient for you to separate the foam from the fiberglass.
We impregnate the matrix with resin.
We apply 450 glass mat in two layers.
This will be quite enough for the strength of the bumper.
We are waiting for the fiberglass to dry completely.
At an air temperature of 20 degrees, this time ranges from 30 to 60 minutes. After which the fiberglass can be processed.
Processing fiberglass and applying putty.
For rough grinding of the surface, you can use a grinder with a flap wheel, then we process it using a grinding machine.
We use wheels with grit P 40.
For this, it is better to use a special putty with a plasticizer, but since I ended up with quite thick layers in some places, I used putty with fiberglass.
We rub it with a block of sandpaper and apply putty again, only this time fine-grained.
And so we repeat this procedure until we achieve a perfectly flat surface.
Bumper priming.
Perhaps this is the most pleasant moment after such labor-intensive work. We dilute the primer according to the manufacturer's instructions, apply it in two layers and wait for it to dry. Now it's up to the painter.
Bumper painting.
The “Hopeless Bumper” turned out quite well, as you have seen, nothing is impossible when you have such a wonderful material as fiberglass. I will be glad if my article “repairing a bumper with fiberglass” is useful to you.
PS If some points are not particularly clear to you, ask questions in the comments, I will be happy to help.
I recommend reading:
to the entry “Repairing a bumper with fiberglass. (“We mold” the missing fragments.)”
Amazing! This is great! I would never have thought that such a “fragment” could be perfectly restored with one’s own hands! It even seemed to me that a week would be too long for such a process. Although it may seem so from the outside, until I get down to business myself. My garage is empty, one of these days I’ll try to restore my bumper myself. I'm glad that my missing piece of bumper is several times smaller. )) Thank you for such a detailed description of bumper repair using fiberglass! I didn’t find anything useful on this issue on the Internet until I came here. Great article! Just a find for me!
From fiberglass, you can restore a bumper with absolutely any damage, even up to half the part being missing. I had a copy, a Mazda 626, on which the right side of the bumper was missing, and I couldn’t find a new one, so I had to restore it. It turned out perfect, even many thought that the bumper was simply replaced. With some fiberglass, two hands in the right place, and some creativity, anything can be invented. Good luck to you, Anton, in restoring the bumper.
I don’t understand, did the tape remain under the fiberglass layer? And also, did you then remove the rest of the foam that remained inside the bumper, or did you leave it as reinforcement?
After the fiberglass had dried, I first removed the foam from the back side, and then, where possible, removed the tape, since there is no point in leaving it inside the bumper. After this, on the inside, you can apply another layer of fiberglass, in case you think this structure is not very strong.
Thank you ! Great article! Respect to the author!
If you have any questions, please leave a contact number
What is your question?
Thank you very much for the article, everything is to the point, without further ado... I just need to do both the front and rear ones.
Great article. That's just how to restore a bumper that has all the elements in place, but from an impact it was all broken, but it still stands on the car simply by the holy spirit. What should you do in this case? Yes, so that on the second bump it doesn’t start to creep apart again.
It's hard to tell from your description alone! It’s like asking on the phone: “Doctor, my stomach hurts, what do you recommend?”
So, if the bumper is made of plastic and all the parts are in place, it is easier to solder it (with electrodes for plastic)
How to repair minor damage to a plastic car bumper
Bumper damage comes in many different types, from minor scratches and small dents to serious cracks. Small dents and scratches can be removed yourself.
If the car bumper is made of thermoactive plastic, then minor damage to it can be easily eliminated using the polishing method with special chemicals. means.
For example, if there is a shallow scratch, it can be treated with WD-40 universal cleaner.
In order to polish a scratch or chip, you will need a sponge, a soft rag and a chemical reagent. First, you need to clean the damaged area from dirt and dust with a sponge and water. After applying chemical. spray or sponge. Next, the damaged area is intensively polished with a rag until no damage is visible on it.
The second way to eliminate small dents and scratches on a plastic car bumper is to straighten the damaged area with a hot air gun. The essence of the method is that the damaged surface is evenly heated with a hair dryer. Due to heat treatment, the damage is leveled and straightened.
The method is simple and does not require special skills to perform, but it is not without its drawbacks: there is a possibility of deformation of the plastic; heating with a hairdryer can only be used on unpainted areas.
Also, a wax pencil is considered a simple and inexpensive way to eliminate minor damage to a plastic car bumper.
With its help, scratches and chips are simply painted over. Chem. the composition of the pencil fills the damaged areas, leveling them with the general surface and forms a protective layer. The process of removing chips and dents with a wax pencil takes no more than 5 minutes.
Repairing scratches on the bumper
We will also mention simple scratches that can occur randomly on the bumper of your car. Usually shallow scratches are removed using various polishing methods, the degree of polishing depends on the depth of the scratch itself. Ideally, after such polishing, the area is treated with a special protective varnish or a special protective paste for the polished areas.
Of course, if you have a scratch on the bumper as deep as iron or plastic, then it will be extremely difficult to do without spot painting, and in many cases you will have to apply a thin layer of putty paste.
Sequence of actions when soldering a damaged bumper
- The first step is to clear your workspace, be it a workbench, shelving or table. After removing the bumper from the car, place it on a flat surface and securely fix it.
- Thoroughly wash the bumper outside and inside (regular dishwashing detergent will do the job).
- Degrease the soldering area on each side; the surface should be clean and dry.
- Before you start soldering cracks, you need to make sure that the bumper is not deformed, as this can make it much more difficult to repair the cracks. To return the bumper to its original shape, you need to heat the plastic with a hairdryer. To do this, heat the bumper throughout the entire thickness of the plastic at the place of deformation and squeeze out the dent. It is better to straighten the dent with a blunt object (it can be a wooden block or the handle of a screwdriver), and then cool the area with a damp cloth. When working with a hairdryer, use a rag and straighten the hot plastic with gloves on, this will help protect your hands from burns.
- Remove all varnish and paint in areas where soldering will be carried out. Use a wire brush or coarse sandpaper.
- It is necessary to thoroughly clean and degrease not only the damaged area, but also the surrounding area.
- To eliminate further growth of cracks, their ends must be drilled.
- After this, start soldering. In places where the edges of the crack are in close contact, grab the plastic with small solders; this must be done as accurately as possible.
- Having soldered the main places of the crack, you need to wait until the plastic hardens. It is easy to determine whether plastic has hardened or not: semi-liquid plastic is shiny, while fully hardened plastic has a matte texture.
- Next you need to adjust the broken pieces of the bumper. Applying a splinter to the crack, trim off the interfering edges. In the same way, grab them to the bumper.
- Thoroughly sand the joint, apply primer, paint and varnish.
Repair plastic with your own hands using a soldering iron
Let's consider the option of how to restore the bumper frame and its attachment to the wing using a minimum number of tools. Prepare a millimeter mesh, a soldering iron, scissors, a screwdriver, and a sharp blade. To make soldering the structure with your own hands convenient, as well as to obtain a high-quality result, it must be removed from the car and then proceed step by step .
- Place the part on a flat surface;
- Plug in the 100-watt soldering iron and wait until it reaches maximum temperature;
- Connect the damaged parts evenly to solder them from the front side;
- Cut the mesh into pieces, apply it to the inside of the structure and heat it with a soldering iron. If you have a plastic welding hair dryer, use it;
- Quickly, without allowing it to cool, use a screwdriver to carefully press the mesh into the plastic;
- In case of serious damage, repeat the previous procedure for the front side of the structure;
- Cut off excess plastic with a sharp blade>;
- Level the seam with a rubber spatula using plastic putty;
- To improve adhesion, apply a primer, then you can begin painting.
By performing these simple steps with a minimal set of tools, you can solder any plastic car structures with your own hands.
The main thing is to take the work seriously, take your time and carefully solder the gaps. If you can carefully perform this sealing procedure only on the inside of the part, then you can do the plastic repair without painting the bumper!
Step-by-step instructions for restoring a bumper
Step 1. Regardless of the type of damage, the spare part must be removed . First of all, it will be convenient for you. Step 2. Prepare the repair site . Cover the reverse side of the damage with tape. Clean the surface and sand the edges. Cleaning is carried out in the direction of damage at a distance of up to 10 cm. Step 3. Alignment . If there are dents or uneven spots, it's time to heat them up and straighten them with a hair dryer. Step 4. Recovery . It is necessary to work with gloves. Apply the resin to the damaged area and 20 cm from it, using a previously prepared brush. The top is covered with fiberglass; the more layers, the stronger the joint. The resin should saturate the fiberglass well; for this, each layer is lubricated.
Step 5. Dry well and sand the surface with sandpaper. Step 6. Putty. For a more reliable connection of the putty with the fiberglass, apply a primer . The putty is applied in a thin layer . If the damage is serious (break, chip), an additional thin metal reinforcing mesh should be applied to the putty. Step 7. Preparing for painting. Again, dry the surface well, you can use a simple hairdryer. Sand the repair area to perfect condition.
Step 8. Painting . You can paint the entire bumper, or part of it, if the damage was not significant, the main thing is to choose the right paint tone. If you have no previous experience in painting, most likely you will not be able to do it unnoticed, so it is preferable to paint the entire bumper. To do this, you should clean the entire surface with a grinding machine and paint it with new paint in 2 layers.
Step 9. The restoration of the bumper with your own hands is completed, you can begin installing it in place .
0 0 vote
Article rating
Requirements for soldering irons for plastic
One of the main parameters for any such tool is power. When choosing a suitable soldering iron, you need to ensure that it is at least 100 W. This is a very important requirement that must be fulfilled, since otherwise the plastic may simply not melt. When choosing thermal hair dryers, you should focus on models from 1600 W.
The main requirements include rapid heating of the tip. Standard models that take several minutes to warm up are not suitable here. When working with plastic, it is better to choose those options in which the tip reaches the desired temperature within a period of up to 10 seconds. For some situations, it is permissible to take a model with a longer warm-up time, but in professional work this will be a big disadvantage.
"Note!
A soldering iron for plastic bumpers should be convenient so that the master can easily control all movements. This requires delicate work so as not to damage entire parts of the product.”
Removing the bumper
On most cars, bumpers are secured using pins and screws. The difficulty here is that some fasteners are not visible at first glance, you will have to look for them.
Next, you will need to disconnect the fender liners from the bumper; often there are screws hidden under them that secure the sidewalls. Then you should look at the part from below: there are screws for attaching it to the body, and sometimes there is a special plastic splash guard.
The upper mounting bolts of the front bumper are located under the decorative radiator grille, so remove it first. Additional screws may be located behind the lower grille, as well as behind the registration plate.
After unscrewing all the fasteners, the bumper, starting from the end parts, is carefully detached from the body. If necessary, the wires from the fog lights and washer hoses are also disconnected.
Final stage
After the soldering area has cooled and completely hardened, use 40 and 80 grit sandpaper to remove excess plastic and smooth the seam with putty.
To finish leveling the seam, we use a special putty for plastic. Try not to apply too thick a layer of putty, as this may lead to it peeling off from the seam during use. We wait until the putty has completely hardened and begin sanding the seam with P800 sandpaper. We dilute the primer according to the manufacturer's description indicated on the can of primer. Apply the primer in 2 layers, waiting 15 minutes between each layer. Additionally, you can apply a layer of developing primer, after which the identified defects can be eliminated using nitro putty, followed by sanding with P1000 sandpaper. After removing dust from the surface, you need to degrease the part, after which you can begin painting the bumper. Paint the part following the paint application technology.
Primer work
- Take a rag and thoroughly wash the bumper. Let it dry.
- Inspect the bumper for proper shape. If everything is in order, then you can start priming.
- The primer must be applied in the same circular motion towards the right and left sides of the bumper.
- Allow the primer to dry completely.
- Take 800 grit sandpaper and scrub the bumper very well with water. Use a water bottle for this. At the same time, you need to take into account that it doesn’t matter where you had a crack or a chip appeared. It is necessary to wash the entire bumper.
- After it dries, the plastic layer should take on a matte tint, and the top primer layer will be completely washed off.
Then you can apply another layer of primer and wash it off the same way. After it has dried, you need to carefully inspect the entire bumper using a lamp. It must be absolutely even and form a single whole.
In conclusion, we can add that a plastic bumper is the face of your car. Therefore, it requires proper care and, if the need arises, then it will also need high-quality repairs. Whether you repair it yourself or entrust this matter to specialists is up to you to decide.
Another way to solder a bumper at home
For more complex repairs of a plastic bumper, you need to prepare the following equipment and materials:
- soldering iron, staples for stapler;
- hair dryer, grinder.
You will also need tools for subsequent surface treatment:
- rubber or plastic spatula;
- spray gun, putty;
- primer, paint.
Start soldering the damaged parts from the inside, making soldering evenly along the entire fault line. It is important to solder all branches.
- Secure the seam with staples from a stapler , placing them at a distance of a couple of centimeters from each other. To prevent the legs of the staples from extending to the front side, they should be filed down a little. It will be easy to insert the staples into the heated plastic.
- The front side of the structure should restore its previous shape. Sand it with a sander. To sand the surface, if you do not have a sander, you can use coarse sandpaper.
- After sanding, start soldering the front side.
- Line up the seams by carefully melting the plastic into the grooves. Sand the treated surface.
- Clean the repair area of the part from dust and plastic particles.
- Use a hair dryer to fuse the plastic hairs on the surface of the part. Do this carefully, without overheating the material. Apply putty to the surface. After drying, sand with a sander. Use sandpaper in hard-to-reach places.
- Remove dust and apply 1-2 layers of plastic primer, then paint using a spray gun.
If you are an inexperienced craftsman, then in order to get an excellent result after painting, it is better to do a complete painting of the structure, since local painting (with a transition) requires some skills and abilities.
What is required for repair and how to choose the right technology
In order to restore a plastic bumper, it is best to purchase a special kit, which includes the following materials:
- fiberglass;
- epoxy resin;
- hardener;
- sandpaper;
- putty for plastic;
- mixing container.
In addition, it is worth having the following tools and materials available:
- varnish, paint of any color;
- wire;
- metal reinforcing mesh;
- electrodes;
- electric soldering iron
So, you decided to repair the plastic bumper yourself. Where to begin? First of all, you must first determine the need to prime the plastic. There are several ways to do this:
Setting fire to plastic. To do this, take a small piece of the bumper, clean it of any remaining paint and dirt, and set it on fire. In this case, you need to carefully monitor the combustion behavior of the material. If the material burns and produces black smoke, there is no need for a primer. If the material burns like a candle, then before the main priming you need to apply primer for plastic.
Buoyancy check. The plastic is dipped into water. If it sinks or goes completely under water, the part does not need to be primed first. When the plastic remains afloat, it means that before applying acrylic primer, there is a need to use a special primer for plastic.
How to restore fiberglass and hard plastic parts
If the body kit is made of hard plastic or fiberglass, do-it-yourself repairs of plastic bumpers are carried out using the gluing method. This restoration method is most popular for fans of auto tuning and repair of body parts of VAZ family cars. In this case, after cleaning and thoroughly washing the part, the following actions are performed:
- Treatment of crack edges. After tearing, the edges of the cracks in fiberglass bumpers are framed by threads of material that do not allow the parts to fit tightly together. Interfering fibers are removed using a universal grinder (angle grinder), usually called a grinder.
- We combine the joined fragments and fix them on the front part with tape or special glue
- Next, epoxy resin or a more modern material is prepared - polyester resin , according to the instructions from the manufacturer
- From the wrong side, lubricate the crack and an area 50 mm wide next to it with the prepared composition.
- We impregnate a thin fiberglass mat with the same mixture and apply it to the fracture
- We apply layer after layer of glue and fiberglass until the thickness of the patch is comparable to the thickness of the bumper at the defect site
- We are waiting for the fiberglass to harden and move on to sealing the front side
- Using a grinder, we make a V-shaped groove on the outer surface so that the edges of the break gently converge towards the patch
- We fill the resulting groove with fiberglass impregnated with polyester resin until it is completely level.
- After the repair compound has hardened, we grind the ESM
Step-by-step instructions for bumper repair technology for different types of damage
Nature of damage - gust
When there is a tear, the edges of the tears are processed using a grinding machine.
Having completed grinding the edges, the edges of the gaps are joined, and the part is placed on a table or flat surface to be able to adjust the dimensions. You can achieve complete disappearance of the damage by stripping the part with your own hands towards the cracks, at intervals of up to 5 cm. The stripping lasts until the new layer laid on the other side of the part is visible. Polyester resin is applied to the crack and around it at a distance of up to 10 cm. Work with resin using rubber gloves. The resin is applied with special brushes. The resin is covered with fiberglass (grade 300) in several layers. After everything, we leave the part for a while until the resin dries. The putty is applied in a thin layer, and sanding is carried out with sandpaper or a belt disc of a grinding machine.
Break or hole
If damage in the form of a hole is discovered on a part, repairs will take more time and effort. The hole in the bumper needs to be repaired and it's not a crack, it will require more fiberglass and putty. It is necessary to clean the surface in the area of the hole at a distance of up to 10-15 cm. This is necessary to increase the rigidity of the glass fabrics. After cleaning the surface, tape is glued to the hole on the back side of the part. The resin is applied to the hole and at a distance of up to 20 cm from it.
Fiberglass is laid on top of the resin, in 3-4 rows. The more, the stronger the connection will be. Each row is re-lubricated with resin. After the resin has dried, you need to start cleaning the resulting protrusion. Using sandpaper or a resin roller, remove this layer and clean it. A primer is applied over the covered area and sealed with putty. A metal mesh is applied to the putty to prevent microcracks from appearing. The putty can be dried with a hairdryer. You can level this place with the plane of the bumper yourself using a grinding machine and a special disk.
Dents
It depends on the complexity of the dent; if it is strong and large in size, then it is better to cut it out and carry out the same actions as with a hole. If it’s small, then we’ll use a hairdryer and do it ourselves. The damaged area warms up, and when heated to a certain temperature, we return it to its original position. Even if you can’t level it with a hairdryer, you can always cut off the protruding part and seal it with resin. Small dents that go inside the bumper are repaired with resin and putty, and you're done.
Scratches
Depending on the nature and complexity of the scratch, apply resin (for a deep scratch) or putty (for a shallow one), after sanding the area in the area of the scratch.
Breakaways
There are times when the corners of a part or their parts break off. The lost part of the bumper can be restored using fiberglass. Here, DIY repairs will be a little more difficult. After all, repeating the shape of the broken part of the bumper can cause problems, especially if this part is lost. It is better to seek help from a professional, but if you have self-confidence and decide to do everything at home, then you can try. The place where the part broke off is cleaned until the fiberglass fabrics that protrude completely disappear. Fiberglass can perfectly replicate any corner shape. The fiberglass patch is equalized with sandpaper. Part of the corner should be the same shape as the bumper. The gaps will be closed with new layers of resin and fiberglass. It is better to strengthen the corners from the inside by installing 4 layers of glass material. Repairs have been completed for any type of damage, and you can move on to the last stage of work, painting the bumper.
Painting
Painting is done using a spray gun and compressor. The paint is pre-mixed with a solvent and the color is selected. Either the damaged area or the entire bumper is painted. The first option is very difficult, the difficulty is that a non-professional will not be able to paint the place so that it does not stand out. It is better to use the second option, sand the entire bumper and open it with new paint. Painting is carried out in two layers. After the paint has dried, the bumper is installed in place. The car's bumper was restored at home.
Forget about fines from cameras! An absolutely legal new product - Traffic Police Camera Jammer, hides your license plates from the cameras that are installed in all cities. More details at the link.
- Absolutely legal (Article 12.2);
- Hides from photo and video recording;
- Suitable for all cars;
- Works through the cigarette lighter connector;
- Does not cause interference to radios and cell phones.
Step-by-step bumper soldering technology
Do-it-yourself bumper soldering is performed using the following technology:
- It is necessary to securely fix the body kit. You can use a clamp, or two workbenches (in this case, it is important not to overpress the fastening, otherwise the plastic will be deformed).
- The workpiece must be thoroughly washed on both sides. This will greatly facilitate the process of restoring the element.
- Sand or sand the edges of the damaged area. Degrease the work surface.
- A hot soldering iron. At an angle of 45 degrees, you will need to make “notches” on the edges of the parts to be joined (the tip of the device is deepened to almost half the thickness of the elements being soldered). Afterwards the edges are smoothed and sealed.
- Reinforcement is being carried out. Using a hair dryer, the working surface is heated from the inside, then metal elements are soldered along the entire seam: staples from a construction gun or brass mesh. If you skip this step, the crack will open again.
- Increased connection strength. This is done through the use of plastic solder; it must have a type of plastic identical to the body kit.
The repaired body kit may crack, therefore, the seam is additionally treated with epoxy resin or glue.
After completing the restoration work, you will need to give the body kit an acceptable appearance.
Step-by-step instructions for bumper repair technology for different types of damage
Nature of damage - gust
When there is a tear, the edges of the tears are processed using a grinding machine.
Having completed grinding the edges, the edges of the gaps are joined, and the part is placed on a table or flat surface to be able to adjust the dimensions. You can achieve complete disappearance of the damage by stripping the part with your own hands towards the cracks, at intervals of up to 5 cm. The stripping lasts until the new layer laid on the other side of the part is visible. Polyester resin is applied to the crack and around it at a distance of up to 10 cm. Work with resin using rubber gloves. The resin is applied with special brushes. The resin is covered with fiberglass (grade 300) in several layers. After everything, we leave the part for a while until the resin dries. The putty is applied in a thin layer, and sanding is carried out with sandpaper or a belt disc of a grinding machine.
Break or hole
If damage in the form of a hole is discovered on a part, repairs will take more time and effort. The hole in the bumper needs to be repaired and it's not a crack, it will require more fiberglass and putty. It is necessary to clean the surface in the area of the hole at a distance of up to 10-15 cm. This is necessary to increase the rigidity of the glass fabrics. After cleaning the surface, tape is glued to the hole on the back side of the part. The resin is applied to the hole and at a distance of up to 20 cm from it.
Fiberglass is laid on top of the resin, in 3-4 rows. The more, the stronger the connection will be. Each row is re-lubricated with resin. After the resin has dried, you need to start cleaning the resulting protrusion. Using sandpaper or a resin roller, remove this layer and clean it. A primer is applied over the covered area and sealed with putty. A metal mesh is applied to the putty to prevent microcracks from appearing. The putty can be dried with a hairdryer. You can level this place with the plane of the bumper yourself using a grinding machine and a special disk.
Dents
It depends on the complexity of the dent; if it is strong and large in size, then it is better to cut it out and carry out the same actions as with a hole. If it’s small, then we’ll use a hairdryer and do it ourselves. The damaged area warms up, and when heated to a certain temperature, we return it to its original position. Even if you can’t level it with a hairdryer, you can always cut off the protruding part and seal it with resin. Small dents that go inside the bumper are repaired with resin and putty, and you're done.
Scratches
Depending on the nature and complexity of the scratch, apply resin (for a deep scratch) or putty (for a shallow one), after sanding the area in the area of the scratch.
Breakaways
There are times when the corners of a part or their parts break off. The lost part of the bumper can be restored using fiberglass. Here, DIY repairs will be a little more difficult. After all, repeating the shape of the broken part of the bumper can cause problems, especially if this part is lost. It is better to seek help from a professional, but if you have self-confidence and decide to do everything at home, then you can try. The place where the part broke off is cleaned until the fiberglass fabrics that protrude completely disappear. Fiberglass can perfectly replicate any corner shape. The fiberglass patch is equalized with sandpaper. Part of the corner should be the same shape as the bumper. The gaps will be closed with new layers of resin and fiberglass. It is better to strengthen the corners from the inside by installing 4 layers of glass material. Repairs have been completed for any type of damage, and you can move on to the last stage of work, painting the bumper.
Painting
Painting is done using a spray gun and compressor. The paint is pre-mixed with a solvent and the color is selected. Either the damaged area or the entire bumper is painted. The first option is very difficult, the difficulty is that a non-professional will not be able to paint the place so that it does not stand out. It is better to use the second option, sand the entire bumper and open it with new paint. Painting is carried out in two layers. After the paint has dried, the bumper is installed in place. The car's bumper was restored at home.
How to solder a bumper
Due to the fact that the final result of DIY car repair depends on soldering, this process must be treated very carefully. If you do not solder correctly, the putty, primer and paint will apply unevenly.
Try to follow all instructions as carefully as possible:
- First of all, correctly and evenly connect the broken parts of the bumper together and solder them on the front side.
- Now you will need scissors and a mesh. The size of the mesh depends on what kind of crack you need to repair.
- Now you need to carefully solder the bumper from the inside. To do this, the mesh must be applied to the plastic and heated with a soldering iron. After this, carefully place the mesh into the soft plastic using a screwdriver.
- If the car bumper is very damaged, then you need to solder not only the inside, but also the front part using a mesh. Thanks to this, you will strengthen the seam as much as possible with your own hands and prevent the possibility of repeated breakage.
- Take a blade and cut off the excess plastic
Damage to bumpers is divided into several types
- Scratches.
- Gusts or ruptures. The integrity of the structure is lost.
- Dents. Severely damaged. In addition to simple gluing, you will also need to straighten dents. If the damage is deep, you can cut it out and repair the hole.
- Holes, breaches. There is some isolated damage, but the bumper itself retains its structural integrity. Repair is more labor-intensive and will require more fiberglass and polyester resins.
- Chips. Chipping of corners of the bumper or its parts. The damaged part needs to be reproduced or restored using fiberglass material. When making repairs yourself, difficulties may arise because it is difficult to repeat the shape of a part of the bumper, especially if it is lost.
Features of contraction
First, repairs, including preparation and soldering, are carried out from the inside of the bumper, and then from the outside. Pulling is the first stage of work. It is especially relevant in the case of a serious violation of the structure, since it is very difficult to solder such damage yourself.
First of all, you need to cut the metal fasteners with construction scissors or a metal blade, depending on the nature of the damage. Then you need to use a drill to make holes for the bolts. Screws are inserted into them and secured with nuts on the back side of the bumper. If you are doing the repair yourself for the first time, you should install the fasteners from the inside. It is advisable to do the tightening from the back side in order to preserve the aesthetic properties and shape of the part. The plate is installed and secured outside the gap. The screws should be kept as far away from it as possible along the path of the bolt in the fastener. The drill is installed in the far part of the plate. If you install the bolts correctly, the unevenness will be restored without disturbing the geometry of the bumper.
Next you need to recess the top of the bolt into the bumper. To do this, you need to make a hole around its head with a drill of a smaller diameter, observing the angle of the head. In this case, it is necessary to create a rim that is not too shallow, but also not to drill through the bumper, as this will cause the bolt to fly out. It must enter the recess with some force, otherwise the crack will open again.
The bolts are installed from the outside, and the fastening material is installed from the inside, and the nuts are tightened. Remember that if you tighten them too much, the bumper may crack, and if you tighten them too loosely, the connection will come apart over time.
If the crack is located in the curved part of the bumper, you need to give the plate the appropriate shape. There are various methods, but in any case, the plate should be held on the back side of the bumper under the defect. In this case, when the bolts are tightened, the crack will close.