Replacing the timing belt of VAZ 2113, 2114 and 2115 with your own hands
Replacing the timing belt with your own hands on VAZ 2113, 2114, 2115 cars, in the cylinder head of which 8 valves are installed, is relevant today for many owners of cars of these brands.
This operation cannot be called complicated, since repairs can be easily carried out in a garage or on any flat area without the use of special equipment. Before starting work, you should prepare the necessary spare parts:
- Timing belt, article number 21080-1006040-82.
- Tensioner roller, article number 830900AE2 (2108-1006120).
- Pump in the engine cooling system, article number 2108-1307010.
Experts recommend replacing the timing belt, tensioner and pump in the cooling system at the same time, since problems with this unit most often lead to malfunctions in the valve mechanism. You will need tools and accessories:
- car jack;
- car body stand;
- wheel chocks;
- set of wrenches;
- container for draining coolant;
- rags.
How to independently replace the timing belt on an 8 valve VAZ-2115 car
The design of the timing mechanism on the VAZ 2115 is identical to previous modifications 2114, 2112, 2110. The main purpose of the timing belt. transmission of torque from the crankshaft to the camshafts for further movement of the car.
During systematic use of a technical device, the drive often fails. At high speeds and rpm, the belt breaks into shreds, blocking the operation of the cylinder head and valve mechanism. Frequent cases of holes in the block, valve bends.
WARNING! I found an absolutely simple way to reduce fuel consumption! You do not believe me? An auto mechanic with 15 years of experience also didn’t believe it until he tried it. And now he saves 35,000 rubles a year on gasoline! Read more
The process of replacing the drive yourself is not complicated, but requires the attention of a specialist. Violation of technology is unacceptable. If you have any difficulties with repairs, contact a workshop specialist for help.
On VAZ 2115 cars a toothed belt is pre-installed. Unlike wedge and clinic, it has a long service life. The cost of the belt is 10% higher!
Analogues of the video
- GATE T42042 or T42042A (2 pcs.)
- MAPCO 23081
- FLENNOR FS99018
- LUK 531 0671 20
- OPTIMAL 0N1917
Show all articles
- BREDA LORETT TDI3009
- TORK 830900AE2
- ESPRA 2108-1006120 / ES0108
- INA 531075010
- KORAM C747
- VPZ-23 830900AE1
Preparatory work
To replace the VAZ 2114 timing belt with your own hands, you will need a lift, an inspection hole in the garage. When there is neither one nor the other, any flat area will do.
The car is placed at the work site, the handbrake cable is tightened, and the gear shift lever is placed in the neutral position. Wheel chocks must be installed under the rear wheels. Using a wheel wrench, tear off the wheel bolts on the wheel in the front of the car on the right side, lift the vehicle with a car manual lift, place a reliable stop under the body and dismantle the wheel. Now you can begin the operation of replacing the timing belt on a VAZ 2114 8 valve.
Set timing marks for VAZ 2115 injector
How to correctly and accurately set the timing marks of a VAZ 2114 with an eight-valve engine will be discussed in this article. In fact, the engines on the 14th Lada model are installed the same as on the eights, nines, and tens. There are minor differences. Therefore, this guide will also be useful to owners of these models. Let's look at the most important questions that a motorist asks himself.
About the procedure for doing the replacement yourself
Open the engine compartment hood and disconnect the terminals on the battery. Further work is carried out in this order:
- Using a “10” key, unscrew the screws securing the plastic cover of the front part of the timing mechanism and remove it from the engine.
To loosen the tension of the generator set drive, take the key to “13”, loosen the tension, and dismantle the generator belt.
Now you need to set the control marks in the drive. To do this, the assistant uses improvised means to rotate the crankshaft pulley, and the driver controls the location of the installation marks. One of them is on the camshaft pulley and the cover behind the pulley, the second is on the cylinder block and the crankshaft pulley.
To ensure that the marks are installed correctly, remove the rubber plug on the clutch housing. In the window that appears, a mark on the engine flywheel should be visible, which coincides with the mark on the clutch housing.
- The time has come to remove the engine crankshaft pulley. It is necessary to stop it from turning. To do this, engage first gear and press the brake pedal. After this, use a socket wrench to “17” to unscrew the pulley mounting bolt and remove it from the engine.
- To remove a worn belt, you need to loosen its tension. This is done by unscrewing the tensioner roller fastening bolt, then turning the roller to the left and dismantling the belt.
- When it is planned to replace the tension roller and cooling system pumps, they are removed from the engine. Before this, the engine cooling system fluid is drained.
Installing a new belt
Installation of the timing belt VAZ 2113, 2114, 2115 8 valves is carried out in the reverse order of removing the worn part. Before starting work, carefully check the position of the timing marks in the timing mechanism drive again. Failure to perform this check may damage valve train components in the cylinder head. There are known cases where, in addition to valves, pistons and, in some cases, connecting rods were damaged. Install the adjusting washer first, then the tensioner roller, screw the nut onto the bolt securing it, but do not tighten it. When the engine cooling system pump is changed, a new spare part is installed. Next, the order of work will be as follows:
Installation begins with the crankshaft pulley of the power unit.
Next, they cover the pump pulley, circle the roller in the tensioner, and cover the belt on the camshaft pulley.
At this point, the repair work done by yourself can be considered complete. The belt in the drive can be replaced by contacting a specialized center, but the price for such work will start from 1000 rubles. You can save on repairs by replacing the belt yourself, following the instructions provided and the advice of specialists.
Also watch the video of replacing the timing belt on a VAZ 2113, 2114, 2115:
How to install a new timing belt on a VAZ 2115
Replacing the timing belt begins with marking. When they are ready, you can begin attaching the new unit.
Timing belt marks on VAZ 2115
Before installing the timing belt on the VAZ 2115, you need to put marks. They will allow you to complete the work according to the regulations, accurately and in accordance with all the rules. The gears are fixed at zero, and points in the range are tested for matches. When the work is completed, the casing marks are secured in the optimal position, and the shafts are fixed.
Look for a plug on the box (it is located under the thermostat). They test it, remove it, and find the flywheel. As you make marks on the casing and camshaft, check that they match.
To make all the marks faster, it is convenient to use a special diagnostic device
Installation process
To install a timing belt on a VAZ 2115 with an injector you need:
Reassemble in reverse order.
Causes of timing belt failure
There are several reasons for this breakdown on the VAZ-2115:
- natural wear and tear;
- pollution;
- ingress of oil and foreign objects;
- pump failure;
- changing the position of the tension roller;
- camshaft or crankshaft jamming.
The role of the timing belt installed on the injector of a VAZ-2115 car is to ensure that the engine valves open at the right time. It synchronizes the camshaft pulley with the crankshaft. Therefore, it is important to change it in time when it wears out so that problems with the engine do not arise.
Timing belt on a VAZ 2115 car
The belt drive on the VAZ 2115 is identical in size to the VAZ 2110 - 2114. Technical characteristics of the drive: length 1306 x number of teeth 116 x width 9.5 mm.
| Name/article | Price in rubles |
| Original | |
| VAZ-2112 / 2110 engine 16 valves, 2112-1006040-83 | From 1600 |
| VAZ 21120 (2110)-1006040-00 | From 1600 |
| VAZ 2112 (2110)-1006040 (16 valves) | From 1600 |
| GATES K015644XS | From 2000 |
| GATES K015536XS (16 valves) | From 2000 |
| GATES K055781XS, K015587, K015564 | From 2000 |
| Analogs | |
| BOSCH 2112-1006040 | From 1200 |
| INA 530055410 | From 1200 |
| CONTITECH CT996 | From 1200 |
| GATES 5539 | From 1200 |
| BOSCH 1987948286 (16 valves) | From 1300 |
| BOSCH 1987946329 | From 1300 |
| CONTITECH CT527K2 | From 1800 |
| CONTITECH CT1137K1 | From 1800 |
| LYNXauto 137FL22 (16 valves) | From 1500 |
| Hola TH1372 (16 valves) | From 1500 |
| BOSCH 198798527 (tension rollers) for VAZ 8 and 16 valves | From 450 |
*check prices with an authorized dealer at the time of purchasing parts.
Before purchasing components, check the compatibility of the part with your technical device. Check the article numbers with the data specified in the operating instructions.
When replacing parts, do not forget to place marks on the crankshaft and camshaft. Many car enthusiasts neglect the rule, as a result of which the engine does not start, operates unstably, and the ignition timing shifts.
Which manufacturer is better: domestic or foreign? Russian analogues are not inferior in quality to imported ones. Whether it’s worth overpaying for “delivery” - decide individually, but you need to listen to the opinion of experts.
Causes of timing belt wear on VAZ 2115
- Duration of vehicle operation without intermediate prevention and diagnostics;
- Installation of non-original parts, poor workmanship;
- Mismatch in length, width, number of teeth;
- Aggressive driving style, speed limits;
- High, low temperature conditions, climatic features of the region where the technical product is used.
How to determine when it's time to change the timing belt
The most prudent thing to do would be to install a new spare part on your VAZ-2115 before the belt breaks. The following signs may indicate that urgent replacement is necessary:
- hum and extraneous noise during operation of the power unit;
- mileage on one belt is over 60 thousand kilometers;
- oil getting into the timing belt.
In a situation with a belt, it is best to spend money on a new spare part and replace it several times than to pay later for a major engine overhaul. Manufacturers often assure that you can drive up to 100 thousand kilometers on one belt on a VAZ-2115; in fact, it is better to change it every 60 or a little earlier.
Check the belt tension regularly; if it sag or distributes the load unevenly, this component may soon need to be replaced. Remember that in this part of the timing belt there is no such thing as self-adjustment during operation. Uneven tension will inevitably lead to breakage. This part of the gas distribution mechanism must be replaced immediately after the first time it is tightened.
Be sure to monitor the battery and ignition system of your VAZ-2115, since starting the engine “from the pusher” has a detrimental effect on the condition of the timing belt. The fact is that with this type of launch, the shafts begin to move with a strong jerk, which stretches the belt and leads to a decrease in its service life.
Video “Replacing the timing belt on a VAZ 2114 with an eight-valve engine”
In this video you can see the replacement process, as well as the necessary tools.
A specialist at a service station or an experienced car enthusiast who has already performed this procedure several times will be able to replace the timing belt in a few minutes. Another thing is for a car owner who has encountered this for the first time and does not know how to set timing marks on a VAZ 2114. In this case, the process will take much longer.
At the same time, the better a person knows the very operating diagram of the engine and the functions performed by the part being replaced, the easier it will be for him to understand the features and subtleties of the replacement. So let's understand the theory.
How is the replacement made?
Before replacement is carried out, you need to buy a new high-quality spare part and a set of car heads and keys. The price of a high-quality timing belt fluctuates around a thousand rubles. For that kind of money you can buy components made in Germany, the USA or Russia.
The cheapest components for the VAZ-2115 eight-valve engine are currently supplied from China, but their quality leaves much to be desired. Car enthusiasts increasingly prefer German spare parts from the BOSCH, Finwhale and ContiTech brands. The American brand Gates is not bad in terms of its quality characteristics. Do not buy cheap components, as they quickly fail. In this case, you will need replacement very often.
Once you have everything to carry out the work, you can proceed to it, following the instructions:
- Using a wrench or spanner, unscrew the three bolts that secure the cover, which prevents lubricant and dirt from getting on the belt.
- Be sure to remove the negative terminal from the battery - this is necessary so that parts of the car are de-energized. Before proceeding with further replacement work, set the pistons of the first and fourth cylinders to top dead center.
- Loosen the timing roller until it begins to rotate. To do this, use a 13mm wrench to slightly unscrew the bolt holding it down. Carefully rotate the roller.
- After this procedure, the belt will loosen and can be easily removed from the camshaft.
- To gain access to the gas distributor from below, it is necessary to remove the right front wheel.
- Using a spanner wrench, unscrew the bolt that secures the generator pulley. This is not so easy to do, since this pulley is constantly spinning. The trick is that there is a special black plug on the left side of the clutch housing; it needs to be removed. Insert a mounting blade or screwdriver into the resulting hole so that it fits between the teeth of the flywheel. After that, unscrewing the bolt from the pulley will not be difficult.
- Once the generator pulley is loose, the belt can be easily removed. After which it is replaced.
After you remove the worn part of the gas distributor drive, you need to install the new one in the reverse order:
- first stretch on the crankshaft pulley;
- then install through all the rollers on the upper (camshaft) shaft.
Important! After you remove the worn belt, do not spin the shafts. Changing the position of the pulleys leads to the need to adjust the phases of the gas distribution mechanism.
To adjust the tension of the GR mechanism belt, there are two small holes on the roller. A special key is inserted into them (you can replace it with a drill or self-tapping screws) to turn the roller. When the tension is correct, the belt in the middle part between the two pulleys turns 90 degrees.
How to replace the alternator belt on a VAZ 2113-VAZ 2115?
Removal: 1) First, decide which side will be easier for you to replace (You can replace it from above, but this is not very convenient, or crawl under it from the side, but this requires more time), once you have decided, proceed to it, at the beginning we will describe how to replace it if you crawl under it from the side (Even if you are going to change it from above, still read this and do not jump to another point, because you will miss very important details that we will not describe in the next paragraph) , to do this, lift the right front side of the car with a jack and as soon as it is raised, remove the right wheel (For information on how to properly remove a wheel, read the article: “Replacing wheels on a car”), after which you will have excellent access to the alternator belt (If you have you have the fender liner installed, then remove it too, all the fender liners are attached with screws, so they will need to be unscrewed), but by the way, if the crankcase protection still bothers you (there are simply bulky protections that cover the entire bottom, how to remove the protection, read the article : “Replacing the crankcase protection on a VAZ”), then remove it too, and now proceed with the replacement, to carry it out, loosen the two nuts securing the generator (One nut is indicated by a red arrow, the other white in the small photo) and then completely unscrew the bolt to the maximum amount by which it will turn away (Indicated by the blue arrow) and thereby remove the old alternator belt from the side through the arch, but before removing it, pull the alternator itself completely to the car engine until it stops.
2) As for replacing the belt from the top, in this case there is no need to remove any wheel and you also don’t need to lift the car into the air, but simply unscrew the two nuts securing the generator (They are shown in the photo above, one of them is shown with a red arrow, and the other white, by the way, if the bottom nut cannot be unscrewed, it is still indicated by a white arrow, then do not unscrew it, the red one will only need to be loosened thoroughly and that’s it) and after that, unscrew the bolt itself to the maximum value (Indicated by the blue arrow in the photo above) and likewise With one hand, bring the generator close to the car engine, and with the other, remove the belt itself from it and pull it out through the top if you succeed.
Installation: Installation of a new belt begins with putting it on the generator drive pulley and only after that it is put on the generator roller (So that you can distinguish the pulley and the roller from each other, we will tell you right away that the pulley is a large part, and the roller is small and it comes out exactly from the generator, we also indicated the roller with a yellow arrow in the second photo from the top), after the belt is on, proceed to adjust it, to do this, move the generator itself away from the engine with your hand (It moves because its fastening nuts are loose) and then adjust tighten the bolt (Indicated in the photo below by an arrow) clockwise (This way the belt will tighten), but if you suddenly overtighten it, then loosen the belt tension a little, to do this, loosen the adjusting bolt counterclockwise and at this time move the generator itself closer to the car engine, all this is done until the belt is adjusted normally, as soon as you have achieved the correct belt tension, tighten all the nuts previously turned out until they stop and you can start the car and check the operation of the new belt on the car, let's immediately note the fact that It shouldn’t make any extraneous sounds (Whistling), if it does, it’s either too loose, or it’s very cold outside and the car hasn’t warmed up yet, or the material itself from which the belt you bought is made is too oak and that’s why this is happening. whistling sound in a car engine.
Note! The best way to adjust the belt is to bend it with your finger with a force of 10 kg by 6-10 mm in the middle part. For more details on where the belt needs to be bent with your finger, see the photo below, by the way, to be 100% sure if it’s normal Is the belt tight or not, we recommend that you use one of the methods, the first is that you must put the car in fourth gear and drive it (About 5-10 meters), the second method will give us the same thing as the first, it’s just done according to another, namely, the neutral gear is engaged and the bolt that secures the generator drive pulley is turned with a socket head (see photo below, this bolt is indicated by an arrow; to get to it, you need to crawl under the wheel on the right front side and, if possible, even remove this wheel and through the arch you can easily reach this bolt) you need to turn this bolt about 2-3 turns, then check the belt tension again and, if necessary, loosen it or tighten it again, but only if you adjust the belt tension again , then again perform one of the two operations indicated just above!
Additional video clip: You can find more details about how you can remove the alternator belt from the car and more details about how it can be adjusted in the video clip located just below:
Replacing the timing belt on VAZ 2113, VAZ 2114, VAZ 2115
The timing belt synchronizes engine operation. Without it, the car simply won’t start, and if it was working and the belt breaks or falls off, the engine will instantly stall. And if the engine bends the valves, it will not only stall, but also bend the valves. True, this does not apply to 8-valve cars of the Samara-2 family. The belt must be changed on time, its condition monitored and maintenance carried out. Belt rupture, flying off and other troubles depend on the quality of the belt and the pump. We recommend that you always carry a new belt with you in the trunk, because replacement is a simple and short process. This prospect is much more pleasant than a breakdown far from home, garage or service station. Here only a tug or tow truck will save you.
Note! You will need the following tools: spanners, a 10mm socket wrench, a mounting spade (sold at a reasonable price at a car dealer, but a thick, strong screwdriver will do instead), a special wrench for turning the tension roller (two thin drills and a screwdriver will do instead) , knob with cap heads.
Timing belt location
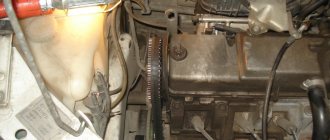
The belt is hidden under a cover from dirt and other debris. This cover is made of plastic and can be easily removed by unscrewing the fastening bolts. Having removed the cover, the entire timing mechanism will appear before your eyes (except for the pistons, their connecting rods, valves, etc., they are located in the cylinder block). Below we have posted a photo where the belt is clearly visible (indicated by a red arrow), and we indicated the camshaft pulley with a blue arrow, the pump with a green arrow, and the tension roller (which regulates the tension of the belt) with a yellow arrow. Remember the details listed.
When is it necessary to change the belt?
It is advisable to look at it every 15-20 thousand kilometers. Visual signs of wear are obvious: you will find traces of oil, signs of wear on the toothed surface of the belt (puts on the pulleys and holds the belt), various kinds of cracks, folds, peeling of rubber and other defects. The manufacturer recommends replacing it every 60,000 thousand km, but we do not recommend such long intervals.
How to replace the tension roller on a VAZ 2113-VAZ 2115?
Conclusion: 1) At the beginning of the operation, set the whole tag timing mechanism, detailed information in detail and pictures how to do it is explained in the article called Setting Valve Timing by Tag, so go to this article and do everything as described in it, by the way a little Above, we indicated in this article about the cover that needs to be removed to get to the synchronization mechanism, so how to remove this cover, read in the same article, the link to which is given in this paragraph.
2) Go ahead and go to step 2, now you will need to remove the idler pulley from the car, but before removing it, remove belt from the camshaft and remove the idler pulley from the idler pulley
, to do this, loosen the nut that secures this roller a little (This nut in the photo above is marked with a blue arrow, by the way, by the way, we will run straight ahead, there will still be a washer behind this nut, so do not lose this when you completely unscrew the nut) and return the roller manually so that the belt is untied (the roller itself is made in the shape of an oval, so it regulates the belt tension, i.e. at some point it pulls the belt tightly, and at some point it doesn’t pull at all), then remove the belt from the camshaft as shown in the photo below (Do everything carefully), well, remove it from the roller and let it hang (To completely remove the belt, you need to unscrew the bolt securing the generator drive pulley, you also need to remove the Belt from the generator, there are many brands, and in order not to remove it completely, how we already wrote above, remove it from the camshaft pulley,
tension roller and let it hang with you).
3) Well, at the end of the operation, when the belt no longer interferes, completely unscrew the nut securing the tension roller, remove the nut and the same washer behind it, and then remove the roller along the shaft, as shown in the photo below, after the roller will be removed, check its bearing, to do this, take the central part of the roller and turn the outer part of the roller, it should not jam and should rotate normally, there should also be no play, well, grease should not leak out of the bearing (In this case, the roller will be dirty fat).
The note! When removing the roller, there will be a spacer ring installed behind it, which we also recommend removing and checking for defects if it is in good condition, i.e. If it is not compressed or cracked, then this ring cannot be replaced with a new one. one and install it yourself, the place is repeated, by the way, thanks to this ring, as you already understand, the fact depends on how the tension roller will stand, for example, if the ring is installed large, then the roller will move a little and the belt will not stand level, but under angle, so if the strap doesn't eat you, and also if it doesn't come off while moving, then you won't be able to even touch it, since it does its job as they say in ur!
Installation: The new roller is installed in its place in the same way as it was removed, but only the entire operation is performed in the reverse order of removal, in addition, the roller must still be installed so that it has two holes (see photo below) facing in and out, by the way, if you look closely at the tension roller, which is shown in the photo below, even with the naked eye you can see that it is all greasy, such a roller needs to be replaced and may not be reusable, because there is a possibility that the bearing will soon jam , but a jammed tensioner roller will not lead to a good result (or in this case the timing belt will fly off, or after installing a new roller and fixing its nut, be sure to put on the timing belt and adjust it, for more information on how to do this, read the article: Replacement timing belt, point 1.
READ Where is the Engine Number for VAZ 2115
Additional: Just below we have attached a very interesting and visual one for you so that you can look at it and see in more detail how the process of replacing this tensioner is carried out, so watch it and immerse yourself in it.
Removal
1) First, remove the plastic cover that protects the belt from dirt, all kinds of water and grease. Remove the cover as follows: Take a wrench or wrench and unscrew the three bolts of the cover (in the photo below the bolts are already unscrewed). There are two bolts on the side to hold the cover in place, and one. in the center. By unscrewing them, you can remove the cover from the car engine.
2) Now turn off the power to the car by removing the negative terminal from the battery. Then we remove the alternator belt for spare parts, read the article: Replacing the alternator belt on a VAZ. Set the piston of the fourth and first cylinders to TDC (top dead center). Simply put, place both pistons absolutely straight and without any upward angles. The publication will be useful to you: Installing the piston of the fourth cylinder at TDC on a car.
3) Then take a 13mm wrench and loosen the nut that slightly secures the tension roller. Loosen until the roller begins to rotate. Then turn the roller by hand to loosen the belt. Grasp the belt and carefully remove it from the rollers and pulleys. You need to start from the top, with the camshaft pulley. It is impossible to remove all pulleys, so release the belt
only at the top.
4) Next, remove the front right wheel (removal instructions are available here: Correct wheel replacement on modern cars). Now take a handle with a cap head, or any other key that can be used to unscrew the bolt securing the generator drive pulley (the pulley is marked with a red arrow).
The note! The bolt is unscrewed with the help of a helper (assistant) and a mounting spatula (or a thick screwdriver with a straight blade). Remove the red plug on the left side (in the direction of travel) of the clutch housing. Then a putty knife or screwdriver is inserted between the teeth of the flywheel (the teeth are marked in blue) and keeps the flywheel from turning. You have to use force, that's the main thing. don't overdo it. Unscrew the bolt, remove the pulley and set it aside.!
5) You now have excellent access to the crankshaft pulley and belt. At the last moment, the belt is removed from the lower pulley. Now he's completely removed.
The note! Although this does not apply to 8-valve cars of the Samara family, for general information we will explain: there is no habit of turning the camshaft and crankshaft pulleys when the belt is not installed. Otherwise, you will mess up the valve timing (they are easily adjusted; you need to install the flywheel and pulley according to the marks). Spinning the pulley, for example on a 16-valve actuator, will cause the valve to contact the piston group and may cause a slight fire.
Installation
1. Perform in the reverse order of removal, taking into account some nuances:
- First, we recommend cleaning the pulleys and tension roller from dirt and various types of lubricants that get on them over time;
- After cleaning, degrease the pulley and tension roller with white spirit;
- continue installation.
Attach the strap at the beginning to the pulley at the bottom, going up. It bends when worn, so pull it with your hands and make sure it is straight and does not deform the pulley. After installation, make sure that the marks match, and then proceed to install the tension pulley. Install the belt onto the idler pulley (see Photo 1), then lower and install the alternator drive pulley into place. Make sure the hole in the pulley, marked A, lines up with the mounting sleeve, marked B in the second photo. If you have a torque wrench (a very handy thing that allows you to tighten bolts and nuts in a specific location without overtightening them), tighten the bolt that secures the alternator drive pulley. Tightening torque 99110 N.m (9911.0 kgf.m).
Next, we proceed to adjust the timing belt on the car: insert two drills or screws into the two holes on the tension roller (in photo 1 the holes are marked with arrows). Friendly configuration is performed using a special key. However, not everyone has it, so we are looking at an alternative method of tension. Insert the two screws and insert a screwdriver between them (Photo 3), then turn the roller counterclockwise. Fully tighten the belt, tighten the nut that completely secures the roller until it stops (photo 3). Make sure that the measures taken are correct: manually turn the belt exactly along the middle part between the pulleys with a force of 1.5-2 kg. If it turns approximately 90 (photo 4), then the belt is adjusted correctly. Otherwise, repeat the setup.
The note! An overstretched belt can damage the roller, belt and pump. A weak, insufficiently tensioned belt will jump out of the pulley teeth when driving at high speeds, and the timing will be disrupted and the engine will not work properly.
2. After installing the parts in place, be sure to check the alignment of the marks and the belt tension.
Replacing the timing belt on a VAZ 2113-VAZ 2115
Removal
1) First, remove the plastic cover that covers the belt from dirt, various types of water and lubricants. The cover is removed as follows: take a wrench or socket wrench and unscrew the three bolts securing the cover (in the bottom photo the bolts are already unscrewed). Two bolts are present on the side and hold the cover in place, and one is located in the central part. By unscrewing them, you can remove the cover from the car engine.
2) Now turn off the power to the car by disconnecting the negative terminal from the battery. Then remove the alternator belt - read the article for details: “Replacing the alternator belt on a VAZ.” Set the piston of the fourth and first cylinders to TDC (top dead center). Simply put, place both pistons completely straight and without angles up. The publication will be useful to you: “Installing the piston of the fourth cylinder at TDC on a car.”
3) Then take a “13” wrench in your hands and use it to slightly loosen the nut securing the tension roller. Loosen until the roller begins to rotate. Then turn the roller by hand so that the belt loosens. Grasp the belt and carefully remove it from the rollers and pulleys. You need to start from the top, with the camshaft pulley. It will not be possible to remove all the pulleys, so only release the belt at the top.
4) Next, remove the front right wheel (removal instructions are available here: “Correct replacement of wheels on modern cars”). Now take a socket wrench or any other wrench that can unscrew the bolt securing the generator drive pulley (the pulley is indicated by the red arrow).
Note! The bolt is unscrewed with the help of a second person (assistant) and a mounting spatula (or a thick screwdriver with a straight blade). From the left side (in the direction of travel of the car) of the clutch housing, remove the plug marked in red. Then a spatula or screwdriver is inserted between the teeth of the flywheel (the teeth are indicated in blue) - the flywheel is kept from turning. You will have to use force, the main thing is not to overdo it. After unscrewing the bolt, remove the pulley and set it aside!
5) Now you will have excellent access to the crankshaft pulley and belt. At the last moment, the belt is removed from the lower pulley. It has now been completely removed.
Note! Although this does not apply to 8-valve cars of the Samara family, for general information we will explain: do not have the habit of turning the camshaft and crankshaft pulleys when the belt is not installed. Otherwise, you will mess up the valve timing (they are easy to adjust; you just need to align the flywheel and pulley to the marks). Turning the pulley, for example, on a 16-valve Priora, will cause the valve to meet the piston group and they may be slightly bent.
VAZ 2115: replacing the timing belt - not everything is so complicated
VAZ 2115 timing belt replacement, belt operation diagram
Replacing the timing belt on a VAZ 2115 is a standard procedure that is included in maintenance; replacement should be done every 50,000 kilometers or once every 3 years of operation of the car. If the belt breaks during operation, then you should put on a new one and first determine the degree of damage to the gas distribution mechanisms (check the compression, if not, check the valves, then the condition of the pistons, and so on). To avoid problems, it is better to replace the VAZ 2115 timing belt according to the regulations, regardless of its external condition.
Purpose
It is important to note that such 8-valve engines were installed on all (almost) VAZ models, so this manual is relevant for cars with such an engine, if you have a 16-valve engine, then look, replacing the timing belt on a VAZ 21154 is described a little lower . So:
- The timing belt is the most important element of the gas distribution mechanism; it is responsible for the timely injection of the fuel-air mixture and the emission of exhaust gases
- Its breakage is dangerous, since damage to the valves and even pistons is possible, after which a major overhaul may be required with the replacement of the piston group or the cylinder head - the price of inattention
- It is a rubber-metal belt with teeth on the inside; the teeth firmly engage the camshaft and crankshaft gears to ensure their synchronous operation.
Tools
To do the replacement yourself, you need the following tools:
- A set of keys
- Screwdrivers
- Vorotok
- Metal pipe, strengthen the lever
- Jack
Let's move on to replacement
When replacing, the tension roller must also be changed (in addition, it is recommended to replace the cooling pump every second belt replacement). Operating procedure:
- Stop the car with the handbrake, then place chocks under the rear wheels.
- Raise the front right side with a jack and unscrew the wheel.
- Remove the wheel and protective mudguard
- Using the “10” key, unscrew and remove the timing case
Removing the timing cover
- To remove the generator pulley bolt (you can lock the flywheel by inserting a screwdriver or pry bar through the inspection window on the gearbox housing)
- Remove the alternator belt, then the pulley
- Unscrew and remove the timing belt protective cover
- Align the engine according to the marks (one is located on the camshaft, and the second is on the flywheel)
Camshaft gear mark
Crankshaft mark in the box hatch
- Loosen the tension roller, then remove the belt
Release the tensioner roller
Attention: When the belt is removed or loosened, it is strictly forbidden to turn the crankshaft or camshaft to avoid damage to parts of the gas distribution system.
- After checking the condition of the gears for wear, the pump for play or leakage, then, making sure that there is no oil leakage, you can begin installing a new belt drive
- We install a new tensioner roller and start a new belt drive (you should be careful, sometimes there is an arrow in the direction of rotation on the belt drive)
- Once again, after checking that the marks match (see Timing belt marks and replacement according to them), we put on the belt drive - first by the lower gear (crankshaft)
- Then we continue to put on counterclockwise - the camshaft gear and tensioner roller
- In this case, the free play is on the side of the tensioner roller
- We tension the belt, while following the marks (the marks located on the crankshaft and camshaft should match perfectly when fully tensioned)
- When tensioning, the roller must be rotated in a counterclockwise direction.
- Rotate the engine several times, then check that the marks match
Then the belt tension is checked, as a rule, in the absence of a tool for checking, it is checked as follows:
- From the consolidated (right) side, photo below, it should twist to an angle of 90 degrees, with a little force - about 2 kilograms
- That is, we can confidently say that, before reaching 90 degrees, the resistance is practically not felt, and when twisting it more than 90 degrees, the required effort increases
- Align and install the alternator drive pulley
- Install and tension the alternator belt
- We put the protective cover in its place
- Let's start the engine
- After all the procedures, the engine should start like clockwork.
- Replacing the timing belt on VAZ 2115 was successfully completed
- If suddenly it starts with difficulty, or works unstably and stalls, then your timing marks probably do not match or have shifted
- When you hear extraneous sounds when the engine is running (such as howling, crackling, or knocking on the casing, and others), then it’s likely that your belt drive is overtightened or undertightened
16 valve engine
On sixteen valve engines, in contrast to eight valve engines, when the timing belt breaks, serious consequences occur:
- Since a break or a belt slipping through a tooth (or several teeth) is almost one hundred percent likely to occur in pistons with valves
- This definitely leads to bending of the latter, and therefore major repairs are not very cheap
- That is why the instructions require checking the condition of the timing belt drive and replacing it in a timely manner.
- You should not forget about the quality of domestic spare parts, so you should take this issue seriously
- It is prescribed to check the condition of the belt every 15 thousand kilometers and replace it after 50 thousand or earlier, follow these rules
Diagram of the gas distribution of a 16-valve engine
- To visually assess the condition of the belt, pry off the plug with a screwdriver, it is located on the front drive cover
Removal
Replacing the VAZ 21154 timing belt begins with removing it, for this:
- Stop the car and put chocks under the rear wheels
- Using the “10” head, unscrew the six bolts that secure the front cover and remove it
Removing the timing mechanism casing
- Then remove the right wheel and behind it the plastic shield covering the engine compartment
- Using the “17” head, turn the crankshaft in a clockwise direction using the bolt that secures the generator drive pulley
- In the flesh until the marks on the camshaft pulleys coincide with the marks on the rear timing case cover
- On the engine flywheel, the mark should be opposite the mark on the slot in the clutch cover cover
- Insert a screwdriver through the hole located on the clutch housing between the flywheel teeth to fix it, unscrew the generator drive pulley bolt
- Remove the pulley
- Then use a 17" wrench to loosen the tensioner pulley nut.
Use a wrench to loosen the drive tension by loosening the tensioner roller nut
- Turn the roller and loosen the belt tension, remove its rear branch, starting with the toothed pulley on the exhaust camshaft, then with the tension roller, then with the pump pulley
- After this, the belt is removed from the crankshaft and exhaust camshaft pulleys and from the support roller
- The drive belt is installed in the same way, the sequence of putting it on is the reverse of taking it off.
- We make sure that the alignment marks of the shafts match
- By turning the tensioner roller, tighten the drive belt and fix the roller
- After this, rotate the crankshaft two revolutions and check again that the alignment marks match
- Replacement of VAZ 21154 timing belt drive is completed
- The tension is checked by pressing your fingers in the middle part between the camshaft pulleys
When to change the timing belt VAZ 2115 - 2114
Under ideal conditions, with a fully operational camshaft drive system of an 8-valve engine, the timing belt can operate for a maximum of 80 thousand. In rare cases, its mileage before rupture or critical wear exceeds 100 thousand km. Naturally, it’s better not to let it come to this.
Belt breaks at 44 thousand
Therefore, experienced drivers check the condition of the camshaft drive belt at every opportunity. Fortunately, this is not difficult to do. By removing the timing case, you can immediately see the main problems with the belt:
- Cracks on the surface, scuffs.
- Oiling of the belt, contact with antifreeze on the surface.
- Wear of teeth, destruction of the working surface.
- Belt delamination, cord fraying.
- Breakage, as extreme wear or damage.
Cut end of belt
Adjusting the timing belt tension on a VAZ 2115
The VAZ 2115 timing belt tension must be correct. There are regulations for its implementation. The roller is rotated in a clockwise direction using a special key. When it is possible to reach the specified marks, the positions are checked again and the tension is tested. It should not be excessive or insufficient.
Working without a complex tool is also possible. To do this, the unit is firmly fixed in the spaces between the crankshaft and camshaft pulleys. The optimal values will be those at which the node can be rotated up to 90 degrees.
Optimal tension is important for the correct operation of the car
Why does the timing belt break?
Theoretically, a timing belt from any manufacturer is able to withstand a breaking load of up to 1000-1200 kg. The crankshaft will never be able to load the drive so much in its life, so the cause of destruction lies either in poor-quality material or in lateral scuffing. They, as a rule, lead to a sudden break if you do not monitor the condition of the drive.
Rollers, or more precisely, their quality, are the main cause of breakages. If the roller bearing has even a slight play, the belt will move in the transverse plane in one direction or the other. The restraints will prevent it from falling off the pulleys, but it can easily damage the end edge, leave burrs, and grind off almost half the width. That is why it is important to change the roller along with the belt when replacing it. By the way, the pump can also cause a problem, but this happens much less often and is found out much earlier.
What is a timing belt for?
The timing belt connects the crankshaft to the camshaft and synchronizes their operation. It causes the timing cam shaft to rotate, thereby ensuring that it performs its functions. In addition, other engine components are driven through this belt drive.
The part is a rubber product with a serrated inner surface, which ensures synchronization and prevents slipping.
Which belt is better to buy for a VAZ 2115
In addition, it is of great importance what kind of belt we buy, whether it corresponds to the ratings of a standard VAZ one. The original belt is 19 mm wide and has 111 teeth . No other belt with other parameters will work. The VAZ factory number is 2108-1006040 and is suitable for all 8-valve models 2108, 2109, 21099, 2113, 2114, 2110 (8 cells), Kalina 1117, 1118, 1119 (8 cells).
The best choice would be Gates PowerGrip 5521-98111-1 9, its price is about $7, but you need to be careful not to buy a fake. Complete with a roller ( Gates K015521 ) will cost about $18. We looked at the main differences between fake timing belts here.
The CRB 61000952 kit will cost a little less , if you don’t mind its Chinese origin. It would confuse us, especially since there are much more worthy representatives on the market:
- Dayco 94738M , a global brand headquartered in the States, with facilities, naturally, in China;
- Bosch 1987949095 , no comments needed, good quality, if not fake;
- Contitech CT527 , good expensive belts from the Continental brand;
- Goodyear G1474 , despite the loud brand, I wouldn’t buy one for myself for $2;
- Japan Cars DAY9408 9, price 4 dollars, China;
- BRT 2108-1006040-10RU , JSC "BalakovoRezinoTekhnika", good belts, about $5;
- Polcar BS1987949095, a packaging company that sells inexpensive Chinese spare parts;
- Trialli GD 708 , kit from India, price about 10 dollars.
Correct replacement of the timing belt on VAZ 2115, 2113, 2114 (injector)
Its service life fundamentally depends on the quality of the work carried out to replace the timing belt. Replacing the belt is not enough; you need to carefully inspect the pump pulley, check for any play on its axis, whether the roller axes are bent, or whether the pulleys are worn out. For an 8-valve injection VAZ engine, which is as simple as a matchbox, it’s these little things that are important.
Key for VAZ timing belt roller
For work, we will need a standard set of heads, a key for the roller (but you can do without it), a set of keys and screwdrivers. And, of course, a new roller and belt.
If everything is ready, let's go:
- Remove the front timing drive casing, two screws on the side, one in the center of the casing.
Before installing the timing case, we check how the new belt behaves. To do this, start the engine and watch the belt. It should not move on the pulleys and, when pushed with a screwdriver, should return to its original position.
How to change the timing belt on a VAZ 2115: correct marks, installation and tension
Replacing the timing belt on a VAZ 2115, according to the regulations, must be carried out as planned at certain intervals or as needed if signs of wear on the unit appear. There is no average service life as such, since the durability of a timing belt depends on a number of factors - brand, quality, manufacturer, operating conditions and other factors. To prevent breaks and severe deformations, the unit is regularly inspected. Any significant damage is a reason to perform unscheduled maintenance.
Replacing the timing belt on VAZ 2113, VAZ 2114, VAZ 2115
The timing belt synchronizes engine operation. Without it, the car simply won’t start, and if it was working and the belt breaks or falls off, the engine will instantly stall. And if the engine bends the valves, it will not only stall, but also bend the valves. True, this does not apply to 8-valve cars of the Samara-2 family. The belt must be changed on time, its condition monitored and maintenance carried out. Belt rupture, flying off and other troubles depend on the quality of the belt and the pump. We recommend that you always carry a new belt with you in the trunk, because replacement is a simple and short process. This prospect is much more pleasant than a breakdown far from home, garage or service station. Here only a tug or tow truck will save you.
Note! You will need the following tools: spanners, a 10mm socket wrench, a mounting spade (sold at a reasonable price at a car dealer, but a thick, strong screwdriver will do instead), a special wrench for turning the tension roller (two thin drills and a screwdriver will do instead) , knob with cap heads.
Timing belt location
The belt is hidden under a cover from dirt and other debris. This cover is made of plastic and can be easily removed by unscrewing the fastening bolts. Having removed the cover, the entire timing mechanism will appear before your eyes (except for the pistons, their connecting rods, valves, etc., they are located in the cylinder block). Below we have posted a photo where the belt is clearly visible (indicated by a red arrow), and we indicated the camshaft pulley with a blue arrow, the pump with a green arrow, and the tension roller (which regulates the tension of the belt) with a yellow arrow. Remember the details listed.
When is it necessary to change the belt?
It is advisable to look at it every 15-20 thousand kilometers. Visual signs of wear are obvious: you will find traces of oil, signs of wear on the toothed surface of the belt (puts on the pulleys and holds the belt), various kinds of cracks, folds, peeling of rubber and other defects. The manufacturer recommends replacing it every 60,000 thousand km, but we do not recommend such long intervals.
How to remove the old timing belt on a VAZ 2115
Service begins by removing the old belt. The mechanism is pryed up and dismantled, the plug is removed, and the unit is inspected. If the kit is normal, there is no need to touch it. Any other defects indicate the need for urgent replacement.
First, use a 10-mm wrench to unscrew the mounting bolts and dismantle the previously installed protection. Key 17 will make it possible to carefully unscrew the crankshaft according to the diagram and fix the achieved position. Secure the shaft with a screwdriver and remove the drive pulley. Using a 17mm wrench, loosen the nuts, remove the old belt, and carefully put on the new one. If everything is normal, screw on the next generator drive pulley and return the protection to its place.
The dismantling procedure will take very little time
Replacing the timing belt on a VAZ 2113-VAZ 2115
Removal
1) First, remove the plastic cover that covers the belt from dirt, various types of water and lubricants. The cover is removed as follows: take a wrench or socket wrench and unscrew the three bolts securing the cover (in the bottom photo the bolts are already unscrewed). Two bolts are present on the side and hold the cover in place, and one is located in the central part. By unscrewing them, you can remove the cover from the car engine.
2) Now turn off the power to the car by disconnecting the negative terminal from the battery. Then remove the alternator belt - read the article for details: “Replacing the alternator belt on a VAZ.” Set the piston of the fourth and first cylinders to TDC (top dead center). Simply put, place both pistons completely straight and without angles up. The publication will be useful to you: “Installing the piston of the fourth cylinder at TDC on a car.”
3) Then take a “13” wrench in your hands and use it to slightly loosen the nut securing the tension roller. Loosen until the roller begins to rotate. Then turn the roller by hand so that the belt loosens. Grasp the belt and carefully remove it from the rollers and pulleys. You need to start from the top, with the camshaft pulley. It will not be possible to remove all the pulleys, so only release the belt at the top.
4) Next, remove the front right wheel (removal instructions are available here: “Correct replacement of wheels on modern cars”). Now take a socket wrench or any other wrench that can unscrew the bolt securing the generator drive pulley (the pulley is indicated by the red arrow).
Note! The bolt is unscrewed with the help of a second person (assistant) and a mounting spatula (or a thick screwdriver with a straight blade). From the left side (in the direction of travel of the car) of the clutch housing, remove the plug marked in red. Then a spatula or screwdriver is inserted between the teeth of the flywheel (the teeth are indicated in blue) - the flywheel is kept from turning. You will have to use force, the main thing is not to overdo it. After unscrewing the bolt, remove the pulley and set it aside!
5) Now you will have excellent access to the crankshaft pulley and belt. At the last moment, the belt is removed from the lower pulley. It has now been completely removed.
Note! Although this does not apply to 8-valve cars of the Samara family, for general information we will explain: do not have the habit of turning the camshaft and crankshaft pulleys when the belt is not installed. Otherwise, you will mess up the valve timing (they are easy to adjust; you just need to align the flywheel and pulley to the marks). Turning the pulley, for example, on a 16-valve Priora, will cause the valve to meet the piston group and they may be slightly bent.
Installation
1. Carry out in the reverse order of removal, observing some nuances:
- firstly, we recommend that you clean the pulleys and tension roller from dirt and various types of grease that get on them over time;
- After cleaning, degrease the pulleys and tension roller using white spirit;
- start installation.
Install the belt first on the pulley from the bottom, moving to the top. As you put it on, it will sag, so pull it with your hands and make sure that it stands up straight and the pulleys are not distorted. After installation, make sure the marks match, then proceed to install the tension roller. Install the belt onto the tension roller (see photo 1), then climb down and reinstall the generator drive pulley. Be sure to ensure that the hole on the pulley, indicated by letter A, lines up with the mounting sleeve, indicated by letter B in the second photo. If you have a torque wrench (a very convenient thing that allows you to tighten bolts and nuts to a certain torque without overtightening them), tighten the bolt securing the generator drive pulley. The tightening torque is 99–110 N m (9.9–11.0 kgf m).
Next, proceed to adjusting the timing belt on the car: insert two drills or self-tapping screws into the two holes present on the tension roller (the holes are indicated by arrows in photo 1). In a good way, the adjustment is made with a special key. however, not everyone has one, so we are looking at an alternative method of tensioning. Insert two screws and insert a screwdriver between them (photo 3), then turn the roller counterclockwise. With the belt fully tensioned, tighten the nut securing the roller fully and fully (photo 3). Make sure that the steps have been carried out correctly: by hand, turn the belt exactly in the middle part between the pulleys with a force of 1.5-2 kg. If it turns approximately 90° (photo 4), then the belt is adjusted correctly. Otherwise, repeat the adjustment.
Note! An overtightened belt will lead to failure of the roller, belt and pump. A weak, under-tightened belt, while driving at high speeds, will jump off the pulley teeth and the adjustment of the gas distribution phases will be disrupted - the engine will not work properly.
2. Having installed the parts in place, be sure to check the alignment of the marks and check the belt tension.
When do you need to change the timing belt, and how to do it on a VAZ 2114
- When do you need to change the timing belt, and how to do it on a VAZ 2114
- Where is the timing belt located in the VAZ 2114
- How to find out that the belt has failed, the frequency of replacing the timing belt
- Why does he chew his belt?
- Instructions for replacing the VAZ 2114 belt
- What are the consequences of untimely replacement of the timing belt?
The timing belt (gas distribution mechanism) is used to synchronize the operation of the engine. The main task of the belt is to transmit rotating torque from the crankshaft to the engine camshaft with a decrease in speed. If the belt breaks or falls off, the car engine will stall.
- Where is the timing belt located in the VAZ 2114
- How to find out that the belt has failed, the frequency of replacing the timing belt
- Why does he chew his belt?
- Instructions for replacing the VAZ 2114 belt
- What are the consequences of untimely replacement of the timing belt?
Where is the timing belt located in the VAZ 2114
The timing belt is a fairly noticeable part, which is located immediately under the hood of the car. It passes through the crankshaft and camshaft of the engine. Therefore, if you need to replace the VAZ 2114 timing belt, it can be easily recognized by the teeth on the inside. The belt also passes through several other parts of the engine, leaving it constantly subject to wear and thermal stress.
How to find out that the belt has failed, the frequency of replacing the timing belt
Why does he chew his belt?
The belt can chew for a number of reasons, which must be eliminated, because this affects the operation of the car. Main reasons:
- The problem may be mechanical damage to the teeth of the pulley or crankshaft.
- Displacement of the axes of the tension roller or toothed roller of the pump.
- The cause of the belt chewing may be its sagging.
- Poor quality timing belt.
If you notice that the timing belt is chewing, be sure to figure out the cause and, if necessary, replace it with a new one.
Instructions for replacing the VAZ 2114 belt
In order to know how to change the timing belt 2114, you need to read the car's operating instructions and follow simple rules.
First of all, you will need: a 10 mm socket wrench, 13 mm and 17 mm open-end wrenches, a large screwdriver, a wrench for tension rollers, a wheel wrench, a jack, and machine oil. Replacing the timing belt on a VAZ 2114 is carried out as follows:
- We align the timing gear and engine flywheel according to special marks.
- We park the car on a flat area.
- Using a jack, you need to lift the front right wheel so that it rotates freely.
- Open the hood, unscrew the three bolts that secure the protective cover using a 10 mm wrench.
- Loosen the belt tensioner using a 13 mm wrench. Let's take it off.
- You need to find a special mark (rectangular protrusion) on the camshaft gear. The mark must coincide with the mark on the fastening of the protective belt cover.
- We take out the special plug that is located on the crankcase. Under the plug there is a flywheel crown, it also has a mark. It should coincide with the protrusion on the left in the form of a triangle.
- After removing the upper part of the timing belt from the timing mechanism, turn the crankshaft using a 17mm wrench so that the flywheel marks match.
- Fix the flywheel with a screwdriver.
- We dismantle the front wheel, and then remove the arch protection.
- Now remove the generator pulley. We take out the pulley.
- Remove the timing belt from the crankshaft pulley.
- Using a 17 mm nag, unscrew and remove the tension roller fastening. Pull out the belt.
- We put the new belt on the crankshaft pulley without disturbing the marks.
- We put the belt on the timing gear.
- Lubricate the new tension roller with oil and install it in place.
- After this, you need to tighten it with a special key for the tension roller. If you don’t know how to tighten the timing belt on a VAZ 2114, look at the instructions. Adjust the tension roller so that the belt is not too tight or sagging.