07/19/2021 19 158 Kia Sportage
Author: Ivan Baranov
Many drivers forget about such consumables as the timing belt. Its condition must be regularly monitored and changed on time. The article describes how to replace the timing belt on a Kia Sportage 2 with your own hands. A video is also included that describes the main replacement steps.
[Hide]
Kia Sportage 3 timing belt or chain
Kia Sportage 3 vehicles use chain and bushing chains as a means of transmitting torque from the timing belt. Chain transmission has a number of important advantages, the main one of which is the durability of such a mechanism and its resistance to various types of loads. An interesting fact is that the manufacturer does not indicate the standard timing for replacing chains. They should be repaired or replaced if necessary during the next periodic service inspection. In practice, problems rarely occur until 100,000 km of circuit production.
You can select a suitable chain for your car based on the parameters and model of the engine installed on it. It makes no sense to search for products by serial number or other characteristics; you need to know the article number and name of the engine model in the manufacturer’s model range. In particular, chain drives are used on the following types of engines:
Thus, if you are looking for a timing chain for a car, first of all you need to determine what type of gasoline or diesel engine is used in the car and what name it has. Further, choosing the right products will not be difficult. To simplify your search, we recommend contacting a direct dealer or other company representative.
When to replace
Replacing the timing chain for Kia Sportage 3, depending on the type of engine and the chain used, is recommended after driving 100-150 thousand kilometers. However, it is worth paying attention to the condition of the timing unit much earlier, during routine inspection and other preventive maintenance to achieve 50,000 kilometers or more.
An urgent replacement procedure can be carried out if knocking noises appear in the engine, which are especially obvious at a particular rotation speed. As a rule, this indicates that either the level of chain tension has decreased due to a broken tensioner, a tooth is broken, or one of the gears of the mechanism is worn out.
The urgency of the repair is explained by the fact that a chain torn from the shafts can cause serious damage to the timing mechanism. Engine cylinders will also fail at high speeds due to reduced rotational force. As a result, instead of replacing the chain, you will have to carry out a full engine repair.
Comments and reviews
Then remove the generator tension bar, which also secures the pump in two places. It is also extremely useful to remove the engine cushion support bracket from the cylinder block. Now nothing prevents you from unscrewing the remaining bolts securing the pump and replacing it.
replacing timing belt Kia Sportage 2007 2.0 contitech gmb
As it turned out, Korean engineers did not provide for the option of draining coolant from the cylinder block. And at the moment of removing the old pump, coolant will flow from the block... When inspecting the giblets from the side of the block, a place with deposits of rye or something similar to it was discovered.
The owner of the car says that he never poured water.
So, the reason for the appearance of deposits will remain a mystery. The new pump is not original. On the right is the old one, on the left is the new one, not original. Put the pump in place. True, that’s not all.
Due to the fact that the pump is not original, the internal small power steering drive pulley had to be modified. It sits inside the pump pulley. Therefore, I had to drill the inner pulley, pulling it together with the outer one. We count the number of teeth on the old timing belt and compare the resulting number with the number of teeth on the new belt.
Because I had an experience when I installed it without looking, but it turned out that the new belt had one tooth more than it should have.
Then we count the number of teeth between the marks that were placed on the old belt and mark the new belt in the same way. We install a new timing belt pulley on the block. And most importantly, what is the point? I’m not the one who needs to change anything, just change the belt, of course you need to change the entire kit prescribed by the manufacturer, and better yet with fasteners, but besides, why invent or recommend extra hemorrhoids!
Slon74, I apologize if what I said looks uncultured, I didn’t mean to offend in any way. If we have at least a dozen specific cases, I think that the real picture will immediately become clearer!
So far, unfortunately, there is only one real answer.
What will happen, what will happen: The air conditioner will not work! Guys, what about air conditioning belts?
Replacing the timing belt Kia Sportage 2.0
Gurov, Rollers, tensioners, dirt under the hood, etc. After all, the specific question is about the timing belt. A big request - please erase all the flooding incl.
I would appreciate the information! Information was requested - who could express their opinion on this topic. Including me. But I didn’t ask to discuss my opinion on this issue, I said what I think I know!
I don’t know from the instructions or from conversations in the parking lot! Knowledge, brother, comes with experience! When you’ve done everything you’re talking about hundreds of times with your own hands! I also don’t need to explain the state of the roads and climate in Russia for the simple reason that I’ve been driving kilometers on these roads for 36 years in a row, and more than half of it on a long-distance road trip!
You asked for information and opinions from forum participants - you received them, whoever could, who knows what! Not satisfied - there is such a “bible”, instructions for repair and maintenance, and they were not fools who wrote it!
Separately, I will say “a particularly thorough check of the rollers and bearings.” Moscow and other large cities simply don’t need it - go and buy it “at any pharmacy”!
They won’t deliver a bearing with a belt to his barn with a phone call! And a magpie won’t drag it in its beak! So he has to remove the bearing and, if it is a “closed type,” use a sharp knife to remove the plastic or metal-plastic boot on at least one side, carefully without damaging it.
Next, washing the bearing in gasoline with a brush is a mandatory operation! Well, then, after filling the bearing with fresh grease and snapping the boot into place, assemble everything in the reverse order! The topic has been created and people are reading it!
Preparing for replacement
Before carrying out work to replace the timing chain, make sure to buy an original repair kit or the chain itself separately. The price of these components will depend on the place of purchase, but usually the original kits are quite inexpensive.
Make sure to provide easy access to the car from all sides of the hood, since in the process of disassembling the engine and dismantling other elements, a lot of work will have to be done. The layout of the Kia Sportage 3, due to the desire to place everything quite compactly, is not very convenient for work.
Considering the location of the side timing cover and the bolts on its surface, you will need to remove the front right wheel by placing the car on a jack. This will greatly simplify access and allow some dismantling and installation work to be carried out faster.
To carry out the necessary work, you will need a standard set of car mechanic tools, the main components of which are:
Before starting work, it is mandatory to drain the oil from the engine and antifreeze from the radiator, as well as any other technical fluids that can interfere with the work being carried out.
KIA Sportage 게 (/)O_О(/) › Logbook › Replacing the timing belt and accessory belts.
Yesterday my friend and I changed belts. The procedure, I would say, is not very pleasant, because... in the Sportica you need to remove a lot of things to get to the treasured timing belt)))
It all started when I ordered spare parts:
1) Timing belt Dayco 94397
— 1,048 rubles;
2) Timing belt roller, tensioner Nakamoto H010204
- 383 rubles;
3) Timing belt roller, bypass Nakamoto H010203
- 432 rubles;
4) Power steering belt Meyle 052 013 0775
- 182 rubles;
5) Alternator belt Meyle 050 004 0925
- 251 rubles;
6) Air conditioner belt Contitech 4PK875
- 327 rubles.
Total: 2623 rubles. How it later turned out to be a wedge
belt, and Contitech 4PK875 is
poly-V-ribbed
and doesn’t suit me...sadness...although according to the catalog it fits my motor. They installed the old one, fortunately it is in good condition.
After purchasing the spare parts, I studied the manual for the Sportik, regarding the replacement of belts and some topics on Drive2. This later helped to set the belts clearly the first time, everything now works as it should. The time is still long...we worked from 12:30 to 22:30, i.e. 10 hours) Let's proceed to the replacement procedure.
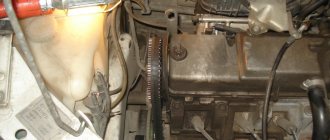
We drove the car into the garage and removed the negative from the battery. Next, we drained the antifreeze through the tap in the radiator, about 6-7 liters poured into a bucket. We unscrew the air intake and disconnect the chips from the air sensors. Remove the viscous coupling and diffuser. Next, unscrew the pulley and viscous coupling bracket. Remove the thermostat and disconnect the 2 pipes. Remove the upper and lower timing belt covers. We have a view of the old timing belt and rollers.
Remove the belt and unscrew the rollers. My belt had traces of small tears, although the teeth were in very good condition, the rollers had play, but small, the spring was not stretched...
1)
Make sure the alignment marks (6 and 7) are in the correct position.
2)
Starting from the camshaft gear and moving in a counterclockwise direction, insert the new belt into its original place - make sure that the belt fits tightly on the gears.
3)
Loosen the tension roller bolt (9) and turn the crankshaft two full turns in a clockwise direction - make sure that the timing marks (6 and 7) are in the correct positions, otherwise repeat the belt tensioning procedure.
4)
Rotate the crankshaft in a clockwise direction so that the “S” mark on the exhaust camshaft gear aligns with the mark (10).
5)
Tighten the bolt (9) of the tension roller with the required force (37 ÷ 52 Nm).
By the way, we did not turn the marks on the camshaft gears, but on the flywheel, which can be reached by unscrewing 2 bolts and bending the protective plate.
The x-r00t material helped a lot, from where we got the idea of how to fasten the belt to the camshaft gears))) It’s simple - plastic clamps help)
Then we assembled everything else, and at the same time replaced the belts of the additional equipment, there’s nothing complicated there. Antifreeze was added.
We lit a cigarette, prayed and started it... and IT WORKED! They rejoiced like children, by God, because... I changed the timing belt for the first time, but my friend only changed the cans)
I hope my post will help someone in some way!)
PS And finally, I’ll add a small video that we recorded during the process, so as not to forget how the marks were placed. ATTENTION! There is profanity!
Source: www.drive2.com
How to replace
When replacing the timing belt, you must adhere to the following procedure:
Please note that the three gear drums that the chain connects have so-called “dead points” - special notches on the surface. These points are duplicated on the chain links. The markings are made to simplify installation of the chain in the desired engine position. When installing, you need to combine these elements, which will further reduce the level of wear due to the uniform distribution of the load on the surface.
Replacing the timing belt on Kia Sportage 3
Modern cars are a holistic and complex system consisting of dozens of various components. If even one seemingly insignificant element of the engine breaks down, movement becomes impossible. Last but not least is the timing belt, which needs to be updated periodically. Let me tell you how to carry out this procedure on a Kia Sportage 3. Let's get started.
Choosing a timing chain for Kia Sportage 3
First about the function of the circuit. This component transmits torque from the engine to the shaft, directly participating in the movement of the car. For reliability, Korean-made machines use strong steel chains.
Technically, the wear resistance of the components is so high that the factory solution should last the entire life of the product.
However, in practice we are faced with the fact that after overcoming a distance of 100 thousand kilometers, serious problems begin with the chain. Repairing individual links is not possible; it is easier to replace the entire structure.
But first you should select a new installation. Check to see if the installed motor is not supporting the circuit. Only the following models are compatible with metal chains:
After checking the compatibility of the chain with the motor, you can continue working.
Timing drive for engine
Having established whether the Kia Sportage 3 timing chain is compatible with the engine, we proceed to the next stages of updating the part. It is worth recalling the timing belt drive structure:
As you can see, the design includes such components as a pulley from the crankshaft, as well as a thermostat. Pay attention to the top and rear drive covers.
The guide washer, along with the tension spring roller, deserves special mention. Work to replace such a critical component as the timing chain must be carried out in accordance with the strictest regulations.
If the belt breaks during operation, problems with the valves and resulting repair costs cannot be avoided. Do not forget to first determine which belt has broken. There are two chains in the engine, so try not to mix them up.
So, having understood the theory, you can further touch upon when you need to replace the timing belt on a Kia Sportage 3.
Sportage 1 Timing Belt Replacement (Official Guide)
Instructions for checking the condition and replacing the KIA Sportage 1 timing belt, chapter from the operating manual.
After reading this article, you can see a short guide to replacing the Sportage 1 timing belt from one of the owners of this car.
Do not turn the engine by the camshafts and other timing gears! Unless otherwise stated otherwise, the engine should only be cranked in the normal direction! Do not turn the crankshafts/camshafts with the timing belt removed! Remember to maintain cleanliness - dirt or grease should never get on the new timing belt! Do not twist the new belt or bend it at sharp angles! When installing a used belt, make sure that the direction of rotation remains the same!
The timing belt must be replaced at least as often as specified in the Vehicle Maintenance Schedule (see Section Routine Maintenance Schedule), as well as if signs of excessive wear and mechanical damage are detected - during inspection, do not twist the belt strip or bend it under sharp points. corners.
Checking the condition of the timing belt
A - Broken belt - check the correct fit and condition of the timing cover sealing elements, replace the belt, paying special attention to its correct installation B - Destruction/loss of teeth - replace the belt C - Signs of wear/cracks - replace the belt
D - One-sided wear - replace the belt E - Significant tooth wear - replace the belt F - Do not twist or bend the belt when inspecting
Gasoline engine timing belt installation details
RV - Camshafts KV - Crankshaft
P — Intermediate roller N — Tensioner VN — Water pump
Diesel Engine Timing Wire Belt Installation Parts
1 — Upper radiator hose 2 — Cooling system fan shroud 3 — Cooling system fan impeller with drive pulley 4 — AC/V compressor drive belt (if equipped) 5 — AC/V drive belt tensioner with support bracket
6 — Alternator drive belt 7 — Crankshaft pulley 8 — Right timing cover 9 — Left timing cover (rotate the crankshaft so that the piston of the first cylinder is in the TDC position) 10 — Timing belt tensioner with spring 11 — Drive belt timing belt
Do not clean the tensioner assembly with any solvents. If necessary, wipe contaminated surfaces with a soft cloth.
Source
When to change timing belts on Kia Sportage 3
It was said above that replacement is required after 100 thousand kilometers. However, you should think about diagnosing this part much earlier. At approximately the 50th distance of 50 thousand kilometers, you can start troubleshooting.
An unambiguous signal will be the appearance of strange knocking noises inside the engine, which indicates a loss of sufficient tension or breakdown of the engine gears. We do not recommend delaying intervention in the operation of a non-functioning belt.
It is important to repair the belt or chain in time to maintain full engine functionality.
Instructions for replacing the timing chain
Before direct repairs, you should prepare the car. You will need full access to the hood on each side. Considering the complex engine layout of the Kia Sportage 3, you will have to work hard. The following tools are required:
Don't forget to drain the oil from the engine and empty the antifreeze container. These compounds, like other technical fluids, must be drained.
Manipulations are carried out in the following sequence:
We focus on the “dead spots”, that is, the notches on the gear drums. Carefully align these protrusions with similar elements on the chain links. Otherwise, rapid wear of the new chain cannot be avoided.
Be sure to remove the gears along with the stops to wash the engine components in gasoline. By cleaning the parts from contaminants, you can reduce friction and ensure stable operation of the motor. The absence of such prevention will force the gear to be updated.
When the work is completed, pour the appropriate compounds into previously emptied containers. Make a habit of periodically checking the timing belt functionality. This is a surefire way to avoid unpleasant breakdowns.
Source
Replacement instructions
The procedure should only be carried out on a cold engine. It is more convenient to work on an overpass, lift or inspection groove.
Required Tools
The following tools should be prepared:
Stages
The procedure consists of two stages: removal and installation.
Installation is in the reverse order:
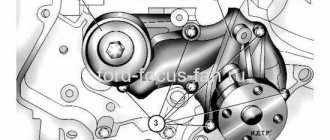
Timing belt tension diagram and alignment of marks
Assembled gas distribution mechanism
Once the marks are aligned, the shafts must not be rotated.
Replacement on the Kia Sportage 2 diesel is carried out in the same way. After replacement, add coolant and start the engine to check.
In what cases is replacement necessary?
The timing belt is replaced according to the recommendations specified in the Kia Sportage 2 operating instructions. Typically, consumables on gasoline and diesel engines are changed after 60-90 thousand kilometers. The frequency of replacement depends on the conditions in which the car is operated and the quality of the product. Therefore, it is important to monitor the condition of the timing belt on both gasoline and diesel engines. It is recommended to check it after 20 thousand kilometers or when extraneous noise appears in the engine area.
The need to replace a consumable is determined by the following criteria:
- cracks, tears;
- frayed edges, sidewall wear;
- cutting, tearing off teeth;
- traces of oil;
- irregular cord breaks.
Condition of consumables after use
The cause of defects may be:
- natural wear and tear;
- weak tension;
- excessive tension;
- misalignment;
- belt overheating.
You should change the belt on time to prevent it from breaking. Since in the event of a break, the valves can bend, and on a diesel engine also the pushers. In this case, engine overhaul will be required.
Replacing the timing belt Kia Sportage 2.0
You should jack up the car, install stands and remove the front wheel. Then remove the protective cover, which is attached to 4 bolts and is located in the wheel well. Next, place the jack under the engine pan and lift it slightly, placing a plate between them - this will make it easier to unscrew the cushion.
Next, the scope of work moves under the hood - you need to provide yourself with a working space, remove the interfering tubes, and unscrew the pillow bracket and the pillow itself. Then you need to rip off the crankshaft pulley.
This video instruction will tell you more about how to replace the timing belt on a Sportage with a 2.0 engine.
Ask in the comments. We will definitely answer!
Changing the timing belt G4GC
Before removing the drive belts of the attachments, you need to loosen the four “10” bolts that secure the pulleys of the G4GC pump. The fact is that if this is not done immediately, then it will be extremely difficult to stop the pump.
Having loosened the upper and lower bolts of the hydraulic booster, it is necessary to move it towards the engine. The generator is located under the hydraulic booster.
Having loosened the lower bolt of the clamp , you need to unscrew the adjustment bolt .
Now you can remove the G4GC alternator and power steering belt. By unscrewing the bolts that secure the pump pulleys, you can remove the latter. Having previously remembered in what sequence they were located, and which side they were turned to the pump.
By removing the four “10” bolts from the timing cover, you can remove the protection and jack up the G4GC engine.
By unscrewing the three nuts and bolt that secure the engine support, you can remove both the cover and the support .
Then you can remove the right front tire and unscrew the plastic mudguard .
Now the crankshaft pulley and the Conder belt tension roller become visible.
All that remains is to unscrew the tension bolt until the strap loosens, and you can replace it.
Markings and TDC setting
Next, you need to set the so-called “top dead center” . turn the crankshaft clockwise using the bolt so that the marks on the pulley and the mark with the letter T on the timing cover coincide.
There is a small hole on the top of the camshaft pulley; it is worth mentioning right away that this is not a groove in the cylinder head. It is required that this hole be placed just opposite the groove . It’s not very convenient to look at it, but you can check if it’s correct: insert a suitable metal stick (for example, a drill) into the hole. Looking from the side, it remains to understand how accurately the target is hit.
After unscrewing the crankshaft pulley fixing bolt , you need to remove it, along with the protective cap. To block this part, you can use a self-made stopper.
All that remains is to unscrew the four bolts that hold the bottom protective cover in place and remove it. The mark on the crankshaft should be in the right place.
Rollers and timing belt installation G4GC
Having unscrewed the tension roller , you can safely remove it. You just need to first remember how it was installed, so that you can then correctly return it to its place.
Next, you can remove the G4GC timing belt, and at the same time remove the idler roller, which is located on the right side, in the middle part of the cylinder block. You can install new parts.
On the tensioner, the direction of tension is indicated and there is a mark , which the arrow (indicated earlier) must reach if the tension is correct. It is important to make sure that absolutely all marks match.
And only now is it possible to install a new timing belt. This must be done in the following sequence : starting with the crankshaft, continue to the idler roller, then to the camshaft and finish at the tension roller.
The lowering branch of the belt must be in a tense position. To ensure it, you need to turn the camshaft pulley clockwise a couple of degrees, then put on the strap and return the part to its previous position. To be sure, you need to again make sure that the marks are placed correctly.
Use a hex key to turn the tension roller until the arrow aligns with the mark. Next, you need to tighten it and, turning the crankshaft a couple of turns, again make sure that the marks match.
In addition, it is worth checking the tension of the timing belt in the direction of the arrow. Experts say that the procedure is carried out correctly if a load of a couple of kilos is applied to the strap, and it sags no more than 5 mm. Of course, it is difficult to imagine how to do this. Yes, in addition, you also need to take measurements. But, if all the marks match and the tension does not raise any doubts, you can put the G4GS mechanism back together.
Changing the timing belt of Kia Sportage 2
The maintenance schedule provides for replacing the Kia Sportage 2 timing belt.
The change interval for gasoline engines is 60 thousand km, for diesel engines - 90 thousand.
Some drivers drive more than 100,000 kilometers without replacement. The example of the latter should not be followed exactly. As for the interval stated in the manuals for the Kia Sportage 2 - every 60 thousand km. do a thorough inspection and then decide for yourself whether to change it or not.
When should such repairs begin?
Any repairs must be carried out in a timely manner. Therefore, it is important to know the signs that will allow the owner of a Kia Sportage 2 to understand that the timing belt installed on his property has become unusable. There are several of them, and all can be identified only by visual inspection of the product:
In all these situations, it is recommended to immediately replace the belt with a new product, since its complete rupture threatens serious problems with the Kia Sportage 2 power unit, which may be damaged in such a development.
There are also plenty of reasons for the rapid wear of this important element of the car:
That is why it is important not only to visually check the integrity of the rubber product, but also to monitor its correct operation, which will increase the shelf life of the timing belt on the Kia Sportage 2.
Necessary tools and warnings
If you decide to replace the Kia Sportage 2 timing belt yourself, stock up on the following tools:
The timing drive is a consumable; never delay installing a new element. It’s even more worth doing this immediately if, upon examination, you find:
Many people do not pay attention to oil stains formed on the surface of the gas distribution mechanism drive, but in vain. In this case, the rubber quickly breaks down, losing its strength. This element must be replaced. Oil getting into the timing belt in Kia Sportage 2 most often occurs due to leaky seals on the crankshaft or camshaft. This problem must be corrected.
Spare parts
Repair kits for replacing the timing belt of Kia Sportage 2 with a 2.0 G4GC gasoline engine:
Self-replacement technology
Before the process itself, it is recommended to prepare in advance all the tools necessary for the work; fortunately, not so many of them will be required:
- Assorted keys and sockets;
- A device for lifting a car (jack) and a torque wrench;
- Ordinary rags.
Replacing the timing belt on a Kia Sportage 2 is as follows:
A Korean vehicle is completely de-energized by disconnecting the negative terminal from the battery. Additionally, the candles are unscrewed. This will secure and facilitate further stages of the planned process.
- The next step is to drain the coolant through a special hole in the machine system;
- The belts of the suspended units, the cooling fan and the bracket are dismantled;
- To remove the crankshaft pulley, you will need to unscrew the mounting bolts;
- Protective covers are removed from the drive;
- Before continuing work, you should align the crankshaft to the mark corresponding to the camshaft;
- The roller is loosened, the damaged product and the tensioner itself are removed.
Video:
At this moment, a pre-prepared rag will come in handy to help clean the system of contaminants. Installing a new element occurs in the reverse order. During this procedure, it is important to remember several important points:
- The tension roller must be mounted according to a specially marked mark.
- The belt should be put on from the camshaft gear, moving further clockwise.
- Before final tensioning, it is necessary to check all marks for complete alignment.
Returning the remaining previously removed elements to the place of operation should not cause any special problems even for the least experienced car owner.
Step-by-step description of changing the Sportage 2 timing belt
This is not the easiest procedure; you will have to unscrew a decent number of parts. Many drivers, not wanting to bother, simply take the Kia Sportage to a car service center. But it’s worth considering that the price tag corresponds to the amount of work, which means it won’t be that cheap . For those who like to tinker with the car themselves, replacing the belt in a garage will not be a hassle. Of course, you will have to spend a little more time and effort than with some other machines, but no special tools are needed. And since you still have to crawl under the hood with wrenches, it will be useful to inspect and, if necessary, replace the air conditioning drive.