It is difficult to meet a driver who has not encountered the problem of a flat tire. This happens often, and sometimes at the most inopportune times. If a tire goes flat due to a puncture, you just need to change it and take the punctured one to a tire shop. However, it also happens that the tire starts to go flat for a completely different reason. The pressure in it gradually disappears, and this happens constantly. There are many reasons for this behavior. The spool comes first. It is he who is responsible for maintaining the pressure in the tire. Its failure leads to a decrease in pressure.
Automotive spool: what is it, how does it work?
Tire spools can be one of the main reasons why your tire may not leak air. It is a special device whose purpose is to direct air and maintain a strictly defined level of pressure in the tire tire.
The following wheel spools are distinguished:
- chamber valves used in tube tires;
- automobile spool valves for tubeless tires;
- reinforced spools installed in tubeless tires of cars that participate in sports races.
Based on the type of size, there are long and short spool valves for the car camera.
The price as of January 2021 can also be very different - from 2.2 rubles for a long chamber spool to about 68 rubles for a “Bell” tractor spool. The spool is also part of the tire pressure sensor system.
What is a spool and how does it work
Such a small element of a car wheel as a spool actually plays a huge role in the operation of the vehicle and the ability to maintain a given pressure inside the tire.
This is a special device, the main function of which is the ability to supply air inside the wheel and keep it within a given level. This element can safely be called a valve. The spool is located inside the nipple. Having inflated the tire to the required 2 atmospheres, for example, the nipple will not allow air to escape. But this is only possible if it is in good condition.
There are several types of spools:
- elements for tube tires;
- spool valves for tubeless tires;
- reinforced, designed for tubeless tires used in harsh conditions.
The last category includes elements used on sports cars participating in various competitions.
Depending on the size, nipples with a spool inside can be divided into short and long.
Various materials are used for the production of spools, which plays a role. Preference should be given to stainless steel parts. They are better than the same brass counterparts.
The cost of such parts is cheap. For them you will need to pay no more than 50-100 rubles for the highest quality and best products.
The spool is also part of the system that ensures the operation of the tire pressure sensor.
Causes of air leakage from a tire
Tires can leak air for several reasons. Among them are such common ones as:
- tire punctures or cuts that may be caused by road damage;
- the contact surface of the fitting fits poorly and loosely to the surface of the tire;
- the wheel rim has defects or damage;
- worn and old rubber, which, in the presence of cracks, sometimes even microscopic, allows air to pass through;
- the spool began to “etch”, which is very often the main reason, provided that the tire and wheel are intact.
Why does air leak out of a tire?
Before replacing the old nipple on a car wheel, you need to make sure that the reason for bleeding air from the tire lies precisely in this element.
There are several main reasons why air loss occurs, that is, the internal pressure in the tire decreases:
- insufficiently tight fit of the contact surface of the fitting to the surface of the tire;
- presence of damage to the wheel rim;
- a cut or puncture of a tire caused by a collision with some objects or deliberate actions of other persons;
- an old and worn tire on which microcracks have formed, and they cause a loss of pressure;
- air passes through the spool or damaged nipple base.
How to determine that the spool has begun to poison
Therefore, the air quickly leaves the tire, which in turn deflates quite quickly, and normal driving of the vehicle becomes impossible.
It is quite easy to determine whether a valve is worn out or inoperable. It is enough to moisten the nipple hole with saliva (or water). If bubbles appear (and, as a result, air escapes), the nipple must be replaced. The reason may also be its poor twist. It is worth trying to unscrew and then tighten the nipple more tightly and repeat the test. If the problem was that the valve was not tightened, then there is no reason to worry, the chamber spool is working properly.
Do-it-yourself nipple replacement
In any tire shop, replacing the nipple is done quite quickly.
To replace the nipple yourself, you will need the following tools:
- jack for raising the car;
- pry bar for wheel beading;
- pliers, pliers for twisting nuts and nipples;
- inflation can;
- screwdriver for releasing the valve;
- pressure gauge for air release.
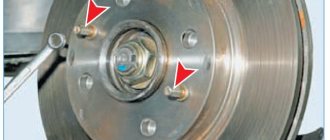
The car must be raised, the nuts removed and the wheel removed. Remove the cap from the nipple and use a screwdriver to press the valve to bleed out the remaining air; you can also bleed it using a pressure gauge. The wheel is beaded. The disc is carefully separated from the tire using a pry bar. The old worn nipple is removed.
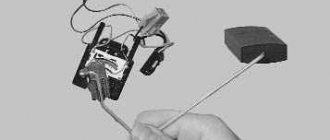
The best way to unscrew the spool is, as a rule, pliers. In this case, you should be as careful as possible so as not to damage it. You should unscrew the spool without strong or excessive pressure; you need to unscrew it as carefully as possible so as not to break it. The new nipple must be lubricated and inserted from the inside.
Spool valves without caps are often found on new car models and their wheels. The question arises - how to unscrew them without caps? This can be done using tweezers, wire or a special screwdriver.
Replacing a spool without a cap
The wheel must be inflated to the required pressure. The jack is lowered and the nuts are tightened. As you can see, the operation is quite simple and almost any car owner can handle it. But despite the simplicity and simple sequence of actions, this operation should be done with great care and quite accurately.
When replacing spool valves on tubeless wheels, the sequence of actions differs little; it must be taken into account that for tubeless tires, the load valves are attached and unscrewed on the rims with a torque wrench.
The spool, despite its apparent insignificance, is a valuable and irreplaceable part that ensures the movement of vehicles. You can replace it yourself and for an experienced vehicle owner this will not be too difficult.
source
Nipple repair
When a nipple fails, it does not always require replacement, since installing a new spool sometimes helps solve the problem. Some cars have metal valve caps with a special key on the back of them. With its help, you can easily unscrew and tighten the spool.
Metal nipple cap with a key for unscrewing the spool
Most modern cars have plastic caps that do not allow the spool to be unscrewed. In this case, it is recommended to purchase a special key.
Experienced car owners recommend using improvised means to unscrew the spool valve. Tweezers or a pointed fork are suitable for these purposes. You can also make a special key from strong wire.
How to replace a spool on a car wheel
It is difficult to meet a driver who has not encountered the problem of a flat tire. This happens often, and sometimes at the most inopportune times. If a tire goes flat due to a puncture, you just need to change it and take the punctured one to a tire shop. However, it also happens that the tire starts to go flat for a completely different reason. The pressure in it gradually disappears, and this happens constantly. There are many reasons for this behavior. The spool comes first. It is he who is responsible for maintaining the pressure in the tire. Its failure leads to a decrease in pressure.
What is a spool
This is a special device designed to direct air and maintain a certain pressure in the tire. The industry produces several types of spool valves:
- Chamber. Used in tube tires.
- Standard. For tubeless.
- Reinforced. Installed in tubeless tires of cars participating in sports races.
Since spool valves have to work in difficult conditions, they gradually age and become unusable. They begin to let air through, and the tire gradually deflates. Therefore, spool valves require regular replacement. Usually when a valve is changed, a new spool is installed.
How to determine that the spool has begun to “poison”
This problem applies to almost any type of wheel. The valve that allows air to pass through during pumping must close and prevent it from escaping outside. But if the parts of the element are severely worn out or defective, the air begins to quickly leave the tire.
To make sure that the spool is working, just wet your finger and put it against the hole. If bubbles appear coming out of the nipple, it simply needs to be replaced. Another possible reason is that it is poorly twisted. For complete fixation, you need to use a special key or cap with a slot on the outer surface.
In a tubeless tire, the problem of air leakage is usually related to the fitting.
Outwardly, it may be in good working order, but its loose fit to the metal surface at the point of contact with the disk can lead to a drop in pressure.
To determine the malfunction, you will need a soap solution. The appearance of air bubbles becomes a signal to replace the fitting. The reason for the failure of the fitting may be old rubber that has lost its properties. Sometimes the fitting begins to deflate at sub-zero temperatures. Its size decreases by several microns. This is enough for the air to gradually begin to leave the wheel.
How to Diagnose Spool Problems
You can make sure that you cannot do without replacing the nipple on the car wheel by independently diagnosing this element.
When pumping up the wheel, the spool valve must close the air outlet without letting it back in. If it is worn out or damaged, the nipple will not be able to perform its functions.
When the spool valve fails, air actively leaves the wheel, the tire quickly deflates, and it becomes impossible to drive normally and in a straight direction. The car pulls to the side every now and then, and the steering function deteriorates. This could potentially lead to an accident.
It is quite easy to diagnose a spool yourself. Simply moisten the spool hole with saliva. If you see bubbles on the surface, this indicates that air is escaping through it, which should not happen in the normal state of the element. Therefore, a replacement is required.
Sometimes the reason for bleeding air is not the breakdown or wear of the spool, but its poor screwing.
To verify or disprove this theory, try removing the spool, returning it to its place, tightening it tightly, and repeating the experiment with saliva. If after this the bubbles no longer appear, the cause has been eliminated and there is no need to change the element.
You can tighten the spool tightly using a special wrench. Also, on some nipple caps there is a special slot on the back side, which is designed specifically for twisting.
In normal working condition, unscrewing the spool should occur quite easily, without unnecessary effort and the feeling that the thread has been stripped.
If these are tubeless tires, then the cause is usually due to a problem with the fitting. Moreover, outwardly he may not show his malfunctions in any way. But when the fitting does not make tight enough contact with the metal surface on the disk, the internal pressure can drop.
You can check the fitting on a tubeless tire using a soap solution. If bubbling appears when it is applied to this point, the fitting will have to be replaced.
The fitting usually fails due to the age of the tire, when it has already served its useful life. Also, air bleeding due to severe frost cannot be ruled out. This reduces the metal by several microns, which may be enough for the gradual loss of air.
If such symptoms occur, when the problem is precisely a malfunction of the nipple or spool, it needs to be replaced. This can be done at a car service center or with your own hands.
Do-it-yourself nipple replacement
This operation can be done very quickly in a tire shop. But if necessary, you can do the replacement yourself. To do this you need to have:
The car is raised on a jack. The nuts are unscrewed and the wheel is removed.
Then remove the cap from the nipple and press the air valve with a screwdriver. This is necessary to bleed out the remaining air in the tire. You can also bleed air using a pressure gauge.
After this, the wheel is beaded. A pry bar is used to separate the wheel rim from the side surface of the tire. The work must be carried out carefully so as not to deform the disk and tire.
The damaged nipple is pulled out of the disk with ordinary pliers.
The new one is coated with lubricant. You can use WD-40.
The treated nipple is inserted into the disc from the inside. For tight fixation and fastening, it is pulled up with pliers.
The tire is then mounted on the rim. The wheel is inflated to the required pressure and installed on the car. The jack is lowered. The wheel nuts are tightened. The work is finished, you can go.
Replacing the nipple yourself is a very labor-intensive and complex job. If necessary, it can be done. But in order not to have to do this on the road, it is better to have an assembled wheel in stock. Its presence will save time and physical effort.
source
Replacing the valve yourself
Installing a valve for a tubeless tire yourself is a complex procedure. This should only be done in extreme cases when there is no spare wheel.
The nipple replacement scheme for cars and trucks, for high-pressure and low-profile tires is the same. The only exception is that the weight valve for a tubeless tire is secured to the rim with a torque wrench.
The entire replacement process consists of a number of sequential steps:
The main condition for long-term and safe operation of the valve is to choose the right type for a specific type of wheel.
Source
How to replace the nipple (nipple) on a tubeless tire yourself without removing the wheel.
If your car periodically gets a flat tire, then the problem may not be a puncture on the tire, but in the valve itself. Over time, the nipple becomes covered with through cracks and can leak air. To replace it, you don’t have to go to a tire shop or disassemble the wheel yourself to insert a new nipple.
You can replace the nipple yourself and quickly, but first you need to make several devices.
Using this method, you can replace the nipple on both a stamped metal disk and a cast aluminum one.
Required accessories:
The hook is made of wire with a diameter of approximately 2-3mm. It is advisable to equip the hook with a handle for ease of use. The hook should be of such a size that it fits easily into the nipple.
The pusher is made of a metal rod and a metal cap for the nipple. The cap must be soldered to the rod. It is also advisable to make a comfortable handle on the pusher.
To make a cone tube you will need a thin sheet of metal. The edges of the sheet need to be welded. Soldering is not suitable here, as it will not withstand the pressure during operation and the seam will separate. The diameters of the tube holes must be selected according to the dimensions of the nipple. The larger diameter should be slightly larger than the nipple seat. The smaller diameter of the cone tube must correspond to the mounting hole in the wheel rim.
How to change a tire
Having a flat tire and not knowing how to change it can leave you feeling helpless. With a few simple tools, you can do it yourself. Changing a tire without air is fairly easy, and everyone should have a basic understanding of what's involved:
1Protection of the car so that it does not roll; and roll the spare tire onto the scene.
Never change a tire on a slope or hill; Always look for a flat surface, even if that means driving on a flat tire. Use bricks, wooden wedges, or metal wheel chocks to block the wheels on the opposite end of the vehicle from the end that needs to be raised.
2Remove the wheel cover.
You can use a screwdriver to remove the wheel cover. Simply insert the tool where the edge of the cap meets the wheel and apply a little force. The cap should come off. You may have to do this in several places, like you would lift the lid off a paint can.
3Loosen the clamp nuts.
You may know it like , breaking
fastening nuts.
Whatever you call it, find the end of a wrench that fits the lug nuts on your car and install it on the first nut. Place all your weight on the bar , leaving
.
This begins to turn the nut counterclockwise, which loosens it. Don't completely remove the lug nuts;
just reach them out enough to remove by hand
after
you jack up the car. Hollow pipe and a cross wrench can loosen even the strongest nuts.
If you have alloy wheels that are secured with finely finished nuts, you will need to be careful when handling the delicate aluminum or chrome nuts. They should never be loosened or replaced with power tools, which can scratch the delicate surface.
4 Pick up the vehicle about 6 inches off the ground.
Place the jack securely under the edge of the vehicle. The correct locations may vary depending on the vehicle model, so refer to your owner's manual for the correct location to install the jack.
If you have a scissor jack (Figure a), place a rod or wrench on the handle and then turn it. If you have a hydraulic jack (figure b), place the handle in the appropriate location and pump up and down. Use gentle, even strokes, raising the jack handle from the lowest point to the highest point on each stroke to reduce labor costs.
5Remove the flat tire.
Remove the lug nuts by hand and place them in a safe place - inside the wheel cap or hub cap works well. Grasp the flat tire with both hands and pull it straight towards you. When you flat, it should slide along the bolts until it clears the end of the bolts and you find yourself supporting its full weight. Roll the flat on the ground in the back of the car to get it out of the way.
6Lift the spare part using the eye bolts.
Because the tires are heavy, you may have a little trouble lifting the spares, especially if you are not used to lifting heavy objects.
7Replace the lug nuts and tighten them by hand.
Hit each lug nut with a wrench to secure it, but wait until the car is on the ground before you actually try to tighten the lug nuts.
8Load the vehicle and tighten the nuts.
With the car on the ground, use a wrench to tighten the lug nuts as much as possible.
9Replace the wheel cover or hubcap.
If your car has delicate wheel covers, your owner's manual should provide instructions on how to replace them. If your car has wheel covers, place the wheel cover on the wheel and shake it with the heel of your hand. First, place your hand on a soft cloth to avoid damaging it. And don't hit the cap with a wrench or hammer - you'll break it.
,
Replacing the nipple
We install the car so that the nipple on the wheel is at the bottom.
Now you need to lubricate the tip of the hook with grease. Liquid soap or silicone grease can be used as a lubricant.
We push the hook between the nipple and the wheel rim into the inside of the wheel. We hook the nipple and pull it towards ourselves. Thus, we remove the old nipple from the wheel.
Screw the valve onto the pusher and lubricate the nipple with liquid soap. We also lubricate the hole on the disk and the inside of the cone tube with soap.
We insert the nipple into the wide part of the conical tube and press it against the hole in the disk. Now we press on the pusher, thereby pushing the nipple along the tube according to the principle of a syringe. When the nipple enters the wheel disk, a click will be heard from the rubber nipple being straightened.
Now we make the opposite movement. Pull the pusher towards you with a rocking motion until the nipple is in place.
The installation is complete, the tire can be inflated.
For those who don’t want to bother with making accessories, there is a ready-made kit for replacing the nipple without removing the tire. But they are not exactly cheap.
Advice. In the cold season, the nipple must be heated before installation, then the rubber will be softer and the installation process will be easier.
Watch the video: how to replace the nipple.
source
How to replace a damaged nipple yourself
To do this you will need a new nipple and the following tools:
- Jack.
- Balloon key.
- Pliers.
- Mount.
Then you can start:
- Loosen the nuts on the damaged wheel.
- Raise the car with a jack.
- Remove the nuts from the wheel.
- Remove the wheel.
- Remove the cap from the nipple and use a screwdriver to press the air valve to release the remaining air in the tire. You can also bleed the air using a pressure gauge.
- Disassemble the wheel. Use a pry bar to separate the tire sidewall from the wheel rim. To do this, it is inserted into the gap between the tire and the disk, after which you need to tap the mount with a hammer/sledgehammer until a pop occurs. The procedure must be done extremely carefully so as not to damage the tires and wheels.
- Remove the damaged nipple from the disc using pliers.
- Treat the new nipple with light oil or lubricant (for example WD-40).
- Insert the nipple from the inside of the disk, from the outside - pull it up with pliers to fix and fasten it.
- Mount the tire on the rim.
- Inflate the tire with a compress to the recommended pressure.
- Install it on the car.
- Place the nuts on the wheel and tighten them a little.
- Lower the car to the ground.
- Tighten the wheel nuts thoroughly.
- You can start moving.
Replacing a damaged nipple is a complex procedure, but can be done in a pinch. To avoid difficult work, you need to carry a spare tire with you. In this case, you can save time and effort.
How to replace a wheel nipple without beading
What is a spool on a wheel
A wheel spool (also known as a nipple) is a mini-device whose function is similar to the structure of a check valve. With its help, due to the displacement of the movable element, air can be pumped into the tube or tire - or, if necessary, deflated. After the valve returns to its original position, it becomes an obstacle to air escaping. If the spool is working properly, it holds air as reliably as a valve on a water pipe.
There are three types of spools:
- Spool for chamber wheel. It is inserted into the fitting (nipple) of the camera, and then screwed on with a lid.
- Automotive spool for tubeless tires. It is part of a valve consisting of a body, into which it is placed, and a cap. That is, the spool is a complete valve element that is sold assembled.
- Reinforced spool valves for sports class wheels. They are also installed inside the valve for tubeless tires, but have greater rigidity. They are mainly used on low-profile sports tires.
Valve with reinforced spool
The car spool is constantly subjected to loads, and therefore wears out. Like any other part of the car, and even more so the wheels, it ages and becomes unusable. In tubes, only the spool valve is changed; on a tubeless tire, the valve is completely changed.
Power Steering - How a car steering wheel works
There are several key components in power steering
in addition to a rack and pinion or recirculating ball mechanism.
Pump
Hydraulic steering power is provided by a vane pump (see diagram below). This pump is driven by the car's engine through a belt and pulley. It contains a set of retractable blades that rotate inside an oval chamber.
As the vanes rotate, they draw hydraulic fluid from the return line at low pressure and force it into the outlet at high pressure. The amount of flow provided by the pump depends on the speed of the vehicle's engine. The pump must be designed to provide sufficient flow when the engine is idling. As a result, the pump moves much more fluid than necessary when the engine is running at higher speeds.
The pump is equipped with a safety valve that prevents the pressure from becoming too high, especially at high engine speeds when so much fluid is being pumped.
Rotary valve
The power steering system should only assist the driver when he or she is applying force to the steering wheel (for example, when starting a turn). When the driver is not exerting any effort (for example, when driving in a straight line), the system should not provide any assistance. The device that senses the force on the steering wheel is called a rotary valve.
The key to a rotary valve is the torsion bar. A torsion bar is a thin metal rod that turns when torque is applied to it. The top of the bar is connected to the steering wheel, and the bottom of the bar is connected to the gear or worm gear (which turns the wheels), so the amount of torque in the torsion bar is equal to the amount of torque. The driver uses the wheel to turn. The more torque the driver uses to turn the wheels, the more the bar twists.
The input from the steering shaft forms the inside of the spool valve assembly. It also connects to the upper end of the torsion bar. The bottom of the torsion bar connects to the outside of the spool valve. The torsion bar also turns the output of the steering gear by connecting to a gear or worm gear, depending on the vehicle's steering type.
This content is not compatible with this device.
An animation showing what happens inside the rotary valve when you first start turning the steering wheel
As the rod twists, it rotates the inside of the spool valve relative to the outside. Since the inside of the spool valve is also connected to the steering shaft (and therefore the steering wheel), the amount of rotation between the inside and outside of the spool valve depends on how much torque the driver applies to the steering wheel. ,
When the steering wheel is not turning, both hydraulic lines provide equal pressure to the steering mechanism. But if the spool valve is turned one way or the other, the ports open to supply high pressure fluid into the appropriate line.
It turns out that this type of power steering system is quite inefficient. Let's look at some of the advances we'll see in the coming years that will help improve efficiency.
,
How to determine that a tire is flat due to the fault of the spool
At the end of air injection, the spool valve automatically closes, preventing air from escaping outside. If it is worn out or has a manufacturing defect, the air is not retained in the tire and, due to the loose fit of the valve to the inlet hole, it gradually “poisons”.
You can verify this by lightly lubricating the mouth of the spool with soapy water. If the cause of the air leak is in the nipple, you will see this by bubbles appearing on the surface. However, do not rush to change it right away - first check whether the cap is screwed on well. It happens that it is simply not screwed in enough, in this case it is enough to tighten the cap more tightly with a special wrench.
How to tighten the spool valve in a wheel
Note: In a tubeless tire, air leakage may be due to a loose fit of the fitting to the metal surface of the rim at the point of contact. Most often this happens in winter, when the metal contracts due to low temperatures. Therefore, northerners often install tubes on tubeless tires in winter - especially when they have a long journey ahead.
How to make a replacement yourself
If a car has a flat tire, the car owner usually goes to a tire shop. They quickly determine the cause and professionally eliminate it. But it happens that this happens on the road, or in the garage after the car has been parked for a long time, and you don’t want to go to the workshop with a flat tire, so as not to spoil the tire. In this case, you can change the car spool yourself, because everything you need is usually in the trunk of every car, not to mention the garage.
How to change a steering wheel on a car
Although changing a tire on a car must be done properly, it is not difficult if you know the basics of changing tires:
How to change a steering wheel on a car
• Find a level, level surface: Only attempt to change a tire when the ground is level and level.
• Place the vehicle in first or reverse gear and firmly apply the handbrake. Throttle the wheel that is diametrically opposite.
• Loosen the wheel nuts one full turn, but do not remove them completely yet!
• Place the jack under the designated jack point on the vehicle and slowly wind the jack until the tire you want to replace is 3 to 4 inches off the floor.
• Remove the wheel nuts and wheel.
• Install the new wheel and tighten the wheel nuts until they stop.
• Lower the jack until the weight of the vehicle is completely on the tire.
• Tighten the wheel nuts using a wheel wrench.
Of course, these are just the very basics, and there is more to successfully changing a car tire - but not too much to handle, as I hope I'll show in this simple guide.
Is changing a car tire becoming a lost art?
The average motorist will suffer a puncture every 44,000 miles, or about one flat tire every four years.
This modern tire technology is what makes it so rare, which means replacing car tires is becoming something of a lost cause these days.
Many drivers are also afraid of this whole process, fearing that the car will fall on them or the newly installed wheel will move down the road as they drive away.
What you need to change a tire
• Jack
• Wheel key
• Lock nut wrench
• blocks if possible, although bricks and stones can be used in situ
• Spare wheel
• Directory
• Reflective jacket or vest (a few pounds from eBay)
• Gloves and wet wipes
Assembly of basic automotive tools
Replacing car tires: in detail
Checks before puncture
Before you begin your journey, you should make sure that the spare tire in your trunk is inflated, and you have a jack and a wheel wrench. If your vehicle has lock nuts (usually one per wheel), you will also need a lock nut wrench that will allow you to remove them.
While you're there, it's worth adding an old coat in case you need to change a tire in the rain, a reflective vest or vest, a torch, some latex or rubber gloves, and a small pack. baby wipes to keep your hands clean.
Once you've checked availability and got everything fixed, it's worth checking your spare tire pressure every month or so in case you experience a slow tire valve leak, which isn't uncommon.
10 Automotive Laws People Forget or Ignore
Consider a test run
You might consider doing a trial tire change in your driveway. Yes, it's a little flawed, but it's much better to discover the problem now - and develop the right technique - than to be forced to do it in the rain and darkness.
Even if you're not jogging, now is the time to dig out your vehicle's manual and identify lifting points.
Again, it's much easier to do this now when you're not in a rush than when you have to actually do it.
Level
, Smooth surface
You should only attempt to change a car tire on a flat, level surface, even if it means driving slowly forward for a few meters on a flat tire. It's much better for a tire to ruin than for it to fall on you because it's not stable.
Once you have stopped, turn on your vehicle's warning lights to warn other motorists, and place your warning triangle on the road at least 45 meters from your vehicle if you think another warning is necessary.
Even though the hard shoulder of the motorway is smooth and level, you should never attempt to change a tire there as it is too dangerous. You need to get out of the car as quickly as possible using the passenger side, carefully climb up the embankment and turn to your mobile phone for help.
Loosen your wheels
Place the car in first or reverse gear (or Park if automatic) and firmly apply the handbrake.
You may consider using any nearby bricks, stones or pieces of wood to choke the wheel that is diametrically opposed to give you an extra margin of safety. Place one brick in front of the wheel and another at the back, pressing them firmly under the tire to secure the wheel and prevent its movement.
Get the spare tire out of the trunk along with a jack, wheel wrench and wheel lock wrench nut.
Place them on the ground nearby so they are within reach, but not so close that they get in the way! If the ground is muddy, consider using a mat in your car to kneel on.
Then, using a wheel wrench and/or a wheel nut wrench, loosen the wheel nuts on the damaged wheel one full turn.
Don't remove them completely!
The wheel nuts will be very tight so you may have to use your weight to help dislodge them and the easiest way to do this is to tilt the wrench so you can apply steady downward pressure with your foot.
Be careful because if your foot or wrench slips, it will hurt. Also, please ensure that you keep your back straight and your weight is evenly balanced to avoid injuring yourself.
Or, you could do what I did and invest in a telescopic spanner from somewhere like Halfords. A ten's man will save all sorts of swears and curses, which might prove a wise investment if you have grandchildren with you...
N.B. You should loosen the wheel nuts while the car is on the ground because if you try to do this with the car in the air, you will in all likelihood lift the car off the jack.
Saga Car Insurance: Join over a million drivers who already benefit from our superior coverage and personalized service for over 50s. Get a price quote and find out more!
Fit jack
You can now place the jack under the designated jack point on your vehicle. Now raise the jack slowly, making sure that it is firmly secured and cannot slip. You can stop when the flat tire is 3-4 inches from the floor; You don't have to wind it up all the time.
Make sure you do not place any part of your body under the vehicle at any time. A jack is just a lifting device and cannot hold your vehicle securely.
Remove the wheel nuts and wheel
You can now completely remove the wheel nuts. If your car has bolts rather than nuts, be careful as removing the last bolt will leave the wheel unsupported and may collapse. If in doubt, get someone to help you as the wheel will always be heavier than you think.
Install a new wheel
Carefully lift the spare tire into place. If it's a space saver or one of the smaller versions you've seen on other cars, it will be a little lighter than the wheel you just removed, but will still be quite weighty.
If your car uses nuts, you will have studs to secure the wheel, but if your car has bolts, you will need to center the wheel on the hub and hold it in place while you get the bolt. The job gets easier when one bolt is on place, as it will help hold it while you approach the others.
Tighten the wheel nuts until they are tight. Very gently wiggle the wheel to secure it to the hub and try to tighten the lug nuts a little more, but don't tighten them all the way yet.
Which is better: a spare tire or a foam tire?
Lower the jack
Now carefully turn the jack until the weight of the car is completely on the tire. When this is the case, you can remove the jack.
Tighten the wheel nuts
Tighten the wheel nuts using a wheel wrench. Tighten them as close to the diagonal pattern as possible to keep the car wheel running nice, straight and level.
You should tighten them as tightly as possible, even pressing lightly with your foot if necessary.
Don't be tempted to use the retractable wrench in the fully open position, as it will apply too much torque and could damage the vehicle or strip the wheel threads.
Put it all back in the trunk
Now you can put everything back in the trunk and dry your hands. Double check the area for anything you might have left behind—the wheel lock nut wrench is a favorite since it's so small—and drive away carefully, keeping an eye out for anything unusual.
I always stop after 15-20 miles and double check the wheel nuts are tight using a wrench. If you are using a spare tire to save space, adhere to the 50 mph speed limit.
That skinny spare tire may save trunk space, but it offers far less grip than the other three tires, and your car can become dangerously unbalanced if you drive it as fast as usual, especially in corners and on wet road.
If you have any doubts at all about your ability to properly change a car tire or feel that your health could be affected if you try to use one, remember that there is no shame in using a crash cover—safer is always better than sorry.
Informative, in-depth and up to date: Get the latest news, interviews and reviews in Saga Magazine.
How to change a tire: Saga readers say...
'I read with interest about changing the tire. As a former engine mechanic, I've changed a lot of car tires. Since I'm older now and not as strong, I bought two bolts with the same threads as the headless wheel bolts. Remove one or two bolts and replace them with the cut ones. This way you can easily remove and replace the wheel without having to push on the wheel to line up the holes." — WR, via email
Next article: Four Must Visit Motorways >>>
,
Scale of the problem
Usually, the pressure decreases slightly due to a damaged nipple, so you can safely drive to a car service/tire repair shop, where the faulty part will be replaced with a new one and you can drive as before.
But it happens that the air-permeable valve in the nipple gets jammed or it freezes in the lower position in the cold due to moisture (for example, after washing). In this case, the tire quickly goes flat, and further driving in a car with a damaged tire is not possible.
What to do in this case?
What to do
You should start from simple to complex. You can do the following:
- Drive to the nearest tire shop. Provided that the service is close, you can “reach” it. But, it should be remembered that a strongly deflated tire has a large contact patch with the road. This creates additional friction force with the road, which can lead to overheating and deformation of the tire, and the wheel rim may also be damaged. Therefore, driving for a long time with such a wheel is highly not recommended.
- Replace the wheel with the faulty valve with a spare one. The most optimal and safest solution to the problem. But, if there is no spare wheel, there is another way out of a difficult situation.
- Replacing a damaged nipple with your own hands. This is difficult and will require certain skills and time. However, it is quite doable.