30.10.2019
| (Votes: 1, Rating: 5) |
Issues discussed in the material:
- Is it legal to tint headlights?
- How can you tint headlights?
- What do Internet users think about headlight tinting?
If you have a desire to make changes to the appearance of your car, then the optimal solution is tinting. You can tint anything, from windows to headlights and stops. In this article we will look at what types of headlight tinting there are, how they differ, and also find out which tinting is preferable for a car.
Is it possible to tint headlights?
First, you should figure out whether it is possible to tint the headlights and taillights. To do this, we need to study the legislation, primarily two main documents.
- “Technical Regulations of the Customs Union TR CU 018/2011 on the safety of wheeled vehicles.”
- Traffic rules
The traffic rules directly state that the vehicle must be equipped in accordance with the requirements of current regulations. It is also prohibited to drive with faulty headlights, but this is not relevant.
Here in the “Technical Regulations of the Customs Union” the headlights are described in more detail. In particular, it is prohibited to install devices not authorized by the manufacturer, as well as to use modified headlights and lanterns. It turns out that you can’t stick a film, even a transparent one, this is already a change in design.
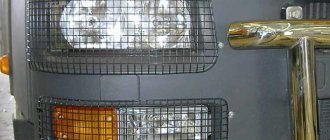
The document also indicates what color of headlights is allowed. No darkening, orange and especially red color. The same applies to the rear lights. You cannot use headlights that are tinted with film or spray on a car.
It’s worth making a small remark here. If your car already has tinted headlights from the factory, there will be no problems. This machine can be used.
Separately, it is worth mentioning the practical application of tinting. This modification does not provide any technical advantages; it is done only for aesthetic reasons. At the same time, excessive tinting of headlights can lead to a decrease in brightness. As a result, you will experience reduced visibility on the road. In bad weather conditions, even minor tinting of headlights can affect traffic safety. The same applies to the rear lights, although in this case such tuning has less of an impact on safety.
Conditions for caring for tinted optics on a car
Regardless of how car headlights are tinted, they can endure high-pressure washing and other more severe abuse. The operation of tuned optics is not limited in any way, which is an important advantage of tinting. Moreover, if necessary, you can easily remove the tint by prying it off and carefully removing the film or removing the varnish using a solvent.
Despite the simplicity of tinting car headlights, making mistakes or using low-quality materials can lead to a decrease in light transmittance. In addition, the presence of film or varnish on the surface of the headlights can lead to difficulties when passing technical inspection. Before tuning, you should carefully weigh all the advantages and disadvantages, and when actually performing the work, it is important to follow the tinting rules established by law.
Removing glue from glass after tinting: minimum time and cost
Direct flow - how to make it yourself.
What is the difference between tinting headlights and taillights?
First of all, the possibility of using different films. On the front, only clear or tinted films can be used. They must also transmit a sufficient amount of light (the power of the light beam is measured during technical inspection). If the brightness and directions of the light are within normal limits, the car will receive a diagnostic card without any problems.
In practice, experts do not pay much attention to the presence of film on the headlights; it is enough for them that the lighting device produces a sufficient amount of light.
Tail lights should be orange or yellow. You cannot cover them with red film, this is the only restriction. If they look normal, then there will be no problems. The power of the luminous flux during inspection on lamps is not measured.
How to do the pasting correctly
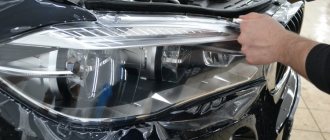
If the car has been in use for more than two years, before armoring the headlights with film yourself, polish the lenses. Small scratches are polished with a special paste, medium scratches are polished by hand, and deep scratches are polished using a special set of tools. If polishing headlights and armoring with film cannot be done at home, then it is better to turn to specialists.
After polishing, the lenses are thoroughly washed and wiped with alcohol. Then the film blanks are cut to size, leaving a margin of 2-3 cm.
After heating with a hairdryer, the workpiece is applied to the plastic lens without removing the backing. The protective layer is removed after cooling, carefully smoothing it with a spatula, preventing the formation of bubbles.
You may need to remove the old film.
Selection of tools and materials
First of all, you need to decide how you will apply tint to the headlights and lanterns. In practice, two methods are used.
- Varnish. In this case, a tinting varnish is applied to the surface of the glass. A good solution for halogen headlights. Although it has a number of disadvantages, in particular, tinting is prone to fading quickly.
- Vinyl film. It is considered the best option. If necessary, you can quickly remove it. There is no need to prepare the headlight for tuning for a long time. The film also serves as additional protection for the glass from damage.
We will look at the film method first since it is more common. Buy the most suitable film. It should not change the main color of the headlight or tail light of the car. You also need to take into account the degree of light transmission, this is especially important for front lighting fixtures.
To tint your headlights yourself, you will need the following equipment:
- Scissors;
- A stationery knife, in extreme cases a regular knife will do;
- Rubber spatula;
- Soap solution, preferably in a spray bottle;
- Hair dryer.
We recommend taking a hair dryer, which allows you to change the temperature of the air supply.
Which is better: film, varnish or paint?
As we said earlier, tinting can be done in three ways. Let's figure out which one is preferable, assessing all the pros and cons.
Let's start with tinting with varnish. It is sold in special cans. This method has a number of advantages:
- cheapness;
- beauty.
READ Do-it-yourself window tinting
However, when talking about how exactly to tint, one cannot fail to mention the disadvantages. Among them:
- the need to remove the headlight to apply varnish;
- the impossibility of applying the product yourself due to the fact that few people succeed in doing it carefully;
- storage restrictions: the varnish is afraid of exposure to the sun (ultraviolet) and temperature changes;
- It is impossible to remove the layer, so you will have to change the entire optics.
Some experts argue that the varnish does not transmit light very well.
Another means is film. What are its main advantages? Among them:
- simple application and removal of the film, you can handle it yourself without damaging the optics;
- no need to remove headlights before application;
- in addition to changing the color of the headlights, the car owner receives glass protection from scratches, chips and other troubles that can be encountered on the road;
- many colors transmit light well.
The film has almost no shortcomings, we will only note these:
- before applying the film, it is better to practice on a cheap product of dubious quality;
- in general, the film is not too cheap.
You need to pay attention to ensure that the film is not excessively thick and dense. This will further absorb light.
Let's look at the last option for tinting paint. Just like varnish, it is sold in cans and is very similar to it in the way it coats the optics. The pros and cons of paint and varnish are the same.
As for the structure, if applied independently there will be not only streaks, but also unevenness in the layers. This will cause additional problems when passing the technical inspection. Acceptable colors for the front lights are orange, yellow and white, and for the rear lights - only white.
DIY tinting
Technically, the tinting of headlights and taillights is not very different. Therefore, we will consider only one option. It is also important to take into account that preparation may vary for different car models, it depends on the technical features of the headlight. In some cases, almost complete removal of the headlight or flashlight may be necessary.
Before starting work, you need to do some preparation. We dismantle all nearby plastic elements, remove wipers and other technical elements. Sometimes it may be necessary to completely remove the headlights or taillights.
After completing the preparatory stage, you can proceed directly to tinting. We will look at the example of a rear light, since they usually have a more complex shape. Tinting the headlights of a car follows approximately the same principle, but a little easier.
Tinting is done with film in the following order.
- Degrease the glass of the lanterns. To do this, first wash with any detergent, after which we wipe the surface of the headlights dry. Next, wipe with white spirit or solvent, this will be enough.
- We take film for tinting. We apply the piece to the glass and, warming it up with a hairdryer, smooth it out. When the material takes the shape of the taillight, cut it along the edge.
- Wet the surface of the headlights and film with a soap solution.
- Glue the film to the glass. At the same time, heat it with a hairdryer. It is important to place the material evenly and without wrinkles.
- It is impossible to apply film to the tail lights without any air bubbles. We need to kick them out. To do this, heat the glass with a hairdryer and expel the air with a rubber spatula. We make movements from the center to the edge of the lantern. This is painstaking but obligatory work.
- After you have expelled all the air, all that remains is to glue the edges of the glass and remove excess film.
If you have coped with tinting the rear light, tuning the headlights with film will not cause any difficulties. The only thing is that you need to pay more attention to removing air bubbles. They can greatly distort the light beam, acting like a lens.
Cut the film to shape
We apply a tint film to the washed headlight and carefully cut it using a stationery knife so that there is a margin of about 3 cm around the headlight. If we are working with a removed headlight, we can simply put it on a sheet of film and in this case this step the work can be done much easier. Don't be afraid to cut the piece a little larger, as it can be trimmed later. In this case, it is worth trying and giving the workpiece a shape that is as similar as possible to the shape of the headlight.
Varnish tinting
This tint has several disadvantages. Firstly, it will not be possible to quickly remove it when needed. If the film can be removed in literally half an hour, in most cases the varnish cannot be erased; you will have to replace the glass, or even the entire headlight unit.
Also, when tinting the headlights, there is a problem with minor damage. Quite often, sand and small stones fly out from under the wheels of oncoming and passing cars. They get into the headlights, as a result, a large number of small damages and scratches gradually accumulate. This can lead not only to a deterioration in the appearance of the optics, but also to a reduction in technical characteristics.
If such difficulties do not stop you, you can begin the tinting process. To work you will need:
- degreaser;
- tinting varnish;
- spray gun (if the varnish is not in a can);
- rag;
- fine sandpaper;
- construction hairdryer.
Apply tint in the following order.
- We clean the surface of the optics from dirt: there should be no dust or other mechanical particles.
- Degrease the glass. This is one of the main preparations for applying varnish.
- We perform matting of optics. To do this, we go over the glass with sandpaper - this will remove the protective layer that may interfere with the application of varnish. In general, the varnish holds better on frosted glass and does not run off.
- Wash the optics again and degrease them.
- Apply varnish in three layers. The spray bottle or spray gun should be kept at a distance of 15–20 cm, this allows you to achieve the most even application of the tint.
All you have to do is wait until the varnish dries. Depending on the ambient temperature, drying may take from 12 to 24 hours.
Advantages and disadvantages
If you are thinking about whether you should tint your headlights or not, you need to focus your attention on the strengths and weaknesses of such tuning.
The advantages include the following:
- films protect the optics from minor damage;
- the film prevents intentional damage to the headlights;
- additional protection against chips and scratches;
- small shockproof effect;
- a way to keep headlights in their original form;
- good light distribution;
- light transmittance at 90-96%;
- vehicle decoration;
- Long lasting and more durable protection than polishing.
In theory, varnish has similar advantages. But it has too many significant shortcomings.
The main negative aspects of varnish as a material for tinting car optics are:
- low light transmittance. This material greatly blocks the light coming from the car's lighting fixtures. This has a negative impact on safety;
- irreversibility. Applying the polish is really easy. This does not require much time and effort. But once applied, it is almost impossible to get rid of the varnish. When it is removed from the surface, the optics body will most likely be damaged;
- life time. Immediately after application, the varnish looks impressive and beautiful. But this only lasts for a short time. This type of tinting is considered extremely short-lived;
- application. Although it is easy to treat the surface of a machine's optics, only a specialist with good experience in such work can apply varnish in a truly high-quality manner.
As for the disadvantages of vinyl film, it is worth noting the complexity of the application procedure, as well as the fairly high cost.
If you carefully study the instructions and practice a little, mastering the technique of applying film to optics will not be difficult. In terms of cost, each motorist decides for himself whether he is ready to pay that kind of money for tinting, or whether it is better to spend it on other ways to improve his car.