How to check the lambda probe and signs of malfunction? Will a Bosch universal fit?
- The car jerks when you drive at low speeds - 1 answer
First of all, when the lambda fails and malfunctions, several tangible consequences appear in the car’s behavior:
- Increased fuel consumption
- Unstable operation of the car engine (jerks)
- The operation of the catalyst is disrupted (toxicity increases)
Then, to check the lambda probe, you can first unscrew it and carry out a visual check (just as a visual check of the spark plugs can tell you a lot).
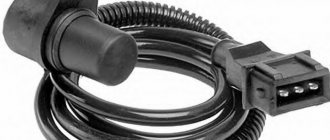
Several types of lambdas are installed on cars; the sensors can have one, 2, 3, 4, even five wires, but it is worth remembering that in any of the options, one of them is a signal (often black), and the rest are intended for heater (usually they are white).
What and how can you check the lambda?
To check, you will need a digital voltmeter (preferably an analog voltmeter, since its “sampling” time is much shorter than that of a digital one) and an oscilloscope, if possible, the measurements will be more accurate. Before checking, you should warm up the car since lambda operates correctly at temperatures above 300C°.
First we look for the heating wire:
We start the engine, do not disconnect the lambda connector. We connect the negative probe of the voltmeter (ordinary gauge) to the car body. We “poke” the positive probe on each wire contact and observe the voltmeter reading. When the positive wire of the heater is detected, the voltmeter should show a constant 12 V. Next, using the negative probe of the voltmeter, we try to find the negative wire of the heater. We connect to the remaining contacts of the sensor connector. If a negative contact is detected, the voltmeter will again show 12 V. The remaining wires are signal wires.
Checking the lambda probe with a tester:
We take an electronic constant voltage millivoltmeter and connect it in parallel with the LZ (“+” “-” to the LZ, - to ground), and the lambda probe must be connected to the controller.
When the engine warms up (5-10 minutes), then you need to look at the voltmeter needle. It should periodically move between 0.2 and 0.8 V (i.e. 200 and 800 mV, and if less than 8 cycles occur in 10 seconds, it’s time to change the LZ. Also replace if the voltage “stands” at 0 .45 V.
When the voltage is always 0.2 or 0.9 V, then there is something wrong with the injection - the mixture is too lean or too rich. Since the oxygen sensor voltage should change all the time and jump from ≈0.2 to 0.9V.
There is another quick way to check the lambda probe . You should do this:
Carefully pierce the positive contact of the tester (black lambda wire), the other contact to ground. With the engine running, the readings should range from 0.1 to 0.9V. Constant readings (for example, 0.2 all the time) or readings that go beyond this range, or fluctuations with a smaller amplitude indicate a malfunction of the probe.
- all the time 0.1 - little oxygen
- all the time 0.9 - a lot of oxygen
- The probe is fine, the problem is something else.
If you have the time and desire to bother, you can conduct several tests on a rich and lean mixture and additionally check the lambda probe sensor .
- Disconnect the oxygen sensor from the block and connect it to a digital voltmeter. Start the car and, by pressing the gas pedal, increase the engine speed to 2500 rpm. Using a device for enriching the fuel mixture, reduce the speed to 200 per minute.
- If your vehicle is equipped with an electronically controlled fuel system, remove the vacuum tube from the fuel pressure regulator. Look at the voltmeter reading. If the instrument needle approaches the 0.9 V mark, it means the lambda probe is in working condition. A malfunction of the sensor is indicated by the lack of response from the voltmeter, and its readings are less than 0.8 V.
- Do a lean mixture test. To do this, take a vacuum tube and provoke an air leak. If the oxygen sensor is working properly, the digital voltmeter reading will be 0.2 V or lower.
- Check the operation of the lambda probe in dynamics. To do this, connect the sensor to the connector of the fuel supply system, and install a voltmeter parallel to it. Increase engine speed to 1500 rpm. The voltmeter readings with a working sensor should be at the level of 0.5 V. Another value indicates a failure of the lambda probe.
Electric snag
The emulator has a microprocessor that corrects the signal for the ECU. The latter “believes” that the sensor is working and passes the data without interpreting it as an error.
In fact, there is no longer a catalyst in the design; instead, a section of the exhaust pipe is welded in.
The cost of the emulator varies from 1,500 rubles, which is 85–90% of the price of a new recreation center. Unlike a standard controller, the emulator has an unlimited service life.
| Catalog article/marking | Price in rubles |
| BOSCH 0 258 006 537 (8 and 16 valves) | From 1500 - 1600 |
| BOSCH 0 258 986 602 (8 and 16 valves) | From 1500 - 1600 |
| BREMI 30223 | From 1500 - 1600 |
| ERA 550489 | From 1500 - 1600 |
| DENSO DOX-0150 | From 1500 - 1600 |
| Metal spacer | 250-300 |
| Electronic emulator | From 1350 |
| *prices are as of May 2021 | |
How does a lambda probe work?
The principle of operation of the oxygen sensor is to monitor the amount of air (oxygen) in the exhaust gases. Why oxygen? Because it has been scientifically proven that complete combustion of the fuel mixture occurs at a rigid fuel to air ratio of 1:14.7 . To assess this ratio, the composition of the mixture, the concept of “excess air coefficient” was introduced, which is defined as the ratio of air entering the cylinders to the amount of air contained in the optimal air-fuel mixture, which is usually denoted by the Greek letter “λ” (lambda). The formula is as follows: if “λ” is equal to “1” - the mixture is lean.
Due to the constant deterioration of the environment throughout the world, the requirements for harmful CO emissions are constantly becoming more stringent, so almost all modern engines are equipped with oxygen sensors, catalysts and other systems aimed at making the exhaust less toxic. The control unit regulates the fuel supply through the injectors and also monitors the correct operation of the lambda probe. In the event of a malfunction, a report in the form of an error will be recorded in the appropriate log, and the driver will see the hated “Check Engine” inscription on the instrument panel.
How to check the serviceability of the lambda probe will be discussed in my article today. You will learn about the signs of malfunction, the causes, and how to check the oxygen sensor at home.
Oxygen sensors come in various types, among which there are one-, two-, three-, and also four-wire ones, it all depends on the configuration (presence of a heater and power supply circuit). Almost all modern lambdas are heated.
First, let's talk about why the lambda probe fails. The reasons may be the following:
- Excessive lead content in fuel;
- Antifreeze gets inside the sensor;
- Violation of the tightness of the sensor housing during cleaning or as a result of exposure to chemicals. substances;
- Severe overheating of the sensor housing due to the use of unsuitable (low-quality) fuel.
Signs of a malfunctioning oxygen sensor:
- Jerking while moving;
- Increased fuel consumption;
- Problems with the catalyst;
- Unstable engine speed;
- High exhaust toxicity.
You can check the lambda probe in different ways, using:
- Oscilloscope;
- Multimeter;
- And also a voltmeter.
Regulator replacement
Replacing an oxygen sensor on domestic cars, as a rule, does not cause any particular difficulties. The only difficulty may be that the probe boils, after which it is practically unaffected by mechanical action. But even for such cases there are effective and step-by-step instructions. It is given below.
- The car climbs onto the overpass.
- The protection of the power unit is removed.
- The hood opens and work begins with the probe wires. The wiring from the oxygen sensor can be found on the CO hoses (cooling systems). They are secured with clamps.
- The plastic clamp holding the wiring is cut;
- The sensor is unscrewed with a key set to “22”.
If the device is not removed, the sensor is boiling. We proceed according to the following scheme. We spray the regulator with WD-40, wait a little and try to remove it again. If it doesn’t work again, start the engine and heat up the exhaust system a little, pour water on the regulator and try again. If that doesn’t help, you’ll have to heat the sensor directly with a soldering iron, tap it with a hammer (not too hard) and unscrew it.
The regulator is installed in the reverse order of removal. You must remember to connect the connector and secure the wiring to the hoses.
Knowing the signs of a malfunctioning lambda probe, you can react to it in time and replace it. A normally functioning sensor means high-quality and trouble-free engine operation. A motorist should never forget this.
How to check a lambda probe using an ohmmeter
As a rule, in all operating manuals, checking the oxygen sensor comes down to using a multimeter to measure the voltage that the sensor produces under different engine operating modes.
Checking the lambda on different cars can differ significantly due to the differences in the sensors themselves. This verification method is described using the example of checking a lambda probe manufactured by BOSCH.
Most often, the “weak link” in a lambda probe is the filament circuit; usually problems arise with it. A little less common is a malfunction of the tip, which reduces sensitivity. In order to understand whether the filament coil is intact or not, it is necessary to perform a “ringing”; for this you can use an ohmmeter. The electrodes of the device are connected to the clamps of the two white wires of the sensor - contacts 3-4 of the connector (sometimes - white and brown wires), and are first disconnected from the power supply. The resistance of the spiral should not be less than 5 ohms.
As for the sensitivity of the tip, it can deteriorate as a result of the plaque that I described above. If the plaque I talked about is there, then the oxygen sensor needs to be changed. To check the thermoelectric parameters of the sensor, connect the voltmeter electrodes to contacts 1-2 of the connector, or to the terminals of the black and gray lambda wires. The test itself must be performed with the engine warm and running.
Characteristic
What is this element needed for? Another name for it is lambda probe. This is a sensor that monitors the level of oxygen concentration in the exhaust gases. Next, the lambda value is sent to the electronic control unit. The latter, if necessary, adjusts the air-fuel mixture supplied to the cylinders.
This sensor is found on all fuel-injected cars that are equipped with a catalytic converter and comply with environmental requirements of Euro 2 and higher. These include the VAZ-2114 with 8 valves. The oxygen sensor does not reduce the level of toxic substances, as many people think. He just takes measurements. And the toxicity of gases is affected by the catalyst. It is he who, thanks to chemical reactions, converts lead and other metals into harmless oxides and water.
How to check a lambda probe using a voltmeter
In order to check the oxygen sensor with a voltmeter, you need to start the engine and increase the engine speed to 3 thousand, then check the readings of the device at a maximum of 2 V. The voltmeter should show a voltage of about 0.55 V. Your task in this case is to either increase or decrease the speed . The voltmeter should show up to 0.8-1 V or drop to 0.4 V and below. If the data changes dynamically, the lambda is most likely working. If there are no vibrations or they are insignificant, most likely the probe is faulty and requires replacement.
How to check the oxygen sensor for a lean mixture?
To check whether the mixture is rich or lean, you need to take a vacuum tube and simulate an air leak. If the oxygen sensor is working properly, the voltmeter will show 0.2 W or lower.
To more accurately check the functionality and serviceability of the oxygen sensor, you will need an oscilloscope.
I recommend watching a video on how to check the lambda probe
Information on how to test an oxygen sensor yourself will help you determine whether it is faulty. Do not rush to waste time and money on replacing the element, as the problem may not be in this sensor at all. The lambda probe detects the amount of oxygen in the exhaust gases and converts this data into a voltage signal. It is necessary for the electronic engine control unit to form an optimal mixture of fuel and air.
If the sensor signal is outside normal operating parameters, the car computer stores a fault code in memory and the Check Engine light on the instrument panel lights up, warning the driver of the problem.
If you suspect that the oxygen sensor in your car is faulty or diagnostics have shown problems with it, do not rush to change the lambda probe. The computer simply reports where the problem was found. And the real culprit could even be a damaged vacuum hose. Because of this problem, the oxygen sensor “sees” too much oxygen in the exhaust gases. Another option is damage to the electrical connector of the lambda probe, preventing it from working properly. In both cases, the control unit will report a sensor malfunction.
Therefore, before replacing the lambda probe, you should definitely check its functionality. Today you will learn how to check the lambda probe with your own hands. Only after confirming the diagnosis can you go in search of a new part.
Malfunctions
If the exhaust gas quality control system malfunctions, engine operation becomes ineffective.
The VAZ 2114 oxygen sensor is a reliable element of the electronic control system, however, if it malfunctions, car owners are faced with the following symptoms:
- Frequently the engine reaches a temperature that exceeds operating temperature;
- twitching during exercise;
- increased fuel consumption;
- the engine stalls after revving or accelerating the car and engaging neutral gear;
- reduction in the technical characteristics of the car (dynamics, power);
- the engine error indicator on the dashboard is lit - Check Engine;
- change in the quality of exhaust gases (color, smell, quantity);
- uneven engine operation at idle (random change in the number of revolutions).
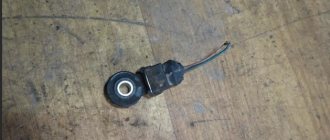
Connecting a multimeter to the oxygen sensor before testing
To diagnose the oxygen sensor, it is recommended to use a professional multimeter (it allows you to get the most accurate results), but a regular tester will do.
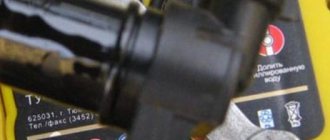
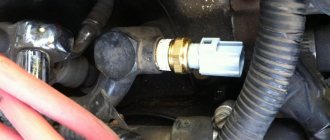
Before performing a lambda probe test, you must first locate it. On many older vehicles, the sensor was installed on or near the exhaust manifold. Modern cars often use two sensors - one installed in the exhaust manifold area, and the second after the catalyst. Make sure which sensor you need to check.
What does it consist of?
Oxygen sensors for Lada Priora consist of:
- metal case;
- four-pin connector for connecting electrical wiring:
- external electrode (platinum);
- internal electrode (zirconium);
- electrode insulator (ceramics);
- sensor electric heater;
- protective casing of the external electrode.
The lambda probe elements are resistant to high temperatures, as well as to its constant changes. This is due to the fact that its installation location is the engine exhaust system, some areas of which heat up to 900 °C.
Reading Oxygen Sensor Signals
Start the engine and check the sensor voltage signals with a tester. When checking the lambda probe with a multimeter, the voltage on the device display should constantly change within the range of 0.10-0.90 Volts. This is a sign of normal sensor operation.
If you only see a low or high voltage signal on the screen, there is clearly a problem. To verify that the sensor is operating correctly, perform the following two tests.
Checking the reaction of the oxygen sensor to a lean fuel mixture
- Disconnect the hose from the crankcase ventilation valve that goes to the intake manifold. As a result, more air will flow into the engine. You can find the valve using your vehicle's owner's manual.
- Check the digital multimeter readings. Such actions should result in a signal of about 0.20 V being displayed. If the reaction is different or the numbers on the screen change only after a while (not immediately), the sensor is not working correctly.
- Connect the hose to the crankcase ventilation valve.
Checking the reaction of the oxygen sensor to a rich fuel mixture
- Disconnect the pipe that connects the engine throttle body and the air filter housing.
- Block the hole leading to the engine with a clean rag. This will reduce the amount of air that enters the engine.
- Check the tester readings. The oxygen sensor should produce a signal of about 0.80 V. If the lambda probe responds differently or takes a very long time to respond, it is faulty.
- Connect the air duct to the air filter housing and stop the engine.
If such diagnostics show that the oxygen sensor is functioning properly, the problem may lie in other components of the power unit. The engine may have a vacuum leak (air leak – https://avtopub.com/kak-najti-podsos-vozduxa-v-dvigatele-i-ustranit-ego/), problems in the ignition system, etc. If the lambda probe did not respond to your actions or reacted too late or incorrectly, it will have to be replaced.
See our article about what happens if you turn off the lambda probe in a car. Is it possible to drive without it? Read the link – https://avtopub.com/chem-grozit-otklyuchenie-datchika-kisloroda-v-avtomobile/
Now you can accurately determine whether the oxygen sensor is really faulty or whether it’s not the problem at all. This simple check will help you save money and time and get your car back to life faster.
What to do if there are signs of a flow meter malfunction
Control oxygen sensor in Priora, Kalina
First of all, carry out an inspection. To do this, you need to disconnect the negative terminal of the battery, disconnect the connector of the cable going from the mass air flow sensor to the computer, and carefully remove the flow meter. On Priora it is located near the air filter housing, after which the intake manifold air duct begins. For dismantling, you will need a Phillips screwdriver (loosen the clamp of the air duct pipe) and a size 8 wrench (bolts attaching to the filter).
There should be no cracks or dents on the case, the connector contacts should not be oxidized. Dust, and possibly water or oil stains, will most likely be found inside the MAF channel. This is the main reason for the massive failure of sensors: under normal operating conditions, mass air flow sensors live a long time and do not cause problems for car owners.
A dirty sensor must be blown off dust using an intense stream of air, then carefully washed with a special product or alcohol. Washing is done with an aerosol jet (when using the product) or pressure from a syringe (with alcohol). While the device is drying, be sure to wipe off dust from the air ducts and the filter housing inside. It is recommended to combine this procedure with replacing the air filter.