A short list of typical generator malfunctions
To begin with, we will briefly list the characteristic malfunctions of a car generator without any explanation. This will make it possible to assess in general terms, so to speak, the scale of the disaster. It is quite possible that some of the breakdowns listed are already familiar to you. As a rule, these include those that occur very often, and almost every first-time car enthusiast with little experience has encountered them at least once.
So, here are 10 typical car generator malfunctions:
- Poor contact or damage in the battery charging circuit.
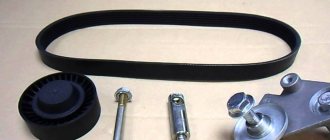
- Slipping or broken drive belt.
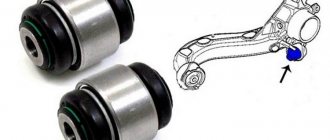
- Worn or damaged rotor bearings.
- Worn or stuck brushes.
- Wear of slip rings.
- Incorrect operation or failure of the voltage regulator relay.
- Interturn short circuit or break in the generator windings.
- Breakdown of the rectifier bridge diodes.
- Broken rectifier bridge diodes.
- Insufficient generator power.
We will return to a detailed consideration of each of these breakdowns later. As well as the symptoms by which these malfunctions can be identified.
Common battery problems
- short circuit of battery electrodes/plates;
- mechanical or chemical damage to the battery plates;
- violation of the tightness of battery cans - cracks in the battery case as a result of impacts or improper installation;
- chemical oxidation of the battery terminals. The main causes of these malfunctions are:
- gross violations of operating rules;
- expiration of the product's service life;
- various manufacturing defects.
Of course, the design of a generator is more complex than a battery. It is quite reasonable that there are many times more generator malfunctions, and their diagnosis is much more difficult.
It is very useful for a motorist to know the main causes of generator malfunctions, how to eliminate them, as well as preventive measures to prevent breakdowns.
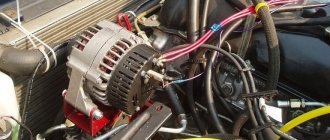
All generators are divided into alternating and direct current generators. Modern passenger vehicles are equipped with alternating current generators with a built-in diode bridge (rectifier). The latter is necessary to convert current into direct current, on which the vehicle's electrical consumers operate. The rectifier, as a rule, is located in the cover or housing of the generator and is integral with the latter.
This is interesting: Why is anti-gravel film needed?
All electrical appliances of the car are designed for a strictly defined operating voltage range. As a rule, operating voltages are in the range of 13.8–14.7 V. Due to the fact that the generator is “tied” with a belt to the engine crankshaft, it will work differently depending on the speed and speed of the vehicle. It is for smoothing and regulating the output current that the relay-voltage regulator is designed, playing the role of a stabilizer and preventing both surges and dips in the operating voltage. Modern generators are equipped with built-in integrated voltage regulators, colloquially referred to as “chocolate” or “tablet”.
It is already clear that any generator is a rather complex unit, extremely important for any car.
Design and principle of operation of a car generator
First, it would not hurt to at least get acquainted in general terms with the structure of the generator, as well as with the operating principle of this component of the car. Many car enthusiasts, unfortunately, always skip this stage and immediately begin diagnostics and repairs. As a result, due to a misunderstanding (or misunderstanding) of the operating principle, things often reach a dead end, serious mistakes are made, short circuits and more serious breakdowns are provoked than before. It follows from this that the search for and elimination of any malfunctions of a particular component of the car must begin with studying its structure and operating principle.
The car generator is designed and works as follows. Actually, the electricity used to power the on-board network and charge the battery is generated through electromagnetic induction. It is removed from the terminals of the stator windings, inside which the rotor rotates on two bearings. The rotor is driven by the engine crankshaft, to which it is connected by a belt.
The first feature that you need to know about is the uneven rotation speed of the generator rotor. It completely depends on what speed the engine is running at. Accordingly, if the rotor were powered (for excitation) by the same voltage, then at the output of the generator we would receive a jumping voltage, which is unacceptable for the vehicle’s on-board network.
This problem can be solved quite simply. The rotor is not supplied with a stable voltage, but with an adjustable one. A relay-regulator is responsible for this, which “monitors” the voltage at the battery terminals and, depending on the current indicators, adjusts the power supply to the rotor. Roughly speaking, when the voltage at the generator output reaches the upper permissible level (for example, 14.4 volts), the relay-regulator circuit stops powering the rotor. The output voltage drops, the RRN resumes excitation of the rotor, and so on in a cycle with a very high frequency. Due to this, the voltage of the on-board network is constantly maintained at the same level, and does not depend on what speed the car engine is running at.
The second feature of a car generator is that it generates three-phase alternating voltage. And to power the on-board network and charge the battery, it must be constant. To solve this problem, the generator is equipped with a rectifier bridge consisting of diodes. As a rule, the rectifier has six main diodes (two for each phase), as well as three additional ones.
In principle, this knowledge will already be enough to understand the characteristic generator malfunctions described below. Although, for successful self-repair, it doesn’t hurt to delve into the topic using additional sources of information.
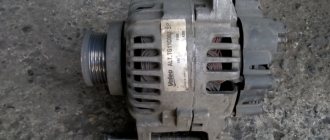
Alternator
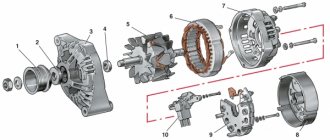
The alternator consists of two main parts: a stator with a stationary winding in which alternating current is induced, and a rotor that creates a moving magnetic field, as well as covers, a drive pulley with a fan and a built-in rectifier unit.
The alternating current of the generator is rectified by a full-wave, three-phase rectifier with semiconductor diodes.
AC generators have a number of advantages over DC generators. The rotor of an alternator can rotate at a higher frequency than the armature of a dc generator.
At high rotation speeds of the DC generator armature, the contact between the brushes and the commutator lamellas deteriorates due to vibrations of the brushes as they slide along the commutator. In addition, under the influence of centrifugal forces, it is possible for the windings to come out of the armature slots.
In order for the voltage not to change as the armature rotation speed increases, it is necessary to proportionally reduce the excitation magnetic flux. When using electromagnets in a generator, this can be achieved by reducing the current in the field windings. The voltage regulation of automobile generators is based on this principle. It is carried out using electromagnetic vibration relays, called relay-regulators.
Diagnostics of the generator relay-regulator is carried out using diagnostic stands, where the generator switch-on voltage and charging current are determined. The voltage regulated by the relay regulator should be in the range of 13.9 - 14.5 V.
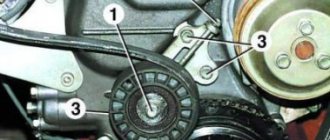
The tension of the generator drive belt should be checked. When the belt slips, the generator does not develop full power, which leads to battery discharge.
The generators are also checked for brush wear, the force of the brush holder springs and the condition of the slip rings and rotor bearings.
The height of the brushes is measured with the brush holder removed. If the brushes are worn to a height of 8 - 10 mm, they are replaced.
The force of the brush holder springs must comply with the standards of your car brand, for example, for a VAZ - 4.2 ± 0.2 N (420 ± 20 gf).
The slip rings must be clean and free of oil.
The condition of the bearings can be checked by rotating the rotor shaft by hand with the brushes removed. The shaft should rotate easily, without jamming, noise or knocking.
Signs of a generator malfunction
Problems with the alternator and charging system can affect your vehicle in a variety of ways. You may notice:
- The ALT or CHARGE indicator will light up
- Your engine is hard to start, starts slowly, or won't start.
- Your generator is noisy
- Your headlights suddenly dim
These and other problems can be caused by a faulty charging system.
Before you begin replacing components in hopes of fixing the problem, you need to determine which component or components are causing the problem. Often, you can diagnose and fix the problem yourself using a few simple tests and tools.
The sooner you find out what's causing the problem, the better. You will prevent the faulty component from destroying other system components, making your repairs more expensive.
This handy car alternator troubleshooting guide will help you do tests you can do at home using a test light or digital multimeter (DMM) and maybe a few other common tools.
It's a good idea to have the repair manual for your specific make and model of car on hand. This will help you identify wires, specific components, and perhaps suggest some specific tests recommended by your manufacturer.
This is interesting: How to properly adjust the clutch with your own hands
Types of generator faults
Due to the fact that any generator is an electromechanical device, there will be two types of faults - mechanical and electrical.
The first includes the destruction of fasteners, housing, malfunction of bearings, pressure springs, belt drive and other failures not related to the electrical part.
Electrical faults include winding breaks, diode bridge faults, brush burnout/wear, turn-to-turn short circuits, breakdowns, rotor beating, and relay-regulator faults.
Often, symptoms that indicate characteristics of a faulty generator can also appear as a result of completely different problems. As an example, poor contact in the fuse socket of the generator field winding circuit will indicate a generator malfunction. The same suspicion may arise due to burnt contacts in the ignition switch housing. Also, the constant lighting of the generator malfunction indicator lamp can be caused by a breakdown of the relay; the blinking of this switching lamp may indicate a generator malfunction.
The main signs of a faulty generator:
- When the engine is running, the battery discharge warning lamp flashes (or stays on continuously).
- Discharging or overcharging (boiling) of the battery.
- Dim car headlights, a rattling or quiet beep when the engine is running.
- Significant change in headlight brightness with increasing speed. This may be acceptable when increasing the speed (re-throttle) from idle, but the headlights, having lit up brightly, should not increase their brightness any further, remaining at the same intensity.
- Extraneous sounds (howling, squeaking) coming from the generator.
It is necessary to regularly monitor the tension and general condition of the drive belt. In case of cracks and delaminations, immediate replacement is necessary.
Causes of generator malfunction
To speed up diagnosis and repair, look at the system condition that most closely resembles your problem and review the possible causes described in this section. Some checks or tests may be offered as needed.
1. If the battery seems to remain undercharged
You have already charged the battery several times and found that the battery is discharged again. Before you blame your battery or alternator, here are a few preliminary checks you might want to do.
a) Check the drive belt or timing belt, especially if you have not replaced it within the last five years. Make sure the belt has the correct tension. Look for signs of wear or damage such as cuts, shiny spots, missing pieces. Today, serpentine belts show no signs of wear even if they need to be replaced. Use a belt wear indicator or check the maintenance schedule for the replacement interval suggested by your vehicle manufacturer. You can find the schedule in your vehicle's owner's manual or repair manual.
b) In addition to the drive belt, also check the belt tensioner. Make sure it rotates freely and makes no noise. Car manufacturers recommend replacing the tensioner at the same time as replacing the drive belt.
c) Make sure your battery connections are secure and clean. However, just because the terminals look clean does not mean they are sealed or in good condition. Look for damage to the cable and the terminal itself, which may prevent electrical current from flowing correctly.
d) Check your battery and charge it, if necessary, charge it. Is there stray capacitance (a shorted cell in the battery itself) stealing energy from your battery.
- A quick test is to connect a test light in series between the positive battery cable and the positive terminal of the battery. If the warning light comes on, there is electrical current in one of the systems.
- First, disconnect the alternator electrical connector. If the warning light goes out, the alternator is causing a leak. If not, look for the parasitic drain.
f) Don't forget the starter: A faulty starter can draw excessive current during operation, draining the battery. If necessary, check your starting motor (starter) or starting system.
- If the system is overloaded
Besides the test results, another potential sign that your battery is overcharging is if corrosion continues to accumulate on the battery terminals.
Here are some checks you need to do:
- Make sure all connections to the alternator, remote voltage regulator (if applicable), and battery are clean, tight, and in good condition.
- Check the battery or have it checked at your local auto parts store or service center. A faulty battery cell can cause the generator to overcharge.
- Check the condition of the voltage regulator and generator circuit. If necessary, consult your vehicle's repair manual.
- Make sure you have a good ground connection to the alternator (alternator housing) and voltage regulator, especially if your vehicle uses a remote voltage regulator. Ground connections should be free of rust, and the alternator and remote voltage regulator mounting bolts should be clean and sealed.
- Check the alternator rectifier or have it checked at an auto parts store.
- Additionally, perform the tests described in the “Troubleshooting Unusual Charging System Voltage Drops” section below.
- If the alternator is not charging the battery
This is interesting: Engine mounting: principle of operation, purpose, design and replacement
When your tests indicate insufficient or zero charging:
- Make sure the drive belt is not loose or worn.
- If necessary, borrow a good battery just to run the engine and make sure your drive belt and belt tensioner are working properly.
- Manually check the belt tensioner for proper operation. Make sure the tensioner pulley rotates freely and without noise. Check it for damage.
- Manually turn the alternator pulley and make sure it rotates without problems. If one of the bearings is seized, the generator will not be able to rotate freely.
- Check that the connections at the battery, alternator and remote voltage regulator are clean and secure.
- Check to see if the fuse or fuse link has blown. If necessary, consult your vehicle's repair manual to locate the alternator fuse or fusible link.
- Perform the tests described in the "Troubleshooting Unusual Charging System Voltage Drops" section below.
- If the engine makes noise
The noise can be a sign of problems with the alternator when it comes from the charging system. The following test points will help you isolate the source of the noise.
- Check the drive belt or timing belt. Look for signs of wear or damage, such as cuts, shiny spots, or missing pieces under the belt. A worn belt may squeal during operation.
- Also check the belt tensioner for serviceability and damage. It should rotate freely.
- Make sure the generator is installed correctly. Loose mounting bolts can cause the alternator drive belt and drive pulley to become loose and noisy.
- Check the generator for noise.
- If the light dims while the engine is running
Most generators use diodes inside the rectifier to convert alternating current (AC) to direct current (DC) for use by the system. When one or more diodes fail, alternating current can enter the electrical system. Sometimes you may notice this when the headlights, instrument panel lights and other interior lights dim while the engine is running and this may also indicate a faulty alternator diode bridge. To test the alternator for AC leaks, see the "Checking Alternator AC Voltage Leakage" subsection in the previous section.
Measure system voltage and voltage drop using a digital multimeter.
Poor contact or damage in the battery charging circuit
In order for the generator unit to operate, it must be securely connected to:
- The positive terminal of the battery.
- Ignition switch.
- "By the mass."
Let's start with the last one. The generator is in contact with ground due to its metal casing, with which it is attached to the car engine. As a rule, in this place the contact is always good, and almost never causes a unit malfunction. However, it should be remembered that the engine itself is connected to the negative terminal of the battery using a wire. And problems very often arise with it.
The most common one is poor contact. In most cars, the ground is connected to the engine somewhere at the bottom. Dirt, moisture, temperature changes, leaking oil and other factors lead to oxidation and corrosion of the connection. This manifests itself in the form of several symptoms.
Firstly, due to poor grounding, voltage drops in the vehicle’s on-board network may occur. The result is a systematic undercharging of the battery. Secondly, significant voltage drops are observed when a serious load is turned on - a stove, air conditioner, subwoofer, headlights, and so on.
Checking the engine ground is very simple. To do this, using a multimeter turned on in ohmmeter mode, measure the resistance between the negative terminal of the battery and any point on the engine. If the device shows more than 0.05 Ohm, the “ground” should be cleaned of dirt and oxides. It may be necessary to replace or even add another wire connected in parallel with the main one. Due to this, the cross-section of the ground wire increases, and very often problems such as voltage drop or undercharging of the battery are solved.
Absolutely the same with the positive power wire of the generator. It goes directly to the battery, and is quite thick. If this wire is damaged or has poor contact at the attachment points, the symptoms described above appear. The malfunction can be eliminated by simply cleaning the contact pads. If the wire is mechanically damaged (as a result of carelessness, corrosion or vibration), then it must be replaced with a new one, respecting the cross-section.
Additionally, the condition of the contacts of the control wire coming to the generator from the ignition switch (thin), as well as the signal wire (on the relay regulator), is checked. Poor contacts at these points also lead to unstable and incorrect operation of the entire battery charging unit.
Generator function
Operating principle of a car generator:
- When the ignition is turned on, voltage is applied to the field winding through the brush block and slip rings;
- The appearance of a magnetic field is initiated;
- The magnetic field acts on the stator windings, which leads to the appearance of electrical alternating current;
- Next, the alternating current is sent to the rectifier unit, where it is converted into direct current;
- The final stage of “preparing” the correct current is the voltage regulator.
After the entire process, part of the electricity powers the electrical consumers, part goes to recharge the battery, and some goes back to the alternator brushes (as the alternator was once called) to self-excite the generator.
Simply put, the generator converts the mechanical energy of the crankshaft into electrical energy through rotational movements within itself. In most cases, the generator is driven by a V-belt or serpentine drive belt, which is connected to the generator via a pulley. With this drive, the generator uses engine power to generate electricity, taking about 5 hp from the internal combustion engine. With. It costs fuel. Therefore, modern alternators are focused on making energy conversion more efficient.
For example, during intense acceleration, the generator power decreases and the resistance also drops. Conversely, at idle, when the engine consumes little fuel, more power begins to be consumed from the generator, and resistance increases.
Drive belt slipping or breaking
Drive belt slippage can be caused by several reasons. Firstly, its insufficient tension. Secondly, water from puddles or motor oil gets on the generator pulley. Thirdly, the belt stretches over time, sags, and also begins to slip periodically. As a rule, at first this malfunction appears only when the generator begins to operate under serious load. This happens because as the load increases, the rotor resistance increases.
Very often, belt slippage is determined by a characteristic squeak that is heard when the engine starts, as well as immediately after turning on the load. Quite often this whistle can be heard in rainy weather, which indicates water has gotten on the generator pulley. If this happens, the belt must either be tightened or replaced with a new one.
A broken alternator belt is a more serious malfunction, which it is highly advisable to notice immediately after its occurrence. The primary symptom is the warning light on the instrument panel coming on, indicating that the battery is not charging. This lamp should only light when the ignition is on and the engine is off. In all other modes it does not light up.
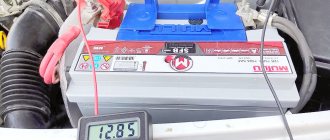
A secondary symptom of a broken alternator belt is low voltage on the on-board network. When everything is working normally, the voltmeter should show at least 13.8-14.5 volts. If while driving the voltage drops to 12 volts, this means that the on-board network is powered only by the battery. Conclusion - the generator is faulty.
Worn or damaged rotor bearings
When the generator rotor bearings wear out, several problems can arise. Firstly, due to a violation of the axis of rotation of the armature shaft, it begins to touch the stator with its windings. Secondly, due to significant wear, the bearings may even jam and the rotor will stop. The first problem will first lead to voltage drops in the on-board network, and later to an interturn short circuit in the stator. What happens when the bearings jam is already clear. The rotor will stop.
In most cases, wear of the generator bearings can be detected in advance by a characteristic hum coming from under the hood. This sound can change volume and tone depending on what load is currently placed on the vehicle’s on-board network. That is, for example, when the headlights are turned on, the hum can increase significantly, which makes it possible to identify a malfunction in advance.
To avoid the problems described, it is highly advisable to periodically check the bearings for play. To do this, just grab the generator pulley with your hand and shake it from side to side. If the bearings are in good condition, there should be no play.
How to check the generator rotor
The first step is to test the excitation winding. To do this, set the multimeter to check the resistance and measure it between the slip rings - the winding resistance should be in the range of 2.3-5.1 Ohms. When it is above, there is either a break or simply poor contact between the rings and the winding terminals. Low resistance indicates an interturn short circuit.
Using the ammeter mode on the multimeter, you can also check the current consumed by the winding. You need to apply 12V to the slip rings and measure the open circuit - the excitation winding should not consume more than 3-4.5 Am.
Auto generator rotor
Car generator stator (winding)
To the full complex, you can also add a check of the rotor insulation resistance. To do this, you will need a 40-watt light bulb and wires (one wire from the socket to the ring, and the other through the light bulb to the body - if everything is normal, the light bulb will not light up, but if the filament barely glows, then there is a current leakage to ground) .
By following all the recommendations and testing sequence, in most cases, you can easily check the car’s generator and its performance on your own, having only one multimeter at your disposal. But in order to repair it, having identified a faulty unit, you need to replace the failed part. Monitor the belt tension, the condition of the contacts, watch the generator light on the dashboard and the generator will last you longer.
A generator is a source in a car's structure that is responsible for recharging the car while the engine is running. This element is so important that it is impossible to drive without it. Yes, if the generator burns out, you can drive until the battery runs out. When the generator becomes unstable, the battery quickly runs out. In order to check the functionality of the generator, it is not necessary to go to a service center, but can be checked at home.
- Reasons for generator failure.
- How to check the generator?
- Video.
Worn or stuck brushes
Brushes are needed to supply power to the constantly rotating generator rotor. As a rule, together with the relay-regulator they are one separate part. The brushes are made of conductive graphite and are spring-loaded to ensure reliable contact with the commutator. If the contact between them and the slip rings is poor (or absent), the generator will not be able to work normally (or will not work at all).
The most common problem with brushes is their natural wear. When the graphite wears away, the brushes are simply not long enough to power the rotor. As a rule, at the initial stage, this malfunction manifests itself in the form of abundant sparking inside the generator. Due to wear, the brushes do not always come into close contact with the commutator, and sparking occurs between these parts.
The second characteristic malfunction of the generator is associated with the so-called freezing or sticking of the brushes. This happens due to graphite dust or other dirt getting into the brush guides. The latter become motionless, and therefore can no longer be pressed by springs to the collector. As a result, increased sparking is first observed, and then the generator stops generating electricity altogether.
Along with sparking, critical wear or sticking of brushes can be detected by voltage drops in the on-board network (if there is a voltmeter in the cabin) or by a warning lamp on the instrument panel. It should also be noted that this malfunction can be identified visually without removing the generator from the car. The brush assembly, as a rule, can be easily removed together with the relay regulator, as it is secured with two screws. If the brushes are worn out, then this is only a replacement. Sticking can be eliminated by cleaning the guides of graphite and other dirt.
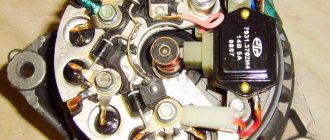
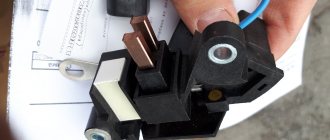
Checking generator components
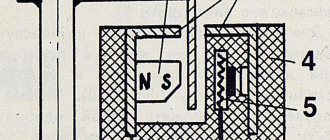
The test begins with checking the functionality of the voltage regulator. To do this, the regulator is disassembled from the generator and a simple connection diagram is created.
Use any car dealership light bulb as a light bulb. If voltage regulator 3 is working properly, light bulb 6 should not light up at full power. When the multimeter is connected in parallel with the light bulb (brush), its readings should be in the range from 5.0 to 10.0 V. If the multimeter readings are outside these limits, the regulator must be replaced. Some generator models are designed in such a way that the regulator can be replaced without dismantling the unit.
After this, it is necessary to check the generator excitation winding for failure. To do this, set the multimeter to 200 kOhm resistance measurement mode. The sensors are connected: black to the collector lamellas, red to the metal part of the armature. The resistance must be greater than 100 kΩ or greater than the upper limit of measurement, as shown in the figure.
The resistance between the plates (rotor windings) is usually 0.5 - 2 Ohms.
Stator testing begins with an attempt to damage the windings. To do this, connect the red probe of the multimeter to the metal part of the stator, and the black probe to the series windings.
The resistance must be above the upper limit of measurement. Then the resistance between the winding contacts is measured. They cannot differ by more than 5%. The multimeter's measurement limit should be set to 200 ohms.
If the winding has an electrical failure, a short circuit in the winding or an open circuit, it must be replaced. There are workshops that rewind stators and rotors.
To check the condition of the diode bridge, switch the multimeter to the “diode” measurement mode. Then the diodes (usually 9 of them on the block) are sequentially “tested” in forward and reverse connections. In the forward direction (black probe to cathode) the resistance is 550-700 Ohms, when connected in the reverse direction it is higher than the maximum measurement limit.
If the diode fails, the resistance in all directions will be practically zero. This diode should be replaced. Difficulty: Replacing diodes is based on the fact that the diodes in generators are not soldered, but spot welded to ensure reliable contact under different temperature conditions.
A car alternator is an integral part of the vehicle's electrical equipment. At the first sign of a problem, check it with a multimeter.
A generator is a type of power plant that provides energy to all engine systems: power, cooling and ignition, so its failure will inevitably lead to other malfunctions. To prevent breakdowns, diagnose them systematically, and if breakdowns cannot be avoided, repair them immediately.
In this article we will talk about how to check the generator for functionality without resorting to the help of specialists. But first, let's learn about the symptoms of its possible malfunctions.
Wear of slip rings
The slip rings are located on the generator rotor shaft. They are designed to transmit power from the brushes to the armature winding. The rings are made of copper and therefore are subject to wear and tear over time. The symptoms of this malfunction are absolutely the same as in the case of brushes - sparking, voltage sags, as well as complete generator failure. To clarify the diagnosis and eliminate the breakdown, dismantling and complete disassembly of the unit is required. Fortunately, on many common generators these parts can be changed without problems and are relatively inexpensive.
Incorrect operation or failure of the PRN
The voltage regulator relay “suffers” from several types of breakdowns, which are quite easily diagnosed even without disassembling the generator. The first sign of its malfunction is low voltage on the on-board network. Drawdowns can be observed both without load and with it. This happens due to the fact that the electronic components in the relay-regulator circuit burn out.
The second known sign of a unit malfunction is that the generator does not work at all. This is determined both by the warning lamp on the instrument panel and by the readings of the on-board voltmeter. The latter in such cases begins to show a voltage of around 12 volts. As the battery discharges, the performance decreases noticeably.
It is worth noting that most of the described generator malfunctions manifest themselves in approximately the same way. In particular, low voltage and a lit warning lamp may indicate either a failure of the relay-regulator or other failures. To identify the fault more accurately, there is a fairly simple method for checking the voltage regulator relay. It is performed using an adjustable power supply and a multimeter according to the following algorithm:
- The relay regulator is removed from the generator.
- A multimeter is connected to the brushes in voltage change mode (you can also use a 12-volt test light).
- The negative of the power supply is connected to the ground of the relay regulator.
- The plus is fed to the wire that comes out of the relay regulator.
- The power supply voltage rises to 14.0-14.5 volts.
- When this voltage is reached, a working relay-regulator should operate - the control lamp connected to the brushes goes out.
If the control lamp does not light up at all at any voltage, there is a break in the relay-regulator. If the lamp does not turn off when the control voltage is reached (14.0-14.5 volts), but continues to glow further, this is called a breakdown of the relay regulator. In practice, the first outcome means the battery is undercharged, and in the second, it is overcharged (with boiling, swelling of the case, and even an explosion).
The so-called new type relay regulators (with two wires) are a little more difficult to check, but possible. The difference is that the second wire must be supplied with a simulated alternating voltage during testing. How to do this at home can be found on the Internet.
Why do you need a generator in a car, and why can’t even a working one always charge the battery?
photo: nairaland.com
Modern cars are usually equipped with a three-phase alternating current electric generator.
While driving, it generates energy for all electricity consumers in the car (the voltage corresponds to plus or minus 14 volts and is maintained by the regulator). The more sophisticated the car, the more consumers it has and the more current it requires. Air conditioning, heated mirrors, rear/front windows, heated seats, cruise control and so on and so forth, from the latest electronic assistants to the fuel pump and engine control unit. see also
The use of a 48-volt on-board electrical network
In addition, as many people know, even those who are not very familiar with the structure of cars, the generator is responsible for charging the battery and ensuring that it always remains fully charged while driving. This is very important, since the battery, in turn, is an energy storage device in the car and, so to speak, a conditional backup generator that supplies current, which is sometimes even required while driving.
IMPORTANT! Do not forget to turn off energy consumers when the engine is off. If you turn off the engine, turn off all energy consumers: headlights, radio (if you use the radio for a long time on an old battery, the car may not start after parking - there is not enough current), even the interior lighting.
Use a fresh battery of normal capacity. Moreover, if the car is used for short trips, especially in winter, when it is necessary to turn on voracious consumers of electricity such as glass/mirror heaters, heated seats, then even a working generator will not have time to saturate the battery with energy, which will ultimately lead not only to the inability to start the car, but also to battery degradation.
Breakdown or breakage of the rectifier bridge diodes
Let us recall that the diode bridge serves to rectify the alternating voltage generated by the stator windings of the generator. Since there are three phases in a car generator, the bridge also consists of three branches - two diodes in each. When a breakdown of one of the diodes occurs, a sharp increase in voltage in the vehicle’s on-board network may be observed. A breakdown is when a diode begins to pass current in both directions, but should only pass in one.
A break in the diodes of the rectifier bridge does not threaten anything catastrophic, unlike a breakdown. For example, if one of the diodes breaks, then only two of the three phases continue to work. If there is no heavy load on the on-board network, then this malfunction may not be noticed. However, when the load is turned on, the power of the two phases is no longer enough, and therefore there is a drop in the on-board voltage.
It is clear that if all the diodes break, which does not happen very often, the generator stops functioning completely. This can be seen both in the voltage of the on-board voltmeter and in the warning lamp on the instrument panel. To more accurately check the bridge diodes, you will need to dismantle the generator and partially disassemble it.
Charge indicator lamp - the first indication of a malfunction
An important “tool” for checking the operation of the generator is located right in front of the driver’s eyes. This is the charge indicator lamp on the instrument cluster. The generator or battery symbol lights up every time the ignition is turned on. If the warning light remains on when the engine is started and running (idling or revving, it doesn't matter), this may be the first and most important sign that the loads on are not getting the power they need and the battery is currently supporting the system, continuously and discharging very quickly.
see also
How to light a battery?
To find out if this is a problem, simply press the accelerator pedal briefly and quickly. In most cases, the light will go out, which means everything is in order (although you should still contact a service station). If the indicator continues to light, this may already be a sign of a malfunction of the generator.
Insufficient generator power
A fairly common problem nowadays, which, in fact, is not a malfunction. It lies in the fact that after installing any powerful non-standard equipment on a car, wild voltage drops are observed. These symptoms may well indicate that the power of the existing generator for the load placed on it is not enough.
This is most often observed after installing powerful acoustics, xenon headlights, an inverter that allows you to get 220 volts on board the car, and so on. This “malfunction” can be eliminated very simply - by selecting and installing a more powerful generator. Unfortunately, such a decision is often reached when the standard generator cannot withstand the load and burns out.
Brief summary
Most of the typical malfunctions of a car generator are very easy to identify and fix even without relevant experience. If the generator is working, but the problem is reduced only to voltage sags or sparking in the brush assembly, it can be solved by cleaning the contacts or replacing the relay regulator. Extraneous sounds from the generator can be eliminated by tightening or replacing the belt, as well as installing new bearings. Other faults - short circuits in winding turns, breakdowns and breaks of diodes, etc. - are best left to specialists, since their elimination requires not only bare knowledge, but also experience.