Do-it-yourself car body polishing
An important step in protecting your body from aging is polishing. It will hide pores and microcracks in which fine dust accumulates, and protect the paintwork from the aggressive effects of external factors. Plus, polishing will help your car literally shine!
There are two types of polishing:
Abrasive polishing – carried out when there are visible scratches on the body surface.
Protective polishing helps prevent the coating from being affected by external factors for some time. The most important thing in this matter is not to overdo it with polish, so as not to cause more harm to your car than good. We will tell you how to do this below.
What will help maintain the shine of the body:
- Rubbing Compound is a polish with an abrasive for car bodywork. This polish perfectly copes with problems such as scratches and minor damage to the body, and also easily cleans the car body from traces of rain or snow, removes tar residues and other persistent contaminants. Polish with Rubbing Compound abrasive will restore the lost shine to the body surface and help prepare the body for painting.
- Higlo Wax is an express polish for car bodies. An effective and easy-to-use polish suitable for cars with any body color. The product has an excellent water-repellent effect, prevents rapid contamination and damage to the paintwork and adds shine to the body.
- Cosmic – body polish. This durable protector contains carnauba wax. Thanks to this, the polish not only forms a durable water-repellent shell that protects the paintwork from harmful influences, but also gives the body a beautiful shine. The product is easy to apply and suitable for cars of all colors. Does not contain abrasive substances.
- Easy Tex Multi-Polishing Glove – microfiber mitten. The microfiber polishing mitt makes polishing your car or dashboard an easy and enjoyable task. Due to their structure, microfiber fibers have a large surface area, which allows EasyTexMulti-PolishingGlove to effectively absorb water, small dirt, and excess polish.
- Portable car wash or bucket with clean water.
- Rubber gloves – it’s better to stock up on 2-3 pairs
- A drill or screwdriver is not necessary, but it will make polishing much easier and faster.
- Polishing attachments (polishing wheels) - sold in car dealerships. For the drill, you can buy a special polishing attachment with Velcro - it will be convenient to attach and change it.
A couple of tips, or what NOT to do when polishing:
– Do not polish in dusty or windy places! The newly applied polish will be of no use, because it will immediately collect all the fine dust brought by the weather.
– The machine should not be in direct sunlight and the body should not be heated, since the polish should not be used on heated surfaces to avoid streaks and stains.
– The body should not be heated, as polishes cannot be used at high temperatures, humidity, cold weather and bright sunshine!
– There is no need to apply polish after each wash; usually the protective layer lasts on the car for more than a month.
– Each of the presented polishes can be used as an independent product.
How to properly apply liquid wax to a car
Polishing a car with liquid wax
Polishing a car with your own hands is not a difficult operation, but before you understand the technology of applying liquid wax, you need to carry out a number of preparatory measures. First of all, you need to wash the car very thoroughly. Hand washing will not work in this case, so it is better to use special equipment or go to a car wash. Then you need to let the car dry quite a bit, but keep in mind the fact that the wax will stick well only to a moistened surface. While the body is drying, it is necessary to dilute the wax in water, strictly following the instructions. And prepare a napkin or sponge with which you plan to apply the coating. Now you can start applying liquid car wax to the body. Both cold and hot varieties are applied in an identical way, only the method of diluting the composition differs. It is necessary to apply the protective composition in small areas, leaving no untreated gaps or gaps. It is necessary to start processing from the roof, slowly moving towards the lower parts of the body. After the wax protective layer has covered the entire body, you need to let it “absorb” a little, that is, do not touch the car for 15 - 20 minutes. After waiting the specified time, you can begin polishing - use a soft, dry cloth to treat the entire area of the body in a circular motion. To obtain the desired effect, two essential conditions must be met:
- To ensure that the composition adheres well, avoid direct sunlight on the car;
- Avoid large temperature changes. The difference between the temperature of the body and the wax solution should be no more than 20 degrees.
Article on the topic: How to identify a faulty ignition coil yourself
Removing scratches using Rubbing Compound abrasive polish
So, first of all, we remove scratches and deal with the cloudy body. To do this, we use RubbingCompound - this is an abrasive polish. It is used when you have superficial scratches in the varnish rather than deep scratches in the paint. This is a polish that restores the entire body coating.
How we apply Compound:
– To protect the decorative elements of the body, before polishing it is necessary to cover all plastic and rubber parts, as well as cracks on the car body, with masking tape. Since after complete drying, the polish in these areas may appear in the form of matte deposits, which will not be so easy to remove. To make it easier to clean the polish, we will also seal the edges of the glass.
– Visually divide the car into main sections – roof, doors, hood, and divide each of these parts into several more sections – this will make it much easier to process the surface. You should not try to process the entire body at once, as the polishing agents will have time to dry and will be difficult to remove.
– Apply a small amount of RubbingCompound polish to a sponge or cloth (do not put a lot of polish on the sponge, otherwise it will be difficult to clean the surface) and lightly rub it over the car in the selected area until the polish is barely noticeable and the sponge begins to move easily over surfaces.
– Try to polish so that the next row minimally overlaps the previous one; ideally, they should run parallel.
– Polish the surface in the longitudinal and transverse directions. Do not use circular movements - this may result in uneven polishing!
– Next, using a special microfiber polishing mitt, EasyTexPolishingGlove, carefully remove all residue from the body until completely gone. It is important to work with a dry mitten (napkin or rag). Do not leave the product on the surface for a long time - it will be difficult to get rid of it later.
– Hold the treated area up to the light. If there are no scratches left, move on to the next part; if roughness is visible, repeat polishing.
– Remember that if you overdo it, you can damage the body coating. Therefore, use an abrasive polish without fanaticism.
– Thus, a complete restorative polishing of the entire body will take from three hours, depending on the condition and dimensions of your car
– Just one can of polish is enough for 2-3 applications.
If you have a drill:
– Use it to speed up the process. To do this, use special attachments that are sold in construction or auto stores.
– The operating principle is the same as when polishing by hand.
– A caveat: always press the polishing disc evenly and with equal force onto the surface being treated, since if the disc is placed at an angle, this can cause the formation of stains and abrasions, visible transitions from one area to another.
We perform protective polishing of the body using Cosmic
After restorative polishing, the body will look like new. However, if the car is constantly used, this will not last long (a few weeks). In order for restorative polishing to make sense and the result to last for a long time, protective polishing must be carried out immediately after it. Then the effect will last for about 6 months.
For a protective polish, use Cosmic. This is a polish that not only cleans and adds shine, but also protects the body of your car from rain, sunlight and exhaust fumes. At the same time, it is very easy to use. All thanks to the unique composition, namely natural carnauba wax and mineral additives. They form a dense protective shell on the surface of the body, which covers the car body with a film that protects your car from various environmental influences - from ultraviolet radiation, preventing the paint from fading, to road service agents, preventing the paint from corroding.
Proceed with protective polishing of the body:
– Application of this polish should be very quick.
– Apply the polish completely to the entire body using a sponge.
– Spread the polish evenly and vigorously over the surface in a thin and uniform layer, avoiding open areas.
– Wait until the product dries (10-15 minutes) and forms a uniform protective coating.
– Wipe the car body clean using a dry EasyTexMulti-PolishingGlove microfiber mitt, removing any remaining product.
– Attention: do not leave the polish on the surface for a long time to avoid stains!
– Apply very carefully when polishing joints of parts and places of contact between plastic and metal, since after drying the polish will be quite difficult to remove from crevices and plastic.
– The entire process of applying protective polish takes on average 30-40 minutes.
– One jar of this product is enough for a large number of polishes.
Bright shine without polishing: how to make your car shine?
A freshly washed car , coated with wax, shines and sparkles like new, as if you just recently took it from a car dealership. It's a pleasant feeling, isn't it? Even better is that the car not only radiates beauty - its body, or rather paintwork, is also protected from dirt, rain and road reagents. But are there any pitfalls when applying a wax protective layer? We turned to professionals and this is what we learned about how to apply this very wax, what this procedure will give, which wax is better to use and is there a difference between cheap and expensive formulations.
Those who wax their car after washing are doing absolutely the right thing. Thus, they give the paint a beautiful shine and “seal” it, preventing the negative influence of the environment in all its manifestations (rain, ultraviolet radiation, pollen, bird droppings, insects, snow or road salt).
Add shine to the body using liquid Higlo wax
At the final stage, use liquid wax Higlo wax from Kangaroo - an “express” polish in the form of a spray that will give your car extra shine after a protective polish. It can be compared to wax that is applied to the body in car repair shops. The effect lasts until the first wash, but the product is applied very quickly.
Higlo wax polish can be applied to both wet and dry bodywork:
– Shake the bottle of polish and spray the product on the surface of the body.
– And rub it with a microfiber cloth until it shines in a circular motion.
– It only takes 20 minutes to process the entire car.
We removed scratches, minor roughness, chips, added shine and preserved the effect. Now your car should shine like a mirror!
The simplest test of your work can be an ordinary bucket of water.
Pour over the polished part of the body; you should see that the water collects in large drops and rolls freely off the car.
If you decide to do the polishing yourself, choose a weekend, as polishing takes a lot of time, but it's worth it!
Watch the video “How to polish a car body with your own hands”
Which liquid wax is best for a car?
Before you figure out how to use liquid wax, you need to find out what types of wax exist and how they differ. Today on the market you can find 3 types of wax from different manufacturers: Cold. The most affordable and easiest to use option. Before treating the body, you just need to dilute liquid car wax in water in accordance with the instructions and you can get to work. However, the effect of this procedure is not very durable and will need to be repeated 1-2 times a month; Hot. This type is distinguished by more expensive components that prevent the formation of corrosion. Dilute the protective liquid in hot water, strictly following the instructions. The price of hot liquid wax for cars is higher, but the effect is longer - from 6 months to a year; Foamy. This is the most expensive option. Only professionals can treat a car with foamy liquid wax, since special equipment is needed to convert the wax composition into foam. The effect of such a procedure is the most noticeable and long-term. Regardless of the type of protective liquid, the quality of the product itself is of great importance. Liquid wax "Grass" combines the highest quality and a very attractive price.
Why is this necessary?
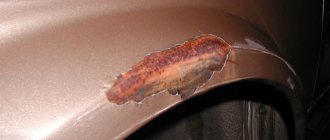
The paintwork of a car has a limited service life. Over time, the paint fades and damage forms on the surface. Car body wax is used to remove:
The substance fills defects in the car coating, resulting in the formation of an even, smooth surface. The hydrophobic protective film formed after the mixture hardens adds brightness and shine. Additionally, coating the car with wax provides the body with protective properties. The impact on the paint layer of the car is minimized:
- ultraviolet;
- chemical substances;
- dust and dirt;
- detergents.
It is necessary to cover the body with liquid car wax at least twice. This condition results in the presence of a complete protective film on the surface of the vehicle.
Why do you need polish?
For any make and model of car, regular polishing of the body and protruding metal components is important. With the help of high-quality polish, you can restore the visual appearance and beautiful shine of your car.
The product also helps eliminate minor defects - chips, cracks, rust, scraped paint. In addition, the surface of the body material will be protected from negative external influences.
In the car market you can find a huge number of cosmetics to improve the appearance of your car. They are available in different packaging options - tubes, bottles, aerosols. The remaining bottles can also be used for home remedies.
Types and popular manufacturers
Polymer wax is produced and sold in different forms. There are three types of classification: by method of application, form of manufacture and composition. According to the first sign, the material can be:
Depending on the form of production, the following types of wax are distinguished:
Based on its composition, the liquid material is divided into 4 categories:
- mineral;
- synthetic;
- animal;
- vegetable.
Each type has its own characteristics. To choose the best option, you need to consider the advantages and disadvantages of each.
Cold
Cold wax includes a group of liquid substances. They are produced based on the synthesis of cationic active substances and emulsion wax. The material is applied by hand. The substance is removed from the body after washing the surface of the car. To maintain protection, the mixture is regularly applied to the surface of the car. It is recommended to coat the body with the substance after washing.
The mixture fills microdamages. Its disadvantage is its short-term effect. For this reason, high consumption of the substance occurs.
Hot
Hot wax is a substance made in the form of fat. The product is divided into two categories depending on its composition: natural and artificial. The Carnaus type is superior in quality criteria to other products of a similar type.
The material contains corrosion inhibitors. This factor increases the performance characteristics of the car body.
After application to the surface, the mixture retains its properties throughout the year. The product has a high cost, but has a low consumption rate. The main disadvantage of the mixture is the melting point of +90 degrees Celsius. For this reason, it is difficult to work with such a substance at home. The material melts in hot water, but this can negatively affect its properties.
The minimum interval for applying the protective mixture is 6 months.
Liquid
Liquid wax is a substance made for self-application to the body of a vehicle. The advantage of this type is a long period of action and ease of use. The substance is applied to the car part and rubbed with a soft cloth.
So what is liquid car wax?
There are several types of liquid wax
Liquid car wax is a special liquid product for protecting the paintwork of a car, based on synthetic or natural components. When treated with a car body composition, its components fill microcracks, small scratches, chips and other unnoticeable coating defects and prevents dirt and dust particles from penetrating into them. The wax also forms a kind of protective film that covers the entire body and repels road dirt and moisture from it, thus preventing the formation of premature corrosion. Waxing is also used to add shine to the paintwork of the body. After this procedure, the color of the coating will look brighter and it will acquire shine. The protective layer repels dirt particles and moisture, so the car stays clean much longer. In addition, the car dries much faster after washing. Treating a car with liquid wax can be done independently at home, or by professionals. Liquid glass , a modern ceramic-based protective product, has similar properties Coating with liquid glass gives a more pronounced and long-term effect, but only professionals can perform such a procedure, and it costs several times more. But it’s up to you to decide whether liquid glass or wax is better.
Article on the topic: What causes the car to start poorly after replacing the fuel filter?
How to apply
The mixture is applied to the car body in two ways:
- manual; using special tools.
- The second method is used only for the hot look. In all other cases, the surface of the car body is processed manually.
The body is first cleaned of dirt and dust and dried. A high-pressure washer is best suited for this purpose, allowing you to remove dirt of any complexity. Then the coating is processed. Each type has its own instructions. Regardless of which material is chosen for surface treatment, it is correct to apply the mixture indoors or under a canopy, where the sun's rays do not reach. When exposed to the sun, the substance hardens quickly, forming a matte rather than shiny surface.
How to apply liquid wax to a car
Liquid wax is diluted in water. The water temperature is indicated on the packaging. The substance is applied to a damp surface. The difference between the temperature of the coating and the water with the diluted mixture should be no more than 20 degrees.
The car body is treated with liquid wax in sections. When rubbing the surface of the car, take breaks of up to 2 minutes between individual zones. Waxing a car starts from the roof. Applying and rubbing the mixture is done using:
If excess mixture remains, it is carefully removed. The processing time is up to 30 minutes. In order for the substance to adhere better to the body, it is recommended to blow it with air.
Applying hard wax
Coating a car with hard wax is done indoors. To apply the substance, use a dry sponge or soft cloth. It is prohibited to use hard material for this purpose. The mixture is applied to a dry surface.
Depending on the type, it may be necessary to pre-melt the material. Its melting point is between 40 degrees Celsius. Application is carried out in separate sections, between which there should be no visible transitions.
The minimum temperature at which wax can be applied to a car is 6 degrees Celsius.
How to use hot wax
Hot wax for a car is selected depending on the color for which it is intended. This condition is indicated on the product packaging in the specifications. The substance is applied to the dry surface of the vehicle in a ventilated area.
The application technology for this type is standard. The mixture is diluted in a container with warm water and applied to the paintwork using a soft sponge. The surface is then polished and dried for a certain period. The best time for processing is autumn.
Applying cold wax
Cold car wax remains on the surface of the vehicle for a short period. To maintain protective properties, the substance is used after each car wash.
You can wax your car using a soft cloth or sprayer. After applying the liquid to the body, the remaining mixture is carefully washed off.
It is better to wax the car with a sprayer, this way the procedure is completed faster.
When and how to apply wax?
Wax is applied after washing the car. It is necessary not only to clean the car of dirt, but also to remove the polish remaining from the previous treatment.
Each type of product has its own application technology, which involves manual work or the use of special devices.
It is not recommended to use the polish in hot weather under the sun's rays, so that the wax does not dry out before the required time and does not turn into a matte lump instead of a glossy film.
Before processing, you need to dry the body. Then apply the substance evenly and rub it with a napkin. It is recommended to treat the surface in small areas. After drying, wipe the entire area with a woolen rag.
It is not advisable to use a polishing machine for processing, because... the film will be thin, which will affect its functionality.
Hand movements should be directed from top to bottom to avoid grains of sand that could scratch the paint.
How to remove wax from a car
Old car wax is removed if, after the expiration of the operational period, it remains on the surface of the car. It is impossible to carry out treatment with a new substance if the old protective coating remains.
To remove it use:
- special spray cleaner;
- clay.
In both cases, the substance is applied to the surface of the car and left there for a while, after which it is washed off with a rag or towel with microfibers.
Do not use standard detergents to remove old coating.
Advantages and disadvantages
- high processing speed;
- budget cost of production;
- ease of application of the substance to the car;
- high-quality damage repair;
- the appearance of the coating is updated.
- short operational period;
- inability to repair major damage;
- the risk of damaging the coating if dirt gets on the uncured surface.
If it is necessary to eliminate not only microcracks and scratches, but also major damage, it is better to cover the car with hard wax.
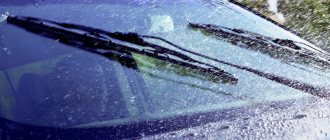
What is the use of the anti-rain product?
Recently, car owners are increasingly using such a product as “anti-rain” for their cars. The substance is a chemical composition intended for application to the surface of glass in order to remove precipitation under the influence of oncoming air flow. “Anti-rain” is applied to the working surface of the glass, and after the volatile compounds evaporate, a protective layer is formed that interacts with the glass. This polish fills microcracks, scratches and other defects. After this, the car just needs to pick up a certain speed during the rain, and the water will fly off under the air currents without interfering with the view. In this case, there is no need to turn on the wipers.
Video: how “anti-rain” works
What is “anti-rain” made of and what is it like?
The product contains polymer and silicone components contained in an organic-based solvent. “Anti-rain” is divided into several types:
- Liquid. The use of such products is quite simple and boils down to wetting the fabric and applying the substance to the surface. Quality largely depends on the product used (composition, manufacturer). The consumption of liquid polish will be high, since the container is not equipped with a dispenser.
In addition to store-bought polishes, you can make “anti-rain” at home. For these purposes the following are mainly used:
- paraffin;
- silicone oil;
- construction sealant;
- fabric softener.
Make your own liquid wax
Liquid wax for coating wooden products, body depilation and car care is not difficult to make at home.
Liquid wax for depilation at home recipe
Take 360 grams of carnauba and 130 grams of regular beeswax. Place them in a water bath and melt until they have a uniform consistency, but do not forget to stir. As soon as the wax begins to take on a liquid state, pour exactly 7 ml into it. regular glycerin. Stir. After glycerin, you can add a few drops of essential oils to your taste.
Liquid wax for coating wooden products, body depilation and car care is easy to make at home
Liquid wax for wood at home recipe
A wooden surface can be easily restored if you prepare a product from wax (100 grams), rosin (25 grams), turpentine (50 grams) and propolis.
The main component is melted in a water bath. Add rosin. Turpentine is poured in. Add a small amount of propolis to give the product a pleasant smell. Cool the composition. Apply using a soft rag to damaged areas.
DIY liquid wax for cars
You will need beeswax, which is best purchased from a reputable place so that the product is of truly decent quality. The other component is regular turpentine. The wax is finely chopped, crumbled and melted to a liquid state in a steam bath or in a microwave oven.
Pour the same volume of turpentine into one part of the hot wax, stirring constantly, achieving uniform distribution. After this, pour the polishing wax into any container or jar and wait for it to cool completely. Instead of turpentine, you can use regular vegetable oil, which creates a fatty base.
Source
How to make “anti-rain” with your own hands
The recipe for homemade “anti-rain” will differ depending on the chosen base. Therefore, the preparation of each composition, its features and method of application should be considered separately.
On paraffin
The simplest product that repels water from the surface of glass can be prepared using paraffin (wax). For this you will need:
- paraffin candle 10 g;
- White spirit 100 g;
- non-woven napkin.
To prepare “anti-rain”, perform the following steps:
- Rub the paraffin candle on a fine grater.
The application of this composition does not damage the glass in any way. The positive aspects of the substance include ease of preparation and affordable cost. Among the disadvantages, it is worth highlighting the appearance of stains on the surface, which is especially noticeable in the dark. The duration of action of the described composition is about 2 months, which directly depends on the number of car washes and precipitation.
Video: “anti-rain” made of paraffin
On silicone oil
Silicone oil is an absolutely harmless product that does not cause any harm to glass, plastic, rubber bands, or body paint. The effect of using such a substance is quite long-lasting and is not inferior to expensive purchased “anti-rain”. The cost of oil is about 45 rubles. per bottle 15 ml, which will be enough to treat a car. We use the oil in this way:
- To treat the windshield, apply a few drops of oil to the wiper blades and rub them with a cloth.
- We turn on the cleaners and wait until they rub the substance onto the glass.
- To treat other glasses, just apply a few drops of oil to the surface and rub them with a clean rag.
For application to glass, it is recommended to use silicone oil PMS-100 or PMS-200.
Video: processing glass with silicone oil
On fabric softener
To prepare “anti-rain” based on air conditioner, you will need a regular product used when washing clothes. For the purposes under consideration, it is recommended to use Lenor, since it is more effective compared to similar products. The list of things needed to prepare the solution consists of the following:
- 1 Lenora cap;
- distilled water;
- empty 5 liter mixing bottle.
Preparation of the product is carried out in the following sequence:
- Pour Lenor into an empty container.
Video: using “anti-rain” from “Lenore”
It is necessary to use “anti-rain” based on rinse aid in the same way as using regular washer fluid, only not as often.
The advantage of the considered composition is the simple procedure of preparation and use. Among the disadvantages of the “anti-rain” from the air conditioner, it is worth highlighting the appearance of a film on the glass, which in the daytime can impair visibility. To prevent the appearance of film, it is necessary to use high-quality wipers that will adhere well to the glass.
On sealant
Another tool that can be used to prepare a homemade “anti-rain” is construction sealant. For this you will need:
- 50 g of “White spirit” solvent;
- a teaspoon of construction sealant;
- plastic bottle.
From the practice of car enthusiasts, it can be noted that the most common and effective is the neutral silicone sealant “Moment”. The cooking process is as follows:
- Pour the solvent into the container.
- Add sealant.
Video: homemade “anti-rain” from construction sealant
“Anti-rain” sealant is most conveniently applied from a spray bottle. After spraying, rub the surface with a clean, lint-free cloth. After such a product, there are no streaks or any traces left, while the glass is perfectly protected from dirt and water. Anyone can prepare such a composition due to the availability and low cost of the components. For example, the cost of sealant starts from only 100 rubles.