How to properly bleed the clutch
Diagnostics and repair of a car clutch involves removing it entirely or partially from the car, disassembling and disconnecting various parts. This causes air to enter the hydraulic system of the control mechanism. Therefore, any master knows that after repairs it is necessary to bleed the car’s clutch, removing excess air from it. When repairing a car clutch on your own, or when symptoms of air entering the system appear, the driver must know how to bleed the clutch on his own.
Impacts when starting to move.
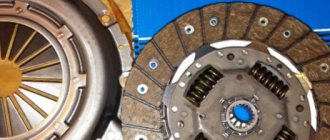
The clutch disc has special damper springs that are arranged in a circle. They serve to gently transfer loads from the manual transmission to the engine flywheel. Accordingly, when their resource is exhausted, they lose their elasticity, shorten, and may simply burst. It is precisely due to these factors that shocks occur when starting to move.
When is it necessary to replace the Chevrolet Lacetti clutch master cylinder?
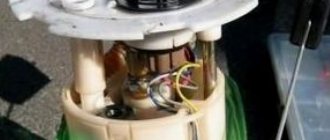
The operation of the Chevrolet Lacetti clutch master cylinder occurs unnoticed by the driver. Until problems arise in it. It is impossible for even an inexperienced car enthusiast not to notice the deviation. A malfunction in the GCS is characterized by the following symptoms:
- decrease in liquid level in the tank;
- failure of the clutch pedal when pressing it;
- grinding noise in the gearbox when changing gears;
- the presence of liquid leaks in the area of the main fluid circulation system.
The appearance of such signs requires immediate diagnosis at a specialized car service center. Operating a vehicle with a faulty clutch drive can easily lead to an emergency.
Symptoms of malfunction
The clutch release bearing itself will tell you that its life is already at its limit or it has completely failed. Therefore, your task is to monitor the behavior of the car and promptly respond to emerging problems.
Sign of breakdown
Peculiarities
The clutch pedal becomes hard to press
Initially, this only causes a certain discomfort, since you have to apply more force to change gears. But this phenomenon should not be ignored. Bearing needs to be replaced
Difficulty engaging first and reverse gears
This indicates that the bearing's life is gradually ending, and you urgently need to take action. If you don't do this, you will soon be unable to engage any of the gears in your transmission.
The car doesn't pull
There is a loss of efficiency and performance of the box. Consequently, it is not possible to change gears correctly and quickly. This makes maneuvers, overtaking and a banal increase in speed more difficult.
This happens occasionally at first, and therefore almost every time you change gears. This symptom clearly indicates that it is time to send the car to a service station or garage for repairs.
Old and new VP
If the release bearing is not replaced in a timely manner, the gearbox will soon fail, the clutch will not work, and this will lead to dire consequences.
Consequences of wear
If you have encountered such a phenomenon as wear of the clutch release bearing, then you probably often drive your own VAZ 2109. It is time and the many kilometers traveled that lead to such breakdowns.
If the bearing is not replaced in time, this will result in the following consequences:
- Any subsequent trip may be the last for the car;
- The clutch disc will overheat, which will lead to destruction of the lining;
- In addition to replacing the bearing, you will have to replace the entire clutch disc;
- It is not uncommon for the clutch to fail. If you hear an incomprehensible noise coming from the clutch system, then there is a problem with it.
Read more: How to start driving an automatic transmission
How to Bleed the Clutch on a Chevrolet Lacetti Video
The casing is connected to the pressure drive disk by three pairs of elastic steel plates. A diaphragm spring is installed in the casing. The driven disk with a spring-loaded torsional vibration damper is located on the splines of the gearbox input shaft between the flywheel and the pressure plate.
Two friction linings of the disc are riveted on both sides to a spring plate, which, in turn, is riveted to one of the two damper plates. The spring plate has a wavy shape. We repeat these steps until the brake fluid with air bubbles stops coming out of the bleeder fitting, or if you change the fluid, no new fluid comes out, you can determine it by the color of the Chevrolet Lacetti and then finally tighten the fitting.
Chevrolet Lacetti Bleeding the hydraulic clutch of the Chevrolet Lacetti
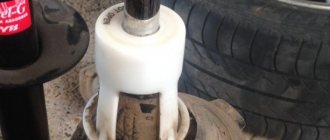
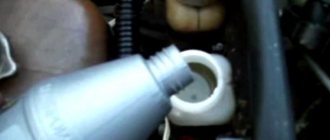
During the process, carefully monitor the fluid level in the tank and top it up on time! If after five or six repetitions the air continues to come out of the tube and the number of air bubbles does not decrease, the Chevrolet Lacetti hydraulic clutch system is sealed! The logic of operation is as follows: Remove the cap from the clutch hydraulic fluid reservoir.
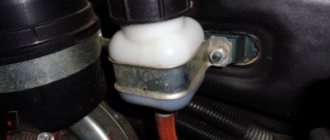
Reservoir with hydraulic clutch fluid 2. We pump out all the old fluid, for example... with a medical syringe.
Cycles Several cycles may be required. As a rule, air leaves the system in 4-5 pumping cycles.
If, despite prolonged pumping, air continues to escape along with new liquid, we check the entire system for leaks. If you do not find obvious places of leaks in the Chevrolet Lacetti clutch hydraulic drive, it is quite possible that the leakage has occurred in the working brake cylinder, and this is a completely different story, which is associated with dismantling the gearbox.
Keep an eye on the fluid level in the tank and enjoy sunny days!
Video on how to bleed a car's clutch. We ask the assistant to smoothly depress the clutch pedal several times and after the last press, hold the pedal in the pressed position.
Bleeding the Chevrolet Lacetti hydraulic clutch
Smoothly unscrew the bleeder nipple of the Chevrolet Lacetti clutch so that the fluid begins to leave the tube, while the assistant continues to press the pedal.
After the brake fluid stops leaving the tube, tighten the fitting.
Do not forget to occasionally check the brake fluid level in the GTZ reservoir.
What you need
This operation is not particularly complicated, but it requires certain skills and knowledge of the sequence of work. The complexity of the operation lies in the fact that many elements have to be unscrewed and disconnected, and access to them is not always convenient.
To remove the box you will need the following tools and accessories:
- A set of keys and sockets (including keys for 10, 14, 17, 19);
- Screwdrivers (thin flathead, Phillips, impact);
- WD-40;
- A section of the gearbox input shaft;
- Long wooden beam;
- Rags;
- Marker;
- Container for draining transmission oil;
All work is carried out in three places - the interior, the engine compartment, and under the car. Therefore >a viewing hole will definitely be required.
How to bleed the clutch of a Niva Chevrolet?
In the photo below, an example is shown on the front wheel; on the rear, everything is done identically. How to bleed the clutch of a Niva Chevrolet?
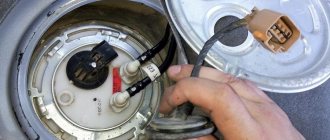
Open the reservoir and fill it with liquid up to the neck. It is located in the engine compartment. We put a hose on the fitting of the system cylinder, and immerse its other end in a container. Next, the assistant needs to squeeze the clutch once, and then hold it depressed. With the clutch pedal depressed, unscrew the valve and bleed the fluid in the system. After this, we close the valve and pressure is created in the system again.
We repeat this procedure until clean liquid comes out of the system, without air bubbles. During the process, you should also periodically check the fluid level. And if necessary, you will need to top it up. After pumping, add brake fluid to the reservoir to the MAX mark.
How to bleed the clutch on a Lada Largus? We add fluid to the brake reservoir to the MAX mark and begin pumping the brake system from the far longer circuit. On the back of the drum we find a drain fitting with a rubber cap on.
Engine selection
It is worth starting the entire process of selecting a new unit based on the old one, since you need to maintain not only the parameters, but also preferably the volume, all this can be done by taking the technical data from the book for your car. It also happens that the unit is the same in volume and other parameters, but does not fit in the fasteners; this is called a generation of engines. It should also be observed, since after installation on the frame there will be problems with connecting auxiliary devices. Therefore, when selecting, try to select the engine as accurately as possible.
When purchasing, pay attention to the price, as they can sell a non-working unit for an exorbitant price; usually the cost of a used engine in good condition is about 30% of the cost of the car, a new unit usually costs 50% of the cost of the car. You can buy an engine either from an official representative in a store or from a service center that services your car, at a disassembly center or a car market.
With the latter, there is a big risk of buying; the unit may not work and instead of a good motor, you will buy a pile of scrap metal. After all, without installing it on a car, there is no way to check it. It is also worth considering that the engine is not light in weight, if you are going to buy it online, you will have to pay a good amount for delivery.
After you have bought the engine, do not forget that you will still need consumables, oil, filters, gaskets for the exhaust system. You shouldn't expect to replace the engine yourself. It's better to ask your garage neighbor or friend to help you with this process. In addition to consumables, we will need a winch with a canopy, or something similar, to lift the unit from the car. A good set of wrenches and screwdrivers to reduce the time for selecting and searching for the right tool.
Read about removing a VAZ 2110 engine
Comments (0)
Replace them if necessary. The Chevrolet Lacetti is always inspected carefully at car services and the replacement is carried out efficiently; Do everything yourself and save yourself from unnecessary expenses; Ask friends or relatives who are more knowledgeable about the Lacetti clutch for help.
This type of replacement offers few guarantees. The second option is the most economical, I can confidently state this.
The third one does not have any special guarantees for the correctness of such a repair. The first one is, of course, the most reliable, but at the same time very expensive. The choice is yours, but if your choice is obviously the first, there is no point in reading the article, since it will tell you how to replace the slave cylinder or any other part of the Chevrolet Lacetti clutch with your own hands.
What will you need to replace the clutch on a Chevrolet Lacetti? Let's move on to the tools. It does not shine with a variety of unusual names for special devices and is quite simple. Almost everyone has one. A set of wrenches, preferably with a wide selection of attachments. Vernier calipers for measuring the exact dimensions of certain clutch components, such as the slave cylinder. Transmission removal tools will also come in handy. It is also worth purchasing some parts in advance.
ADVANTAGES OF ATC "YAUZA MOTORS"
Experienced auto mechanics are well versed in design features and know how to eliminate defects in the functioning of the clutch in cars of any year and manufacturer. The process uses only advanced tools and equipment that does not affect the performance of the clutch-related components of the transmission.
The advantages of our network of car service include:
- thorough diagnosis;
- careful selection of troubleshooting methods (replacement or repair);
- reasonable prices;
- possibility of carrying out complex repairs;
- simple ordering procedure;
- the ability to choose a conveniently located technical center both in the center and in other areas of Moscow.
For regular customers, cumulative discounts are provided for various types of services.
Operating principle of hydraulic drive
As you know, the drive of the device on most vehicles is mainly hydraulic, which means that the role of the drive mechanism is played by the brake fluid. Since brake fluid cannot be compressed, pedal force is transferred to the master and slave cylinders. (The master cylinder is the one to which the pedal is connected, and the slave cylinder is the one on the box!) However, if at least a little air enters the system, then the situation changes radically.
In particular, as a result of the entry of air, which can be compressed, some of the force will be lost when the motorist presses the pedal. Accordingly, the gear selector will either change gears incorrectly or will not be able to turn them off at all. In such cases, the driver, as a rule, wonders how to bleed the clutch.
If this is your first time encountering such a problem, then you should know that the pumping process should be carried out for greater convenience by two people. In this case, it is absolutely unimportant that your assistant understands something about the structure of vehicles. You will learn more about preparation and how to bleed clutches below.
If you do not want to face the need to bleed the device, then it is necessary to periodically adjust the clutch, as well as diagnose it.
Expert advice
Here are some tips to help with the unwinding process:
- The threaded connection can be loosened by moistening it with a special solution, for example, oil, brake fluid or vinegar.
- Sometimes tapping on the edges of the fastener can help. To do this, use a hammer or wrench.
- Removing the nut is half the task. You also need to remove the pulley. If the latter is firmly seated on the shaft, use a screwdriver to pry the part off.
- Make several gentle blows to the connection elements. Impacts should be light so as not to damage the structure.
- The stuck bolts are unscrewed with a spanner. They also try to make the task easier with the help of special substances (gasoline, kerosene).
- If there is rust on the fastener, remove it first; perhaps this is what is preventing it from unwinding. To remove, you can use chemical solutions, machine oil or a mechanical cleaning method.
- During the removal process, there are times when fasteners break, for example, they are rusty or outdated. In this case, simply replace the mount with a new one.
- If all else fails and you cannot unscrew the bolt, you should contact a car service center. If you use excessive force, there is a risk of damaging the threads.
To study the pulley removal process in more detail, it is recommended to watch the following video:
Unscrewing the crankshaft pulley bolt is not difficult if a person does everything correctly. You need to remove all the parts blocking access and unscrew the bolt using a special key. If the fasteners are soured, they try to use special substances that penetrate into the gaps and dissolve the rust.
If you are faced with the problem of how to unscrew the crankshaft pulley bolt, this article is for you. We will describe this process in detail so that you can quickly and easily remove the crankshaft pulley and then begin repairing it.
Removing the clutch
We do everything according to the instructions to avoid troubles and breakdowns!
Let's start in order and carefully!
First, disconnect the negative cable terminal from the same battery output. Then be sure to remove the gearbox from the car. Carefully inspect the pressure plate spring lobes for wear or damage. If found, replace it with a new one!
Then screw one of the bolts that used to hold the transmission to the engine back. Lock the flywheel and use a 11mm wrench to unscrew the bolts that hold the pressure plate near the flywheel. Remove the driven and pressure plates of the clutch from the vehicle.
Inspect the depth to which the rivets of the friction pads of the clutch driven disc are recessed. The depth should not be less than 0.3 millimeters. It is worth noting that when this part wears out, the rivets will begin to rub against the iron elements and leave grooves and scratches. If such defects are found on the flywheel or clutch pressure plate, feel free to change it.
Inspect the damper springs for cracks and replace the clutch driven disc, if any.
Check the amount of wear on the Chevrolet Lacetti pressure plate. If it is more than 0.2 millimeters, replace it. Then clean and degrease the flywheel. Then immediately check the hydraulic clutch drive.
Place the clutch driven disc onto the centering mandrel so that the mark faces the flywheel. Insert the mandrel together with the disk into the hole on the flywheel (it is located in the center). Mount the basket, while securing the flywheel from turning, as you did at the beginning. Then remove the centering mandrel from the hole.
The procedure for removing the gearbox
So, having installed the car on a pit or overpass, let's get started. The first thing we do is remove the driveshaft.
Secondly, we remove some elements of the exhaust system (muffler, “pants”, etc.).
You can, of course, only disconnect the “pants” from the resonator, but if the work is carried out without assistants, it will not be particularly convenient.
The next step is to remove the gearbox working cylinder (it is also convenient to remove it from the pit).
The cylinder can be easily unscrewed with a 13mm spanner; two bolts need to be unscrewed. The gap adjustment is not affected. The next step is the process of unscrewing the bolt securing the ground wire.
Having unscrewed the clutch slave cylinder and the ground wire, we move them to the side so that they do not interfere with us. There is no need to remove them completely, just secure them to the side. Then we remove the “chips” of the reversing light switch terminals.
All that remains is to disconnect the speedometer cable, which is attached to the gearbox.
Don’t forget about the clutch housing shield; it is fastened with four bolts (some have only two left).
While the work carried out from the pit can be considered completed, we move upstairs. We begin to disassemble the gearshift lever, this is done from inside the cabin. Remove the decorative cover and rubber seal.
After this, the lever itself is “pulled off” from the wings. To do this, pry off the nylon ring with some sharp object.
After removing the lever, rubber seals and nylon clamps will remain on the rocker; it is better to replace them with new ones, having previously purchased a repair kit for the rocker.
After completing the “upper” preparatory work, we go down into the pit again, we have to carry out the main part of the work - free the box from the main fastenings - these are four bolts that secure the gearbox bell to the engine (the first attachment point).
The lower bolts unscrew easily; we tear them off with a spanner. But the upper bolts are more “problematic”. To unscrew them, it is better to use a wrench with a head, or you will suffer with a regular cap, but it needs to be wound from the top.
Important! Before removing the gearbox, set the linkage to 5th gear. If the box is 4-speed, then to the 3rd
Otherwise, it will be inconvenient to remove the gearbox.
Now we free the gearbox from the second mounting point, this is its rear support, the so-called “swallow”.
They are held on by 13mm nuts, which we pre-lubricate with WD-40, as they often turn sour and can be torn off.
After carrying out all these procedures, we carefully examine the “bell” of the box. We need this to make sure that we have disconnected all the wires and unscrewed the bolts and drives.
Advice! If there is engine protection, then it is advisable to lay a wooden block between it and the oil pan. This will help keep the motor in its original position, making it easier to attach the box to the motor in the future.
Now we proceed directly to removing the box. Having firmly grasped the gearbox housing with your hands and slightly lowered its rear part to remove the rocker, we move the box back, removing it from the splines.
Do not forget that the box and unit is not light, and it is better to invite an assistant to remove it. Installation occurs in reverse order. Advice! Before installing the gearbox, clean the threaded connections and lubricate the shaft splines; this will make installation and fastening of the gearbox easier.
Something else useful for you:
- How to change the oil in an automatic transmission: available methods for replacing ATF in an automatic transmission
- How to change the oil in a manual transmission Renault Logan, Sandero, Largus
- How to replace coolant on Renault Logan
What types of repairs and services are performed at the Chevrolet dealership technical center in Moscow?
- Warranty repairs for the replacement of parts with manufacturing defects, the malfunction of which was detected in the first 36 months after purchase (or in the first 100 thousand km of the vehicle).
- Computer diagnostics of the fuel system, ABS (anti-lock braking system), internal combustion engine, manual transmission/automatic transmission and other vehicle systems.
- Partial or major repair of an internal combustion engine.
- Unit repairs to replace the clutch, gearbox, fuel system, shock absorbers, balls, etc.
- Repair of body parts to correct geometry (sidewalls, panels, side members) or complete replacement (radiator grille, door sills, front/rear fender, trunk lid, etc.)
- Painting, polishing, straightening damage to vehicle paintwork.
- Tire service
To understand the types of Chevrolet repairs or services you need, to find out the preliminary cost of maintenance, you can get advice from an Autocenter City specialist by filling out the application form.
Basic faults
The gearbox used on the Kopeyka is structurally a fairly reliable unit, capable of handling a significant resource without any special intervention. But still there are problems with the gearbox.
The main problems with this unit are:
- Increased operating noise. This happens mainly due to wear of bearings and gears. To restore functionality, it is necessary to replace all worn elements;
- Difficulty changing gears. The reasons for this may be problems with the clutch, deformation of the gearshift lever or shift forks. Troubleshooting is carried out by replacing damaged clutch and gearbox elements;
- Spontaneous transmission shutdown. This malfunction occurs due to wear of the clamps of the sliders of the power forks. The malfunction is eliminated by replacing the springs and the clamps themselves, sliders;
- Oil leaking from the box. Leaks occur due to damage and severe wear of the box seals. Everything can be eliminated by replacing rubber elements;
Of course, there are other types of malfunctions, for example, jamming of the gearbox while driving, inability to engage or disable any gear, destruction of gears or shafts, breakdown of the gearbox housing. But such problems arise much less frequently and are mainly due to improper operation of the gearbox, as well as design defects in the component elements of the box. Elimination of any of the malfunctions is carried out on the removed box. Therefore, in order to restore the functionality of the gearbox, you must first know how to remove the gearbox on a VAZ-2101
Moreover, it doesn’t matter whether the VAZ-2101 gearbox is being repaired or replaced, it will still have to be removed
Interior
The interior is filled with hard and cheap plastic, which begins to creak over time. With a mileage of more than 40 - 60 thousand km, the following come to life: the clock (plastic lining on it), the instrument panel, the interior mirror, the outer plastic lining at the bottom of the windshield, cup holders, the plastic casing of the fifth brake light and the rear parcel shelf in the hatchback. With a mileage of more than 60 thousand km, the plastic contact group on the steering shaft, where the levers for turning on the turn signal and windshield wipers are inserted, may creak. The noise made by the back of the rear sofa is often perceived as a knocking sound from the suspension.
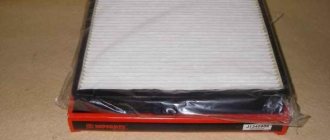
Sooner or later, in the summer, the space at the front passenger's feet turns into a small swimming pool. This is condensation that gets inside from under the cabin filter cover: due to the features of the moisture removal system, which does not cope with its task. Flood prevention should include cleaning the L-shaped drain tube, evaporator and tray.
There are also complaints about the heater motor making a chirping sound. Reason: debris ingress along with outside air, or lack of lubrication on the shaft.
During the operation of the Lacetti, the most likely places for freon leakage from the air conditioning system were identified: the filling valve, the place where the tubes are connected to the compressor and evaporator, and the air conditioner radiator. The flimsy radiator fins are damaged by stones. A protective net will not be superfluous.
Chevrolet Lacetti 1.4 95 hp › Logbook › Chevrolet Lacetti - typical problems and malfunctions
While digging on the Internet, I came across an interesting article. I decided to copy and paste it, maybe it will be useful to someone.
And so on to the problems. The Chevrolet Lacetti was offered with three naturally aspirated petrol engines: 1.4 liters (94 hp), 1.6 liters (109 hp) and 1.8 liters (121 hp). All engines have Opel roots, from which increased sweating (oiliness) was inherited with a mileage of more than 100 - 150 thousand km. In general, the engines are not bad, some of them on the Lacetti overcame the 250 thousand km mark without any problems. The least problematic power unit has a displacement of 1.8 liters.
The gas distribution mechanism on all engines is driven by a belt, the recommended replacement interval is 60 thousand km. Replacing a belt with rollers and tensioner will cost 7 thousand rubles at an official dealer, and about 5 thousand rubles at an unauthorized car service center. It wouldn’t hurt to install a new pump when replacing the timing belt. Although upon inspection the appearance of the coolant pump does not raise doubts about its performance, in reality it rarely lasts until the second belt replacement. Play in the pump pulley or a coolant leak may appear after a mileage of more than 80 - 100 thousand km.
The alternator belt on the first Lacetti often did not last until the first timing replacement due to the plastic tensioner roller, which collapsed when worn and cut the belt with sharp edges. Subsequently, the manufacturer began to install a metal roller, which has a much longer service life. But the tensioner itself is almost eternal.
With a mileage of more than 80 thousand km, cracks may occur in the coolant expansion tank. The thermostat lasts for at least 120 thousand km. At this point, it may be necessary to replace the swollen upper pipe of the cooling system, which has lost its strength properties. With a mileage of more than 130 - 150 thousand km, the radiator may leak, most often from below in the plastic pan.
A flashing oil nipple of the engine lubrication system is most often the result of poor contact on the oil pressure sensor or even failure of the sensor itself. For some, its replacement was required after a mileage of about 10 thousand km, for others - at around 110 thousand km. As a rule, traces of oil leakage from under it become a harbinger of the sensor's imminent demise. But after the oil can caught fire, more dramatic situations arose due to a clogged oil receiver grid (with a mileage of more than 90 thousand km), which led to a drop in oil pressure and, as a consequence, cranking of the liners, followed by a major overhaul of the engine. Auto mechanics consider the cause of clogging to be a large amount of waste that occurs due to the extended oil change interval (15 thousand km), which is also not always of high quality. With a mileage of more than 45-60 thousand km, it is recommended to reduce the interval to 10 thousand km and be more careful when choosing oil. The valve cover gasket begins to poison the oil after a mileage of more than 50 - 70 thousand km. When opening it, it would not be a bad idea to change the gaskets of the valve cover bolts. The most reliable and cheapest analogue is oil system rings for old KAMAZ engines.
Why does the node wear out quickly?
The service life of the unit largely depends on the driving style of the individual driver. Below we will look at several errors that significantly reduce its service life.
A sharp start
The car can move even at idle without pressing the gas pedal. To do this, you need to put the first gear and release the pedal very smoothly, stopping for a few seconds when you start moving. The movement begins due to slipping of the disks.
If you start quickly, abruptly releasing the pedal, each time you will deal a serious blow to the knot. At this moment, almost all of its components suffer.
Driving with the clutch half depressed
This is a common mistake made by beginners. When the car starts moving and it’s time to release the pedal, inexperienced drivers keep it half-pressed, fearing that the car will stall. This technique is often used when a car is stuck in mud or a hole, or when you need to climb a hill.
What happens in this case? The discs slip, which leads to their rapid wear. At such moments you can even smell a slight burning smell.
Clutch operation while parked
Standing in traffic jams or at traffic lights with the gear in gear also wears out the unit greatly. In this case, the node works constantly, although it is not intended for this. Here the petals of the basket and the release bearing suffer the most.
Engine braking
Some drivers like to gradually reduce speed by downshifting. In this case, braking occurs not due to the brake system, but due to the engine, but at the same time the clutch also receives a significant load.
Of course, if you carry out this manipulation correctly, you will not cause significant damage to the node. For example, common mistakes are dropping the clutch or downshifting through one gear. Still, it is better to use the brakes for braking.
Do you need quality components for your car? We invite you to go to the catalog on our website. Here you will find everything you need!
Chevrolet Lacetti black Shevi › Logbook › Adventures with a clutch… (full collection)
Good day))) Now the opportunity and time have arisen to write the next couple of posts about my repair.
This entry is about the clutch... I combined everything into one part, so look and read, I think it will come in handy))) Entry dated May 25, 2013
Hi all! Well, the black one doesn’t want to work properly for me (((now my adventures have begun with the clutch. Yesterday everything was fine, I was driving around Moscow all day, and since it was Friday there were correspondingly long periods of downtime in traffic jams, maybe that’s why my problem came up. I have my clutch disappears(((it all started in the morning. You press the pedal a little, it appears. In the afternoon I had to take my father home from work, and in the middle of the way the clutch disappears completely, I look into the reservoir, and it’s empty((( I turn off the car, put the car in first gear and on the way, there was a store 8 km away, I ran in and bought some brake fluid. Filled it up, pumped it a little with the pedal, it seemed to work. We went home, but along the way it periodically disappeared, but somehow we got there. Now, upon inspection, a leak was discovered from the bottom of the box. Tell me who had this problem with something similar, part numbers if available. I won’t be able to look for it myself in the next couple of days, since it’s the girl’s jam day))) A couple of photos...
Entry dated May 28, 2013 (night-morning)
Well, hello everyone! The weekend has passed, we celebrated the birthday of our beloved girl, and now we can work on the car. True, I only managed to tinker with the canopy for a couple of hours, there were also things to do during the day (((
I decided to do everything myself again. It sucks that the garage has no pit and no light (((one of the reasons that I made the canopy to a minimum) Today we have the following: - I managed to lift the face as high as possible, then you can raise it a couple more centimeters if necessary, when removing the gearbox.
— The battery has been removed, the platform underneath it. Some wiring harnesses are disconnected
Well, spare parts have been ordered: - Valeo clutch cat. number 834 056 - 4300 rubles;
— worker cylinder tube 96549206 — 175 rub. Maybe I don’t need it, but I’ll buy it just in case. (not needed, in stock) - some two sealing rings. I still don’t understand which one I need from the diagram. 96420067 and 94580546 - 57 rubles and 8 rubles, respectively;
— diff gasket 96179241 — 185 rubles; I didn’t need it, since this one is for the cover with 10 bolts, I have 11 (96829393)
There’s some oil left, I’ll buy it tomorrow, I’m still running around town on business. Castrol probably or Elf, haven’t decided yet. If I missed anything in the spare parts, tell me, I will be grateful)))
PS the photos are all from a phone, so no ice(
Entry dated May 28, 2013 (evening)
Hi all! This is me again))) there will be several parts again, then I will combine everything into one. So...the goal for today was to remove the box anyway! I didn’t manage to get busy in the morning because I had some work to do. And somewhere from 3 to 8 p.m. I calmly unscrewed and removed everything. The problem was that I didn’t have a hole. But from personal experience I was convinced that it is not needed, the main thing is to manage to lift the face of the car higher and everything will come out fine. True, again “half the car” had to be disassembled: D well, where would we be without it))) almost everything on the right side is removed, namely... work from above: - battery; — platform under the battery; - fuse box; — wires from the rear speed sensors, speedometer, chips from the ignition coils; — clutch bleeder fitting; - gearbox mounting support (which is under the fuse block) - the gear shift rod is disconnected; — in many books they write that you need to drain the antifreeze and remove one of the pipes, since it interferes with unscrewing one of the gearbox mounting bolts, I did not do this and unscrewed everything)
Now work from below: - drain the oil (it sucks that there is no drain plug) - remove both CV joints, well, I already had experience if anyone remembers))) Andryukha Drunya282 thanks for the tool on 32 and for the help))) - lower support; — starter; - well, it seems so...
And you can also manage to remove the box in one person))) I almost succeeded