Setting the timing belt on a Chinese scooter
CHECKING THE TIMING MARKS ____________________ Many people incorrectly call this adjustment! This is not an ignition setting, but rather an INSTALLATION OF TIMING MARKS! The generator will produce a spark even without a CPG.
There are several marks on the rotor, we need “T” (Top or TDC), it should be located strictly in the middle of the inspection hatch in the upper part of the crankcase. Not the letter itself, but its mark (mark next to the letter) on the rotor! The second pair of marks will be visible if you remove the characteristic round cover on the head (by unscrewing the bolt whose head is located on the opposite side - there are two more bolt heads, but the one needed is closer to the spark plug). At the camshaft drive sprocket, the stamped recess should be located opposite a small hole oriented forward in a horizontal plane. Since the gear ratio in the timing drive is 1:2, not every position of the piston at TDC (mark T) will correspond to the desired valve timing, but every other revolution. If the mark is not visible, the crankshaft will have to be turned one more revolution. If the marks do not match, unscrew the 3 screws securing the camshaft sprocket, pull out two and leave one in place. It is needed so that the star does not jump to the side. Next, pry the edge of the star with a screwdriver and, holding the star and chain, one link at a time, move the chain along the star in the desired direction. Having moved the chain, use a screwdriver to pry the sprocket from the side of the 2 protrusions in the head hole under the locking protrusion of the cover and insert it with your fingers onto the end of the camshaft. 3 bolt prevents the holes on the camshaft and sprocket from becoming misaligned. We tighten the remaining bolts and tighten them, locking them with a screwdriver between the same protrusions and the star.
Mark F - is intended for checking the ignition timing with a strobe light, just like the other marks without letters.
Source
How to set the ignition on a scooter
With minimal experience, but good theoretical knowledge, you can set the ignition yourself. To do this, you just need to strictly follow the instructions below.
The most important part of tuning is to find the correct position for the timing sprocket to sit. In order to find it, they use special marks that are applied at the factory during engine assembly. The desired mark looks like the letter "T". In this position, the piston is at dead center. This is the extreme position after which the piston will return back. You need to rotate the rotor until the protrusion on the crankcase and the letter “T” coincide. This can be done using your hands or a kick starter. An electric starter does not need to be used.
To adjust, you need to align the “T” mark and the protrusion on the engine crankcase
Labels may look different on different scooters
If the piston has only moved down minimally, turn it further until the marks line up. It's not always possible to get the right position the first time. After they match, you need to study the other marks: they are located on the timing star. Usually these are three points or holes that are located on the outside of the star. They form a triangular shape if you connect them visually. Notice that one point is larger than the others. After adjusting the ignition, it should be on top, and the other two marks should remain opposite each other. They must stand horizontally.
Markings on the timing star
If the ignition is contactless, it is adjusted as follows. In order for the engine to run smoothly and correctly, you need to adjust the ignition of the mixture at the right moment. To do this, after all the tags are installed in the right places, you need to understand how the contactless principle works in general.
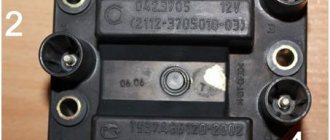
A special feature of the BZS is the presence of special sensors, a switch, and two types of ignition coil winding. When the sensor is closed using a rotor equipped with a magnet, a pulse is generated that enters the commutator, it pumps up the current coming from the generator and directs it to the primary winding of the coil. After this, the charge enters the secondary winding, where a high voltage is generated, with the help of which a spark appears, used to detonate the gasoline mixture. Adjusting the ignition is the alignment of the marks on the crankcase and the star. Usually you have to remove the valve cover.
After this you need to do the following:
- Labels are set in the manner described above.
- In order to set the ignition angle, you can release the stator mount and adjust it in accordance with the technical requirements of your vehicle.
- Make sure that the marks or holes are in the correct position.
Setting the timing belt on a Chinese scooter
1. Install a new cylinder head gasket.
ATTENTION!
The cylinder head gasket is made of soft metal (copper, aluminum) and after tightening the cylinder head nuts it is deformed, thereby ensuring a tight connection. Reinstallation of the cylinder head gasket is not permitted.
2. Install the timing chain guide.
3. Install the cylinder head.
4. Set the piston to TDC according to the marks on the flywheel. This is usually the "T" mark on the flywheel. Align the mark with the tide on the engine crankcase.
ATTENTION!
The following operation is one of the most important when assembling the engine. It is important to align all the marks very accurately. An error in installing the chain even by 1-2 teeth will result in the engine not working correctly, and it will probably even lead to serious damage to the timing and cylinder-piston gas parts when trying to start the engine!
5. After making sure that the timing chain has not jumped off the drive sprocket on the crankshaft, install the camshaft into the cylinder head, at the same time putting a chain on its sprocket so that the marks on the camshaft sprocket are parallel to the plane of the edge of the cylinder head, and the cams are directed downward (inside the head).
6. Install the rocker arm support, orienting it according to the installation marks. Lubricate the cams and camshaft bearings.
On the rocker arm support are the letters “EX” - which means “EXHAUST” - release. The "EX" mark should be located above the exhaust valve.
ATTENTION!
• Check the correct axial alignment of the camshaft (make sure that the camshaft bearings are correctly positioned on the beds). Probably, on some scooter models, the holder will have a mark “IN” - “INTAKE” - inlet. Accordingly, the “IN” mark must be located above the inlet valve.
ATTENTION!
If the copper washers are severely deformed (flattened), they must be replaced, since if the washers do not fit tightly due to oil leakage, the pressure in the lubrication system will drop and the motor will quickly fail. Sealing this connection with any sealant is unacceptable.
7. Install sealing copper washers on the studs.
8. Screw on all four cylinder head nuts without tightening them.
9. We recess the working rod of the timing chain tensioner inside the housing.
10. Reinstall the timing chain tensioner and tighten its mounting bolts.
11. Insert the working bolt and the timing chain tensioner spring, tighten it. In this case, you can hear characteristic clicks - the ratcheting mechanism of the tensioner working rod will be activated, which, under the influence of a spring, will come out of the housing and tension the timing chain.
12. Sequentially, crosswise tighten the cylinder head nuts in 3-4 steps. The final tightening torque is 10-15 Nm (More accurate values can be found in the repair instructions for the specific scooter model).
13. Screw in and tighten the additional cylinder head bolts.
14. Using a socket wrench for the central bolt of the flywheel, or with your hands holding the flywheel, slowly turn the engine crankshaft clockwise 3-4 turns to make sure that the timing timing is set correctly and the piston does not collide with the valves.
15. We install the crankshaft at TDC of the compression stroke and once again check the correct installation of the camshaft according to the marks.
17. Rotate the crankshaft several turns and once again check that the valve clearances are set correctly.
18. Install the cylinder head cover and tighten its bolts.
19. Place the crankcase ventilation hose onto the fitting in the cylinder head cover.
20. Install the cylinder cooling casing.
ATTENTION!
Do not forget to remove the paper from the intake manifold if you covered it from dirt during disassembly.
21. Install the inlet pipe assembly with the carburetor.
ATTENTION!
In most cases, when installing an exhaust system, the exhaust pipe gasket will need to be replaced. It is better to replace it with a new one during assembly.
Source
Replacing the timing chain on a 139qmb engine the easy way
How I replaced the timing chain on a 139qmb engine of a Chinese scooter, and at the same time checked the possibility of shortening the timing chain
When I first opened the valve cover on the 139qmb engine, shortly after purchasing a used scooter, it was discovered that the timing chain was stretched to the limit and even more. The tensioner was pulled all the way out, but the chain was still loose. with spare parts for scooters in our area, and trying to find them in stores led nowhere. I've been driving like this so far. But soon there were two instances of the chain slipping on the camshaft or crankshaft sprocket, but in any case in such a situation, having turned off the engine, it was impossible to start it again until the camshaft was installed according to the marks. Since there is still no timing chain Under the cylinder from thick (2 mm) cardboard, under the head - from metal asbestos, also about 2 mm thick. The chain no longer jumped on the teeth, but it was still rather weak. You won't be able to travel like this for long. There was an idea - to shorten the chain by throwing out one link, but then on one site I found an acceptable option for me to purchase a chain through an online store by mail with cash on delivery - honlingzakaz.ru - Timing chain 50cc (139QMB). Simple registration, the only thing is that the minimum order price was no less than 400 rubles and in addition I ordered head and cylinder gaskets. Placed an order by registering on the website (you need a valid e-mail and phone number). After some time they contacted me and I confirmed the order. A week later I received the parcel at the post office.
to change the timing chain without completely disassembling the engine. To begin with, I removed the valve cover and installed the camshaft according to the marks (large hole at the top, small holes at the edges of the head). Next, I removed the chain tensioner, unscrewed the 4 nuts on the cylinder studs and removed the bed with the camshaft. I secured the chain with wire to prevent it from falling into the engine crankcase. Using a bicycle chain squeezer, I disconnected the timing chain .
Here I could not resist and decided to check whether it was possible or not to throw out one link on an elongated chain. After removing the link, I connected the chain using ordinary pliers
and put it on the camshaft sprocket. It turned out that the shaft does not fit into the head bed.
But this is not surprising because the engine has thick gaskets under the head and cylinder. And so this option (as a temporary one) also has a right to exist. At least it's better than driving with a fully extended chain. But after shortening, the chain replacement must still be carried out as soon as possible. A stretched chain causes accelerated wear on the sprockets. Warning: everyone carries out this option of replacing or shortening the chain at their own peril and risk. If the chain suddenly breaks while the engine is running, the consequences can be dire...
Then I disconnected the circuit again. Then he disconnected the new chain, connected it to the old one from the bottom edge and began to turn the crankshaft with a kickstarter, holding both chains with his hand. Slowly the new chain fell into place. Connected the chain. I tried to put it on the sprocket and it turned out that with thick spacers the new chain does not fit close. We'll have to change the gaskets, which took another hour and a half. After that, I installed the chain, observing the marks on the camshaft and the generator flywheel. The timing chain fit just right and, in theory, even a tensioner was not required yet. New is new... I installed the tensioner - having first reduced the retractable rod to a minimum, and then screwed on the body, inserted the spring and the fixing nut. Put the valve cover on and started the engine. I immediately noticed that the engine began to run smoothly and less noisily.
It will be useful: How to remove the front bumper of a gazelle next
At this point, I completed the timing chain on the 139qmb engine
VIDEO:
Replacing the timing chain
The time has come to change the timing chain, and along with it, I would also recommend changing the chain guide, tensioner and camshaft sprocket, which will save you a lot of time in the future.
To replace the timing chain if it is overstretched, you need to:
- Remove the cylinder head (the cylinder itself does not need to be removed)
- Remove the crankcase cover
- Remove the generator rotor and crankshaft chain drive parts from the electric starter (the electric starter itself does not need to be removed.)
- Remove the cover of the left crankcase half (it is not necessary to separate the crankcase halves)
How to determine that the timing chain has stretched and change it yourself
It’s always like this in life: one thing is good, the other is bad. Exactly the same principle applies to various types of mechanical torque transmissions. Chain transmission was no exception here. On the one hand, there is nothing simpler, more reliable, lighter, more compact and cheaper than a chain drive.
On the other hand, we get eternal “hemorrhage” with stretching of the chain, wear of the sprockets, endless cleaning and lubrication, maintenance and tension of this very chain. But there is nothing to be done, the chain transmission has a lot of advantages over other types of mechanical transmissions, so these types of transmissions are used almost everywhere.
However, today we will not talk about the chain drive as such, but about a method for diagnosing the timing chain driving the camshaft of a scooter engine.
To change or not to change?
Suppose you “overhaul” your engine: you change the seals, crankshaft, gaskets and other devices, but you doubt whether to replace the timing chain with a new one or not. If you doubt it in vain, change it for a new one at the first opportunity. And now I will explain why.
See for yourself: a chain has an average service life of approximately 18,000-20,000 km of a scooter (personal experience), approximately the same as the average service life of the engine itself. And for example, after driving 6,000 km, the crankshaft jammed or the engine leaked, or something else happened that requires complete disassembly of the engine. Naturally, you disassemble the engine, replace the crankshaft with a new one, and leave the chain, which by that time has exhausted a third of its service life.
And what happens? The chain, after 12,000 km, will exhaust its service life and become unusable, but the crankshaft and other parts will be in good order and you, like it or not, will have to again, because of the chain alone, half the engine. Is it necessary? The chain is a consumable item. Never skimp on it!
Which method is preferable?
It is logical that the first option with complete disassembly of the scooter engine is more complicated and takes more time and effort. But, as you can see, it is more reliable. Firstly, the factory integrity of the circuit is not compromised; secondly, when disassembling the scooter engine, you can see any defects, such as cracks, wear, change the seals, clean the parts.
The second option is more simplified and can be used when you only need to replace the chain. And you are confident in the quality of your work.
Final word
The scooter is a fairly popular vehicle and is in increasing demand. Because it leaves traffic jams behind, has low operating costs and is economical in terms of fuel and lubricants. Many people prefer to do scooter repairs on their own, especially since four-stroke engines are simple and reliable to use. Timely technical inspections, careful operation and the above article will allow you to enjoy riding this miracle of the Asian motorcycle industry for a long time.
Examination
Personally, I never check timing chains. I simply throw them in the trash, no matter how awesome they seem to me. For me, a chain is a consumable, just like a spark plug, oil or oil seal. But if you are important, or money is tight, you can use the old fashioned way.
We stretch the chain along its length, hold it with our fingers and try to position it in a horizontal position
- If the chain describes an arc that looks very much like a 90-degree angle, then feel free to throw it in the trash.
- If the chain bends slightly and describes a small arc, then such a chain is quite suitable for further use
For clarity, I took a new and heavily worn chain, put them together and checked for horizontal deflection. As you can see: the new chain (above) described a barely noticeable arc, while the worn and useless chain sagged like snot, almost at an angle of 90 degrees.
The worn chain turned out to be almost a centimeter longer compared to the new one.
About adjusting the ignition of a 4t scooter
Knowing how to set up the ignition of a 4T scooter on your own, you can save time and money, since you will not need to contact a motorcycle repair shop. The procedure is simple, even if you have no experience it takes a little time, but you will need to be patient. Regardless of the type of ignition, an important role is played by how the marks are set.
Correct adjustment is a guarantee of stable and smooth engine operation even in cold weather conditions. Often, in used vehicles, the ignition is broken: this can happen for various reasons, ranging from elementary shaking when driving to improper handling of the equipment. In order for the scooter not to let you down and for you to be able to start it whenever you want, you will need to learn how to carry out this procedure yourself. To do this, you will need to have several keys that allow you to remove the valve cover if the engine is four-stroke.
Reasons for failure of a 4-stroke scooter engine
If the scooter engine does not start, there can be a variety of reasons: 1. There is no fuel supply to the combustion chamber. 2. Air supply is not adjusted. 3. There is no compression. Burnt and deformed valves do not provide compression. The reason for the lack of compression may be incorrect assembly of the cylinder-piston group, as well as a malfunction of the cylinder itself. 4. The gas distribution mechanism responsible for the operation of the valves is faulty. 5. The spark plug is faulty. 6. An ignition spark is not produced during the mechanical operation of the generator.
How to replace the timing chain of a scooter engine?
It’s very simple, my friends: you remove the engine from the frame, disassemble it and replace the chain with a new one. There are no special secrets in this matter, just as there are no special ways to “cheat fate” and replace the chain without disassembling the engine. The chain can only be replaced by completely disassembling the engine.
There is, of course, one guy on YouTube who rivets an old chain, then rivets a new one, connects both chains, pulls out the old one, starts a new one, and then rivets the whole thing back, but that’s porn. I don’t suffer from such crap, since the result of such “repairs” is not always predictable.
The timing chain is in no way designed to be riveted or riveted. During the riveting process, it can easily be pulled or twisted, and this is a sure way for the chain to fly off the sprocket while the engine is running, and then, depending on your luck... Maybe everything will work out, or maybe the valves will bend. And one more point: a beginner will not be able to rivet a chain efficiently. This work is not as simple as it might seem at first glance. Therefore, don’t suffer from bullshit and disassemble the engine.
Photo report: How to check the timing chain of a scooter?
It’s always like this in life: one thing is good, the other is bad. Exactly the same principle applies to various types of mechanical torque transmissions. Chain transmission was no exception here. On the one hand, there is nothing simpler, more reliable, lighter, more compact and cheaper than a chain drive. On the other hand, we get eternal “hemorrhage” with chain stretching, sprocket wear, endless cleaning, lubrication, maintenance and tensioning of this very chain. But there is nothing to be done, the chain transmission has a lot of advantages over other types of mechanical transmissions, so these types of transmissions are used almost everywhere. However, today we will not talk about the chain transmission as such, but about a method for diagnosing the timing chain driving the camshaft of a scooter engine.
To change or not to change?
Suppose you “overhaul” your engine: you change the seals, crankshaft, gaskets and other devices, but you doubt whether to replace the timing chain with a new one or not. If you doubt it in vain, change it for a new one at the first opportunity. And now I will explain why. See for yourself: a chain has an average service life of approximately 18,000-20,000 km of a scooter (personal experience), approximately the same as the average service life of the engine itself. And for example, after driving 6,000 km, the crankshaft jammed or the engine leaked, or something else happened that requires complete disassembly of the engine.
Naturally, you disassemble the engine, replace the crankshaft with a new one, and leave the chain, which by that time has exhausted a third of its service life.
And what happens? The chain, after 12,000 km, will exhaust its service life and become unusable, but the crankshaft and other parts will be in good order and you, like it or not, will have to again, because of the chain alone, half the engine. Is it necessary? The chain is a consumable item. Never skimp on it!
Examination
Personally, I never check timing chains. I simply throw them in the trash, no matter how awesome they seem to me. For me, a chain is a consumable, just like a spark plug, oil or oil seal. But if it’s important to you, or money is tight, you can use the old fashioned method. We stretch the chain along its length, hold it with our fingers and try to position it in a horizontal position
- If the chain describes an arc that looks very much like a 90-degree angle, then feel free to throw it in the trash.
- If the chain bends slightly and describes a small arc, then such a chain is quite suitable for further use
For clarity, I took a new and heavily worn chain, put them together and checked for horizontal deflection. As you can see: the new chain (above) described a barely noticeable arc, while the worn and useless one sagged like snot, almost at an angle of 90 degrees. The worn chain turned out to be almost a centimeter longer compared to the new one.
How to replace the timing chain of a scooter engine?
It’s very simple, my friends: you remove the engine from the frame, disassemble it and replace the chain with a new one. There are no special secrets in this matter, just as there are no special ways to “cheat fate” and replace the chain without disassembling the engine. The chain can only be replaced by completely disassembling the engine. There is, of course, one guy on YouTube who rivets the old chain, then rivets the new one, connects both chains, pulls out the old one, starts the new one, and then rivets the whole thing back, but that’s porn. I don’t suffer from such crap, since the result of such “repairs” is not always predictable. The timing chain is in no way designed to be riveted or riveted. During the riveting process, it can easily be pulled or twisted, and this is a sure way for the chain to fly off the sprocket while the engine is running, and then, depending on your luck... Maybe everything will work out, or maybe the valves will bend. And one more point: a beginner will not be able to rivet a chain efficiently. This work is not as simple as it might seem at first glance. Therefore, don’t suffer from bullshit and disassemble the engine.
How to adjust and tension the chain?
The principle of operation of ignition in a 4-stroke scooter engine
Modern scooters are equipped with contactless systems. They are considered the most reliable and easy to use, do not require complex connections, and provide a constant good spark on time. However, the setting is still important; even the presence of a spark does not always allow the fuel mixture to ignite, since its power also plays a role.
The main reasons for the operation of the ignition system are quite simple: its task is to create a spark to detonate the fuel mixture. If this does not happen, you need to carefully examine each node and find out why the spark disappeared.
- In order to check whether there is a spark at all, you need to unscrew the spark plug and apply it to the engine ground; this can be done using metal objects that are not covered with paint. You cannot hold it with your hand: if there is a spark, it can give you an electric shock, and the discharge reaches 40,000 volts, which the coil creates.
Broken ignition is the cause of engine failure
An incorrectly configured or faulty ignition often causes engine failure. It would be wrong to immediately climb into the cylinder and examine the insides of the scooter, especially since this will not solve the problem. Before touching the ignition system, you need to check for other reasons why the scooter may not work.
- The simplest thing is the lack of gasoline in the tank. Quite often, owners forget to refuel their vehicle, and such a trivial reason can be overlooked.
- The carburetor may be clogged, which prevents the formation of a mixture suitable for driving.
- The carburetor needs to be cleaned regularly, so it doesn't hurt to check whether fuel is flowing from it into the cylinder. It is possible that the fuel pipe is clogged. The jets and other parts of the device may become clogged with debris, which causes little fuel to flow or, conversely, the engine does not have enough air, and therefore it does not start.
- The scooter may also refuse to start if the fault is caused by spark plugs. They may be wet or not produce a normal spark. It is advisable to have a spare set and check with it. In any case, the spark plug needs to be unscrewed and inspected.
Ignition advance
How to set the ignition on a 4t scooter with advance? There is an opinion that if you do this, the speed and power of the motor will increase. In theory, this is true. If the spark at the moment of compression occurs slightly before the moment the cylinder passes the dead center, this should give the desired effect. But the technical implementation of such an ignition setting on a scooter is associated with the transfer of its protrusion on the generator rotor housing. There is a method that is simpler and safer, which gives a certain effect. You can make a step on the ignition ledge. To do this, you need to remove a layer of 0.5 mm from half the surface of the protrusion. The step should start from the side that first contacts the ignition sensor. The resulting dual spark will provide more predictable engine starting and will also increase the likelihood of ignition when exposed to adverse weather conditions and improper fuel and air settings.
How to adjust and tension the chain?
There’s no way you can tighten it or adjust it, and you don’t bother Google or Yandex search with such queries. The chain in the scooter engine is tensioned automatically. And if it has already stretched to such an extent that it begins to fly off or jump over the teeth, feel free to disassemble the engine and replace it with a new one. There are no miracles.
And I will prove this to you now. The chain in the engine is tensioned using a special tensioner, which operates in a fully automatic mode. As the chain stretches, the tensioner rod, under the action of an internal spring, comes out of the housing and tightens the chain. And the more the chain stretches, the more the rod will come out. But! The rod has a limited stroke: on a completely new chain it comes out about a third of its stroke and then, as it stretches, it comes out completely and then it won’t come out anymore. Therefore, the chain will no longer be tensioned! And all your attempts to correct the situation will lead to nothing.
How to tension a timing chain on a scooter
how tight should it be?
when should it be changed? FIFTI__50
, Chinese 4t scooters have an automatic chain tensioner. He regulates the tension himself. After removing the tensioner from the engine (and it is necessary to remove it), you need to disassemble it (tighten one large bolt from above, it is better to loosen it before removing it), and pull out the spring.
Then, press the safety tongue from below and lower the gear rod inside the tensioner body. After assembling the piston and tightening the power bolts on the rocker arm, install the disassembled tensioner on the valve head body and insert the spring. Press it down on top with the cap bolt and screw the bolt back in and tighten. When tightening, do not break the aluminum thread.
While the engine is running, the tensioner itself will push the rod as far as it can go. As the chain wears out, it will gradually move further and further. Critical wear - fully extended rod. I have only come across similar cases twice so far. With such wear, the timing chain will one day jump a tooth or several. And it’s good if it doesn’t fly off at full speed.
Of course, there may be cases of strong tension on the chain during installation - when the new chain is strongly tensioned on its own. This usually happens when the parts do not match - non-original piston parts were installed, or the chain is unsuitable. The thick gasket under the pot - with a metal ring inside and rubberized tracks - may also be to blame. Instead, in this case, it is better to find a relief metal gasket. Look like that's it.
Ignition advance
Some motorcyclists who understand proper ignition settings prefer advanced ignition settings. If we talk about this process more simply, then with this ignition, the motorcycle engine has a little more power and starts much easier. The thing is that with ignition set to advance, the spark plug produces a spark a little earlier than the piston in the cylinder reaches top dead center. Thus, we get a small increase in power and easier starting in bad weather conditions, for example, during cold weather.
Answering the question of how to advance the ignition on a 4T scooter, we can say that this is no more difficult to do than a normal setting. If you are already familiar with how to set marks on a 4t scooter and how to set up the ignition itself, then you will not have any difficulties. All you need to do is not completely connect the marks on the rotor and magneto housing. About half a centimeter is enough to get the ignition to advance.
Broken ignition as a cause of engine failure
First of all, I would like to talk about what can cause a four-stroke scooter engine to fail, and whether misconfigured ignition should be blamed for this. Answering this question, we can answer with one hundred percent confidence that an incorrectly configured or simply faulty ignition may well become the cause of engine failure. However, it is too early to blame everything on a faulty ignition system until you check the main parts that affect the performance of the engine. Let's talk about them in more detail.
How to tell if replacement is needed
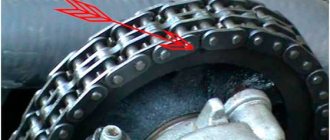
It is clear that the circuit must be changed when there is obvious dysfunction. When the chain wears out a lot, it makes a loud noise. Well, or jumped over the tooth of a star. Or it fell off, which indicates its stretching and wear.
Standard chain lifespans should be close to the lifespan of the scooter engine itself. It's logical. Each owner operates the vehicle differently, but the average chain lifespan is somewhere between 15,000-18,000 km. In a situation where the engine was halved to eliminate other faults, and the chain was immediately replaced after using it for, for example, 9000 km, everything is clear.
There are options for shortening the chain when stretched. But there are some caveats: if the step does not match, the star begins to erase, i.e. the stretched chain eats the camshaft sprocket. If the wear on the star is small, you can isolate the link and ride it a little. You need to do this correctly, adjusting the chain tension with a tensioner, and not forcibly. Otherwise, you will completely damage the chain.
What is typical for a worn chain: A small point: to check, you need to remove it. The degree of wear can be assessed by the angle of horizontal deflection. If it sags downwards, going almost vertically, change it 100%. The new chain deviates approximately 45 degrees from horizontal. And by laying out the old and new chains on the surface, you will see that the first one will be longer. Also, the wear of the scooter's timing chain can be indirectly judged by the level of extension of the tensioner rod. Critical wear is when the rod extends completely.
Replacing the timing chain of a scooter with a detailed description
Sooner or later, during the operation of the scooter, the owner is faced with the need to replace any parts. We are not talking about standard consumables such as spark plugs or seals. Replacing the timing chain of a scooter is quite within the capabilities of its owner, this article will help. How to understand whether a replacement is needed It is clear that the chain needs to be changed when there is obvious dysfunction. When the chain wears out a lot, it makes a loud noise. Well, or jumped over the tooth of a star. Or it has fallen off, which indicates its stretching and wear. The standard service life of the chain should be close to the service life of the scooter engine itself. It's logical.
Each owner operates the vehicle differently, but the average chain lifespan is somewhere between 15,000-18,000 km.
In a situation where the engine was halved to eliminate other faults, and the chain was immediately replaced after using it for, for example, 9000 km, everything is clear. There are options for shortening the chain when stretched. But there are some caveats: if the step does not match, the star begins to erase, i.e. the stretched chain eats the camshaft sprocket. If the wear on the star is small, you can isolate the link and ride it a little. You need to do this correctly, adjusting the chain tension with a tensioner, and not forcibly. Otherwise, you will completely damage the chain. What is typical for a worn chain ? A small point: to check, you need to remove it. The degree of wear can be assessed by the angle of horizontal deflection. If it sags downwards, going almost vertically, change it 100%. The new chain deviates approximately 45 degrees from the horizontal. And by placing the old and new chains on the surface, you will see that the first one will be longer. Also, the wear of the scooter's timing chain can be indirectly judged by the level of extension of the tensioner rod. Critical wear is when the rod extends completely.
How to replace the timing chain in an engine
Having decided on such an action as replacing the timing chain of a scooter, you need to decide on how to implement your plan. There are two replacement options:
- With a thorough disassembly of the scooter engine
- No engine disassembly.
How to change, everyone decides for themselves. Both methods, advantages and disadvantages are described in detail below.
With disassembly
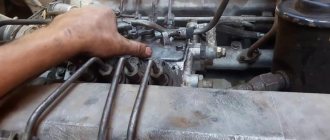
You should choose the right tools - generator and variator pullers (you can make them yourself), a kickstarter sprocket puller, 8, 10, 12 and 17 mm heads, a hammer, two screwdrivers (flat, Phillips). The engine is removed from its place, oil poured out, wiped and cleaned all parts. Next, remove the muffler and cooling casing. We remove the generator only with a puller. To do this, unscrew the bolts from the impeller and remove it from the rotor. It is necessary to fix the rotor with a puller and unscrew the nut. Then we tear the rotor off the crankshaft journal. Remove the variator cover. Also, secure the impeller with a puller, unscrew the nut, and remove the variator from the axle.
Below the variator is the kickstarter gear. Likewise, a puller is required for it. Then we clean the cylinder connector, valve covers and cylinder head. After unscrewing the bolts on the valve covers, remove it. Next, remove the scooter's timing chain tensioner. After unscrewing the bolts on the cylinder head, we pull out the camshaft bed.
Next, remove the chain from the camshaft and pull it out of bed. To avoid losing the guide bushings that center the parts relative to each other, you need to remove them and put them away. We remove the cylinder head, the cylinder itself, the piston (to do this you need to pull out the retaining ring and the pin from the upper head of the connecting rod). Unscrew the bolts on the crankcase cover, tap it a little, and remove it from the engine. We take out the starter intermediate gear, use a screwdriver and a hammer to unscrew the overrunning clutch nut (clockwise) and remove the gear and housing from the trunnion. We got to the chain! Remove the protective screen from the oil pump. Place a metal stick under the chain, twist the nut on the oil pump sprocket, remove it and remove the chain.
No disassembly
We take the following tools: a Phillips screwdriver, pliers, a new chain and a special puller. More details about it will be below. We flare the new chain - to do this, use a puller to press the pin out of the link joint, but not completely. We remove the cooling casing from the scooter engine, then the cylinder head cover. Next you need to remove the chain tensioner. We remove the camshaft bed, take out the shaft, remove the sprocket. We take the puller, center it with the pin, and gradually squeeze out the pin. You can press it out completely, it will not be useful. We compare the links of the new and old chains, thread the wire into the seat of the pin and fix the ends of both chains. We turn the cooling impeller counterclockwise, gradually replacing the old chain with a new one.
Then we separate the ends of the chains, throw out the old one, and combine the new links from the ends. We check the alignment, install the pin, and use pliers to carefully press the pin in so as not to damage the new chain.
We first check the mobility of the links. We finalize the pin with a puller. Again we control mobility. This point is very important: if you install the pin unevenly and miss it, it will begin to rest against one of the links and squeeze out the next one. As a result, the next pin or link bends, leading to it jamming and immobility. Next, we assemble the engine in the reverse order, placing marks on the rotor . When installing the camshaft bed, after tightening the nuts, you need to check the valve clearances with a feeler gauge. Upper valve – inlet: 0.05mm, lower – exhaust: – 0.1. The feeler gauge should pass freely between the valve and the adjusting bolt. Then install the chain tensioner. We unscrew the bolt on the top of the tensioner, install a screwdriver in the groove, and, turning it, push the rod back. We fix everything else back according to the diagram.
Which method is preferable?
It is logical that the first option with complete disassembly of the scooter engine is more complicated and takes more time and effort. But, as you can see, it is more reliable. Firstly, the factory integrity of the circuit is not compromised; secondly, by disassembling the scooter engine, you can see any defects, such as cracks, wear, change the seals, clean the parts. The second option is more simplified, can be used when you only need to replace the chain. And you are confident in the quality of your work.
Final word
The scooter is a fairly popular vehicle and is in increasing demand. Because it leaves traffic jams behind, has low operating costs and is economical in terms of fuel and lubricants. Many people prefer to do scooter repairs on their own, especially since four-stroke engines are simple and reliable to use. Timely technical inspections, careful operation and the above article will allow you to enjoy riding this miracle of the Asian motorcycle industry for a long time.
Symptoms of wear
The failure of a circuit can be determined by the following signs:
- You can determine a worn chain element by the condition of the ignition system. If its recent adjustment quickly goes wrong, then you can reasonably suspect that the timing chain is stretched.
- In addition, this is also evidenced by a knocking, metallic grinding sound when the engine is running while driving a car.
- Indirect signs of timing drive wear are overheating of the engine, a decrease in its power, bluish exhaust gases, and loud sounds inside the muffler.
- At idle, the power unit operates intermittently and roughly, making strange sounds.
- Most modern cars have special indicators that signal the slightest malfunction of the gas distribution mechanism. Based on such signals, you can safely change the stretched, worn-out element.
If you ignore such signals, the valves may bend, and in the worst case scenario, the cylinder block will completely fail.
Therefore, during each scheduled inspection of the car, this timing element should be checked. When purchasing a used car, this element should be given sufficient attention.
5 engines on modern production cars that can withstand 300 thousand km without capital