- © 2014 — 2021 MosCatalogue.net
- Blog
- Requests
- Copyright holders
- Denial of responsibility
- Privacy Policy
- Terms of use
- About the service
- Contacts
About the MosCatalogue.net service
MosCatalogue.net is a service that provides you with the opportunity to quickly, free of charge and without registration, download videos from YouTube in good quality.
You can download videos in MP4 and 3GP formats, and you can also download any type of video. Search, watch, download videos - all for free and at high speed. You can even search for movies and download them. Search results can be sorted, making it easier to find the video you're looking for.
You can download movies, clips, episodes, trailers for free, and you do not need to visit the Youtube site itself.
Download and watch an ocean of endless videos in good quality. Everything is free and without registration!
Drying valves without desiccant
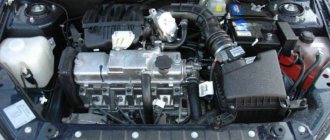
The first cars were equipped with a timing belt driven engine.
Despite a number of improvements, their typical problem was "bent" valves, which became deformed when the belt broke. In 2004, the problem was solved by manufacturers by increasing the depth of the piston groove. However, modern drivers still face the need to replace valves, although not as often. In general, this process is not complicated, so every driver can make repairs without contacting a service center.
Symptoms
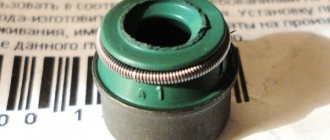
Signs of wear on valve seals, called valve stem seals:
- Increased oil consumption. Wear of the rings also causes oil consumption, but then the oil will definitely get into the breather pipe.
- Blueish smoke from the exhaust pipe after starting the engine. This happens because while the car is standing, oil enters the combustion chambers and burns after the engine starts.
Equally high oil consumption when driving both in the city and on the highway (with no oil in the breather pipe)
Moreover, for diagnostics it is important how much oil the engine consumes in various operating modes. Higher oil consumption outside the city will indicate ring wear.
Burnt oil on spark plugs
If the caps are worn too much, the spark plugs may splatter with oil so much that the engine will stall.
If your car has signs of cap wear, it is unlikely that additives will be able to solve the problem for you. It's worth thinking about renovation.
Without desiccant
Without a valve desiccant, they try to remove the crackers as follows. Take a pipe of a suitable diameter, install it on the spring mounting plate and hit the pipe with a hammer. When struck, the plate moves down, compresses the spring and releases the crackers, which fall onto the surface of the plate. After this, the spring unclenches and the crackers fly away in different directions. I cannot call this method of removing crackers other than barbaric.
This method may damage the valve, spring, or spring retainer. Loss of crackers is also possible. I'm not even talking about the fact that crackers can fall into the oil passages of the engine, and then you are guaranteed to completely disassemble the engine and search for the cracker in it.
Again, I tried SEARCH - I didn’t find such a topic.. all the mentions are scattered by topic.. If Zhenya deletes something.
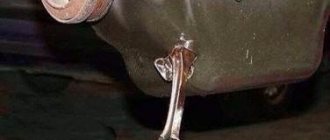
I got to the valves. I bought a desiccant from VAZ 2110-2112. Price 150 rub. I changed it a little. I re-drilled one hole D=5mm and moved the bar with the pressure circle. The photo shows the old hole and the bar in a new place (moved to the bend).
works great. We compress the spring and take out both halves of the crackers with a magnet (I got tired of catching the halves with tweezers)
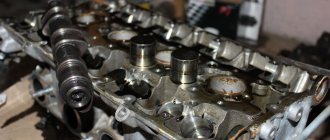
the valves and seats were in terrible condition - carbon deposits and shells. Here is a photo of the exhaust valve seats. The one on the left is already ground in, the one on the right is as it was during disassembly.. Oh, and for ******** I ground them in.. I ground them in until the shells were worn out. I haven't started the intake yet. But then you still need to put everything back together and check for leaks with kerosene.
I rub it in with 2in1 diamond paste. from 20 microns to 5 microns grain. The valve and seat (point of contact) become MATTE after grinding. And at first I thought the contact point would be shiny and glossy. But no. This is actually my first time doing this.
and how many miles does this engine have?
186 kilos. I have it overheated twice. and antifreeze entered the 3rd cylinder after the last overheat. What, heavily smoked?
Familiar from desiccation. I also modified the desiccant to remove the caps. Instead of the original stop, I welded a washer with an internal diameter of 12 and an external diameter of 23. I made a cut of 12 to the center. And he brought it under the cap from below and pulled it out like a lever. The caps were flying all over the garage.
I remove the platypus caps. they don't fly anywhere. They are not difficult to remove. But I haven’t gotten around to it yet.
So if it’s overheated, isn’t it easier to buy a contract one rather than mess with it?
I tried it with platypuses. Did not work. It took an hour to remove 3 caps. And having made a desiccant remover, I changed all the others in an hour.
Zhenya, I removed the valve seals without any problems, with little effort.
When desiccating, do not forget and do not lose the lower backing washer under the valve spring (I almost lost it)
Here are the exhaust valves BEFORE lapping
Here they are AFTER grinding in
Next weekend I'll be grinding the INTAKES. There is a catastrophic lack of time, and winter is just around the corner!!
Last edited by BBOBAHH; 10/17/2010 at 5:27 pm.
It means your caps weren’t completely hardened once they were removed. For me, what should have been rubber broke like plastic. They didn't even bend. And accordingly, when removed, the fixing belt broke and did not move apart. Do you grind it with a drill? I'm adding the topic to the FAQ.
I polish it with a screwdriver. In principle, I think it will work with a drill with a speed controller.
Vovchik, something seems to me that the chamfer on the valves is very wide, in my opinion you got about 4 mm. If so, then this is bad. It should be a maximum of 1.6 mm. This way the valve will overheat, not long before the valve burns out due to a large heat exchange area. It would be a good idea to use milling cutters on the valve seats. Well, of course, it’s up to you to decide.
So, on the contrary, the thermal contact with the head is greater and it should be cooled against it, or am I not understanding correctly?
Vova, the best option is when the contact patch is within 0.4-0.8 mm of the outer diameter of the valve disc; bringing the contact surface closer to the edge of the disc improves heat transfer from the valve to the seat. Too much transfer of the contact patch during wear or grinding to the very end of the disc valve causes a large flow of heat that can burn both the valve plate and the seat. The transfer of the contact patch to the rod is also harmful; the edge of the valve seems to hang in the air and cools worse, and overheating of the plate is also possible. At the same time, the hydraulic resistance to the flow of the air-fuel mixture and combustion products increases. By increasing the width of the chamfer (contact area), the cooling of the plate improves, but it is more difficult to ensure tightness. This can cause leaks of hot gases and burnout of the seat and valve. A narrow chamfer, on the contrary, seals well, but the service life of the valve and seat is sharply reduced due to high mechanical loads and temperatures on the valve surface. The “golden mean” is important here when placing the chamfer on the valve plate. Not higher, not lower. I didn’t invent anything here, the theory is a hundred years old. Check with someone else who works with engines. It’s up to you to decide. I just gave information.
Techniques for working with the device
Working with a desiccant is not difficult, but it requires some dexterity and skill.
Also, before desuction, it is necessary to carry out a number of preparatory measures: - If the cylinder head is not removed from the block, a rope can be inserted into the combustion chamber through the spark plug hole, then bring the piston to TDC - this prevents the valve from releasing into the combustion chamber when the springs are compressed; — If the head is removed, you need to place a wooden block under the valve or simply fill the space under it with a rag; — It makes sense to place a thin plastic gasket between the spring and the head; — If you plan to install the valves in their places, during disassembly all parts must be laid out so that they are not mixed up during reassembly.
The desiccation process itself boils down to the following:
- Install the device over the spring plate;
- Apply force to the device, as a result of which the springs will compress and the crackers will open. In this case, the crackers may “stick” to the valve stem due to the presence of oil, but very often they fall out and sometimes bounce off - in any case they need to be removed;
- Remove the force from the device and disassemble the valve.
When installing crackers, the operations are carried out in the reverse order, but first you need to do a few simple things:
— Be sure to replace the valve stem seals; — Lubricate the valve stem with oil - this will help the crackers “stick”, which will simplify installation; — To protect the stem from damage, you can put a thin-walled plastic sleeve on it or wrap it with adhesive tape, which is then removed.
After installing the nuts, use a soft-faced hammer or other non-metallic tool to give several light blows to the top of the valve stem - this will help the nuts fall into place.
A special device greatly simplifies the process of removing and installing crackers, saving time, effort and, most importantly, nerves. Those who have ever changed crackers will understand.
It's hard to find a child who doesn't like active play outside, and every child has dreamed of one thing since childhood - a bicycle. Choosing children's bicycles is a responsible task, the solution of which determines the joy and health of the child. Types, features and selection of a children's bicycle is the topic of this article.
The warm season, especially spring and summer, is the season for cycling, nature walks and family holidays. But the bike will be comfortable and bring pleasure only if it is chosen correctly. Read the article about the choice and features of buying a bicycle for adults (men and women).
Swedish Husqvarna tools are known all over the world and are a symbol of true quality and reliability. Among other things, chainsaws are also produced under this brand - read all about Husqvarna saws, their current model range, features and characteristics, as well as the issue of choice in this article.
DIY valve desiccant
Heaters and pre-heaters from the German company Eberspächer are world-famous devices that increase the comfort and safety of winter operation of equipment. Read the article about the products of this brand, their types and main characteristics, as well as the selection of heaters and preheaters.
Many adults do not like winter, considering it a cold, depressing time of year. However, children have a completely different opinion. For them, winter is an opportunity to roll around in the snow, ride the slides, i.e. have fun. And one of the best helpers for children in their non-boring pastime is, for example, all kinds of sleds. The range of children's sleds on the market is very extensive. Let's look at some types of them.
Making desiccant
Universal desiccant diagram
a universal valve desiccant with your own hands using simple drawings. It is based on a lever with two brackets attached to it. These brackets are attached using screws and nuts to form a hinge joint. To assemble it you need to prepare :
- Bulgarian;
- Welding machine;
- Durable metal bar for lever;
- Two short strips for making brackets (one is approximately half as long as the other);
- A pipe with a diameter slightly larger than the plate covering the springs and approximately 3-5 cm long.
Weld a washer with a diameter of approximately 8 mm to the shortest strip. It will be used to attach the device to the unit. Its other end is attached to the edge of the lever using a hinge method. A prepared piece of pipe is welded to the middle bar, and also attached to the lever, only closer to its center.
To put the structure into action, you need to attach the short bracket to the edge of the head, and install the middle part with the pipe on the plate. Pressing the handle of the structure allows you to press the spring down, freeing access to the crackers.
Replacement
Replacing valve stem seals with your own hands:
- Remove the timing cover.
- Align the crankshaft and camshaft to the marks. Place the appropriate markings on the parts so that there are no difficulties with their placement after repair. Write down the location of the pipes and connectors to be removed.
- When removing the camshaft, loosen its drive tensioner.
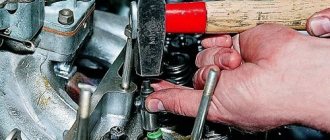
Device for desiccation of valves. The photo shows the process of removing crackers
If the drive is chain, unscrew the drive gear and remove it from the camshaft. To avoid losing it, it is better to remove the key from the shaft groove and tidy it up. If the drive is belt driven, it is easier to remove the belt from the gear.
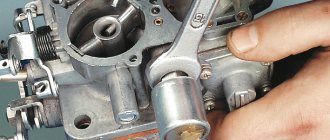
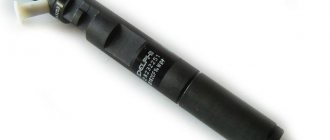
The correct tool for removing caps
Take a desiccant. Fix its bracket, which is attached closer to the edge of the lever, to the bed fastening stud, and attach it closer to the middle with a ring on the plate covering the valve springs. With one hand, press the desiccant lever so that the valve springs are compressed and the plate moves down the rod, and with the other hand, take tweezers and use them to remove the crackers from the plate.
Installation process
- Remove the springs from the seals.
- Insert the oil seal into the mandrel and place a drop of oil on the valve stem.
- Place the oil seal together with the mandrel on the valve stem and slide it down to the seating lug of the guide. Lightly tap the mandrel with a hammer to press it into place.
- Do not forget to put the springs on the installed caps before assembly.
- After this, install the valve components and dry using the method used to remove crackers.
- Repeat this sequence as many times as necessary and replacing the caps yourself will be done.
- Reassemble the disassembled components in the reverse order of removal. If your engine does not use hydraulic compensators, adjust the valves.
Now you know how to change valve stem seals with your own hands. No matter how many times you perform all the procedures before, be very careful.
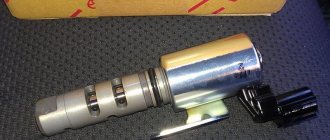
Valve desiccant - how to make a special tool with your own hands?
When repairing a car engine, the majority of parts are dismantled using standard mechanic tools. In some cases, you may need a special device - valve depressurizer . Its task is to help the driver remove the valve cotter.
The valve desiccant is indispensable when repairing the cylinder head.
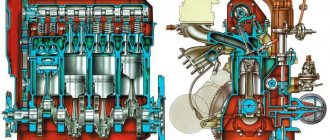
First of all, you need to figure out what a cracker is, where it is located on the valves and why it must be removed only with the help of special tools. The task of both the intake and exhaust valves is to close the window very tightly and open it only at the necessary moment.
Why are there crackers in the engine?
Simple question: how to fix the valve in an internal combustion engine? The question ceases to be so simple if we remember that each valve - both inlet and exhaust - opens and closes with a frequency of 20-25, or even 40 times per second. Under such loads, the simple task of securing a valve becomes very difficult.
Is it possible to screw the valve to the spring with nuts? It is possible, but with constant shock and vibration, the nuts will tend to unwind, and even cotter pins will not give a reliable result. In addition, the threaded connection will be quite complex. It is also impossible to weld the valves “tightly” - in this case repair will be impossible.
That is why a special solution was found for fixing the valves - a crayon connection, which is as simple as it is reliable.
Universal valve depressurizer (clamp) in JTC case
Universal desiccant 7 items AVTODELO
Universal valve depressurizer in JTC case
Universal valve depressurizer in a case 8 items ROCKFORCE
VAZ universal valve depressurizer AVTOM
Valve desiccant GAZ dv.ZMZ-402 AUTOM
Valve desiccant VAZ-2108-21099 rack AVTOM
Universal desiccant for engines (OHV,OHC,CHV) in blister ROCKFORCE
Valve desiccant VAZ-2101-2107 AVTOM
Valve desiccant VAZ-2112 AVTOM
The structure of a crack joint generally comes down to the following. In the upper part of the valve stem (stem) there is an annular groove into which the inwardly directed annular projections of two crackers, shaped like a cylinder cut along the length, are inserted. When the cracks fit into the groove, a cylindrical thickening is formed at the top of the valve, which cannot move along the stem. The crackers rest against the plate that holds the springs and fix the valve in the closed position.
However, the crackers must be fixed so that they do not fall out due to constant vibration, but can still rotate freely in the groove. This is achieved very simply: there is a recess in the upper plate in which the crackers are located, as in a well, and cannot fall out provided that the valve springs do not weaken.
How to make your own valve desiccant
It’s good when any garage, not to mention a workshop, has the necessary tools. But it is not always possible to buy it. Sometimes it's easier to do it yourself. For example, making a device such as a valve depressurizer yourself is more profitable than purchasing it.
What is a desiccant and why is it needed?
To begin with, it’s worth remembering how the valves are held in the gas distribution mechanism of any engine. So, the intake and exhaust valves are held closed by a spring. It, in turn, is fixed on the valve stem with a plate and crackers.
To remove the valve, you need to compress the spring and remove the crackers. The desiccant should cope with exactly this task.
Of course, experienced motorists know how to remove the valve without this tool - using a spark plug wrench and a hammer. However, this method, firstly, is traumatic, and secondly, it will not help in the future to put the crackers in their place.
Tags: dry, dry, valve, VAZ, 2110, 2112, without tools, simple, easy, method
Comments 27
As soon as I remember, I’ll shudder - how many gray hairs these crackers have added to me... And it’s so good - fast and comfortable)))
this is called degradation. a return from civilized methods to the hammer. when there is no desiccant there is a way out, but it’s not serious. no offense.
Not serious, judging by the first 15 seconds of an 8 minute video
what's behind these conclusions? I looked at it in its entirety and what does it change? For many of us, the know-name desiccant “from the market” has nothing to do with the bed, and I’ve never seen any problems with crackers flying away.
Never mind, you just admitted that my conclusion is correct... From the context it is clear that you did not watch the video the first time)))
2 Most likely you haven’t read the comments, from which it is clear that I have a good desiccant for 4 kilo rubles, as in the picture, and a “bad” one for 8 kilo rubles. So it’s not a matter of lack of tools, experience, desire, etc. But the only thing is that the method is really good!
3 if your crackers have never fallen out, it means you have little experience. Everyone who deals with this will say that crackers flying out is a problem. Resulting from a gradually increasing force, on an unevenly positioned cracker, when the spring opens. And there is no salvation - you have one hand occupied, with which you press the lever (and it is tired) in the second you have, fucking tweezers! It is also important to press evenly, otherwise one of the crackers will not “go in” both at the beginning of the phase and at the end - for this, the installation of a desiccant is important, both in terms of reach and leverage.
I’ll also note that the cracker with a large ring (type 8 bug, but it doesn’t always fit into foreign cars) pressing on the plate comes very close to the bed of the pushers, and you can accidentally scratch it, but it’s easier to insert the crackers with tweezers or something else. And with a small ring, they make it difficult to access the breadcrumbs, and sometimes they are likely to slip off the valve plate (the shape of the plates does not always fit well with the desiccant press)
So this is what I’m getting at... The method really saves time and nerves, I regret that I didn’t use it earlier, because if the cracker shoots out, it will be in a rag, and the sizes of the heads in the standard set are more than enough. If you wish, you can dry with one hand, and if you try, (place emphasis on the shoulder, like a crutch) without any hands at all. And this is about the least favorite operation for mechanics...
The man in the frame, Denis, is drying out the last 4 valves - for the first time in his life, three times faster than you can do with the best desiccant. DOES THIS TELL YOU WHAT? Well, stand your ground, please, since it’s hard to admit that you ate shit. I don't care anymore, continue. THIS IS A BAD METHOD, YOU SHOULD NOT EVEN PAY ATTENTION
You yourself ate shit)) I’m not proving anything to you, I watched the video twice without sound. I studied to be an auto mechanic... from 20 to 22 years old I worked as an assistant to a diesel engine mechanic. Well, we won’t mention our garage and the guys in the garages. You’re right In your video, I saw crackers for the first time. In fact, you can plan the head with sandpaper and a board, but the hat method is only suitable in the absence of a tool; on serious springs you will either have to suck it out or you will have to hammer it hard.
Never mind, you just admitted that my conclusion is correct... From the context it is clear that you did not watch the video the first time)))
2 Most likely you haven’t read the comments, from which it is clear that I have a good desiccant for 4 kilo rubles, as in the picture, and a “bad” one for 8 kilo rubles. So it’s not a matter of lack of tools, experience, desire, etc. But the only thing is that the method is really good!
What you need to make your own desiccant
To make this device, you will first need suitable materials. For the clamp option you need to have:
- Metal profile or sheet metal 10-15 mm thick;
- A couple of large bolts or studs (screws will be made from them, so the length of each is at least 15 cm);
- Two nuts comparable to the bolts.
For the lever option, you must stock up on the following elements in advance:
- A metal pipe or rod with a diameter of about 15 mm and a length of up to 40-50 cm;
- Two steel strips 20-30 mm wide and 5 cm long. Thickness about 3 mm.
- Two strips 20-30 mm wide, up to 3 mm thick, 15 cm long;
- Two 6x25 mm bolts with nuts and washers;
- Two steel washers (you can make your own). The first has a diameter of 25 mm, a thickness of about 3 mm, and an internal hole of 8 mm. The second has a diameter slightly larger than the spring plates. Its thickness is at least 5 mm.
Of course, it will not be possible to make a valve desiccant without available tools. Required:
- Grinder or hacksaw for metal;
- Welding machine (you will have to make several seams of 2-3 cm each);
- Vise;
- Drill and drill bits for metal;
- Spanners.
Making desiccant
Universal desiccant diagram
a universal valve desiccant with your own hands using simple drawings. It is based on a lever with two brackets attached to it. These brackets are attached using screws and nuts to form a hinge joint. To assemble it you need to prepare :
- Bulgarian;
- Welding machine;
- Durable metal bar for lever;
- Two short strips for making brackets (one is approximately half as long as the other);
- A pipe with a diameter slightly larger than the plate covering the springs and approximately 3-5 cm long.
Weld a washer with a diameter of approximately 8 mm to the shortest strip. It will be used to attach the device to the unit. Its other end is attached to the edge of the lever using a hinge method. A prepared piece of pipe is welded to the middle bar, and also attached to the lever, only closer to its center. To put the structure into action, you need to attach the short bracket to the edge of the head, and install the middle part with the pipe on the plate. Pressing the handle of the structure allows you to press the spring down, freeing access to the crackers.
Hello, I didn’t understand a little)))) I, in principle, may have the same thing))) can you send me a photo))) I’m kind of afraid that if I have the same problem at the service they might force me to change my head)
Polo
Registration 03/30/2010 Address Belarus Minsk Age 36 Messages 278 Diary entries 1
| Thank you: |
| Received: 3 Sent: 0 |