Fog lights are an element of the road illumination system that will allow you to better navigate the road in difficult weather conditions in your VAZ 2109. Due to their glow, PTFs effectively illuminate the path in fog, snow, and rain. Plus they inform oncoming cars about your approach.
Installing a PTF is important primarily from a safety point of view. Although many people install them to improve the appearance of the car. Combine both functions? Why not.
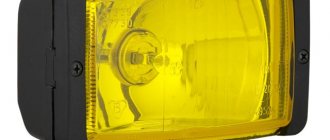
PTF in all its glory
Self-installation of fog lights: VAZ 2109
Recently, in light of the adoption of rules on the use of automobile lighting in the daytime, the issue of installing additional lighting in the form of fog lamps has become especially acute.
The introduction of such equipment allows drivers to avoid the need to turn on low beams during the day.
And this, in turn, will lighten the load on the entire electrical system of the car. This is why you should consider installing fog lights. This also applies to VAZ 2109.
Tools
Here again, everything depends on the car model. But in any case, you will need a screwdriver, pliers, a test lamp and a crimper for the male-female terminals. If necessary, wrenches to secure the lights. By the way, you can purchase ready-made terminals with wire sections.
In principle, this is even more convenient than clamping these terminals yourself, but you definitely need to tighten them with simple pliers. By the way, for the relay, you can purchase a ready-made plastic platform with 4 10 cm wires coming out. Fog lights (VAZ 21099), the installation of which can be done independently, requires the need for wiring. So, everything is at hand, you can start.
Installation kit
To implement the project you will need:
- two fog lights with mounting brackets;
- normally open relay for connecting lighting devices;
- button for turning on fog lights;
- single-core wire with a cross-section of 1 sq. mm, approximately 4 meters long;
- fuse 16A;
- connection diagram;
- contact blocks - if they are not included in the kit with headlights and relays.
If you already have something from this set, purchase the rest. And if you have to buy everything, then consider purchasing the entire boxed set. It includes everything you need, and there are also detailed installation instructions.
Connecting fog lights on a VAZ 2109 will require certain tools. You will need a 10 mm wrench, a screwdriver, side cutters, a shoemaker's knife for stripping wires and electrical tape. This is the minimum set. It is sufficient if twisting technology is used to connect wires.
Another option for connecting PTF, which most experts recommend, is soldering all connections and using heat-shrinkable materials for insulation.
What you need to buy
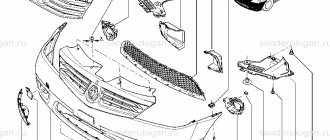
If you are installing fog lights (VAZ 2114, you can watch the video in the article), then first of all, of course, you will need lighting equipment. You need to select according to the characteristics of the car. For example, in VAZ models such as 2110, 2112, 2114 and 2115, there are plugged technological holes in the bumper, and accordingly it makes sense to purchase lights based on their shape.
But the classics 2108 and 2109 do not have such holes, and you need to take equipment with mounting posts. When you install fog lights on a VAZ yourself, you need a standard coil of wire 5 meters long. General purpose relay with 4 contacts. Power button suitable for the type of instrument panel. Male and female connectors for wires. Ring terminals for the “ground” and “plus” of the battery.
Installation
Having prepared everything you need, you can begin the procedure of assembling new elements for your car.
- Install and connect the button with which you will turn the PTF on and off. In this regard, the owners of the Nine with a high panel are lucky, since there is already a regular place provided for fog lights, that is, for their button.
- Remove the grille that covers the speaker, unscrew the speaker itself and look for a couple of connectors inside. They are designed to connect the foglight activation button and the indicator for turning them on.
- Remove the plug from the panel, put your button in its place and connect it to the electrical connector. The speaker and grille can be returned to their rightful place.
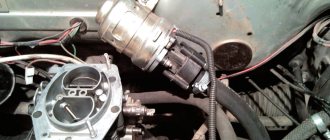
- Now we go to the engine compartment. You need to unscrew the mounting block, or as it is also called the black box. Lift the cover to gain access to the connectors there.
- Next, you will need to conduct wiring from the fog lights, as well as from the installation location of the corresponding relay to the fuse mounting block. But you don’t need to touch the relay ground wires yet.
- Disconnect connectors Ш7 and Ш8 from the mounting block. They are located directly next to each other, but at the same time Sh7 is significantly wider than Sh8.
- Insert your prepared terminals into the connectors, based on the diagram provided. If your car does not have PTF, then these connectors will definitely be free.
- Place the connectors back on the fuse block.
- Return the removed mounting block to its rightful place.
- The relay is mounted on the car body, and the relay ground must be installed under the mounting bolt used. Do not forget to thoroughly clean the contact area of paint before doing this, otherwise the grounding will not work properly.
- The power wires are connected to your fog lights from the purchased kit.
- In the immediate vicinity of the fog lights, it is necessary to connect the ground in a convenient, safe, protected place. Contact with the body of your car should be as reliable as possible. Otherwise, the headlights simply will not work or there will be problems with stability of operation.
- The installation of the fog lights themselves can be done by drilling holes in the metal insert. The optimal drilling location is near the mounting bolts that hold the bumper in place.
- Some models of bumpers, in addition to standard factory ones, provide in their design the presence of ready-made holes for mounting fog optics. To install them, use the brackets that must come with the PTF connection kit.
- Be sure to securely fix the fog lights so that they do not shake while driving.
- Many people make a big mistake by mounting fog lights directly on a plastic bumper. Because of this, at the slightest bumps, the headlights begin to shake, and you interfere with oncoming traffic. And the efficiency of the PTF with such an installation tends to zero.
Changing the gearbox lubricant
Let's start with the gearbox, since for many novice drivers this component is a wild jungle in which they understand nothing. Changing the oil in the box of a VAZ 2108 must be done using a jack. Before you start replacing it, you will need to arm yourself with a special container into which the old lubricant will be drained.
In addition, you should first know that a 4-speed gearbox takes exactly three liters of lubricant, and a 5-speed gearbox takes 3.3 liters. As for the brand recommended by the manufacturer, it is 80W-85 or GL-4432.
The drain plug for the VAZ 2108 gearbox is located at the bottom of the gearbox. It also happens that on old boxes there is also a separate filler plug, which is located nearby.
Now we can start changing the gearbox oil.
So:
- First you will need to remove the rubber cap and clean it;
- then clean the breather in the gearbox and put the cap back in place;
- now you need to drain the oil;
- open the drain plug on the gearbox (first you will need to place a container under it);
- We wait until everything drains.
Note. In order for the oil to drain faster, it is recommended to carry out this operation on a warm gearbox. In other words, you need to change the gearbox lubricant immediately after stopping the car, since cold oil flows worse and may not completely drain out of the gearbox.
- after it has completely drained, screw the drain cap back into place;
- then you need to pull out a special dipstick, which is designed to monitor the lubricant level.
Note. On older gearboxes this dipstick is located in the filler hole. You need to remove it from there and put on a funnel instead.
Take fresh oil and pour it into the funnel.
Note. While pouring lubricant, you need to monitor its level using the same dipstick. As mentioned above, the level should be equal to 3 liters if the VAZ 2108 is a four-speed gearbox and 3.3 liters if it is a five-speed one. The level does not indicate the amount of oil in liters, but there are marks. You need to pour so much oil so that the level reaches the middle, between the “minimum” and “maximum” marks.
It is worth noting that the VAZ 2108 can also have boxes without a probe. As mentioned above, on such samples the filler and drain plugs are located next to each other and the liquid has to be filled with a special tool - a syringe.
In order to avoid making mistakes in the process, it is recommended to ensure that the oil change in the VAZ 2108 (video clip can be viewed here) takes place in the presence of a knowledgeable person, neighbor, friend or acquaintance. It will be enough to do it yourself once, and then there will be no difficulties.
Fog lights for VAZ 2109 connection.
The method of connecting fog lights is very simple and will not take you more than an hour. Typically, most of the time is spent installing them on the car itself.
To connect we need:
- The fog lights themselves for the VAZ 2109. (Well, or any others that please your heart)
- Power wires with a cross-section of 1 sq. mm and long enough to stretch them from the block to the front bumper, i.e. the fog lamp itself.
- 3 terminals: narrow and wide (female) and one for ground.
- PTF on/off button.
- PTF transmission with block and wires.
All this can be bought at any spare parts store, namely a kit for connecting fog lights. The asking price is 1500 rubles.
It looks like this:
Need for installation
It’s good when on the latest model cars everything is initially provided for these lighting devices. All that remains is to buy equipment that corresponds to the technological description, and without further ado, insert it into standard niches, connecting the wires provided by the manufacturer.
What if there is none of this? You can go to the nearest car service center and pay the technician to wait for the results of the work. Well, after reading this article, you can do it yourself. The main thing is to have at least some skills in working with the tool.
Headlight adjustment
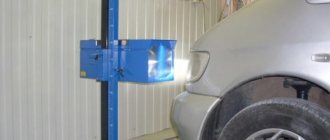
Adjusting foglights is a responsible matter. If the headlights are not adjusted correctly, there is a risk of causing inconvenience to other road users and creating a safety hazard. Rough adjustment of the PTF can be done independently. To do this, select a horizontal area near a white vertical wall. The verticality of the wall can be checked by eye, but it is better to verify the horizontality of the site using tools. A two-meter building or water level is suitable for this. Having found a suitable place, place the front of the car against a white wall at a distance of 4-5 meters from it. It will be good if direct rays of bright sunlight do not fall on this wall. Measure the distance from the center of the headlight to the ground. Turn on the fog lights. Measure the distance from the center of the light spot to the ground. The center of the spot should be located 2-3 centimeters below the center of the headlight.
This adjustment is quite rough. For more accurate results, you need a specialized stand at a service station. If you order the installation of a PTF at a service station, the adjustment will be included in the price automatically and will be carried out without fail.
Structurally, on VAZ 2108, 2109, 21099 cars and their modifications, the standard version has fog light lamps (21W) only in the rear lights. They are used as additional lighting in inclement weather to the side lights.
Diagram for switching on the fog light in the rear lights of VAZ 2108, 2109, 21099 cars with mounting block 2114, after 1998, “high” instrument panel
Features of the fog light switching circuit
— Voltage to the fog light lamps comes from terminal “30” of the generator after turning the key in the ignition switch to the “│” (ignition) position - its contacts “30” and 15/2 close. Next, through the external lighting switch (the second position of the key, which turns on the low beam headlights), the fuse, the fog light switch on the instrument panel, the warning lamp on the instrument panel, the mounting block to the fog light lamps in the rear lights of the car.
— The activation of the fog light is indicated by a warning lamp on the instrument panel (“low panel”) or a lamp on the fog light switch button (“high” panel).
— On cars produced before 1986, the electrical circuit of the fog light was protected by fuse “15” of the mounting block. After 1986, a separately located fuse (8A) is used, located in a plastic case in the wiring harness near the fog light switch.
Notes and additions
— On VAZ 2108, 2109, 21099 vehicles it is possible to install additional fog lights (in some trim levels PTFs are installed at the factory). Voltage to the fog lights will be supplied via a relay (type 113.3747) in the relay and fuse mounting block. The additionally installed fog lights turn on after turning on the exterior lighting button with a special separate button installed on the instrument panel. Read more: “Scheme for switching on fog lights for VAZ 2108, 2109, 21099 cars.”
Completion of work
After making sure that the fog lights are working, you can complete the work. To do this, assemble the front bumper in reverse order and install it back on the car. This must be done carefully so as not to pinch the wires.
After the bumper takes its place, you will need to adjust the PTF using a special adjusting screw. On the Lada Kalina, this screw is located under the headlight itself, literally a couple of centimeters lower.
In order to properly adjust the light, place the car about 5 meters from the wall, pointing the fog lights in its direction. One headlight needs to be closed so that the beam of light is not visible, and the second one must be adjusted so that its flow is 5 cm lower than the light of the main headlights. Do the same with the second headlight.
Thus, your Lada Kalina will receive a good and useful improvement that will work flawlessly and help the driver out in bad weather conditions.
Features and design of PTF
Conventional headlights on the VAZ 21099 in bad weather work in such a way that they reflect light from raindrops or grains of snow, as a result of which the rays fall directly into the driver’s eyes. This, in turn, contributes to the deterioration of the visibility of the road surface. If we talk about PTFs, their design is somewhat different. Fog lights on the VAZ 2109, in accordance with the diagram, should be located close to the road surface, since fog does not fall on the asphalt. As a result, it turns out that the fog lights of the VAZ 2109 shine as if under fog, forming a flat beam of illumination, thus illuminating exactly the required section of the road.
PTF kit for domestic nine
Fog lights on the VAZ 2109 with or without xenon are placed in a symmetrical manner, necessarily below the main optics. That is, the headlights on the VAZ 2109 should be higher in any case. The distance of the PTF from the road surface should be 25 cm, and from the dimensions and turns the distance should be at least 40 cm. If you decide to install lensed PTF with or without xenon, these requirements should be taken into account. According to some car enthusiasts, installing xenon in the lenses of daytime running lights will replace fog lights, but this is a wrong opinion.
In order for PTFs with lenses to shine normally, they must be correctly adjusted. Please note that if the angle of the lights is too small, their use will be pointless. Moreover, such an adjustment can cause inconvenience to drivers of oncoming cars. As for lighting, it should be either yellow or white, which is why many car owners install xenon in their lenses. The use of red, green or blue light bulbs in PTF is not allowed, since their efficiency is minimal (the author of the video is the Kakto SO channel).
How to install fog lights on a VAZ 2109?
So, the installation begins. To carry it out, you must first install the headlights in the intended location. After this, take the wire and connect it to the right fog lamp (positive terminal). Lead the wire into the engine compartment and connect it to the harness running under the radiator. Bring this to the left fog lamp of the VAZ 2109, and then make a connection with its lamp. Insulate all bare areas; for this it is best to use heat shrink.
Connection to standard mounting block 2109
Next, the wire must be brought to the installation site of the electromagnetic relay, whose normally open contacts serve to supply voltage to the fog lights of the VAZ 2109. The plus from the battery comes to one terminal through a 16 Ampere fuse, from the second it will be removed and go to the fog lights connected in parallel.
Two wires are connected to the contacts of the relay coil: one immediately to ground, and the second lead to the button in the cabin. Now all that remains is to supply negative power to both fog lights of the VAZ 2109, and apply positive power to the second contact of the button from the ignition switch (to prevent the fog lights from turning on when the ignition is off).
Bottom line
An important part of installing new car lighting is adjustment. After installing and connecting the equipment, all that remains is to set the correct lighting angle and enjoy your trips.
Video on how to install and connect fog lights on a VAZ-2109:
- Fog lights on the VAZ-2109: installation and connection method
Appearance of fog lights on a VAZ 2109:
Installing fog lights on a VAZ 2109 is not difficult if you know how to read simple diagrams and have basic installation skills. The connection diagram is standard, and if you look closely, you will even see the wiring that lies in the engine compartment, goes to the button in the cabin and to the fuse box.
But don’t be happy, these wires do not always allow you to connect the fog lights - the age of the car and outside interference in the wires laid at the factory have an effect. As a result, installation in this way becomes impossible, and we have to resort to extreme measures. So, let’s look at the process of installing fog lights on a VAZ 2109, 21099 and 2108 car in order.
Why do you need PTF on VAZ 2113, 2114, 2115
The fog is located above the surface of the earth (road) at some distance and this gap remains transparent. Thanks to the fog lights (FTL), a beam of light is formed: wide in the horizontal plane and narrow in the vertical plane. It is directed parallel to the roadway. When the fog lights are on, the fog is illuminated from below, which improves road illumination. Thanks to the wide beam, side markings and the curb are clearly visible, thereby reducing the risk of leaving the roadway.
Installing PTF provides better illumination of the roadside and side markings, reducing the risk of leaving the road
Some motorists have the mistaken opinion that fog lights with high lighting efficiency can only be yellow. In fact, the road is illuminated quite well by devices with both white and yellow glasses. The designated colors, compared to green, red or any other, are characterized by maximum light energy in the spectrum. However, it should be taken into account that when installing even the highest quality PTFs, visibility will be no more than 10 m in heavy fog. But since in such weather conditions the speed of movement is low, these indicators are quite sufficient. Sometimes vehicles are equipped with rear fog lights, the purpose of which is to improve the vehicle's visibility when driving in fog.